
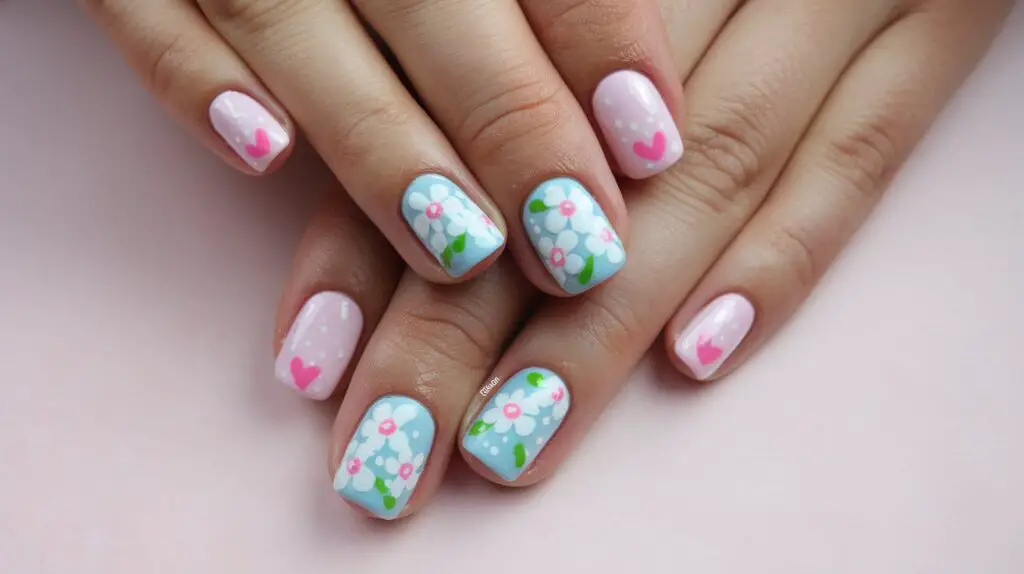
Creating beautiful flower nail designs brings instant joy to your fingertips, transforming ordinary nails into miniature works of art. Whether you prefer delicate daisies, bold roses, or abstract floral patterns, these designs add personality and charm to your overall look. The intricate details and vibrant colors of floral nail art make them particularly appealing for special occasions or simply brightening up your everyday style.
The frustration of watching your carefully crafted flower designs chip away after just a few days can be incredibly disappointing. You spend hours perfecting those tiny petals and leaves, only to see them flake off while washing dishes or typing at work. Many women give up on elaborate nail art altogether, believing that beautiful designs and durability simply cannot coexist.
The good news is that with the right techniques and products, your flower nail art can stay pristine for weeks rather than days. In the following sections, you’ll discover professional preparation methods, product selection tips, application techniques, daily care habits, and insider tricks that nail technicians use to create chip-resistant floral masterpieces. Let’s transform your nail art game and finally achieve those long-lasting flower designs you’ve been dreaming about.
- Essential Nail Prep Techniques for Long-Lasting Flower Art
- What Products Make Flower Designs Chip-Resistant?
- How to Apply Flower Designs for Maximum Durability
- Which Daily Habits Protect Your Flower Nail Art?
- Professional Tricks for Extending Flower Design Life
- Your Path to Indestructible Flower Nails
- Frequently Asked Questions
Essential Nail Prep Techniques for Long-Lasting Flower Art
The foundation of any long-lasting nail design starts long before you pick up that polish brush. Your natural nails need specific preparation to create the perfect canvas for flower art that won’t chip or peel prematurely. Skipping these crucial steps practically guarantees your beautiful designs will start lifting within days, no matter how expensive your polish or how skilled your application technique.
Proper Nail Cleaning and Dehydration
Clean nails form the cornerstone of durable nail art. Start by removing every trace of old polish, oils, and debris from your nail surface. Use acetone or a quality nail polish remover, then wash your hands thoroughly with soap and water. This initial cleaning removes surface contaminants that prevent polish from adhering properly.
After washing, the dehydration process begins. Natural oils from your skin constantly travel to your nail surface, creating an invisible barrier between your nail and polish. A dehydrator or rubbing alcohol on a lint-free pad removes these oils completely. Swipe each nail thoroughly, paying special attention to the edges where oils tend to accumulate.
Wait about 30 seconds after dehydrating before moving to the next step. Your nails should look slightly chalky or matte rather than shiny. This appearance indicates successful oil removal and optimal surface preparation for your base coat.
Importance of Base Coat Selection
Not all base coats work equally for intricate flower designs. You need a formula specifically designed for nail art longevity, not just a basic clear polish labeled as a base coat. Look for base coats containing rubberized polymers or bonding agents that create a sticky foundation for your design layers.
Some base coats offer ridge-filling properties that smooth out nail imperfections. While these work wonderfully for simple manicures, they might not provide enough grip for detailed flower work. Instead, choose a sticky or tacky base coat that remains slightly grippy even after drying.
Consider investing in a professional-grade base coat from brands that supply nail salons. These formulas cost more but contain advanced bonding technology that significantly extends wear time. The difference in durability often justifies the higher price point, especially for special occasion nail art.
Nail Surface Preparation Techniques
Buffing your nails creates microscopic grooves that help polish grip better. Use a fine-grit buffer (240 grit or higher) to gently roughen the nail surface. Move the buffer in one direction rather than back and forth to avoid creating heat that can damage your nails.
The free edge of your nail needs special attention during preparation. This area experiences the most stress and typically chips first. File your nails into your desired shape, then run the file perpendicular to the edge to seal it. This technique, called capping, prevents moisture from seeping under your polish.
Don’t forget about the nail sidewalls – the skin that runs parallel to your nail edges. Push these back gently with a cuticle pusher to expose more nail surface. Polish applied to skin rather than nail will lift quickly, taking your flower design with it.
Cuticle Care for Better Adhesion
Healthy cuticles contribute significantly to nail art longevity. Dry, ragged cuticles can snag on clothing and pull at polish edges, initiating chips and cracks in your design. Regular moisturizing keeps cuticles soft and pliable, reducing the risk of damage to nearby polish.
Remove excess cuticle growth carefully using cuticle nippers or scissors. Focus only on dead skin tags and hangnails, never cutting living tissue. Any bleeding or open wounds near your nails create pathways for water to penetrate under your polish, causing premature lifting.
Apply cuticle oil after completing your flower design and allowing it to fully dry. This post-manicure treatment keeps the skin around your nails healthy without interfering with polish adhesion. Choose lightweight oils that absorb quickly rather than heavy creams that might smudge your fresh art.
pH Balancing for Optimal Results
Your nail’s natural pH level affects how well polish adheres to the surface. Nails with higher pH levels (more alkaline) tend to reject polish, causing chips and peeling within days. A pH balancer or bonder helps neutralize your nail surface, creating ideal conditions for long-lasting adhesion.
Apply pH balancer after dehydrating but before your base coat. Use sparingly – one thin swipe per nail suffices. Too much product can actually create a barrier rather than enhancing adhesion. Let the balancer dry completely, which usually takes about 60 seconds.
Some nail technicians recommend using both a dehydrator and pH balancer for maximum longevity. While this might seem excessive, the combination provides the best possible foundation for intricate designs that need to last. Think of these products as insurance for your time investment in creating beautiful flower nail art.
What Products Make Flower Designs Chip-Resistant?
Product selection can make or break your flower nail art’s longevity. The overwhelming array of polishes, treatments, and tools available makes choosing the right ones challenging. Understanding which products actually contribute to chip resistance versus those that simply claim to helps you invest wisely in your nail art supplies.
Quality Polish Selection Criteria
Professional nail polishes contain different ingredients than drugstore varieties, and these differences directly impact durability. Look for polishes with high pigment concentration, which provides better coverage in fewer coats. Fewer layers mean less thickness and reduced likelihood of chipping.
The consistency of your polish matters tremendously for flower designs. Thick, goopy formulas create bulky designs prone to catching and chipping. Conversely, watery polishes require multiple coats for opacity, again creating unnecessary thickness. The ideal polish flows smoothly from the brush but doesn’t run or pool.
Check the manufacturing date when possible. Old polish becomes thick and stringy, making precise flower details nearly impossible. Fresh polish applies evenly and dries properly, creating a durable finish. Most quality polishes last about two years when stored properly in a cool, dark place.
Pay attention to the brush quality included with your polish. Cheap brushes shed bristles that create weak spots in your design. They also make precise petal painting difficult, forcing you to go over areas multiple times. This repeated application creates thick, chip-prone spots in your flower art.
Gel vs Regular Polish Comparison
The debate between gel and regular polish for nail art continues among professionals. Gel polish offers superior durability, often lasting three weeks or more without chips. The curing process creates molecular bonds that regular polish simply cannot match. However, gel requires UV or LED lamps and more skill to apply correctly.
Regular polish provides more flexibility for detailed flower work. You can blend colors while wet, creating beautiful gradient petals and realistic shading. The longer working time allows for corrections and adjustments before the design sets. Plus, removal is gentler on your nails, requiring only standard remover rather than prolonged acetone soaking.
Hybrid formulas bridge the gap between traditional and gel systems. These polishes cure under LED light but remove like regular polish. They offer improved durability over standard formulas while maintaining the ease of use that makes regular polish appealing for home nail artists.
Consider your lifestyle when choosing between systems. Gel works better for those who use their hands roughly or expose them to water frequently. Regular polish suits those who change designs often or prefer gentler removal processes. Both can create stunning, long-lasting flower designs when applied correctly.
Essential Top Coat Properties
Your top coat serves as armor for your flower design, protecting delicate details from daily wear. Quick-dry formulas might seem convenient, but they often sacrifice durability for speed. These formulas tend to shrink as they dry, pulling at design edges and creating weak spots where chips begin.
Look for top coats specifically marketed as “long-wear” or “gel-like” rather than quick-dry versions. These formulas take longer to cure but create a harder, more protective shield over your art. Many contain UV filters that prevent color fading, keeping your flowers vibrant for weeks.
Consider using multiple top coat layers for maximum protection. Apply a thin first coat to seal your design, let it dry completely, then add a second layer for extra durability. Some nail artists even apply fresh top coat every few days to maintain the protective barrier.
The application technique for top coat matters as much as the formula itself. Here are key tips for maximum protection:
Wrap the tips: Brush top coat across and slightly under your nail’s free edge
Seal the sides: Run the brush along nail edges to prevent side chips
Avoid flooding: Too much product creates soft spots that dent easily
Float over designs: Don’t press hard on dimensional flower details
Allow proper drying: Full curing takes longer than surface drying
Nail Strengthening Treatments
Weak, flexible nails provide poor support for any nail art, especially detailed flower designs. Strengthening treatments applied before your design routine can dramatically improve longevity. These products work by filling microscopic gaps in your nail plate or adding protective layers.
Protein treatments rebuild damaged nail structure but require careful use. Too much protein makes nails brittle and prone to breaking rather than bending. Use these treatments once weekly at most, following package directions carefully. Look for formulas containing hydrolyzed keratin or silk proteins for best results.
Calcium and vitamin-enriched base coats offer gentler strengthening over time. These products won’t provide dramatic overnight results but gradually improve nail health with consistent use. They work particularly well for naturally thin or peeling nails that struggle to hold polish.
Some women find success with nail hardeners containing formaldehyde or related compounds. While effective, these can cause allergic reactions or excessive brittleness if overused. Start with formaldehyde-free alternatives and only move to stronger formulas if necessary.
Professional-Grade Product Recommendations
Investing in salon-quality products transforms your at-home flower nail art dramatically. Professional brands formulate their products for heavy salon use, meaning superior durability and consistency. While the initial investment feels substantial, the cost per manicure often equals or beats repeated applications of cheaper products that chip quickly.
Research brands that supply nail salons and competition nail artists. These companies stake their reputations on product performance, not just marketing claims. Read reviews from professional nail technicians rather than casual users for the most relevant feedback about durability and application properties.
Don’t overlook professional tools in your product selection. Quality brushes for detail work, proper LED lamps for gel systems, and professional-grade files all contribute to longer-lasting results. These tools maintain their performance through multiple uses, making them worthwhile investments for serious nail art enthusiasts.
How to Apply Flower Designs for Maximum Durability
Application technique separates mediocre nail art from designs that last for weeks. Even the best products fail when applied incorrectly, while proper technique can extend the life of average products significantly. Mastering these application methods takes practice, but the payoff in durability makes the effort worthwhile.
Layering Techniques for Longevity
The way you build your flower design layers directly impacts chip resistance. Start with the thinnest possible base coat layer – thick application creates soft spots that dent and chip easily. Wait for complete drying between each layer, even if the surface feels dry to touch. Trapped solvents in lower layers cause bubbling and weakness over time.
When creating flower petals, work in thin layers rather than trying to achieve opacity in one coat. Three thin coats last longer than one thick coat, even though the total polish amount might be similar. Thick single coats never fully cure in the center, remaining soft and vulnerable to damage.
Build your design from background to foreground, allowing each element to dry before adding the next. This approach prevents colors from bleeding together and creates distinct layers that bond properly. Background leaves should dry completely before you add flower petals on top.
The waiting time between layers feels tedious but proves crucial for longevity. Use this time productively by working on other nails in rotation. By the time you finish the fifth nail, the first is usually ready for its next layer. This rotation method speeds overall application time while ensuring proper drying.
Proper Curing Methods
Whether using regular or gel polish, proper curing determines your design’s durability. Regular polish requires more than surface drying – complete curing can take up to 24 hours. During this time, avoid hot water, harsh chemicals, and activities that might dent soft polish.
For gel systems, lamp positioning and timing affect curing quality. Position your hand flat and centered under the light, ensuring all nails receive equal exposure. Cure for the full recommended time, even if the polish appears set earlier. Under-cured gel peels off in sheets, taking your entire design with it.
Temperature affects curing speed and quality for both polish types. Cold polish takes longer to dry and may never cure properly. Store your polishes at room temperature and avoid applying nail art in cold rooms or near air conditioning vents.
Consider which curing aids actually work versus marketing gimmicks. Quick-dry drops and sprays can help surface drying but don’t speed internal curing. In fact, they sometimes create a hard shell over soft polish, leading to smudges hours later when you think your nails are fully dry.
Design Placement Strategies
Where you place flower elements on your nail affects how long they last. Designs extending to nail edges experience more wear and chip first. Consider placing your main flower elements slightly away from edges, using smaller details or solid color at the tips and sides.
Think about your dominant hand’s wear patterns. If you’re right-handed, your right hand likely encounters more friction and impact. Adjust design placement accordingly – perhaps using simpler designs or more durable elements on nails that see heavy use.
Dimensional flowers created with thick polish or gel create beautiful texture but increase snagging risk. Reserve these techniques for accent nails less likely to catch on fabric or hair. Flatter designs on remaining nails balance visual interest with practicality.
The natural curve of your nails influences design durability too. Highly curved nails cause polish to pool in the center while stretching thin at edges. Adjust your application to compensate, using slightly less product in nail centers and ensuring complete edge coverage.
Sealing Edges Correctly
Edge sealing prevents the number one cause of premature chipping – water and oil penetration under polish. This technique involves wrapping polish around and slightly under your nail’s free edge. Every single layer needs edge sealing, from base coat through final top coat.
Start by holding your finger at an angle that exposes the nail edge. Run your brush horizontally across the edge, creating a thin polish barrier. Don’t glob product here – excess polish on nail undersides feels uncomfortable and peels quickly. A thin, even seal works better than a thick, uneven one.
Side walls need sealing too, though many people forget these areas. After completing your nail surface design, run a nearly dry brush along each side where nail meets skin. This creates an invisible seal that prevents lifting from the sides.
For flower designs near nail edges, pay extra attention to sealing. Each petal that extends toward an edge creates a potential weak point. Run your top coat brush carefully around these design elements, ensuring complete coverage without dragging through wet polish.
Clean up any polish on surrounding skin immediately. Use these tools for precise cleanup:
Small brush: Dipped in acetone for detailed work
Cotton swabs: For larger areas of overflow
Cuticle stick: Wrapped in cotton for precise edges
Cleanup pen: Pre-filled with remover for convenience
Common Application Mistakes to Avoid
Shaking polish bottles seems logical for mixing, but this creates bubbles that weaken your manicure. Instead, roll bottles between your palms to mix pigments without introducing air. Bubbles in your polish create weak spots where chips begin.
Applying polish to damaged or peeling nails guarantees early failure. No amount of base coat or technique can compensate for unhealthy nails. Address nail damage first through proper care and strengthening treatments before attempting long-wear nail art.
Skipping the base coat to save time backfires every time. Polish applied directly to bare nails stains them and adheres poorly, chipping within days. That saved minute during application costs hours of repair work later.
Working in humid environments introduces moisture between polish layers. This trapped moisture causes clouding, bubbling, and premature peeling. Run a fan or dehumidifier if necessary, especially in bathrooms where humidity levels spike.
Which Daily Habits Protect Your Flower Nail Art?
Your daily routine significantly impacts how long those carefully crafted flower designs remain intact. Small adjustments to everyday habits can add weeks to your manicure’s lifespan without requiring major lifestyle changes. Understanding which activities pose the greatest threat to your nail art helps you take protective measures.
Protective Glove Usage
Water remains the primary enemy of long-lasting nail polish. Every time you submerge your hands, water molecules work their way under polish edges, causing lifting and peeling. Wearing gloves during water-heavy tasks provides a simple yet effective barrier against this damage.
Dishwashing presents the biggest threat to nail art longevity. Hot water combined with harsh detergents strips away top coat protection and weakens polish bonds. Keep rubber gloves near your sink as a visual reminder to protect your manicure. Choose gloves with cotton lining for comfort during extended wear.
Cleaning products contain chemicals that attack nail polish on multiple fronts. Bleach, ammonia, and other harsh ingredients break down polish polymers while simultaneously weakening your natural nails. Even “gentle” cleaners can compromise your flower designs through repeated exposure.
Gardening without gloves practically guarantees destroyed nail art. Soil gets under polish edges while tools create impact damage. The combination of moisture, friction, and debris makes gardening particularly hazardous for detailed designs. Invest in well-fitting garden gloves that allow dexterity while providing protection.
Moisturizing Routines
Dry skin around your nails leads to hangnails and rough edges that catch on fabric, potentially pulling at nearby polish. Regular moisturizing keeps this skin supple and smooth, reducing mechanical damage to your flower designs. Apply hand cream multiple times daily, focusing on the skin around your nails.
Cuticle oil application requires careful timing to avoid compromising your manicure. While oil nourishes surrounding skin, excess oil on polish surfaces attracts dirt and can soften top coat over time. Apply oil primarily to skin areas, using a precise applicator to avoid flooding polish surfaces.
Choose your moisturizers wisely based on their ingredients. Products containing alpha hydroxy acids or retinoids can gradually break down polish, especially at the vulnerable nail edges. Save these anti-aging treatments for your face and select gentler formulas for your hands.
Night presents an ideal opportunity for intensive moisture treatment. Apply a rich hand cream before bed, focusing on cuticles and surrounding skin. This overnight treatment maintains skin health without interfering with daily activities or transferring oils to your polish during the day.
Activities to Avoid
Certain activities virtually guarantee nail damage regardless of polish quality or application technique. Opening cans with your nails creates tremendous pressure that cracks even the strongest designs. Keep proper tools handy to avoid the temptation of using nails as instruments.
Typing with your nail tips rather than finger pads causes constant micro-impacts that gradually weaken polish. Adjust your typing position so that finger pads make keyboard contact. This small change significantly reduces wear on nail tips where flower designs often extend.
Excessive hand sanitizer use, while important for health, can destroy nail art quickly. The high alcohol content dissolves polish bonds and dries out nails themselves. When possible, wash hands with soap and water instead, or apply sanitizer to palms only, avoiding decorated nails.
Hair styling creates unique challenges for nail art preservation. Here’s how different activities affect your manicure:
Shampooing: Hot water and surfactants lift polish edges
Heat styling: Tool contact creates burns and dents in polish
Product application: Gels and sprays build up on nail surfaces
Brushing: Repetitive motion causes edge wear
Hair ties: Elastic snapping can chip polish instantly
Touch-Up Techniques
Minor chips don’t always require complete removal and reapplication. Learning effective touch-up techniques extends your manicure’s life while maintaining its appearance. Keep a small kit of essential supplies for quick repairs when damage occurs.
For tiny chips at tips, carefully file the rough edge smooth, then apply a thin layer of matching polish just to the damaged area. Feather the edges to blend with existing polish. Once dry, seal with top coat, extending slightly beyond the repair area.
When flower petals chip or crack, resist the urge to pick at loose pieces. Instead, use tweezers to carefully remove only the loose polish, leaving intact areas alone. Rebuild the damaged petal with thin polish layers, matching the original design as closely as possible.
Develop a maintenance schedule rather than waiting for visible damage. Every three days, inspect your nails for tiny chips or edge lifting. Address these issues immediately before they expand. Apply a fresh thin layer of top coat to the entire nail, refreshing protection and shine.
Sleep Protection Methods
Your sleeping position and habits affect nail polish longevity more than you might expect. Clenching fists during sleep creates pressure and friction that can crack or dent designs. If you notice morning damage patterns, consider how you position your hands at night.
Rough pillowcases and sheets create friction against your nails throughout the night. Silk or satin pillowcases reduce this friction while feeling luxurious against your skin. The investment in quality bedding pays dividends in both nail preservation and hair health.
Night gloves might seem excessive, but they provide excellent protection for special occasion manicures. Choose lightweight cotton gloves that allow skin to breathe while preventing nail contact with bedding. This technique works particularly well during the first 24-48 hours when polish continues curing.
Morning routines often damage nails while you’re still groggy. Rushed showers with aggressive shampooing, fumbling with buttons, and searching through drawers all pose risks. Wake up a few minutes earlier to move deliberately, protecting your nail art investment.
Professional Tricks for Extending Flower Design Life
Nail technicians guard certain techniques that dramatically extend manicure longevity. These professional secrets, developed through years of experience and thousands of manicures, can transform your at-home results. Incorporating these methods into your routine elevates your nail art from amateur to professional quality.
Quick-Dry Techniques
Professional quick-dry methods go beyond basic drops and sprays. The ice water technique actually works, though most people execute it incorrectly. Wait five minutes after applying final top coat, then submerge nails in ice water for three minutes. The cold temperature hardens polish faster while preventing smudges.
Fan placement makes a significant difference in drying time and quality. Position a fan to blow across your nails rather than directly at them. Direct airflow can cause bubbling and uneven drying, while indirect airflow speeds evaporation without disturbing wet polish.
The aluminum foil method speeds drying through thermal conductivity. Tear off small foil squares and gently press them against wet nails for 30 seconds. The foil draws heat from the polish, accelerating the curing process. Remove carefully to avoid smudging.
Professional nail artists often use a combination of techniques for optimal results. They might apply quick-dry drops, wait two minutes, use the ice water method, then finish with indirect fan drying. This multi-step approach ensures thorough drying from surface to base.
Understanding the science behind drying helps you troubleshoot problems. Polish dries through solvent evaporation, not absorption. Thick layers trap solvents, preventing proper curing regardless of quick-dry products used. Temperature, humidity, and air circulation all affect evaporation rates.
Buffing and Smoothing Methods
Professional buffing between layers creates incredibly smooth, long-lasting designs. After your base color dries completely, use an ultra-fine buffer to gently smooth any ridges or bumps. Wipe away dust before applying flower details. This creates a perfectly smooth canvas that helps designs adhere better.
The sandwich method involves buffing between base and top coat applications. Apply base coat and design, let dry completely, then buff lightly with a 400-grit buffer. Apply top coat, dry, buff again very gently, then apply final top coat. This creates multiple smooth layers that bond exceptionally well.
Spot buffing addresses problems without disturbing entire designs. When a single petal appears bumpy or a small bubble forms, use a tiny piece of buffer to smooth just that area. This targeted approach maintains overall design integrity while fixing specific issues.
Buffer quality matters tremendously for professional results. Cheap buffers leave scratches that show through top coat. Invest in quality buffers with consistent grit ratings. Replace them regularly as worn buffers can damage rather than smooth your polish.
Emergency Repair Solutions
Smudges happen even to professionals, but knowing how to fix them prevents complete do-overs. For fresh smudges, lick your finger (saliva’s enzymes smooth polish) and very gently pat the smudge. This technique only works on wet polish and requires an extremely light touch.
The polish thinner trick saves designs when accidents occur. If you dent semi-dry polish, apply a tiny drop of polish thinner to the dent using a small brush. The thinner reactivates the polish, allowing it to self-level. Let dry completely before proceeding.
Nail glue becomes your secret weapon for serious chips or cracks. Apply a microscopic amount to the damaged area, then immediately cover with polish. The glue creates a strong foundation that holds everything together. Sand lightly once dry if needed to smooth any raised areas.
Keep an emergency repair kit in your purse for on-the-go fixes:
Clear polish: For quick chip coverage
Nail file: To smooth rough edges
Buffer squares: For quick smoothing
Nail glue: For serious repairs
Cotton swabs: For cleanup
Professional Sealing Techniques
The double-seal method used by professionals involves sealing nails twice at different stages. First, seal edges after base coat application. Then, seal again after your complete flower design but before top coat. This creates multiple protective barriers against moisture infiltration.
Vertical sealing adds another protection dimension. After completing horizontal edge sealing, hold the brush vertically and run it down the nail’s center from cuticle to tip. This creates a protective ridge that helps prevent tip wear.
Side-wall floating prevents polish from touching skin, which causes premature lifting. Hold your brush at a 45-degree angle when painting near nail edges. This allows polish to flow toward the center rather than flooding the sidewalls. The resulting gap is invisible once top coat is applied.
The wrap technique extends beyond simple edge sealing. Professionals wrap each nail twice – once with color and once with top coat. They also wrap at a slight angle, creating a diagonal seal that proves more durable than straight-across sealing.
Maintenance Scheduling
Professional manicurists know that prevention beats correction every time. Establish a maintenance routine that addresses wear before it becomes visible. This proactive approach maintains your flower designs far longer than reactive repairs.
The three-day rule suggests refreshing top coat every third day. This doesn’t mean adding thick layers – apply the thinnest possible coat just to refresh protection. Focus on high-wear areas like tips and corners where damage typically begins.
Weekly assessments catch problems early. Examine each nail under bright light, looking for tiny chips, edge lifting, or dullness. Address any issues immediately rather than waiting for obvious damage. This vigilance prevents small problems from becoming complete polish failure.
Document what works for your specific lifestyle and nail chemistry. Keep notes about which techniques and products provide the best results. This personal database helps you refine your approach over time, developing a customized routine that maximizes your nail art longevity.
Your Path to Indestructible Flower Nails
Creating flower nail designs that withstand weeks of daily life isn’t about finding one magic product or technique – it’s about combining multiple strategies into a comprehensive approach. From the initial nail preparation through daily maintenance routines, each step contributes to the overall durability of your nail art. The time invested in proper preparation and application pays off when your intricate flower designs still look fresh after two or three weeks.
The key to success lies in consistency and patience throughout the entire process. Rushing through prep work or skipping protective measures might save a few minutes initially, but costs hours in repairs and reapplication later. By treating your nail art as an investment worth protecting and following the professional techniques outlined here, you’ll finally achieve those magazine-worthy flower designs that last as long as you want them to. Your friends will wonder how your delicate petals and leaves remain perfect while theirs chip within days – now you have the knowledge to create truly lasting nail art masterpieces.
Frequently Asked Questions
Q: Can I make flower nail designs last on weak, brittle nails?
A: Yes, but you’ll need to strengthen your nails first. Use a quality nail strengthener for 2-3 weeks before attempting detailed designs. Once your nails improve, follow all the prep and application techniques mentioned, paying extra attention to thin polish layers and proper sealing.
Q: How long should I wait between polish layers for maximum durability?
A: Wait at least 5-10 minutes between thin layers of regular polish, even if the surface feels dry. For the best results, apply base layers in the morning and add flower details in the evening. Gel polish users should cure each layer for the full recommended time, typically 30-60 seconds.
Q: Will my flower designs last longer with gel or regular polish?
A: Gel polish typically lasts 2-3 weeks without chipping, making it superior for durability. However, regular polish offers more flexibility for detailed flower work and gentler removal. Your lifestyle and artistic preferences should guide your choice rather than durability alone.
Q: Why do my flower designs chip at the tips first?
A: Tips experience the most friction and impact during daily activities. You might be forgetting to cap the free edge with each polish layer, or your tips might be too thin. File nails slightly shorter and always wrap polish around and slightly under the nail edge.
Q: Can I swim or take long baths with flower nail designs?
A: Extended water exposure weakens any polish, especially within the first 24-48 hours after application. After this initial curing period, limit soaking to under 20 minutes and dry hands thoroughly afterward. Apply cuticle oil after water exposure to replenish moisture without compromising polish.
Q: How do I fix a smudged flower petal without starting over?
A: For wet smudges, gently pat with a licked finger to smooth the polish. For dry smudges, apply a tiny amount of polish thinner to reactivate the area, then carefully reshape the petal with a small brush. Let dry completely before adding top coat.
Q: What’s the biggest mistake people make with flower nail designs?
A: Applying polish too thick ranks as the most common error. Thick layers never fully cure, creating soft spots that dent and chip easily. Three thin coats always outlast one thick coat, even though application takes longer.
Q: Should I use a UV lamp for regular polish to make it last longer?
A: UV lamps don’t cure regular polish – they only work with gel formulas containing photoinitiators. Using a UV lamp on regular polish might create surface hardening but won’t improve durability. Invest in quality regular polish and proper application techniques instead.