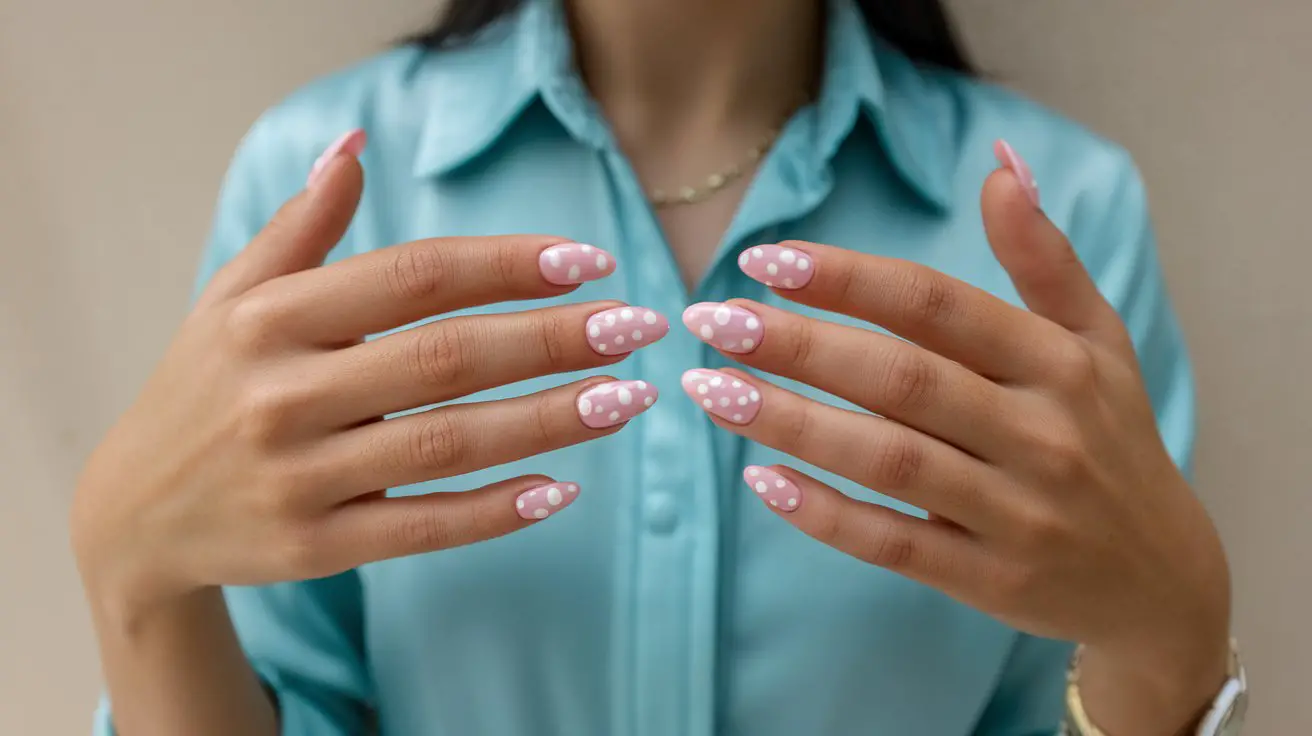
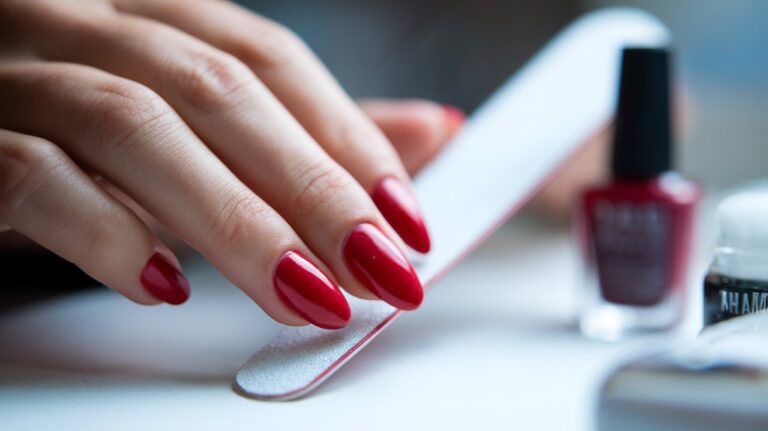
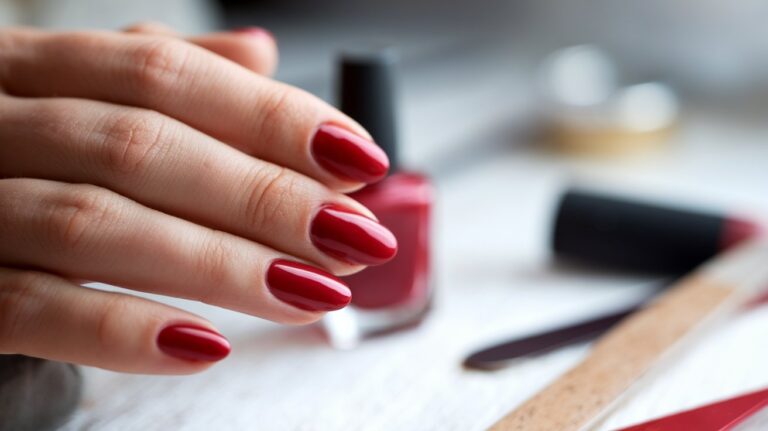
Red medium almond nails have become a signature look for women who want sophistication without the salon commitment. The combination of that classic red shade with the universally flattering almond shape creates an instantly polished appearance that works for both professional settings and special occasions. Press-on nails offer this transformation in minutes rather than hours, making them an increasingly popular choice for busy women who still want beautiful nails.
The technology behind press-on nails has advanced significantly from the basic drugstore options of previous decades. Today’s versions feature realistic textures, professional-grade materials, and customizable fits that rival salon applications. Red medium almond press-ons particularly stand out because they offer that perfect balance – not too long to be impractical, not too short to lose the elegant elongated effect, and in a color that never goes out of style.
Getting professional-looking results with press-on nails comes down to proper application technique and preparation. While the process itself is straightforward, knowing the right steps makes the difference between nails that last a few days versus those that stay perfect for weeks. Let’s walk through everything you need to know to apply your red medium almond press-ons like a professional nail technician would.
What You Need Before Starting
Gathering your supplies before starting saves time and prevents mid-application scrambling for missing items. The right tools make application smoother and help your press-ons look professionally done rather than hastily stuck on.
Essential tools and supplies
Your basic toolkit starts with the press-on nails themselves, but several additional items ensure proper application. Nail glue provides the strongest hold, though adhesive tabs offer a temporary option if you prefer changing your nails frequently. A good quality nail file helps customize the press-ons to your exact preferences, while a buffer smooths any rough edges after application.
Rubbing alcohol or nail dehydrator removes oils from your natural nails, creating a better bonding surface. Cotton pads or lint-free wipes apply these products without leaving fibers behind. Cuticle oil keeps the skin around your nails healthy throughout the wear period, though you’ll apply this after the press-ons are fully secured.
Nail prep products
Preparation products determine how well your press-ons adhere and how long they last. A gentle nail polish remover strips away any existing polish or residue, even if your nails appear bare. Some women skip this step thinking clean-looking nails don’t need it, but invisible oils and products can prevent proper adhesion.
Cuticle remover softens the skin for easier pushing and cleaning. Choose a formula that works quickly but doesn’t dry out your skin. A wooden cuticle stick or metal pusher moves the cuticles back gently without damaging the nail bed. These tools also help remove any stubborn bits of dead skin that might interfere with the press-on sitting flush against your natural nail.
Application tools
Beyond the basics, certain tools make application notably easier. A small pair of scissors helps trim press-ons if filing alone won’t achieve your desired length. Tweezers provide precision when placing smaller nails on pinky fingers, where fingers can feel clumsy and block your view.
A flat surface for organizing your supplies keeps everything accessible. Some women prefer using a small tray or even a paper plate to arrange the press-ons in order before starting. This organization prevents mixing up sizes or accidentally dropping nails during application. Good lighting, whether from a desk lamp or natural window light, helps you see exactly where each press-on should sit.
Optional items for professional finish
While not strictly necessary, certain extras elevate your results. A nail primer creates an even stronger bond between natural nails and press-ons, particularly useful if your nails tend to be oily. Base coat specifically designed for press-ons adds another adhesion layer while protecting your natural nails.
Clear top coat applied after press-ons are secure adds extra shine and can help blend the seam where the press-on meets your cuticle area. Some women also keep nail glue remover on hand for quick corrections if a nail gets placed incorrectly. Having these products ready means you won’t need to stop mid-application if you decide you want that extra professional touch.
Setting up your workspace
Your application area affects both the process and results. Choose a spot with excellent lighting where you can sit comfortably for at least 30 minutes. A table at elbow height reduces strain on your arms and gives you better control during application. Cover the surface with paper towels or newspaper to protect against glue drips.
Keep all supplies within arm’s reach but organized to prevent knocking things over. Open windows or use a fan for ventilation if using traditional nail glue, as fumes can be strong in enclosed spaces. Having everything prepared means you can focus entirely on application rather than hunting for supplies with wet glue on your fingers.
How to Prepare Your Natural Nails
Natural nail preparation determines whether your press-ons last days or weeks. Taking time with this foundation step prevents lifting, breaking, and premature wear that frustrates so many first-time press-on users.
Removing old polish completely
Even seemingly bare nails often have residual products that interfere with adhesion. Soak a cotton pad with acetone-free remover and press it against each nail for several seconds before wiping. This technique dissolves stubborn traces better than quick swipes. Pay special attention to the edges where polish tends to accumulate.
Check your nails under bright light after removal. Any shine or uneven texture indicates remaining product. A second pass with fresh remover ensures completely clean nails. Some women make the mistake of thinking clear polish doesn’t count, but any coating creates a barrier between your natural nail and the press-on adhesive.
Proper nail cleaning techniques
After removing polish, wash your hands thoroughly with soap and warm water. This step removes remover residue and surface dirt. Dry completely with a clean towel, as moisture trapped under press-ons can lead to lifting or fungal issues.
Next, use rubbing alcohol on each nail to remove natural oils. Even freshly washed nails produce oils that prevent proper bonding. Wipe each nail from cuticle to tip, using a fresh section of cotton pad for each hand. Let the alcohol evaporate completely before moving to the next step – usually about 30 seconds is sufficient.
Water temperature matters more than most people realize. Hot water opens up the nail plate, making it absorb moisture that later causes press-ons to lift. Lukewarm water cleans effectively without this expansion issue. After washing, wait at least 10 minutes before applying press-ons to ensure nails are completely dry throughout their layers, not just on the surface.
Cuticle care and pushing
Well-maintained cuticles create a cleaner application line and prevent press-ons from sitting awkwardly on excess skin. Apply cuticle remover according to package directions, typically leaving it on for 30-60 seconds. This product softens dead skin without damaging living tissue when used correctly.
Using your chosen pushing tool, gently move cuticles back toward the nail base. Work in small, circular motions rather than aggressive straight pushes that can tear skin. Focus on creating a clean edge where the press-on will sit, but don’t remove cuticles entirely as they protect against infection.
Wipe away loosened skin and excess cuticle remover with a damp cloth. Any remaining residue can interfere with adhesion or cause irritation under the press-ons. If you notice hangnails or rough spots, carefully trim them with cuticle nippers rather than pulling, which can create open wounds.
Filing and shaping natural nails
Your natural nails should be shorter than the press-ons for the most realistic appearance:
- Trim length first: Cut nails short enough that they won’t peek out from under press-ons
- File straight across: Create a relatively straight edge rather than following the almond shape
- Smooth rough spots: Run the file gently over any snags or uneven areas
- Buff the surface lightly: Create slight texture for better adhesion without thinning the nail
Short natural nails also reduce pressure on the press-ons during daily activities. When natural nails are too long, they can push against the inside of the press-on, causing premature lifting or cracking. Most professionals recommend keeping natural nails at or below fingertip length when wearing press-ons.
Dehydrating nail surface
The final preparation step removes any remaining moisture and oils. Professional nail dehydrators work best, but rubbing alcohol serves as an effective alternative. Apply your chosen product to each nail, covering the entire surface from cuticle to free edge.
Wait for complete evaporation before proceeding – rushing this step often leads to application failure. Your nails should look slightly matte rather than shiny when properly dehydrated. This appearance indicates oils have been removed and the surface is ready for optimal adhesion.
Some women skip dehydration thinking their nails feel dry enough, but natural nail plates constantly produce moisture and oils. Even five minutes after cleaning, enough oil returns to compromise press-on adhesion. This step takes just moments but adds days or even weeks to your wear time.
Selecting the Right Size Press-Ons
Finding press-ons that fit your natural nails perfectly prevents lifting, breakage, and that obviously artificial appearance that gives away you’re not wearing salon nails.
Understanding sizing charts
Most press-on sets include 24-30 nails in various sizes to accommodate different nail widths. Each nail typically has a number on its underside indicating its size. Manufacturers usually provide sizing charts, but these serve only as starting points since nail shapes vary significantly between individuals.
The width measurement matters most when selecting sizes. Length can be adjusted through filing, but width determines whether the press-on sits properly on your nail bed. A correctly sized press-on covers your natural nail from sidewall to sidewall without overlapping onto skin or leaving gaps.
Test fitting each nail
Before applying any adhesive, test fit press-ons on each finger. Place the press-on at your cuticle line and gently press down to check coverage. The sides should align with your natural nail edges without extending onto surrounding skin. If choosing between sizes, select the slightly smaller option as oversized press-ons lift quickly and look unnatural.
Document which size works for each finger by writing it down or arranging selected nails in order. Most women find they need different sizes for each hand, as dominant hands often have slightly larger nails from increased use. Taking notes prevents confusion during actual application when you’ll be working with adhesive.
Pay particular attention to thumbs and pinky fingers, as these often require the most size adjustment. Thumbs typically need the largest sizes in your kit, while pinkies might need filing or trimming to achieve proper fit. Some women even combine techniques, using one brand’s thumb nails with another brand’s smaller sizes for remaining fingers.
Customizing sizes if needed
When press-ons don’t fit perfectly straight from the package, customization creates that tailored fit. File the sides carefully with a fine-grit file, removing small amounts at a time. Focus on maintaining the almond shape while reducing width. Work slowly to avoid taking off too much material.
For length adjustments, clip from the tip first if removing more than a few millimeters. Follow up with filing to restore the almond point. Remember that almond nails should taper gently from the base to a rounded point, not come to a sharp angle. The medium length typically extends about 3-5 millimeters past your fingertip.
Sometimes the curve of the press-on doesn’t match your natural nail’s curve. Gentle heating with a blow dryer for a few seconds makes the material pliable enough to adjust. Press the warmed nail against your natural nail to create a better fit, holding until it cools and maintains the new shape.
What to do between sizes
Finding yourself between sizes happens frequently, especially with pointer and middle fingers. When the smaller size leaves gaps but the larger overlaps skin, several solutions exist. First, try filing the larger size from both edges equally to maintain symmetry. Remove material gradually, test fitting frequently.
Another approach involves using the smaller size but filling gaps with clear nail polish or builder gel after application. This technique works well for small gaps but requires careful application to look natural. Apply thin layers, allowing each to dry completely before adding more.
Some women layer adhesive tabs or use extra glue at gap points to build up the area. While this can work temporarily, it often creates weak points where lifting begins. The filed-down larger size usually provides better long-term wear than trying to make a too-small nail work.
Organizing your selected nails
Before starting application, arrange your chosen press-ons in order. Line them up from thumb to pinky for each hand, keeping hands separate to avoid confusion. Some women place them on a piece of tape sticky-side up to prevent rolling or getting mixed up.
Double-check sizes one final time before applying adhesive. Once glue or adhesive tabs are involved, making changes becomes messy and can waste press-ons. Having everything organized means you can work efficiently through the application without stopping to search for the right nail.
Label any customized nails if you plan to reuse them later. Small stickers or writing with permanent marker on the underside helps you remember which finger each nail fits. This organization saves significant time during future applications and ensures consistent results.
The Application Process Step by Step
The actual application of your red medium almond press-ons requires patience and precision for professional results. Rushing through these steps almost guarantees lifting, air bubbles, or misaligned nails that look obviously artificial. Each nail deserves your full attention during application.
Applying the base coat or primer
While optional, primer or base coat significantly improves adhesion and wear time. Apply a thin layer to each natural nail, avoiding the surrounding skin. These products often dry tacky rather than completely hard, which is normal and actually helps with bonding.
Let primer dry according to package instructions, typically 30-60 seconds. Applying press-ons to wet primer causes sliding and prevents proper adhesion. You’ll know it’s ready when the surface feels slightly sticky but no product transfers to your finger when touched lightly.
Working with nail glue or adhesive tabs
Nail glue provides the longest-lasting hold but requires careful application. Place a small drop on both your natural nail and the press-on. Less is more – excess glue squeezes out the sides creating messy edges and potentially bonding skin to the press-on. One tiny drop spread thin works better than a large glob.
For adhesive tabs, select the size that covers most of your natural nail without extending onto skin. Press firmly to activate the adhesive, then peel off the protective backing. Tabs offer easier removal and repositioning but typically last only 3-7 days compared to glue’s 2-3 week potential.
Whether using glue or tabs, work on one nail at a time rather than preparing multiple nails at once. Glue begins drying immediately, and exposed adhesive tabs collect dust and lose sticking power. This methodical approach might feel slow but produces superior results.
Proper placement technique
Position the press-on at a 45-degree angle with the edge touching your cuticle line first. Roll the nail down slowly toward the tip, pressing out air bubbles as you go. This rolling motion prevents air pockets that cause cloudy spots or weak adhesion points.
Press firmly for 10-15 seconds, applying pressure across the entire nail surface. Focus extra attention on the edges where lifting typically begins. Some women count slowly to ensure they hold long enough – this waiting period allows initial bonding to occur.
Avoid repositioning once the nail makes full contact with adhesive. Lifting and replacing creates air pockets and weakens the bond. If placement is seriously wrong, remove completely with acetone and start fresh with a new press-on rather than trying to salvage a poor application.
Pressing and holding correctly
After initial placement, continue applying pressure for at least 30 seconds per nail. Use your thumb to press firmly from cuticle to tip, then side to side. This comprehensive pressure ensures complete adhesion across the entire surface, not just where you initially pressed.
The temperature of your hands affects bonding. Cold hands slow glue drying and can prevent proper adhesion. If your hands feel cold, warm them under running water (dry thoroughly afterward) or rub them together before application. Room temperature or slightly warm hands create ideal bonding conditions.
Between nails, avoid using the freshly applied finger for at least a minute. Even light pressure or movement can shift the press-on before glue fully sets. Apply nails in an order that allows previously done fingers to rest – many women alternate hands to give maximum drying time.
Finishing touches
Once all press-ons are applied, inspect for any gaps or lifted edges. Small amounts of additional glue can be carefully applied with a toothpick to problem areas. Hold these spots for another 30 seconds to ensure bonding.
File and shape all nails to ensure uniform length and shape. Even pre-shaped press-ons benefit from light filing to perfect the almond point and ensure all nails match. Work in one direction rather than sawing back and forth, which can cause the press-on to separate from your natural nail.
If desired, apply clear top coat for extra shine and durability. Run the brush along the seam where press-on meets natural nail to help seal this vulnerable edge. Cuticle oil applied around nails (not under them) keeps surrounding skin healthy and makes the overall appearance more natural and well-maintained.
Making Your Press-Ons Last Longer
Proper aftercare extends the life of your red medium almond press-ons from days to weeks. The first 24 hours after application prove most critical for establishing long-lasting adhesion, but ongoing maintenance keeps them looking fresh throughout their wear.
First 24-hour care tips
Water exposure during the initial day significantly reduces longevity. Avoid washing dishes, taking long showers, or swimming while glue fully cures. When you must get hands wet, keep contact brief and dry thoroughly afterward. Even seemingly dry press-ons can harbor moisture underneath that weakens adhesive bonds.
Resist testing the press-ons by picking or pulling at edges. Many women unconsciously fidget with new nails, but this habit starts the lifting process prematurely. If you notice yourself reaching to touch them, redirect your hands to another activity. The temptation decreases significantly after the first day once you trust they’re secure.
Daily maintenance routine
Each morning, check for any signs of lifting around edges. Catching problems early allows for quick fixes rather than complete nail loss:
- Tiny lifts: Apply small amount of glue with toothpick under lifted area
- Cloudy spots: Often indicate moisture trapped underneath requiring removal
- Cracks: Seal with clear polish to prevent spreading
- Rough edges: File gently to prevent catching on fabric
Moisturize your hands and cuticles daily, but avoid getting lotion under the press-ons. Apply cream to backs of hands and fingers, using oil specifically around nail beds. This targeted approach maintains skin health without compromising adhesion.
Keep a nail file in your purse for immediate attention to snags or sharp edges. Quick maintenance prevents minor issues from becoming major problems. Filing away a catch takes seconds but can save the entire nail from ripping off.
Activities to avoid
Certain activities consistently cause premature press-on failure. Using nails as tools tops the list – opening cans, scraping labels, or prying things apart puts extreme stress on adhesive bonds. Keep proper tools handy to resist the temptation of using your beautiful red almond nails for tasks they weren’t designed to handle.
Excessive heat weakens most press-on adhesives. Long hot showers, saunas, and even blow-drying hair for extended periods can cause lifting. When heat exposure is unavoidable, protect nails by wearing gloves or limiting exposure time. Let hands cool completely before touching or adjusting press-ons.
Chemical exposure from cleaning products, acetone, and even some hand sanitizers breaks down adhesive bonds. Wear rubber gloves for cleaning tasks and choose alcohol-based sanitizers over those with other chemicals. When wearing gloves, ensure they fit properly as too-tight gloves put pressure on nail tips.
Quick fixes for lifting edges
When edges begin lifting despite your best efforts, immediate action prevents complete loss. Clean the area with rubbing alcohol to remove oils and debris. Apply a tiny amount of nail glue under the lifted section using a toothpick or pin for precision.
Press and hold for at least 60 seconds, longer than initial application since you’re working with a compromised bond. Wipe away any excess glue immediately with acetone on a cotton swab. Seal the repair with clear polish once glue dries completely.
For lifting that won’t respond to glue, consider trimming the press-on shorter. Sometimes reducing length relieves pressure that causes lifting. File the nail to restore its almond shape after trimming. While not ideal, a slightly shorter nail looks better than a missing or damaged one.
When to remove and reapply
Most press-ons last 1-3 weeks with proper application and care. Signs that removal time has arrived include multiple nails lifting, visible grow-out gaps at cuticles, or damage to several press-ons. Trying to extend wear past this point usually results in awkward-looking nails or damage to your natural nails.
Soak nails in acetone to remove them safely rather than forcing or pulling them off. Forced removal can damage natural nail layers, causing weakness and pain. After removal, give natural nails at least a few days to recover before reapplying new press-ons.
Between applications, treat natural nails with strengthening treatments and cuticle oil. This recovery period ensures healthy natural nails that provide a better foundation for your next set of press-ons. Regular breaks also prevent the yellowing or weakening that can occur with constant press-on wear.
Your Perfect Red Almond Nails Await
Mastering press-on application transforms a simple beauty product into a professional-looking manicure that lasts. The process might seem detailed at first, but each step serves a specific purpose in creating those flawless red medium almond nails you’re after. Once you’ve been through the routine a few times, the entire application becomes second nature, taking less than 30 minutes from start to finish.
The versatility of red medium almond press-ons makes them worth perfecting your technique. This classic combination suits every skin tone, complements any outfit, and transitions seamlessly from boardroom to dinner date. With proper application and care, your press-ons will maintain their glossy finish and perfect shape long enough that people assume you’re maintaining expensive salon nails. The confidence that comes from perfectly polished nails affects how you present yourself in every situation.
Frequently Asked Questions
Q: How long do red medium almond press-on nails typically last?
A: With proper application using nail glue, press-ons generally last 2-3 weeks. Adhesive tabs provide 3-7 days of wear. Your daily activities and maintenance routine significantly impact longevity.
Q: Can I reuse press-on nails after removing them?
A: Yes, if you remove them carefully with acetone and clean off all adhesive residue. Store them in their original container and they can be reapplied 2-3 times using fresh glue or adhesive tabs.
Q: What’s the difference between nail glue and adhesive tabs?
A: Nail glue creates a semi-permanent bond lasting weeks but requires acetone for removal. Adhesive tabs offer temporary wear of several days but allow easy removal without chemicals.
Q: Should press-on nails hurt after application?
A: No, properly fitted press-ons shouldn’t cause pain. Discomfort usually indicates the nails are too small, pressed too firmly against the cuticle, or natural nails weren’t filed short enough.
Q: Can I paint over red press-on nails if I want a different color?
A: Yes, you can apply regular nail polish over press-ons. Use non-acetone remover to change colors, as acetone can weaken the adhesive bond between the press-on and natural nail.
Q: How do I type comfortably with medium length almond nails?
A: Use the pads of your fingers rather than fingertips for typing. Most people adjust within 2-3 days. Starting with shorter lengths and gradually increasing helps build comfort.
Q: What if water gets under my press-on nails?
A: Dry the area immediately and monitor for lifting. If the nail becomes loose or cloudy, remove it completely, dry your natural nail thoroughly, and reapply with fresh adhesive.
Q: Can I cut press-on nails after they’re applied?
A: Yes, you can trim them with nail clippers and reshape with a file. Work carefully to avoid putting too much pressure on the adhesive bond. File in one direction rather than back-and-forth motions.