Headband braids have become the go-to hairstyle for women looking to add instant polish to their everyday look. This charming technique wraps a braid across the crown of your head, creating the illusion of a natural hair accessory that frames your face beautifully. Whether you’re rushing to work, heading to brunch with friends, or attending a special event, this versatile style offers countless possibilities for expressing your personal aesthetic.
The beauty of this braided style lies in its ability to transform any hair type or length into something special. Unlike traditional accessories that can slip, pinch, or clash with your outfit, a braided crown stays perfectly in place while complementing everything in your wardrobe. From bohemian loose plaits to sleek Dutch variations, each technique brings its own character to your overall appearance, making it simple to switch between casual and formal settings.
Ready to discover how this trending hairstyle can revolutionize your daily routine? The following sections will guide you through mastering the basic technique, adapting it for your specific hair type, styling it for different occasions, and ensuring it stays flawless from morning to night. You’ll learn professional tricks that make creating these looks surprisingly simple, plus discover which products and tools deliver salon-worthy results at home.
- What Makes Headband Braids the Perfect Hair Accessory
- How to Create the Classic Headband Braid
- Which Headband Braid Variations Work for Different Hair Types
- How to Style Headband Braids for Various Occasions
- What Products and Tools Make Headband Braids Last All Day
- Your Headband Braid Journey Starts Now
- Frequently Asked Questions
What Makes Headband Braids the Perfect Hair Accessory
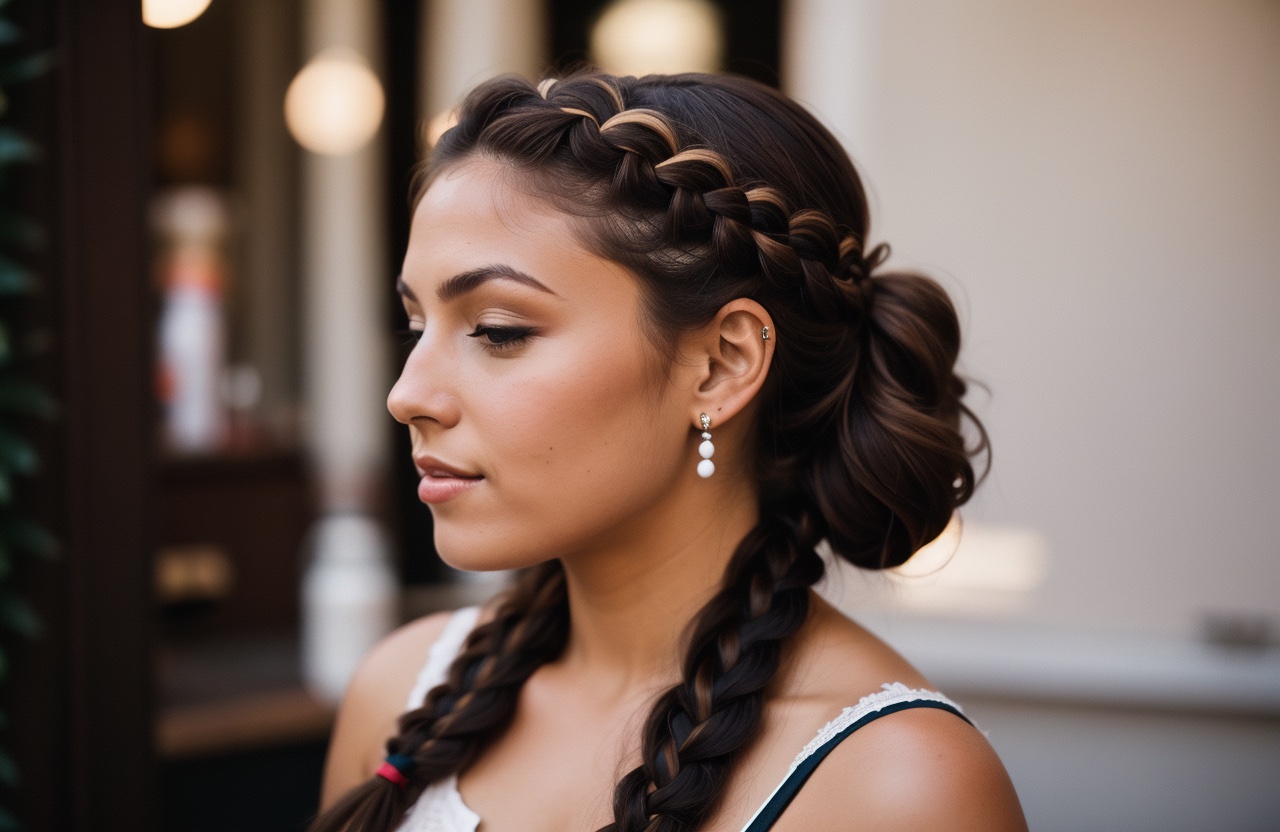
Headband braids stand apart from other hairstyles because they combine practicality with effortless elegance. This technique involves creating a plait that sits across the top of your head, mimicking the placement of a traditional headband while using only your natural hair. The result looks intricate and sophisticated, yet requires minimal effort once you master the basic movements.
Versatility for Different Occasions
The adaptability of this style makes it suitable for virtually any setting. A loosely woven version with face-framing pieces creates a relaxed weekend vibe, while a tight, polished plait works perfectly in professional environments. You can dress it up with decorative pins for weddings or keep it simple for grocery shopping – the same foundation technique transforms based on your finishing touches.
Face Shapes and Hair Types
Round faces benefit from added height at the crown, which this style naturally provides. Square faces look softer with wispy pieces left loose around the temples. Oval faces can experiment with placement – wearing the braid further back or forward to create different effects. Heart-shaped faces shine when the plait sits slightly off-center, balancing wider foreheads.
Hair texture plays a crucial role in determining which variation works best. Fine hair gains instant volume when teased before braiding, while thick hair might need thinning techniques to prevent bulkiness. Natural curls and waves add beautiful texture to looser styles, though straightened hair creates cleaner lines for formal events.
Time-Saving Benefits
Most women complete their first attempt in under ten minutes. With practice, the entire process takes five minutes or less. Compare that to curling, straightening, or creating elaborate updos – you’ll save precious morning time while still looking polished.
The style also extends the life of your blowout or wash day. By keeping hair off your face and secured, you prevent oils from transferring and maintain your style longer. Many women find they can stretch their wash schedule an extra day or two when incorporating this technique into their routine.
Professional vs Casual Looks
Professional settings call for precision and neatness. Start with smooth, detangled hair and create a firm, even braid that sits close to the hairline. Tuck any loose ends securely and use a light-hold spray to eliminate flyaways. The finished look appears controlled and sophisticated, perfect for presentations or client meetings.
Casual occasions allow more freedom and creativity:
Messy Texture: Pull gently at braid sections to create fullness and movement
Mixed Techniques: Combine different braiding methods within one headband
Partial Styles: Braid only halfway across, leaving the rest loose
Double Bands: Create two parallel braids for added interest
Incorporated Accessories: Weave ribbons or small flowers through the plait
How to Create the Classic Headband Braid
Creating your first headband braid feels intimidating until you break down the process into manageable steps. The key lies in understanding the basic mechanics before attempting variations or advanced techniques.
Preparation and Tools Needed
Start with day-old hair rather than freshly washed locks. Natural oils provide grip and prevent slipping, making the braiding process significantly easier. If your hair feels too clean, add dry shampoo or texturizing spray for better hold.
Gather these essential tools before beginning:
- A fine-tooth comb for creating clean parts
- Small clear elastics that match your hair color
- Bobby pins in your shade
- Light-hold hairspray
- A hand mirror to check the back
Step-by-Step Technique
Begin by creating a deep side part on your preferred side. Section off a triangle of hair starting from the part and extending about two inches back from your hairline. This section should be roughly three inches wide at the base. Divide this portion into three equal strands.
Position your hands correctly – this makes all the difference. Hold the sections between your fingers with palms facing down. Start braiding by crossing the strand closest to your face under the middle piece, then the back strand under the new middle. This creates the foundation of your Dutch braid, which sits on top of the hair rather than flat against the head.
As you continue braiding horizontally across your head, incorporate small sections of hair from the hairline into the front strand each time you cross it under. Keep the additions consistent in size for an even appearance. The braid should follow your natural hairline, sitting about an inch back from the edge.
Common Mistakes to Avoid
Pulling too tightly creates an unnatural look and causes discomfort. The braid should feel secure but not painful. If you experience headaches or see skin pulling at your hairline, you’re applying too much tension.
Adding huge chunks of hair at once creates bumps and uneven texture. Instead, pick up pencil-thin sections for smooth integration. Rushing through the process usually results in loose, messy sections that won’t hold. Take your time, especially when learning.
Many women struggle with the direction change as they round the ear. Practice this transition specifically – the braid needs to curve naturally without creating weird angles or gaps. Some find it helpful to tilt their head slightly to maintain consistent hand positioning.
Securing Methods
Once you reach the opposite ear, you have several finishing options. For shorter hair, secure with a clear elastic behind the ear and pin the tail under existing hair. Medium-length hair can continue the braid down and pin it into a low bun or ponytail.
Long hair offers the most versatility. Continue braiding all the way to the ends, then wrap the braid around the base of a ponytail or bun. Alternatively, let the braid transition into loose waves for a romantic effect.
Bobby pins should slide in at an angle, catching both the braid and the hair underneath. Cross two pins in an X formation for extra security in areas that tend to slip. A final mist of hairspray sets everything in place without creating stiffness or visible product buildup.
Styling Variations
The basic technique opens doors to countless interpretations. A standard three-strand braid offers classic simplicity, while a fishtail creates intricate visual interest. The Dutch braid (braiding under rather than over) provides more height and visibility, perfect for fine hair that needs volume.
Try incorporating these creative twists:
Rope Braid Method: Twist two sections around each other for a different texture
Pull-Through Technique: Creates the illusion of an elaborate braid with simple ponytail sections
Mixed Sizes: Alternate between tight and loose sections for dynamic movement
Partial Coverage: Braid only from ear to ear, leaving the back loose
Which Headband Braid Variations Work for Different Hair Types
Every hair type presents unique challenges and opportunities when creating headband braids. Understanding your specific texture and characteristics helps you choose techniques that enhance rather than fight against your natural hair.
Fine and Thin Hair Solutions
Fine hair often slips out of braids and lacks the volume needed for impressive styles. Combat these issues by never starting with squeaky-clean hair. Apply mousse or volumizing powder at the roots before beginning. These products add grip and texture without weighing down delicate strands.
Backcombing serves as your secret weapon. Gently tease sections before incorporating them into the braid. This creates fullness that makes thin hair appear thicker. Focus on the crown area where volume matters most.
The pancake technique transforms skinny braids into full, dramatic styles. After securing your braid, gently tug at the edges of each section, pulling them outward slightly. Work from bottom to top for even distribution. This single trick can double the visual impact of your style.
Consider creating multiple thin braids rather than one thick one. Two or three narrow plaits woven together or placed parallel create more visual interest than a single sparse braid. This approach also provides better coverage across the hairline.
Thick Hair Adaptations
Thick hair brings its own set of considerations. The sheer volume can create bulky, overwhelming braids that throw off facial proportions. Start by working with slightly damp hair or applying smoothing serum to manage bulk.
Section management becomes crucial with abundant hair. Instead of grabbing large chunks, work with smaller sections than seem necessary. This prevents the braid from becoming too heavy or pulling uncomfortably at the scalp. You might need extra bobby pins and stronger-hold products to keep everything secure throughout the day.
Sometimes thick hair benefits from strategic thinning before braiding. Run thinning shears through the sections you’ll be working with, focusing on the mid-lengths rather than roots or ends. This reduces bulk without sacrificing length or overall volume.
Dutch braids work particularly well for thick hair since they sit on top, showcasing the braid’s pattern clearly. French braids can get lost in the volume, making your effort less visible. Experiment with positioning – placing the braid slightly further back from the hairline often looks more balanced with fuller hair.
Curly and Textured Hair Techniques
Curly hair adds natural beauty and dimension to headband braids, though it requires specific handling. Never brush out curls before braiding – this creates frizz and destroys your natural pattern. Instead, gently separate curls with your fingers while maintaining their shape.
Working with stretched hair often yields better results. This doesn’t mean straightening – simply elongating curls through braiding while damp, twist-outs, or gentle blow-drying with a diffuser. Stretched hair shows the braid pattern more clearly while maintaining texture.
Product selection makes a significant difference for textured hair:
Leave-In Conditioner: Keeps hair moisturized and manageable during styling
Edge Control: Smooths baby hairs and creates polished edges
Curl Cream: Defines texture while providing hold
Oil or Serum: Adds shine and reduces frizz on finished style
The braid itself benefits from being slightly looser than you might create with straight hair. Tight braiding can cause breakage and discomfort, especially at the hairline. A gentler approach maintains hair health while still achieving a beautiful result.
Short Hair Modifications
Short hair doesn’t exclude you from headband braid trends – it just requires creative adaptations. The secret lies in strategic placement and utilizing every bit of length available.
Start your braid closer to one ear rather than at the center part. This shorter distance means you need less length to complete the style. You can also create the illusion of a complete headband by braiding as far as possible, then pinning the end and allowing the rest of your hair to cover the transition.
Hair extensions or clip-in pieces designed for braiding can supplement shorter sections. Match your hair color carefully and blend the attachment points thoroughly. Quality synthetic or human hair pieces feel worthwhile for styles you’ll wear regularly.
Mini braids work wonderfully for pixie cuts and bobs. Instead of one substantial braid, create several tiny plaits along the hairline. These require minimal length while still achieving the headband effect. Secure each with tiny clear elastics and bobby pins color-matched to your hair.
Long Hair Possibilities
Long hair provides endless creative options, though the weight can become challenging. The basic headband can transform into elaborate crown braids, multi-strand creations, or combination styles that incorporate various techniques.
Managing length during the braiding process requires strategy. Clip away sections you’re not currently working with to prevent tangling. Some women find it helpful to loosely braid or twist the length before beginning, making it easier to handle.
Extended braids that continue beyond the ear area create stunning effects. You might wrap the braid around your head completely, creating a crown, or let it cascade down one shoulder. The braid can also transition into other styles – morphing into a fishtail or regular plait as it moves away from the hairline.
Long hair sometimes benefits from layered braiding. Create one headband braid, then add another parallel braid using hair from behind the first. This double-band effect looks intricate and formal, perfect for special occasions. The technique also distributes the weight of heavy hair more evenly, reducing strain on any single section.
How to Style Headband Braids for Various Occasions
The versatility of headband braids truly shines when you adapt them for different events and settings. A single technique can transform from gym-ready to gala-appropriate with just a few adjustments in execution and finishing.
Casual Everyday Looks
Your daily routine calls for styles that look effortless yet intentional. The undone headband braid perfectly captures this balance. Start with second-day hair and braid loosely, allowing pieces to fall naturally around your face. Don’t worry about perfection – the charm lies in the relaxed, lived-in appearance.
For weekend errands or coffee dates, try the half-headband approach. Braid only from one ear to the crown, securing with a bobby pin hidden under loose hair. This asymmetrical style adds interest without appearing overdone. Pair it with your favorite jeans and a simple tee for an elevated casual look.
The messy bun combination works beautifully for lazy mornings. Create your headband braid as usual, then gather the remaining hair into a loose, imperfect bun at the nape of your neck. Pull out a few face-framing pieces and you’re ready for brunch or a morning yoga class.
Quick tip: spray some sea salt texturizing mist through your hair before braiding for that perfect beachy, casual texture that looks like you just rolled out of bed looking fabulous.
Work-Appropriate Styles
Professional settings demand polish without sacrificing personality. The sleek headband braid delivers both. Start with smoothed hair – use a flat iron if necessary – and create a tight, even braid that follows your hairline precisely. Every strand should be in place, creating a controlled appearance that conveys attention to detail.
Secure the end of your braid invisibly by tucking it under a low chignon or neat ponytail. This creates one cohesive style rather than separate elements. The back should look as refined as the front, especially important for presentations or meetings where people see you from all angles.
Color plays a role in workplace appropriateness. While rainbow braids might fly in creative industries, conservative offices call for natural tones. If you have highlights or balayage, position the braid to showcase this dimension subtly.
For important meetings or interviews, consider the executive headband braid. This involves creating an extremely thin, delicate braid that serves as a sophisticated detail rather than a statement. It demonstrates creativity and attention to appearance without overwhelming your professional presence.
Special Events and Parties
Formal occasions invite you to amplify the glamour. The goddess crown braid makes a stunning statement – create your headband braid with larger sections for dramatic impact, then wrap it completely around your head. Weave in delicate pearls or tiny flowers for wedding guest perfection.
Evening events call for added sparkle and dimension. After completing your braid, dust it lightly with shimmer spray or weave in metallic thread. The catch of light as you move adds magic to your appearance. Just remember that less is more – you want to glow, not look like a disco ball.
Cocktail parties and date nights benefit from the romantic side-swept variation:
Volume Building: Tease the crown area before beginning your braid
Curved Placement: Direct the braid diagonally across your head rather than straight across
Soft Finish: Allow the braid to transition into loose curls or waves
Strategic Placement: Position the braid to highlight your best features
For truly special occasions, consider the double crown effect. Create two parallel headband braids, spacing them about an inch apart. This regal style works particularly well with updos and formal gowns. The technique requires patience but delivers incredible visual impact.
Athletic and Active Wear
Workout sessions demand hairstyles that stay put through sweat and movement. The athletic headband braid excels here, keeping hair completely off your face while maintaining style. Start with dry hair and apply a strong-hold gel to the sections you’ll be braiding.
The key difference for athletic wear lies in tension and security. Braid tighter than usual – not painfully so, but firm enough to withstand running, jumping, or inverting in yoga. Use extra bobby pins at stress points, particularly around the ears where movement causes the most slippage.
Double-duty styling makes morning gym sessions easier. Create your athletic braid, workout, then loosen and refresh it for the rest of your day. A quick spritz of dry shampoo and some strategic pulling transforms your tight gym braid into a relaxed daytime style.
Consider the protective benefits during outdoor activities. The braid shields your hairline from sun damage while preventing tangles from wind. This makes it ideal for hiking, beach volleyball, or any outdoor sport where elements affect your hair.
Romantic Date Night Options
Creating an enchanting look for romantic evenings requires balancing sophistication with softness. The whisper braid achieves this perfectly – a delicate headband braid with strategic pieces left loose to frame your face softly.
Begin by curling all your hair before braiding. This adds texture and ensures any loose pieces fall beautifully. Create a loose Dutch braid, allowing natural movement rather than strict control. The finished effect should suggest effortless beauty rather than hours of preparation.
Incorporate romantic elements subtly. A single fresh flower tucked behind one ear, or a vintage brooch pinned where the braid ends, adds personal charm. These touches should complement, not compete with, your overall look.
Low lighting in restaurants and bars means your style needs dimension to remain visible. Vary the tightness of your braid sections – looser at the crown for volume, tighter at the sides for definition. This creates shadows and highlights that photograph beautifully and catch candlelight perfectly.
The cascading combination works wonderfully for romantic settings. Let your headband braid flow into a side ponytail or loose curls over one shoulder. This asymmetrical approach draws the eye and creates an intimate, approachable appearance perfect for conversation over dinner.
What Products and Tools Make Headband Braids Last All Day
The difference between a braid that lasts twenty minutes and one that survives twelve hours lies entirely in preparation and product selection. Understanding which tools and products work for your specific hair type transforms frustrating attempts into reliable, long-lasting styles.
Essential Styling Products
Your product arsenal should address three key needs: grip, hold, and finish. Texture spray provides the foundation, giving slippery hair something to grab onto during braiding. Apply it section by section rather than all over – you need grip where you’re braiding, not necessarily throughout all your hair.
Mousse or foam offers lightweight hold without the crunchiness of gel. Work a golf-ball-sized amount through damp hair before blow-drying for optimal results. This creates memory in your hair, helping it maintain the braided shape even after hours of wear.
Hairspray serves as your insurance policy, but timing matters. A light mist before braiding helps, another during secures, and a final layer after braiding seals the deal. Choose flexible hold formulas that allow movement while maintaining structure.
For those with particularly stubborn hair, pomade or wax applied to the sections being braided provides ultimate control. Use sparingly – a tiny amount warmed between your palms goes a long way. Too much creates greasy, heavy-looking braids that attract dust and lose their shape.
Hair Preparation Techniques
The condition of your hair before braiding directly impacts longevity. Day-old hair typically performs better than freshly washed, but three-day hair might be too oily. Find your sweet spot through experimentation.
Proper drying technique sets the stage for success. Blow-dry with your head flipped upside down to create volume at the roots. Use a round brush to smooth the sections you’ll be braiding while maintaining texture elsewhere. This targeted approach gives you control where needed without sacrificing overall body.
If starting with wet hair, braid while damp rather than soaking. Wet braids tighten as they dry, potentially causing discomfort or even headaches. Damp hair offers manageability without the shrinkage factor. Plus, braiding damp hair creates beautiful waves when you eventually undo the style.
Pre-stretching makes a significant difference for certain hair types. Create loose braids or twists the night before, then undo them before creating your headband braid. This technique provides length and manageability without heat damage.
Securing Tools and Accessories
Bobby pins remain the workhorse of braid security, but quality matters enormously. Cheap pins bend, slip, and break at crucial moments. Invest in professional-grade pins that match your hair color exactly. The coating should grip without snagging, and the ends should meet perfectly when closed.
Small clear elastics deserve careful selection too:
Silicone Bands: Nearly invisible and strong, perfect for securing ends
Fabric Elastics: Gentler on hair but more visible
Spiral Ties: Distribute pressure evenly, preventing creases
Mini Scrunchies: Add decorative element while securing
The placement of securing tools affects both comfort and longevity. Pins should enter at a 45-degree angle, catching both the braid and underlying hair. Cross them in an X pattern for double security. Hide elastics by wrapping a small piece of hair around them and securing with a pin.
Hair clips serve as temporary assistants during the braiding process. Use them to section off hair you’re not currently working with, preventing tangles and confusion. Alligator clips work better than traditional clips, providing stronger hold without leaving marks.
Touch-up Strategies
Even perfectly executed braids need midday attention sometimes. Carry a small emergency kit containing travel-size hairspray, a few bobby pins, and clear elastics. This arsenal handles most minor rebellions without requiring complete restyling.
Flyaways appear as the day progresses, particularly around the hairline. Rather than adding more spray, try a clean mascara wand or toothbrush sprayed lightly with hairspray. These tools smooth baby hairs precisely without affecting the overall style.
If sections start loosening, resist the urge to redo everything. Instead, identify the specific problem area and address it individually. Often, a single strategically placed pin or tiny elastic solves the issue without disturbing the rest of your style.
For special events lasting many hours, plan strategic touch-up breaks. After four hours, most styles benefit from a quick smooth-down and re-pin. This five-minute investment extends your style’s life significantly.
Weather-Proofing Methods
Humidity wreaks havoc on carefully crafted braids, causing frizz and loss of definition. Anti-humidity spray creates an invisible shield against moisture. Apply it as your final step, holding the can at least twelve inches away for even coverage.
Wind presents different challenges, loosening braids and creating tangles. Extra security at common failure points – around ears and at the crown – prevents wind damage. Consider creating a slightly tighter braid on windy days, as it will naturally loosen throughout your time outside.
Rain requires serious protection. A water-resistant finishing spray provides some defense, but carry a stylish hat or scarf for true downpour protection. If your braid does get wet, don’t panic – pat it dry gently and re-smooth with your hands. Wet braids often dry into interesting textures that look intentionally beachy.
Extreme heat causes product meltdown and increased oil production. Use lighter products in summer, focusing on powder-based formulas rather than creams or oils. Dry shampoo becomes your best friend, absorbing excess oil without requiring complete restyling. Schedule your braiding for the coolest part of your morning routine, giving your style the best chance of surviving the heat.
Your Headband Braid Journey Starts Now
Mastering headband braids opens up a world of styling possibilities that adapt to every aspect of your life. From polished professional looks to relaxed weekend vibes, this versatile technique proves that beautiful hair doesn’t require hours of effort or expensive salon visits. The skills you’ve learned here – understanding your hair type, selecting the right products, and adapting styles for different occasions – form the foundation for countless creative variations.
The journey from your first attempts to confident execution happens faster than you might expect. Each time you practice, your fingers grow more familiar with the movements, and what once felt impossible becomes second nature. Soon you’ll find yourself experimenting with personal touches, mixing techniques, and creating signature looks that perfectly express your individual style. The headband braid isn’t just another hairstyle – it’s a reliable tool that simplifies your routine while ensuring you always look polished and put-together.
Frequently Asked Questions
Q: How long does my hair need to be to create a headband braid?
A: Your hair should be at least 4-5 inches long to create a basic headband braid. Shorter hair around 3 inches can work with mini braids or by using clip-in extensions to supplement length.
Q: Why does my headband braid always come loose after an hour?
A: Loose braids usually result from starting with hair that’s too clean and slippery. Try using dry shampoo or texture spray before braiding, and ensure you’re using enough bobby pins to secure the style properly.
Q: Can I sleep in a headband braid?
A: Yes, sleeping in a loose headband braid can create beautiful waves for the next day. Wrap your head in a silk scarf or use a satin pillowcase to prevent frizz and protect the braid structure.
Q: Which side should I start my headband braid from?
A: Start from whichever side feels more comfortable for your dominant hand. Most right-handed people find it easier to start from the left side and work toward the right.
Q: How do I prevent headaches from tight braiding?
A: Braid with moderate tension rather than pulling tight. The braid should feel secure but never painful. If you experience discomfort, loosen the braid immediately and try again with gentler tension.
Q: What’s the difference between a Dutch and French headband braid?
A: Dutch braids cross strands under each other, creating a raised braid that sits on top of the hair. French braids cross strands over each other, creating a flatter braid that blends into the hair.
Q: Can I create a headband braid with layered hair?
A: Yes, layered hair can create beautiful, textured headband braids. Use a bit more product to control shorter layers, and don’t worry if some pieces escape – this adds to the romantic, effortless look.
Q: How often should I wash my hair if I wear headband braids regularly?
A: Headband braids can extend your wash schedule by 1-2 days since they keep hair off your face and reduce oil transfer. Most people can comfortably go 3-4 days between washes when wearing protective styles like braids.