The mermaid braid has captured the attention of women everywhere, transforming ordinary hair into stunning, intricate masterpieces that turn heads wherever you go. This enchanting hairstyle combines the classic beauty of traditional braiding with a modern twist that creates volume, texture, and visual interest. Whether you’re preparing for a special event or simply want to elevate your everyday look, mastering this technique opens up a world of styling possibilities.
Many women feel intimidated by the mermaid braid’s seemingly complex appearance, assuming it requires professional skills or years of practice. The truth is much more encouraging – with the right guidance and a bit of patience, anyone can create this gorgeous style at home. The secret lies in understanding the basic mechanics and building your skills progressively, starting with simple techniques before advancing to more elaborate variations.
We’ll guide you through everything you need to know about creating beautiful mermaid braids, from gathering the right tools to troubleshooting common challenges. You’ll discover professional techniques, styling variations, and maintenance tips that will transform you from a braiding beginner into someone who can confidently create this eye-catching hairstyle. Let’s begin your journey to mastering one of the most versatile and stunning braided styles.
Understanding the Mermaid Braid Basics

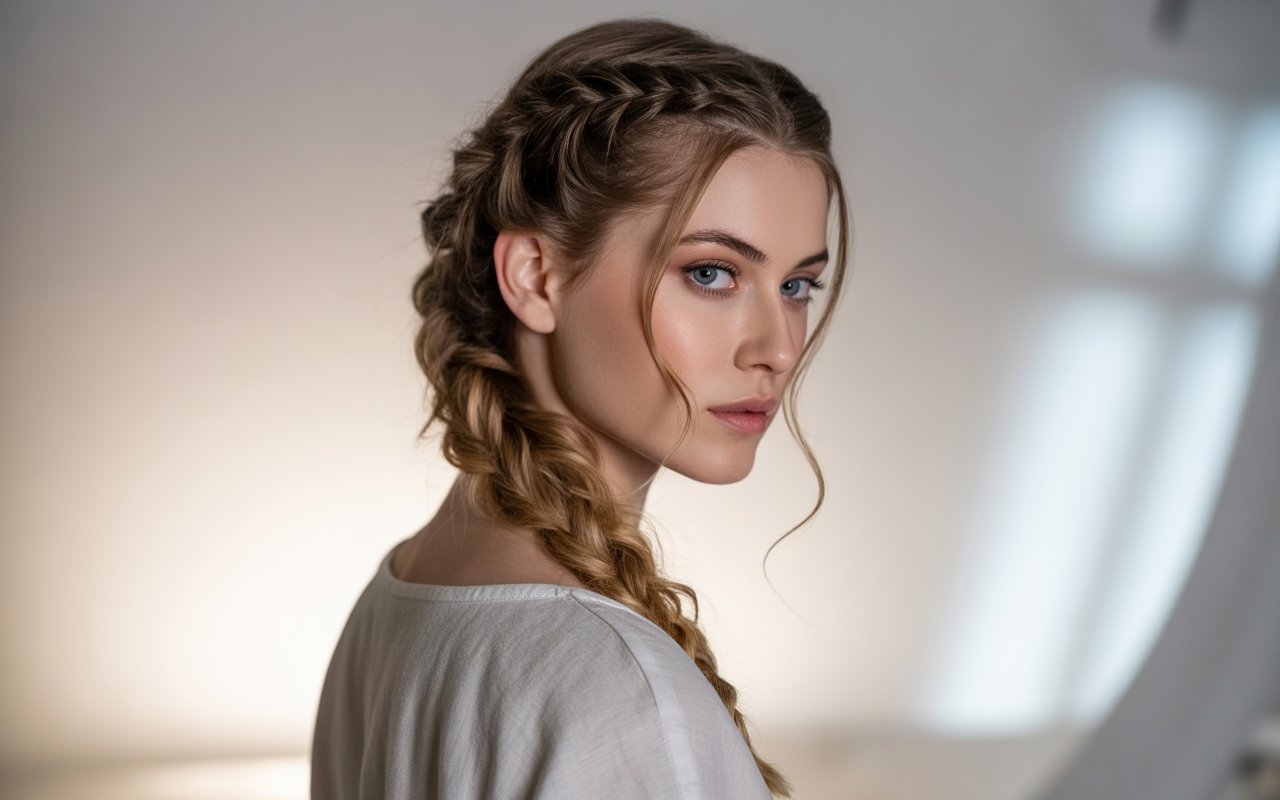
The mermaid braid stands apart from traditional braiding styles through its distinctive construction that creates an almost magical, scales-like appearance. Unlike a standard three-strand braid or even a fishtail, this technique involves pulling small sections through loops to create dimension and texture that resembles mythical mermaid tails. The result is a braid that appears far more intricate than the actual process requires.
What makes a mermaid braid unique?
The defining characteristic of this braiding style lies in its loop-through technique. Rather than simply crossing strands over each other, you create small loops and pull sections of hair through them. This method produces a cascading effect with visible texture that catches light beautifully. The braid typically starts higher on the head and incorporates hair as it moves down, creating fullness that standard braids often lack.
Essential tools and products you’ll need
Success with mermaid braiding starts with having the right supplies at your fingertips. A fine-tooth comb helps create clean sections, while a rat-tail comb proves invaluable for precise parting. Small, clear elastic bands secure your work without being visible in the finished style. Hair clips keep sections separated during the braiding process, preventing tangles and confusion.
Product selection plays a crucial role in achieving professional-looking results. A lightweight texturizing spray adds grip to slippery hair, making sections easier to handle. Smoothing serum or oil controls flyaways without weighing down your creation. Flexible-hold hairspray sets the style while maintaining movement and touchability.
Hair types that work best with this style
While mermaid braids can work on various hair types, certain textures naturally lend themselves to this technique. Medium to thick hair provides the volume needed for dramatic results. Hair with slight waves or texture holds the style better than pin-straight strands. Length matters too – hair should reach at least past your shoulders for the full effect, though creative adaptations exist for shorter lengths.
Fine or thin hair isn’t excluded from mermaid braiding success. Adding texture through curling or crimping before braiding creates the illusion of fuller hair. Dry shampoo or volumizing products at the roots provide lift and grip. Some women with finer hair find that slightly dirty hair (washed the day before) offers better hold and manageability.
Preparing your hair for braiding
Proper preparation sets the foundation for a beautiful mermaid braid that lasts. Start with clean, dry hair – wet hair stretches and can lead to uneven results. Apply a heat protectant if you plan to curl or add waves beforehand. Brush thoroughly to remove all tangles, paying special attention to the underneath sections where knots often hide.
Creating texture before braiding makes the process significantly easier. Light waves from braiding damp hair overnight or using a curling iron add grip and volume. Backcomb gently at the crown for extra height. Apply texturizing spray from mid-length to ends, scrunching lightly to activate the product.
Common mistakes beginners make
The most frequent error involves pulling sections too tightly, which creates a stiff, unnatural appearance rather than the flowing look this style demands. Beginners often struggle with consistent section sizes, leading to an uneven braid that looks lopsided. Taking too-large sections makes the signature texture less visible, while overly small pieces can make the process tedious and the result stringy.
Poor preparation accounts for many failed attempts. Skipping the texturizing step leaves hair too slippery to work with effectively. Starting with tangled hair leads to frustration and messy results. Many beginners also position their hands incorrectly, working at awkward angles that cause arm fatigue and uneven tension throughout the braid.
Step-by-Step Mermaid Braid Tutorial

Creating your first mermaid braid becomes manageable when you break down the process into clear, simple steps. This technique might feel awkward initially, but muscle memory develops quickly with practice. Position yourself in front of a mirror with good lighting, and keep all your tools within easy reach before beginning.
How to section your hair properly?
Begin by creating a deep side part or center part, depending on your preference. Use your rat-tail comb to draw a clean line from your forehead back to your crown. Separate a triangular section at the top of your head, about two inches wide at the part and tapering to a point. This forms your starting section.
Clip away the rest of your hair to prevent interference. The initial section should be substantial enough to create a good foundation but not so large that it becomes unwieldy. Comb this section smooth, ensuring no bumps or tangles remain.
Creating the foundation braid
Take your starting section and divide it into three equal parts. Begin with a regular three-strand braid for about two crosses to establish your base. This foundation provides stability for the mermaid technique that follows. Keep the tension even but not tight – you want security without pulling at your scalp.
After your foundation crosses, you’ll transition into the mermaid technique. Take a small section from the right side of your loose hair. Create a small loop with the right strand of your braid, then pull the new section through this loop. The key is keeping these additions small and even for consistent texture.
Adding hair for the mermaid effect
Continue working down your head, alternating sides as you incorporate new sections. From the left side, take another small section of loose hair. Create a loop with the left strand of your working braid and pull the new section through. This creates the signature scaled appearance.
The rhythm becomes natural with practice: loop, pull through, tighten gently, switch sides. Keep your additions uniform in size – about the width of your pinky finger works well. As you progress down your head, the braid naturally gains volume and shows more of its characteristic texture.
Maintain consistent tension throughout the process. Too loose, and your braid won’t hold its shape. Too tight, and you’ll lose the dimensional quality that makes this style special. Finding the sweet spot takes practice, but you’ll develop a feel for it quickly.
Securing and finishing techniques
Once you’ve incorporated all your hair and reached the nape of your neck, continue the mermaid technique without adding new sections. This creates a uniform look from top to bottom. Stop braiding about two inches from your ends to leave a natural, undone finish.
Secure with a clear elastic band, wrapping it multiple times for security. Gently tug at the edges of each loop to enhance the texture and create fuller appearance. This “pancaking” technique transforms a tight braid into the voluminous style you’re after. Work from bottom to top for even results.
Tips for a fuller, more dramatic look
Creating maximum impact with your mermaid braid involves several professional techniques that add volume and drama:
Pre-braid crimping: Use a crimping iron on sections before braiding for instant texture and fullness
Strategic backcombing: Tease hair at the roots before incorporating into the braid
Loop size variation: Make slightly larger loops in areas where you want more volume
Double elastics: Use two clear bands at the end for extra security during pancaking
Texture spray finishing: Apply throughout the completed braid for enhanced definition
Remember that practice makes perfect with this technique. Your first attempt might not match your vision, but each try improves your skill and confidence. Most women find they can create a beautiful mermaid braid after just three or four practice sessions.
Mastering Advanced Mermaid Braid Techniques

Once you’ve conquered the basic mermaid braid, advancing your skills opens up endless creative possibilities. Professional stylists use specific techniques to elevate this hairstyle from pretty to absolutely stunning. These advanced methods require more practice but deliver results that look like you’ve spent hours in a salon.
How to create texture and volume?
The secret to magazine-worthy mermaid braids lies in layering different texturing techniques. Start by applying mousse to damp hair, then blow-dry while scrunching sections to encourage natural movement. Before braiding, use a large barrel curling iron to create loose waves throughout your hair, focusing on mid-lengths to ends.
Professional stylists often use a technique called “brick layering” when adding sections. Instead of pulling hair straight through loops, angle your sections diagonally. This creates a more organic, dimensional appearance. Vary the size of your loops slightly – not dramatically different, but enough to avoid a manufactured look.
The “twist and pull” method adds another level of sophistication. Before pulling each section through its loop, give it a gentle twist. This creates spiral texture within the braid structure itself. The result catches light differently and appears more complex than standard techniques.
Working with different hair lengths
Shoulder-length hair requires strategic planning to achieve the mermaid effect. Start your braid higher on your head to maximize the working length. Incorporate hair more frequently but in smaller sections. This creates the illusion of length while maintaining the characteristic texture. Consider adding temporary extensions that match your hair color for special occasions.
Very long hair presents different challenges. The weight can cause the style to droop or lose shape. Combat this by creating a lighter, airier braid. Take slightly larger sections but don’t pull them completely through the loops. Leave small tails that blend with the rest of your hair. This reduces bulk while maintaining visual interest.
Medium-length hair often works best for this technique. You have enough length for the full effect without excessive weight. Focus on creating volume at the crown and maintaining even tension throughout. This length allows for the most versatility in styling variations.
Incorporating accessories and embellishments
Subtle additions can transform your mermaid braid from everyday to extraordinary. Weave thin ribbons through the loops as you create them, choosing colors that complement your outfit. Metallic threads catch light beautifully and add glamour without overwhelming the intricate texture.
Small flowers or delicate pins placed strategically throughout the braid create romantic appeal. Insert them after completing the braid, tucking stems or posts into the loops. Fresh flowers work wonderfully for special events, while silk alternatives offer longevity for photos or all-day wear.
For evening events, consider incorporating small pearls or crystals. Thread them onto clear fishing line and weave through your completed braid. The shimmer enhances the dimensional quality of the style. Hair jewelry designed specifically for braids offers another option, with pieces that clip or slide into place without damaging your work.
Creating variations for special occasions
The side-swept mermaid braid makes a stunning wedding or prom style. Begin at one temple and work diagonally across your head, incorporating hair as you move toward the opposite shoulder. This asymmetrical approach frames your face beautifully and pairs well with strapless dresses.
A crown mermaid braid creates regal appeal for formal events. Start at one ear and work across your hairline to the opposite ear, creating a braided headband effect. Leave the back hair flowing freely or gather it into a low bun. This variation works particularly well with updos and shows off statement earrings.
The double mermaid braid offers maximum impact. Part hair down the center and create two braids, one on each side. Connect them at the nape with decorative pins or merge them into a single braid. This symmetrical style suits both casual and formal occasions depending on your finishing touches.
Professional tricks for long-lasting braids
Setting your style properly ensures it lasts from morning to midnight. After completing your braid, mist thoroughly with flexible-hold hairspray. Focus on the base where loosening typically begins. Use your cool shot button if blow-drying any touch-ups to set the style without adding heat damage.
The “pinning method” provides invisible support for heavy braids. After finishing, use bobby pins that match your hair color to secure key points. Slide them horizontally into the underside of your braid at the crown, middle, and just above your elastic. This prevents drooping without visible hardware.
Consider your sleeping position to maintain overnight styles. Wrap your braid loosely in a silk scarf or use a silk pillowcase to reduce friction. For multi-day wear, refresh with dry shampoo at the roots and smoothing serum on any escaped pieces. A light misting of water reactivates styling products without completely wetting your hair.
Troubleshooting Common Mermaid Braid Issues
Even experienced braiders encounter challenges with the mermaid technique. Understanding how to identify and fix common problems saves frustration and helps you achieve professional results. Most issues stem from a few key areas that, once addressed, dramatically improve your braiding success.
Why does my braid look loose or messy?
Insufficient tension during the braiding process creates a loose, undefined appearance. The mermaid braid requires consistent, moderate tension – firmer than you might use for a casual braid but not so tight it pulls your scalp. Practice finding this balance by creating small test braids before attempting the full style.
Hair texture plays a significant role in how well your braid holds. Freshly washed, silky hair often lacks the grip needed for this technique. Adding texture through products or waiting until day two creates better conditions for braiding. Dry shampoo applied before starting adds grip without visible residue.
Section size consistency directly impacts the final appearance. Grabbing random amounts of hair creates an uneven, messy look. Use your pinky finger as a guide for uniform sections. Mark sections with clips initially if needed, removing them as you incorporate each piece.
Fixing uneven sections
Discovering uneven sections midway through your braid feels discouraging but isn’t irreversible. Stop where you notice the issue and gently loosen the previous few loops. Re-pull the sections through, adjusting their size for better balance. This works best when caught early before too much progression.
Prevention proves easier than correction. Before starting, comb all hair smooth and create a mental map of your sections. Use the point of your rat-tail comb to pre-section areas, especially around your crown where visibility is limited. Consistent hand positioning helps maintain even sections throughout.
When unevenness appears in your finished braid, strategic pancaking can minimize the appearance. Gently pull fuller sections less and smaller sections more to create visual balance. This optical illusion works surprisingly well for minor inconsistencies.
Managing flyaways and frizz
Controlling shorter pieces and baby hairs requires the right product combination. A lightweight pomade or edge control product smooths flyaways without creating greasiness. Apply with a clean toothbrush or edge brush for precise control. Work in small amounts to avoid product buildup.
Static creates additional frizz challenges, especially in dry weather. Run a dryer sheet lightly over your finished braid to neutralize static electricity. Anti-humidity hairspray creates a barrier against moisture that causes frizz. Apply from a distance to avoid wet spots that can disturb your braid’s texture.
Adjusting for different face shapes
Round faces benefit from height at the crown when creating mermaid braids. Begin your braid slightly off-center and create volume at the top before starting the technique. Leave some face-framing pieces loose to create lengthening vertical lines.
Square face shapes look best with softer placement. Start your braid lower and keep the sides fuller. This softens angular features. Pull the braid forward over one shoulder rather than letting it hang straight back.
Heart-shaped faces suit mermaid braids that begin at ear level or lower. This avoids adding width at the temples where your face is already widest. Create fullness through the length of the braid rather than at the start.
Oval faces enjoy the most versatility with this style. Experiment with different starting points and positions. You can successfully wear high, low, centered, or side variations. Focus on what complements your personal style rather than face shape limitations.
Quick fixes for braid mistakes
The “loop and hide” technique rescues sections that escaped during braiding. Take the loose piece, create a small loop, and tuck it under an existing braid section. Secure with a bobby pin matching your hair color. This works for pieces too short to incorporate properly.
When your braid appears too tight after completion, gentle massage loosens the overall effect. Starting at your scalp, use your fingertips to slightly shift the base of your braid. Work downward, creating micro-movements that relax the style without destroying its structure.
Elastic bands that slip require immediate attention. Keep extra clear elastics handy for quick replacement. Double-wrapping or using two bands provides extra security. Spraying the elastic with hairspray before applying adds grip that prevents slippage.
Styling and Maintaining Your Mermaid Braid
The longevity of your mermaid braid depends largely on how you care for it after creation. With proper maintenance techniques, this style can last several days while still looking fresh and intricate. Understanding the best practices for preservation helps you maximize the time between styling sessions.
How long can you keep a mermaid braid in?
Most women successfully wear their mermaid braid for two to three days with proper care. Hair type influences longevity – naturally textured or thicker hair typically holds the style longer than fine, straight hair. The initial construction quality also affects durability. A well-executed braid with proper tension and securing lasts significantly longer.
Your lifestyle impacts how long the style remains presentable. Active women who exercise frequently may notice loosening sooner due to moisture and movement. Office environments or less active routines allow for extended wear. Consider your weekly schedule when deciding the best day to create your braid.
Signs that indicate it’s time to remove your braid include significant loosening at the base, matting at the nape of your neck, or scalp discomfort. Leaving any braid too long can cause tangles that damage hair during removal. Listen to your scalp and remove the style if you experience persistent itching or tension.
Overnight care and protection
Protecting your mermaid braid while sleeping prevents premature loosening and frizz. A silk or satin pillowcase reduces friction that causes flyaways and disturbance to your style. If you prefer cotton bedding, wrap your braid in a silk scarf, securing it loosely to avoid pressure marks.
The pineapple method works well for mermaid braids. Loosely secure your braid on top of your head with a soft scrunchie. This prevents you from lying directly on the style while sleeping. Remove the scrunchie gently in the morning and let your braid fall naturally.
For maximum protection, try the wrapped bun technique. Coil your braid into a loose bun at your crown and cover with a silk bonnet or buff. This method works especially well for restless sleepers who change positions frequently. The key is keeping everything loose to avoid creasing.
Refreshing your braid for multiple days
Day two often requires minor touch-ups to restore your mermaid braid’s appearance. Start by smoothing any escaped pieces with a small amount of smoothing serum. Focus on the hairline and nape where loosening typically occurs first. Use your fingers rather than a brush to avoid disturbing the braid structure.
Dry shampoo becomes your best friend for multi-day wear. Spray at the roots to absorb oil and add texture. This prevents the weighted-down look that develops as natural oils distribute. Concentrate on your crown and any areas where your scalp is visible through the braid.
If loops appear deflated, carefully re-pancake them to restore fullness. Work gently to avoid pulling sections completely loose. A light misting of texture spray throughout the braid revives its appearance. Hold the bottle at least 10 inches away to avoid oversaturating any area.
Transitioning to other hairstyles
Your mermaid braid creates beautiful waves when removed, offering a completely different style option. Carefully cut the elastic and use your fingers to separate the sections. Start from the bottom and work upward to minimize tangling. The resulting waves often last another full day with minimal styling.
Transform your mermaid braid into an updo for variety. Wrap the braid around itself to create a textured bun. The existing loops and texture create visual interest without additional styling. Secure with bobby pins and pull a few face-framing pieces loose for softness.
Consider partial take-downs for versatility. Remove the bottom half of your braid while keeping the top intact. This creates a half-up style that feels fresh while requiring minimal effort. The contrast between the braided crown and loose waves looks intentionally stylish.
Products for braid longevity
Selecting the right products significantly extends your style’s lifespan. Here are essential items for mermaid braid maintenance:
Dry shampoo: Absorbs oil without water that would loosen your braid
Flexible-hold hairspray: Maintains style without stiffness or flaking
Edge control gel: Manages baby hairs and flyaways throughout wear
Silk accessories: Reduces friction during sleep and daily activities
Light oil or serum: Refreshes shine without weighing down the braid
Apply products sparingly to avoid buildup that makes hair appear dirty. Focus on problem areas rather than coating the entire braid. Morning touch-ups should take no more than five minutes once you establish a routine.
Mastering the Mermaid Braid
Mastering the mermaid braid transforms your hairstyling abilities and opens doors to countless creative possibilities. From the basic techniques you’ve learned to advanced variations and troubleshooting strategies, you now possess the knowledge to create this stunning style with confidence. Remember that every expert started as a beginner – your skills will continue developing with each attempt.
The versatility of this braiding technique means you’ll never run out of new ways to wear it. Whether you’re preparing for a special event or simply want to elevate your everyday look, the mermaid braid adapts to any occasion. The investment in learning this skill pays dividends in compliments and personal satisfaction as you perfect your technique and discover your own signature variations.
Frequently Asked Questions
Q: Can I create a mermaid braid on myself or do I need someone else to do it?
A: While having someone else braid your hair is easier, you can absolutely create a mermaid braid on yourself. Start with a side braid where you can see better, use mirrors to check your progress, and practice the hand positions until they feel natural.
Q: What’s the difference between a mermaid braid and a fishtail braid?
A: Mermaid braids use a loop-and-pull technique that creates more texture and dimension, while fishtail braids involve dividing hair into two sections and crossing small pieces over. Mermaid braids typically appear fuller and more intricate.
Q: My hair is too short for a full mermaid braid. What can I do?
A: Try creating a half-up mermaid braid using just the top section of your hair, or focus on a small side braid. You can also use clip-in extensions that match your hair color to add temporary length for special occasions.
Q: How do I prevent arm fatigue while braiding?
A: Take breaks every few minutes to shake out your arms. Keep your elbows close to your body rather than holding them up high. Sitting in a chair with good back support helps maintain comfortable positioning throughout the process.
Q: Why does my mermaid braid look different from tutorials?
A: Every person’s hair creates slightly different results based on texture, thickness, and length. Your unique braid is beautiful in its own way. Focus on consistent technique rather than matching photos exactly.
Q: Can I mermaid braid wet hair?
A: It’s best to work with dry hair since wet hair stretches and can result in an uneven braid when it dries. If you must braid damp hair, make sure it’s only slightly damp and expect some shrinkage as it dries.
Q: How do I know if I’m pulling the sections through correctly?
A: You should see distinct loops forming along the sides of your braid. Each pulled section should be visible as its own element. If everything blends together, you might be pulling too much hair through or not creating defined enough loops.
Q: What should I do if my braid starts hurting my scalp?
A: Scalp pain indicates excessive tension. Gently massage the sore areas and slightly loosen the braid at the base. If pain persists, it’s better to remove the style and try again with lighter tension rather than risk hair damage.