Your vacation photos capture memories that last a lifetime, and every detail contributes to those perfect shots. From holding up that tropical drink against a sunset backdrop to pointing at famous landmarks, your hands appear in countless travel photos. Having vacation-ready nails transforms ordinary snapshots into polished, Instagram-worthy moments that reflect the care you put into your entire travel experience.
Travel photography has evolved beyond simple documentation into an art form where aesthetics matter. Your nail design becomes part of your overall vacation style, complementing your outfits and the destinations you visit. Whether you’re gripping the rails of a scenic overlook or showcasing local cuisine, well-designed nails add that extra touch of intentionality to your travel imagery.
In the following sections, we’ll share eight vacation nail ideas that photograph beautifully while standing up to the demands of travel. From classic designs that work everywhere to destination-specific styles, these options will help you create cohesive, stunning vacation photos that you’ll treasure long after your trip ends.
- Why Your Nails Matter in Travel Photos
- Classic French Variations for Timeless Vacation Style
- Tropical and Beach-Inspired Nail Art
- Minimalist Designs That Photograph Beautifully
- Bold Statement Nails for Adventure Travel
- Matching Your Nails to Popular Vacation Destinations
- Your Perfect Vacation Nails Await
- Frequently Asked Questions
Why Your Nails Matter in Travel Photos
Think about your typical vacation photos. Your hands constantly enter the frame, whether you’re holding your passport at the airport, showcasing a beautiful meal, or adjusting your sunhat on the beach. These seemingly small details create the overall aesthetic of your travel documentation. Professional travel photographers know that cohesive styling, down to nail color, separates amateur snapshots from compelling visual stories.
The psychology of coordinated vacation aesthetics
Coordinated details signal preparation and care, qualities that translate through photos. When viewers see thoughtfully chosen nail designs that complement your destination or outfit, they perceive a more curated, aspirational travel experience. This psychological impact extends beyond social media – even personal photo albums benefit from this attention to detail.
Color theory for photogenic nails
Certain colors photograph better than others in various lighting conditions. Bright, saturated shades pop against neutral backgrounds like sand or concrete, while softer pastels complement sunset lighting beautifully. Consider your destination’s typical color palette when selecting your vacation nail design. Mediterranean destinations call for whites and blues, while tropical locations suit vibrant corals and turquoises.
Photography experts recommend avoiding ultra-dark colors in bright sunlight, as they can appear harsh or create unflattering shadows in photos. Instead, opt for colors that reflect light well, creating dimension and visual interest in your shots.
Durability considerations for travel
Travel puts your manicure through significant stress. Between handling luggage, applying sunscreen, and engaging in various activities, your nail design needs to withstand more than usual. Gel polishes offer superior durability compared to regular formulas, typically lasting two to three weeks without chipping. This longevity proves especially valuable during extended trips where salon access might be limited.
Consider the activities planned for your vacation when selecting your nail design. Beach vacations expose nails to salt water and sand, which can cause premature wear. Adventure travel might involve more physical activity that could damage intricate nail art. Choose designs and application methods that align with your itinerary to maintain photo-ready nails throughout your journey.
Classic French Variations for Timeless Vacation Style
French manicures possess an elegance that transcends trends, making them ideal for vacation photos that you’ll appreciate years later. The traditional white-tipped design has evolved into countless variations, each offering a fresh take on this classic style. Modern interpretations incorporate colors, patterns, and unexpected elements while maintaining the sophistication that makes French manicures universally flattering.
Modern twists on traditional French manicures
Contemporary French designs often feature angled or curved tip lines instead of the standard straight across application. V-shaped French tips create an elongating effect that photographs particularly well, especially when holding objects or gesturing in photos. Double French designs, incorporating two parallel tip lines in coordinating colors, add visual interest without overwhelming the overall look.
Some nail artists now create reverse French manicures, where the color appears at the base of the nail rather than the tip. This unexpected placement draws attention while maintaining the clean lines associated with French styles. These modern variations work especially well for shorter nails, which many travelers prefer for practicality.
Colored tips for destination matching
Replace traditional white tips with colors that reflect your vacation destination. Turquoise tips evoke Caribbean waters, while terracotta shades complement desert landscapes beautifully. This simple substitution maintains the French manicure’s structure while adding personality and destination-specific flair to your photos.
Gradient tips offer another variation, blending two or three colors for a sunset effect. This technique works particularly well for beach vacations, where orange, pink, and purple gradients mirror spectacular coastal sunsets. The gradual color transition photographs beautifully in both close-up shots and wider frames.
Negative space French designs
Negative space techniques leave portions of your natural nail visible, creating sophisticated patterns that photograph exceptionally well. These designs often incorporate geometric shapes or asymmetrical lines, adding modern appeal to the classic French concept. The contrast between polished and natural nail areas creates visual depth in photos.
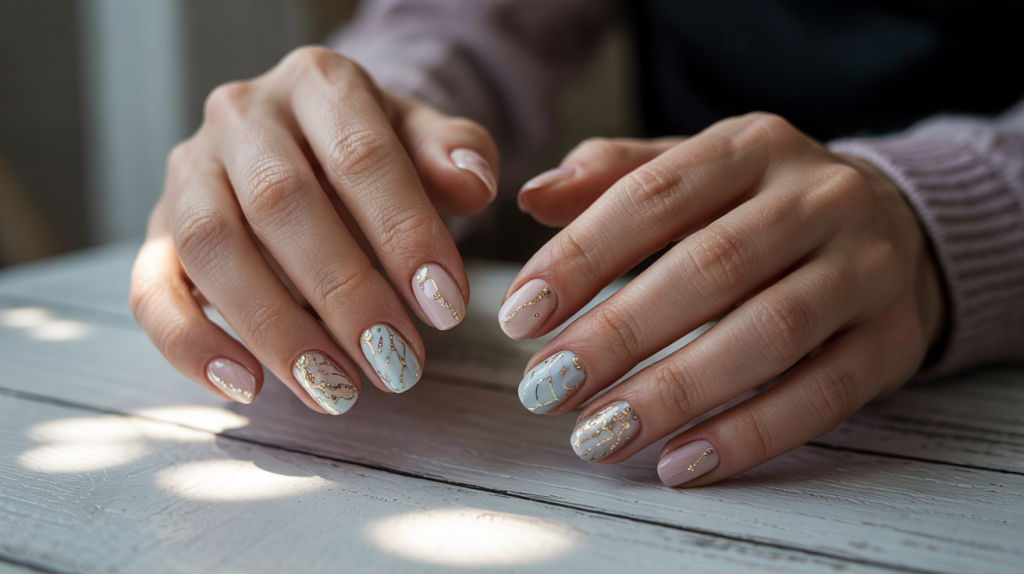
Clear or nude bases with metallic French tips offer another negative space variation. Gold or rose gold tips catch light beautifully in photos, especially during golden hour photography sessions. These metallic accents coordinate well with jewelry, creating cohesive styling throughout your vacation wardrobe.
Gel versus regular polish for longevity
The application method significantly impacts how your French manicure holds up during travel. Gel formulations cure under UV or LED light, creating a durable finish that resists chips and maintains shine for weeks. This durability proves invaluable when you want consistent-looking nails throughout your vacation photos.
Regular polish offers more flexibility for those who prefer changing their nail design mid-trip. However, it requires more maintenance and touch-ups to keep nails photo-ready. If choosing regular polish, pack a small bottle for repairs and apply a quality top coat daily to extend wear. Consider the length of your trip and access to nail salons when deciding between gel and regular applications.
Quick-dry formulas and strengthening base coats can improve regular polish longevity. These products create a more resilient manicure that better withstands travel activities. Some travelers prefer hybrid gel-polish systems that offer extended wear without requiring UV curing, providing a middle ground between traditional options.
Tropical and Beach-Inspired Nail Art
Beach destinations inspire some of the most creative and photogenic nail designs. The vibrant colors and natural motifs associated with coastal vacations translate beautifully onto nails, creating miniature works of art that complement seaside settings. These designs range from subtle nods to ocean themes to elaborate tropical scenes that become conversation starters at beach bars and poolside gatherings.
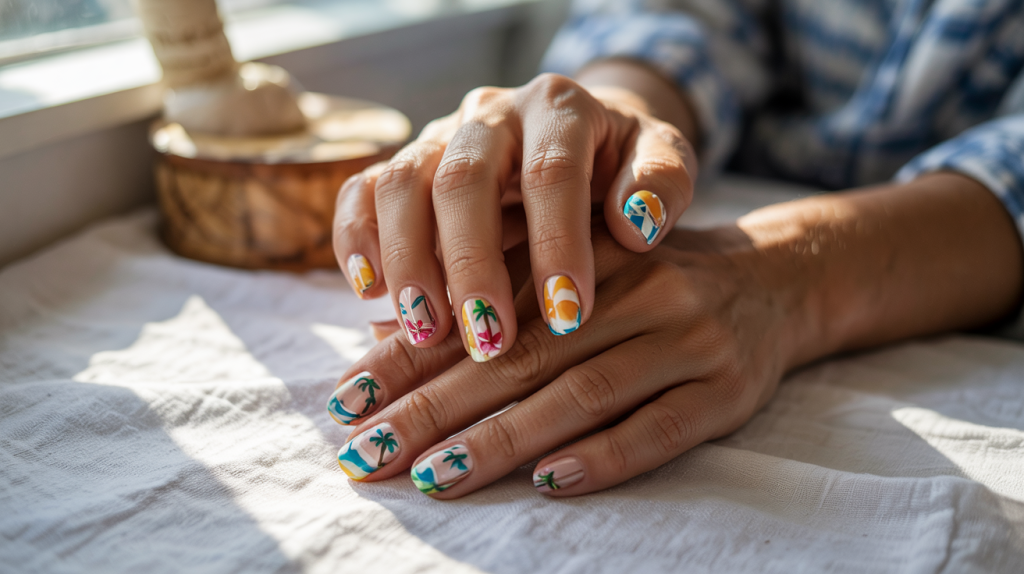
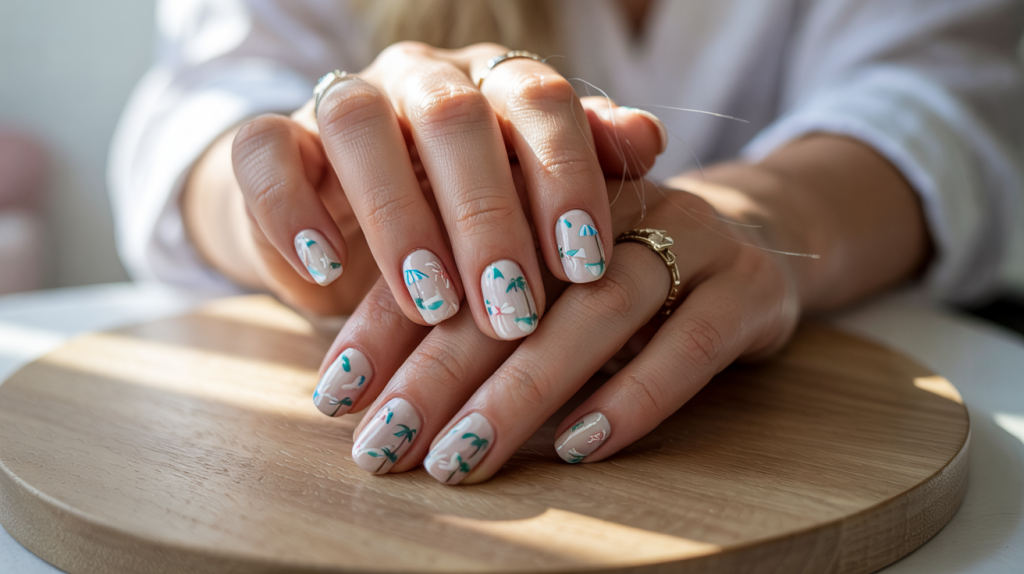
Palm tree and sunset designs
Palm tree silhouettes against gradient backgrounds create instantly recognizable tropical imagery. These designs typically feature black palm fronds against orange, pink, and purple sunset shades. The contrast photographs dramatically, especially when holding tropical drinks or posing against actual beach sunsets. Single accent nails with palm designs paired with solid complementary colors on other fingers balance detail with wearability.
Artists often incorporate multiple elements into sunset scenes, adding birds, waves, or clouds for depth. These detailed designs work best on longer nails where there’s more canvas space. For shorter nails, simplified versions using just gradient backgrounds or single palm fronds maintain the tropical theme without overwhelming small nail beds.
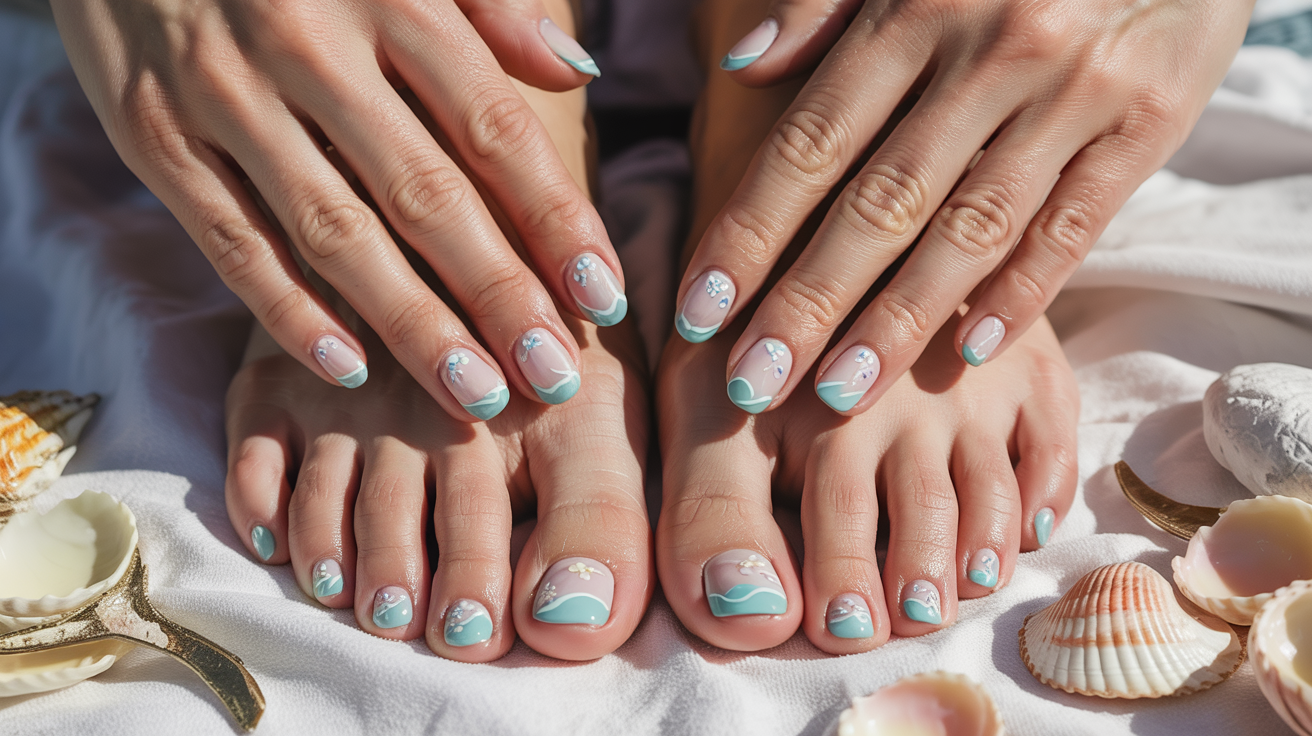
Ocean wave patterns
Wave designs capture the movement and energy of the sea through various techniques. Marbled effects using blues, whites, and teals create abstract wave patterns that photograph beautifully from any angle. These organic patterns complement beach settings without looking too literal or costume-like in photos.
Some variations include foam details using white polish dabbed along wave crests, adding dimension and realism. Glitter accents can simulate sunlight sparkling on water, creating eye-catching effects in photos. These shimmering details catch natural light beautifully, especially in outdoor beach photography.
Seashell and starfish accents
Three-dimensional seashell and starfish elements add texture and interest to beach-themed manicures. These raised designs create shadow and depth in photos, making nails appear more sculptural. Small pearls or rhinestones can simulate the iridescent quality of real shells, catching light for added photographic appeal.
Painted versions offer durability advantages over 3D elements, which might catch on clothing or bags during travel. Skilled artists can create remarkably realistic shell and starfish designs using shading and highlighting techniques. These flat designs photograph well while proving more practical for active beach vacations.
Coral and aqua color combinations
The coral-aqua color pairing epitomizes beach vacation aesthetics. These complementary shades create vibrant contrast that stands out in photos against both sand and water backgrounds. Various coral shades, from soft peach to vibrant orange-pink, pair differently with aqua tones, allowing customization based on skin tone and personal preference.
Consider these popular coral and aqua combinations for maximum photographic impact:
Soft Coral with Mint Aqua: Creates a vintage beach aesthetic perfect for retro-styled vacation photos
Bright Coral with Deep Turquoise: Offers bold contrast ideal for sunny beach days
Peachy Coral with Sky Blue: Provides subtle elegance that complements various outfit colors
Neon Coral with Electric Aqua: Makes a statement in party and nightlife photos
Metallic beach elements
Metallic accents elevate beach nail designs from casual to sophisticated. Gold leaf fragments scattered across blue bases suggest sunlight on water, while rose gold details add warmth to coral and pink beach themes. These metallic elements photograph exceptionally well, adding luxury touches to vacation imagery.
Chrome powder finishes in ocean-inspired colors create mirror-like effects that reflect surroundings in photos. These ultra-shiny finishes work particularly well for pool and yacht settings where glamour takes precedence over natural beach aesthetics. Silver chrome over blue creates a mermaid effect that’s become increasingly popular for tropical vacations.
Minimalist Designs That Photograph Beautifully
Sometimes less truly is more, especially in travel photography where busy backgrounds can compete with elaborate nail art. Minimalist nail designs offer sophistication and versatility, complementing rather than competing with scenic vacation backdrops. These understated styles photograph cleanly and maintain their appeal across various settings, from urban explorations to natural landscapes.
Single accent nail strategies
The accent nail approach allows for creativity while maintaining overall simplicity. Choose one nail per hand for detailed design while keeping others in solid, complementary colors. This technique draws attention without overwhelming photos, creating focal points that add interest to hand poses.
Ring finger accents remain popular, as this finger often features in photos showcasing engagement rings or local jewelry purchases. However, thumb or index finger accents can be equally effective, especially in photos where you’re holding objects or pointing at landmarks. The key lies in selecting accent placements that align with your typical photo poses.
Metallic accents on single nails create particularly striking effects in photos. A single gold or silver nail among nude or pastel companions catches light beautifully, adding subtle glamour to travel shots. These metallic accents coordinate well with jewelry and accessories, creating cohesive styling throughout your vacation photos.
Geometric patterns for modern appeal
Clean lines and shapes photograph exceptionally well, maintaining their impact even in busy scenic backgrounds. Triangle, stripe, and chevron patterns using contrasting colors create visual interest through simplicity. These designs scale well to different nail lengths and shapes, making them accessible regardless of your natural nails.
Nude bases with subtle details
Nude polishes that match or slightly enhance your skin tone provide the perfect canvas for minimal embellishments. Tiny dots, thin lines, or miniature symbols add personality without overwhelming the overall look. These subtle details often only become apparent in close-up shots, creating pleasant surprises when reviewing vacation photos.
Consider adding single rhinestones or metallic studs at the base of each nail for understated elegance. These minimal embellishments catch light in photos while remaining appropriate for various vacation activities. The neutrality of nude bases means these designs coordinate with any outfit or destination, providing ultimate versatility.
Negative space artistry
Strategic use of unpainted nail areas creates sophisticated designs that feel fresh and modern. Geometric cutouts, half-moon designs, and diagonal splits between painted and natural nail sections photograph with striking clarity. The contrast helps define hand positions in photos, making gestures more visually apparent.
Negative space designs work particularly well with bold colors, as the natural nail provides breathing room that prevents the look from feeling heavy. This technique also extends manicure longevity, as minor chips along the deliberate edges appear intentional rather than accidental. For travel, this forgiveness factor proves especially valuable.
These minimalist approaches suit travelers who want stylish nails without the maintenance requirements of complex designs. The simplicity allows for easy touch-ups with basic supplies, keeping nails photo-ready throughout your journey. Whether you’re capturing memories at famous monuments or intimate dinner settings, minimalist nails provide elegant accompaniment without stealing focus from the main subjects of your travel photography.
Bold Statement Nails for Adventure Travel
Adventure travel calls for nail designs as bold as your itinerary. Whether you’re zip-lining through rainforests or scaling mountain peaks, statement nails add personality to action shots and prove your attention to style extends even to extreme activities. These eye-catching designs become part of your adventure story, appearing in photos that capture both natural beauty and personal triumph.
Bright neon colors for outdoor activities
Neon shades create striking contrast against natural backgrounds, making your hands pop in outdoor photography. Electric pink, lime green, and vibrant orange stand out against forest greens, desert browns, and mountain grays. These high-visibility colors also serve a practical purpose during outdoor activities, making hand signals more visible to travel companions.
Neon gradients or ombré effects add depth while maintaining bold impact. Transitioning from hot pink to electric orange, or from neon yellow to lime green, creates sunset-like effects that complement adventure photography’s dramatic nature. These gradient designs photograph particularly well during golden hour, when natural light enhances color transitions.
Mountain and nature-inspired designs
Mountain silhouettes painted across nails celebrate adventure destinations while creating sophisticated nail art. These designs typically feature dark mountain shapes against gradient sky backgrounds, from dawn pinks to sunset purples. Snow-capped peak details using white polish add realism and dimension to these miniature landscapes.
Forest scenes incorporating tiny trees, wildlife silhouettes, or camping elements tell adventure stories through nail art. These detailed designs work best as accent nails paired with solid colors that echo the scene’s palette. Green bases with brown and black details create cohesive woodland themes perfect for hiking and camping trips.
Abstract interpretations of natural elements offer modern alternatives to literal landscape designs. Marble effects in earth tones suggest geological formations, while watercolor techniques in blues and greens evoke mountain lakes and meadows.
Map and compass motifs
Navigation themes celebrate the exploration aspect of adventure travel. Vintage map fragments painted across nails create unique designs that reference your journey’s geographic elements. These designs can incorporate actual map sections of your destination, adding personal significance to your manicure.
Compass roses make excellent accent nail focal points, symbolizing direction and discovery. These geometric designs photograph well due to their clear lines and symbolic meaning. Combining compass elements with coordinate numbers of significant locations adds meaningful detail to your adventure nail art.
Weather-resistant application techniques
Adventure activities demand extra durability from nail designs. Start with thorough nail preparation, including dehydration and primer application, to maximize polish adhesion. These preparatory steps prove crucial when nails face extreme conditions during outdoor adventures.
Builder gel or dip powder systems offer superior strength for active vacations. These methods create thicker, more resilient nail surfaces that resist breaking during physical activities. The added thickness also provides more security for nail art, preventing design elements from wearing away during adventures.
Proper sealing techniques extend manicure life during harsh conditions. Apply top coat not just over nail surfaces but also along tips and slightly under free edges. This encapsulation method prevents water and debris from lifting polish during water activities or dusty trail conditions. Reapply top coat every few days during your adventure to maintain protection and shine.
Choosing quick-dry formulas becomes especially important when doing trail repairs. Being able to quickly touch up chips and continue activities minimizes disruption to adventure schedules. Pack a small nail kit with essential supplies for maintaining your statement nails throughout your journey.
Matching Your Nails to Popular Vacation Destinations
Your destination’s signature colors and cultural aesthetics can inspire nail designs that perfectly complement your travel photos. This thoughtful coordination creates cohesive imagery that captures the essence of specific places. From the whitewashed buildings of Greek islands to the neon lights of Tokyo, destination-matched nails enhance your travel photography’s authenticity and visual appeal.
Mediterranean blues and whites
The distinctive blue and white palette of Mediterranean destinations translates beautifully onto nails. Santorini’s iconic blue domes and white architecture inspire crisp, clean designs using cobalt and pure white polish. These high-contrast combinations photograph stunningly against actual Mediterranean backdrops, creating harmony between your styling and surroundings.
Greek key patterns painted in gold over blue or white bases add cultural references to your nail art. These geometric designs require precision but create sophisticated results that elevate simple color combinations. For easier application, nail stickers or stamps can achieve similar effects with less skill required.
Adding subtle shimmer to blue polishes mimics the sparkle of Mediterranean seas in sunlight. These light-reflecting particles create dimension in photos, especially when hands appear near water or in bright daylight. Pearl or iridescent top coats over solid blues achieve this effect without overwhelming the classic color scheme.
Desert sunset palettes
Desert destinations inspire warm, earthy nail palettes ranging from pale sand to deep terracotta. These colors complement both natural desert landscapes and the adobe architecture common in these regions. Gradient designs transitioning through desert sunset shades create miniature versions of the spectacular skies these destinations are known for.
Incorporating metallic copper or bronze accents reflects the mineral richness of desert regions. These warm metallics photograph beautifully in desert light, which tends toward golden tones especially during sunrise and sunset. Geometric patterns using these metallics over neutral bases create modern interpretations of traditional desert art motifs.
City break metallics
Urban destinations call for sleek, sophisticated nail designs that match the cosmopolitan energy. Chrome finishes in silver, gold, or gunmetal complement city architecture and photograph dramatically against concrete and glass backgrounds. These mirror-like finishes reflect city lights in evening photos, adding glamour to nightlife shots.
Mixing different metallic finishes on alternating nails creates textural interest that suits the varied surfaces found in urban environments. Combining matte and shiny metallics, or mixing warm and cool metal tones, echoes the architectural diversity of city skylines.
Tropical paradise combinations
Island destinations inspire vibrant combinations of hot pink, turquoise, yellow, and green. These cheerful palettes capture the lush vegetation and colorful wildlife of tropical locations. Using all these colors together might seem overwhelming, but strategic placement creates harmony rather than chaos.
Rainbow gradient designs work particularly well for tropical destinations, incorporating multiple paradise colors in smooth transitions. These designs photograph beautifully against both beach and jungle backgrounds, complementing the natural color diversity of tropical environments. Using neon versions of tropical colors ensures your nails remain visible even in the bright, intense light common in equatorial destinations.
Fruit-inspired designs add playful elements appropriate for tropical vacations. Tiny pineapples, watermelon slices, or citrus patterns painted on accent nails reference local cuisine while maintaining vacation-appropriate whimsy. These recognizable motifs become conversation starters and add personality to travel photos without requiring professional-level nail art skills.
Your Perfect Vacation Nails Await
Creating the ideal vacation manicure involves balancing aesthetic appeal with practical considerations. The designs you’ve discovered here offer options for every travel style, from minimalist elegance to bold adventure statements. Your choice should reflect both your destination and your personal style, creating a look that enhances rather than distracts from your travel memories.
The investment in vacation-ready nails pays dividends through improved photo quality and increased confidence throughout your trip. These eight design categories provide starting points for customization based on your specific itinerary, photography goals, and maintenance preferences. Whether you opt for professional application or DIY creativity, planning your vacation nails deserves the same attention you give to outfit selection and itinerary planning.
Frequently Asked Questions
Q: How far in advance should I get my vacation nails done?
A: Schedule your appointment 1-2 days before departure. This timing allows any minor fixes if needed while ensuring maximum wear during your trip.
Q: Which nail shape photographs best in vacation photos?
A: Oval and almond shapes photograph most flatteringly, creating elegant lines that elongate fingers. Square shapes can appear stubby in photos, while stiletto nails might seem aggressive in casual vacation shots.
Q: Can I swim in the ocean with gel nail polish?
A: Yes, gel polish withstands salt water well. However, apply cuticle oil daily and avoid prolonged exposure to very hot water, which can cause lifting. Always dry hands thoroughly after swimming.
Q: What should I pack for nail emergencies during travel?
A: Pack a small nail file, clear top coat, cuticle oil, and the main polish color you’re wearing. These basics handle most minor repairs without taking much luggage space.
Q: How do I prevent my nails from yellowing in the sun?
A: Always use a UV-protective top coat and reapply every few days. Avoid leaving hands in direct sunlight for extended periods, and consider wearing fingerless gloves during long beach days.
Q: Should I match my toenails to my fingernails for vacation?
A: Coordinating creates a polished look in full-body photos, but exact matching isn’t necessary. Choose complementary colors or use the same color family for cohesion without being too matchy.
Q: What’s the best way to photograph my vacation nails?
A: Natural light provides the most accurate color representation. Position hands at angles that catch light on nail surfaces, and use props like drinks, flowers, or destination landmarks for context.
Q: How do I remove gel polish while traveling if needed?
A: Pack acetone-soaked cotton pad strips in a sealed bag, aluminum foil squares, and a cuticle pusher. This DIY removal kit takes minimal space but handles emergency removal needs.