Long nails can be a stunning accessory that instantly elevates your entire look, but for busy women juggling work, family, and social commitments, maintaining intricate nail art often feels impossible. The good news is that beautiful nail designs don’t have to require hours at the salon or complex techniques that demand professional skills. Quick nail designs specifically created for long nails can transform your fingertips into eye-catching statements in just minutes, not hours.
The modern woman needs solutions that fit into her packed schedule without sacrificing style or self-care. Your nails deserve attention even when time is scarce, and with the right approach, you can achieve salon-worthy results from your kitchen table or office desk. These designs work particularly well on long nails because the extra canvas space makes even simple patterns look more dramatic and intentional, giving you maximum impact with minimal effort.
Throughout the following sections, we’ll share seven specific nail designs that take 15 minutes or less to complete, along with practical tips for making them last through your busy week. You’ll discover which tools actually matter, which steps you can skip, and how to avoid the most common pitfalls that waste precious time. Continue reading to transform your nail routine from a time-consuming chore into a quick, enjoyable part of your self-care practice.
Why Quick Nail Designs Matter for Your Busy Schedule
The reality of maintaining long nails while managing a packed calendar often leads women to choose between bare nails or expensive salon appointments. Quick designs bridge this gap, offering a third option that respects both your time and your desire for polished fingertips. The psychological boost from well-groomed nails affects how you present yourself in meetings, social gatherings, and even during routine daily tasks.
Time-saving benefits of simple designs
Simple nail art techniques can transform plain polish into something special in under five minutes per hand. Unlike elaborate designs that require steady hands and artistic skill, quick patterns rely on basic movements anyone can master. A single stripe down the center of each nail or dots placed strategically at the base create immediate visual interest without the complexity of traditional nail art.
The beauty of these approaches lies in their forgiving nature. Small imperfections often add character rather than detracting from the overall look, especially with designs that incorporate organic shapes or abstract patterns.
Professional appearance without salon visits
Your professional image benefits significantly from maintained nails, but weekly salon appointments rarely fit into demanding work schedules. Quick designs you can refresh at home maintain that polished appearance between occasional professional manicures. The key is selecting patterns that look intentional yet effortless.
Many quick designs actually appear more sophisticated than complex nail art because they follow minimalist principles that align with contemporary professional aesthetics. A simple geometric accent on one nail per hand or subtle negative space designs convey attention to detail without appearing overly decorative for workplace settings.
Boosting confidence with minimal effort
The connection between personal grooming and confidence runs deeper than mere vanity. Taking even five minutes to apply a quick nail design signals self-care and attention to detail, which translates into improved mood and self-assurance throughout your day.
Women report feeling more put-together and capable when their nails look good, regardless of how simple the design might be. This confidence boost doesn’t require perfection – it simply requires intention and a few minutes of focused attention on yourself.
Cost-effectiveness of DIY designs
Professional nail services for long nails can cost anywhere from $30 to $100 per visit, depending on the complexity of the design and your location. Creating quick designs at home reduces this expense to just the cost of polish and basic tools, which can serve you for months or even years.
Consider these financial benefits:
- Initial Investment: Basic tools and polishes cost less than two salon visits
- Per-Design Cost: Each home design costs pennies compared to professional services
- Time Value: No travel time or waiting room delays
- Flexibility: Change designs as often as you like without additional expense
The money saved can be redirected toward occasional professional treatments for special occasions or simply toward other priorities in your busy life.
Flexibility for last-minute events
Life doesn’t always give advance notice for important occasions. Quick nail designs allow you to upgrade your appearance for unexpected dinner invitations, impromptu date nights, or surprise client meetings. Having the skills and supplies ready means you’re never caught with chipped or neglected nails when appearances matter.
Essential Tools You’ll Need Before Starting

Setting yourself up for success with quick nail designs starts with having the right tools readily available. You don’t need an extensive collection or professional-grade equipment – just a few well-chosen basics that work reliably every time. Organization and accessibility matter more than quantity when you’re working with limited time.
Basic nail care items
Before any design work begins, your long nails need proper preparation. A good nail file helps maintain shape and prevent snags that could ruin your design later. Choose a glass file or fine-grit emery board that won’t cause splitting or peeling. Cuticle oil keeps the nail bed healthy and makes any design look more professional by creating clean borders.
A buffer creates the smooth surface necessary for polish adhesion. Skip this step, and even the quickest design won’t last through your busy day. Keep these items together in a small bag or box so preparation takes seconds, not minutes spent hunting for supplies.
Quick-dry formulas and their benefits
The biggest time-waster in nail art isn’t the application – it’s waiting for polish to dry. Quick-dry formulas have revolutionized home manicures, reducing drying time from 20-30 minutes to just 2-3 minutes per coat. These formulas use special solvents that evaporate faster than traditional polish, allowing you to move through your design quickly.
Quick-dry top coats work with any polish brand, instantly hardening regular formulas while adding shine and protection. Apply thin coats rather than thick ones for fastest drying times. The slight extra cost of quick-dry products pays for itself in time saved and reduced smudging incidents.
Simple design tools for beginners
You might be surprised how many “professional” nail art effects come from household items. A toothpick creates perfect dots and can drag polish for marble effects. Clear tape produces crisp lines for geometric designs. A makeup sponge generates gradient effects that look complex but take seconds to achieve.
Specifically designed tools worth purchasing include dotting tools (though a bobby pin works just as well), thin brushes for lines, and nail art pens for precision work. Start with one or two tools and expand your collection only after mastering basic techniques. Many women find they can create dozens of designs with just a dotting tool and regular polish brush.
Organization tips for nail supplies
Efficient storage systems save precious minutes when you’re ready to create. A clear plastic organizer lets you see all polish colors at once, preventing time wasted searching for specific shades. Group supplies by frequency of use – everyday basics in front, special occasion items toward the back.
Consider creating a portable nail station using a small tray or basket. Include your most-used polishes, tools, cotton swabs, and acetone in one grab-and-go container. This mobility lets you do your nails while watching TV, sitting outside, or even during lunch breaks at work. Having everything contained also means faster cleanup, another time-saver for busy schedules.
Budget-friendly alternatives
Professional nail tools often have household equivalents that work just as well for quick designs. Before investing in specialized equipment, experiment with items you already own.
Money-saving substitutions that actually work:
- Dotting Tool: Use the rounded end of a bobby pin or a pen cap
- Striping Brush: Cut an old eyeshadow brush at an angle
- Cleanup Brush: Repurpose a small paintbrush or lip brush
- Nail Forms: Regular tape creates better lines than expensive nail vinyls
- Drying Drops: Cooking spray works similarly (though less elegantly)
These alternatives prove you don’t need expensive supplies to create beautiful designs. Focus your spending on quality base coat, top coat, and a few reliable polish colors instead.
The 7 Best Quick Long Nail Designs
Now comes the exciting part – actually creating beautiful designs on your long nails without spending hours perfecting intricate patterns. These seven designs have been specifically chosen because they maximize visual impact while minimizing time investment and skill requirements. Each can be completed in 15 minutes or less, making them perfect for morning touch-ups or evening transformations.
Classic French tips with a twist
The traditional French manicure gets a modern update that’s actually faster than the original version. Instead of carefully painting white tips, use a single piece of tape placed diagonally across each nail. Paint the exposed tip in any color – metallic gold, deep burgundy, or even black for drama. Remove the tape while polish is still wet for the crispest line.
This technique eliminates the need for steady hands or special French manicure guides. The diagonal angle looks intentional and contemporary, while the process takes less than five minutes for both hands once you’ve positioned the tape.
Minimalist dots and lines
Sophisticated doesn’t mean complicated. A single dot at the base of each nail or a thin line running vertically down the center creates immediate elegance. Use a contrasting color against a neutral base for maximum effect. The beauty lies in the simplicity – these designs look intentional rather than rushed.
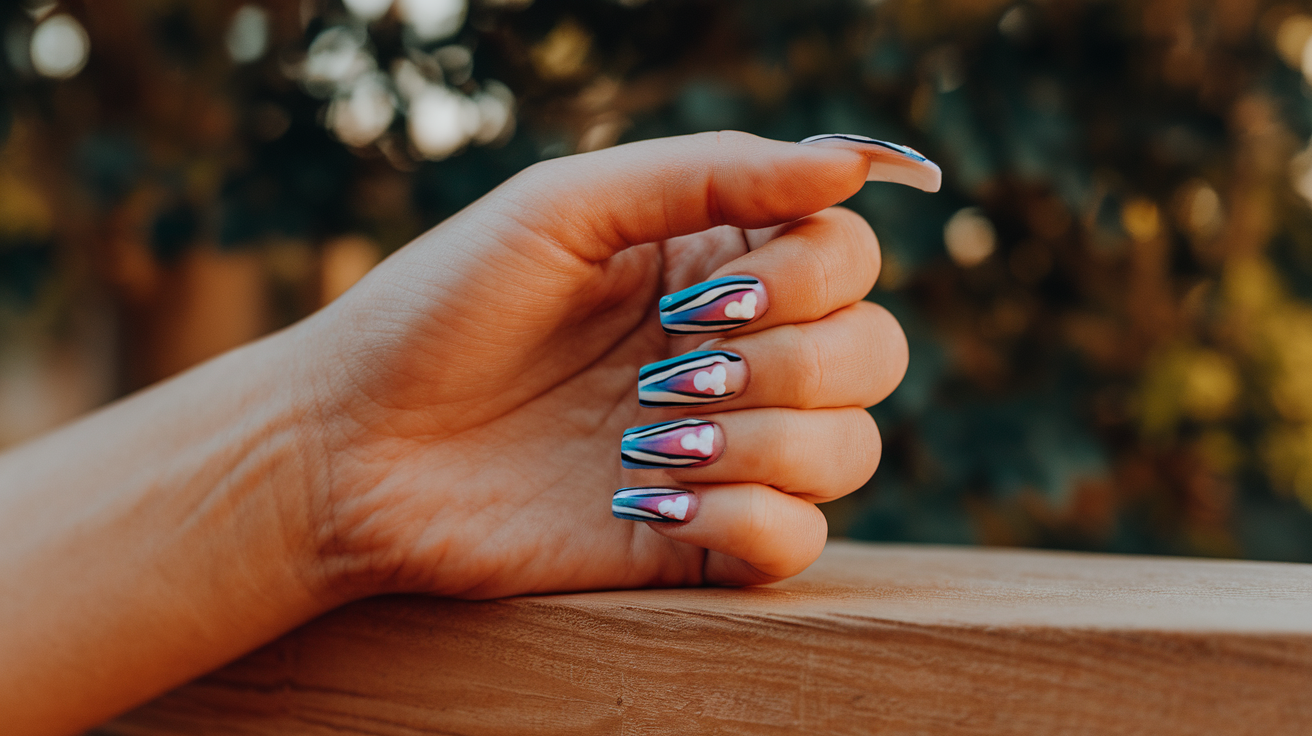
For variation, place three dots in a triangle formation on just your ring fingers while leaving other nails solid. Or create a single horizontal line across all nails at varying heights for an abstract, artistic effect. These patterns work especially well on long nails where the shapes have room to breathe.
Quick gradient effects
Gradient designs seem complex but require just a makeup sponge and two polish colors. Paint both colors in stripes on the sponge, then dab onto your nail with a gentle bouncing motion. The sponge naturally blends the colors, creating that coveted fade effect in seconds per nail.
Long nails showcase gradients beautifully because the extended length allows colors more space to transition. Start with similar shades for subtle elegance or choose contrasting colors for bold statements. Clean up excess polish around the edges with a cotton swab dipped in remover, and you’re done.
Single accent nail designs
Sometimes less truly is more. Paint all nails in one solid color, then add detail to just one nail per hand – typically the ring finger. This accent nail might feature glitter, a different color, or a simple pattern like stripes or dots. The focused approach means you’re only creating detailed work on two nails instead of ten.
This strategy works particularly well for busy women because if the accent nail chips or smudges, you can quickly redo just that one nail rather than starting over completely. Popular accent options include metallic polish over a matte base or a glitter topcoat creating texture contrast.
Negative space patterns
Leaving portions of your natural nail visible creates modern, artistic designs with minimal effort. Apply tape or nail stickers in geometric shapes, paint over everything, then remove the barriers to reveal bare nail beneath. The contrast between polished and natural creates visual interest without requiring artistic skill.
These designs tend to last longer than full coverage because there’s less polish to chip. They also grow out more gracefully, maintaining their appearance even as your nails lengthen. Try a simple triangle at the base of each nail or parallel lines creating striped effects.
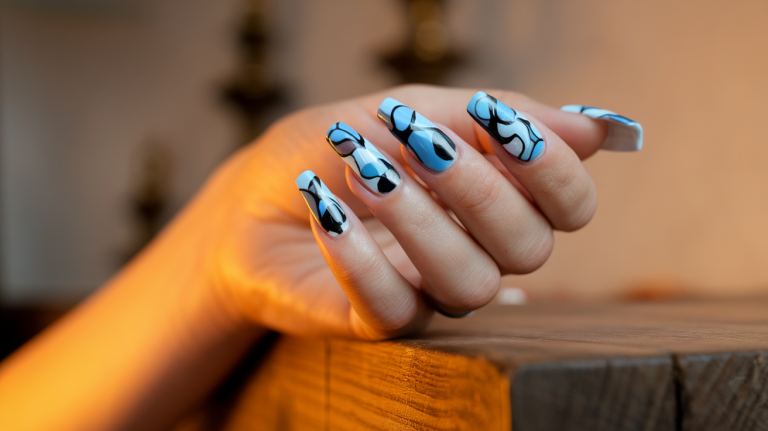
Simple geometric shapes
Geometric designs look impressive but rely on basic shapes anyone can create. Use tape to section off triangles, squares, or diagonal sections. Paint each section a different color or alternate between two shades for a modern, architectural look. The key is choosing colors that complement rather than clash.
Long nails provide the perfect canvas for geometric patterns because the shapes have space to make an impact. Even a single triangle in the corner of each nail or a half-moon at the base creates sufficient interest. These designs photograph beautifully for social media while taking minimal time to execute.
Easy marble effects
Marble patterns appear complex but require just a few drops of polish in water and a toothpick. Fill a small cup with room temperature water, drop different polish colors onto the surface, swirl gently with a toothpick, then dip your nail through the pattern. The polish adheres instantly, creating unique marble veining on each nail.
While this technique seems messy, covering your finger with tape beforehand makes cleanup simple. Each nail takes about one minute including prep and cleanup. No two nails will look identical, but that’s part of the charm – real marble isn’t uniform either. This design particularly suits long nails because the extended surface shows off more of the intricate pattern.
How to Make Your Quick Designs Last Longer
Creating beautiful nail designs quickly is only half the battle – making them survive your busy lifestyle requires smart strategies and proper technique. The longevity of your nail art depends more on preparation and protection than on the complexity of the design itself. With the right approach, even the simplest patterns can last a full week or more.
Proper nail preparation techniques
The foundation for long-lasting nail designs starts before any polish touches your nails. Clean nails free of oils and debris allow polish to adhere properly. Wipe each nail with polish remover even if no previous polish exists – this removes natural oils that prevent proper bonding.
Push back cuticles gently rather than cutting them. Cutting creates rough edges where polish can lift and chip. A gentle push with an orange stick or cuticle pusher creates the clean nail bed necessary for professional-looking results. Buff the nail surface lightly to create slight texture for polish grip, but avoid over-buffing which weakens nails.
Dehydrate nails with rubbing alcohol or white vinegar before applying base coat. This final prep step removes any remaining moisture or oils, creating the ideal surface for polish adhesion. Simply swipe each nail with a cotton pad soaked in alcohol, wait 30 seconds for evaporation, then proceed with your base coat. This single step can double the lifespan of your design.
Choosing the right base and top coats
Base coat serves as both protector and primer, preventing staining while helping polish adhere. Invest in quality here – a good base coat makes more difference than expensive color polish. Look for formulas that specify long-wear or extended-wear properties. Some base coats include strengtheners that benefit long nails prone to breaking.
Top coat seals and protects your design while adding shine. Quick-dry varieties save time, but traditional formulas often provide better protection. Apply top coat not just over the nail surface but also across the free edge – this “capping” technique prevents chips from starting at tips where wear typically begins.
Reapply top coat every 2-3 days to refresh shine and add protection. This 30-second maintenance extends your manicure significantly. Keep a small bottle in your purse or desk drawer for quick touch-ups that prevent minor chips from becoming major problems.
Daily maintenance tips
Your daily habits affect nail longevity more than you might realize. Wearing gloves while cleaning protects both your nails and your design from harsh chemicals and excessive water exposure. Keep multiple pairs – kitchen gloves for dishes, garden gloves for outdoor work, and disposable gloves for heavy cleaning tasks.
Apply cuticle oil nightly to maintain nail flexibility and prevent polish from becoming brittle and prone to cracking. The oil also keeps the skin around your nails healthy, maintaining the overall polished appearance of your manicure. Massage the oil into nails and surrounding skin for 30 seconds per hand.
Type with finger pads rather than nail tips when possible. This small adjustment prevents the repetitive impact that causes tip wear and eventual chipping. Similarly, use tools rather than nails for opening cans, peeling stickers, or other tasks that stress the nail edge.
Protecting your designs during activities
Strategic planning around your schedule protects fresh nail designs. Avoid swimming pools for 24 hours after application – chlorine weakens polish bonds even after drying. Schedule manicures for evenings when you can avoid water exposure for several hours.
During exercise, consider wearing lightweight gloves for weight training or activities involving gripping equipment. The gloves prevent polish from chipping due to pressure and friction while providing better grip anyway. For yoga or pilates, be mindful of floor poses where nails might catch on mats.
High-risk activities for nail designs and solutions:
- Gardening: Always wear thick gloves, even for light weeding
- Cooking: Use tools instead of nails for food prep tasks
- Cleaning: Double-glove for protection against chemicals
- Exercise: Wrap fingers with athletic tape for contact sports
- Swimming: Apply extra top coat before water exposure
These precautions might seem excessive, but a few seconds of prevention saves the time and frustration of redoing damaged designs. Building protective habits ensures your quick nail art investment pays off through extended wear.
Quick touch-up strategies
Even with excellent care, minor chips or smudges happen. Having a rapid repair strategy prevents small issues from requiring complete do-overs. Keep a small kit with your base color, top coat, and a cleanup brush readily accessible for emergency fixes.
For tiny chips, dab a small amount of matching polish directly onto the damaged area using a toothpick or thin brush. Don’t try to paint over the entire nail – this creates uneven texture. After the patch dries, apply top coat over the entire nail to blend the repair. This fix takes less than one minute and extends your manicure several more days.
When time permits, refresh your accent nails or add new details to distract from minor wear on other nails. Adding dots, lines, or glitter to aging designs gives them new life without starting from scratch. This approach particularly suits busy women who can spare five minutes but not thirty for full nail maintenance.
Common Mistakes to Avoid When Creating Quick Designs
Understanding what not to do saves as much time as learning proper techniques. These common errors frustrate beginners and waste precious minutes that busy women can’t afford to lose. By recognizing and avoiding these pitfalls, you’ll achieve better results faster and with less frustration.
Rushing the drying process
The temptation to move on quickly after applying polish leads to more wasted time than any other mistake. Smudged designs require complete removal and starting over, turning a 10-minute manicure into a 30-minute ordeal. Even quick-dry formulas need proper curing time to achieve full hardness.
Cold water doesn’t actually speed drying despite popular belief. It might harden the surface layer, but underneath remains soft and vulnerable to denting. Instead, apply thin coats that genuinely dry faster than thick ones. Two thin coats last longer and dry quicker than one thick coat that never properly cures.
Allow at least 60 seconds between coats, even with quick-dry formulas. This patience prevents the dreaded “bubbling” that occurs when air trapped between layers creates bumps and eventual peeling. Set a timer if necessary – those 60 seconds of waiting save the 15 minutes required to fix bubbled polish later.
Skipping essential prep steps
The excitement of creating designs makes it tempting to skip preparation, but this shortcut guarantees short-lived results. Polish applied to unprepared nails peels within days, sometimes hours. The five minutes saved by skipping prep costs much more time when designs fail prematurely.
Filing nails in both directions creates invisible micro-tears that lead to breaks and snags. Always file in one direction, from outside edge toward center. This technique takes no additional time but dramatically improves nail strength and polish adhesion. Long nails especially benefit from proper filing technique since their length makes them more vulnerable to damage.
Forgetting to push back cuticles leaves an uneven surface where polish pools and lifts. Even the quickest designs look amateur when cuticles aren’t properly managed. This step takes literally 30 seconds per hand but makes the difference between professional and sloppy results.
Using incompatible products
Not all nail products play nicely together. Mixing brands can cause unexpected chemical reactions that ruin designs. Oil-based and water-based formulas particularly clash, causing polish to separate, bubble, or refuse to dry properly.
Quick-dry top coats can cause regular polish to shrink and crack if applied too soon. Wait until color coats are at least tacky to touch before applying quick-dry products. This compatibility issue catches many women off guard, ruining otherwise perfect designs.
Some base coats don’t work well with certain polish formulas, causing peeling or discoloration. When you find a combination that works, stick with it. Testing new products when you’re rushed leads to disappointing results and wasted effort.
Overcomplicating simple designs
The pressure to create Instagram-worthy nails leads many women to attempt designs beyond their skill level or time constraints. Starting with complex patterns guarantees frustration and usually results in settling for plain nails after multiple failed attempts.
Simple designs executed well always look better than complicated attempts gone wrong. A single, perfectly placed dot makes more impact than wobbly attempts at intricate flowers. Master basic techniques before advancing to complex patterns.
The extra length of long nails might seem to demand elaborate designs, but simplicity often showcases their beauty more effectively. Let the nail length itself be the statement while keeping designs minimal and elegant.
Ignoring nail health basics
Focusing solely on appearance while neglecting nail health creates problems that no amount of polish can hide. Damaged, brittle nails won’t hold any design well, regardless of technique or products used.
Regular moisturizing prevents the brittleness that causes breaks and peeling. Healthy nails provide a better canvas for designs and require less maintenance overall. Take vitamins if necessary – biotin and vitamin E particularly support nail strength.
Using nails as tools weakens them and ruins designs simultaneously. Opening soda cans, scraping stickers, or prying open containers should never involve your nails. These habits not only damage current designs but compromise nail health long-term.
Chemical exposure without protection deteriorates both nail structure and polish integrity. Household cleaners, acetone-based products, and even frequent hand sanitizer use strip natural oils and weaken polish bonds. Brief exposure is unavoidable, but prolonged contact requires protective measures.
Your Quick Nail Journey Starts Now
Maintaining beautiful long nails no longer requires choosing between time-consuming salon visits and naked, neglected nails. These seven quick designs prove that stunning nail art fits into even the busiest schedules. With just 15 minutes and basic tools, you can create professional-looking designs that boost your confidence and complete your polished appearance. The techniques you’ve learned work whether you’re preparing for an important presentation, a spontaneous dinner date, or simply wanting to feel put-together during your daily routine.
The key to success lies in preparation, practice, and choosing designs that match your skill level and available time. Start with the simplest patterns and gradually build your confidence and speed. Your long nails deserve to be showcased, and now you have the knowledge to make that happen efficiently. Pick one design from this guide, gather your supplies, and transform your nails today – your future self will thank you for taking these few minutes of self-care.
Frequently Asked Questions
Q: How can I make my nail designs dry faster when I’m really pressed for time?
A: Apply very thin coats rather than thick ones, use quick-dry drops or spray specifically made for nails, and run cool air from a fan over your nails. Avoid hot air from hair dryers, which can cause bubbling and actually slow the curing process.
Q: What’s the best quick design for someone who has never done nail art before?
A: Start with a single dot accent using a bobby pin or toothpick. Paint all nails one color, then add a contrasting dot at the base of each ring finger nail. This takes less than 5 minutes total but looks intentional and polished.
Q: Can I create these quick designs on natural long nails or do I need acrylics?
A: All these designs work perfectly on natural long nails. In fact, natural nails often hold polish better than acrylics because they’re slightly porous, allowing better adhesion. Just ensure your natural nails are healthy and properly prepped.
Q: How do I fix a smudge without starting completely over?
A: Lightly lick your finger (strange but effective) and very gently smooth the smudge while the polish is still tacky. Once dry, apply a thin layer of the same color over that nail only, then top coat. This works for minor smudges but won’t fix deep dents.
Q: Which quick design lasts the longest without touch-ups?
A: Negative space designs typically last longest because there’s less polish to chip and they grow out more gracefully. The exposed natural nail also means minor tip wear is less noticeable than with full coverage designs.
Q: What should I do if my long nails keep breaking before I can design them?
A: Focus on nail health first by taking biotin supplements, using strengthening base coats, and keeping nails moisturized with cuticle oil. File them slightly shorter temporarily while building strength, then grow them out gradually.
Q: Can I layer different quick designs or should I stick to one?
A: Layering works well when you keep it simple. For example, combine a French tip with a single accent dot, or add subtle lines to a gradient. Avoid combining more than two techniques to prevent the design from looking chaotic.
Q: How often should I completely remove polish versus just touching up?
A: Remove everything and start fresh every 7-10 days to prevent yellowing and allow nails to breathe. Between full changes, you can touch up chips and refresh top coat every 2-3 days to extend wear.