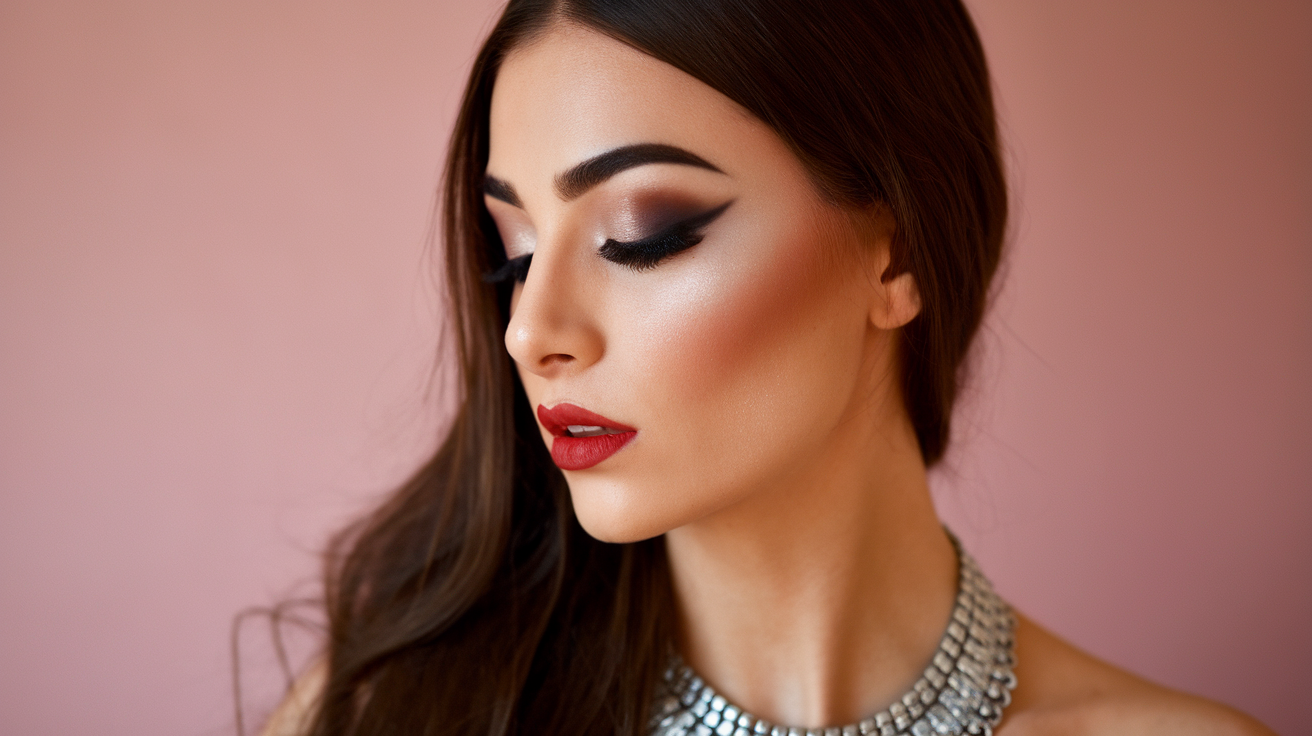
Glam makeup transforms your everyday appearance into something spectacular, turning ordinary features into red-carpet worthy looks. This style of makeup goes beyond basic coverage and subtle enhancement, creating dramatic eyes, sculpted cheekbones, and luminous skin that catches light from every angle. Women across social media platforms showcase their transformations daily, proving that professional-level glamour isn’t reserved for celebrities or special occasions anymore.
The beauty of glam makeup lies in its ability to make you feel confident and powerful. Whether you’re preparing for a wedding, heading to a night out, or simply want to experiment with bolder looks, mastering the techniques opens up endless possibilities for self-expression. This particular style requires specific products, tools, and methods that differ significantly from your morning routine, but the results justify the extra effort and time investment.
Let’s walk through six straightforward steps that will help you achieve that coveted glam appearance. From preparing your skin properly to adding those final touches that pull everything together, you’ll discover how to create looks that photograph beautifully and last throughout your event. Continue reading to learn the professional techniques that makeup artists use to create show-stopping results.
What Makes a Makeup Look Truly Glam?
The distinction between everyday makeup and glam lies in intensity, precision, and strategic product layering. Glam makeup creates dimension through careful color placement, building coverage where needed while maintaining skin that looks healthy rather than masked. This style emphasizes features through contrast and light manipulation, using techniques that photograph exceptionally well under various lighting conditions.
Key Elements That Define Glamorous Makeup
Full coverage foundation forms the cornerstone of any glam look, creating an even canvas that appears flawless in photos and real life. Unlike daily makeup routines where you might spot-conceal or use tinted moisturizer, glam requires uniform coverage that eliminates all imperfections. The goal isn’t to look like you’re wearing heavy makeup, but rather to achieve skin that appears naturally perfect.
Eye makeup takes center stage in glam applications. Multiple eyeshadow shades blend together seamlessly, creating depth and drama that draws attention upward. Where everyday looks might use two or three colors, glam often incorporates five or more shades, including transition colors, deep defining shades, and shimmery highlights. The precision required for this type of application means taking extra time to blend edges until no harsh lines remain visible.
Understanding Product Selection
Professional-quality products make a significant difference in achieving authentic glam results. While drugstore options can work, certain categories benefit from higher-end formulations. Eyeshadows need strong pigmentation and minimal fallout, foundations should offer buildable coverage without caking, and setting products must lock everything in place for hours.
The tools you use matter just as much as the products themselves. Dense brushes pack on color intensity, while fluffy brushes blend seamlessly. Beauty sponges create airbrushed foundation finishes that fingers or flat brushes can’t replicate. Having the right implements transforms application from frustrating to effortless.
Lighting and Environment Considerations
Creating glam makeup requires excellent lighting to see every detail clearly. Natural daylight provides the most accurate color representation, but ring lights or well-positioned vanity bulbs work wonderfully too. Poor lighting leads to uneven blending, mismatched foundation, or overdone application that looks harsh in different settings.
Your workspace organization impacts the final result more than you might expect. Having products arranged logically, brushes clean and accessible, and adequate mirror positioning prevents rushed decisions or skipped steps. Professional makeup artists prepare their stations meticulously for good reason – chaos in your environment translates to chaos on your face.
Time Investment and Realistic Expectations
A proper glam look requires 45 minutes to an hour for most women, sometimes longer when you’re learning. This isn’t a routine you’ll master immediately. Each element builds upon the previous one, and rushing any step compromises the entire look. Planning adequate time prevents stress and allows you to enjoy the transformation process.
Practice makes perfect with glam techniques. Your first attempts might feel overwhelming or produce results that seem too heavy. As you repeat the process, muscle memory develops, and you’ll understand how products work with your specific features. Every face shape, eye shape, and skin type requires slight adjustments to standard techniques.
How to Prep Your Skin for Flawless Glam?
Skin preparation determines whether your glam makeup looks professional or amateur. The most expensive foundations and concealers can’t compensate for poorly prepped skin. Dry patches, excess oil, and uneven texture all become magnified under full coverage products. Taking extra steps before applying any makeup ensures your base looks smooth, hydrated, and ready for hours of wear.
Essential Cleansing Steps
Starting with completely clean skin means removing every trace of previous products, oils, and environmental debris. Double cleansing works particularly well – first using an oil-based cleanser or micellar water to break down existing makeup and sunscreen, then following with a gentle foam or gel cleanser. This two-step process ensures nothing interferes with your fresh application.
Pay special attention to areas where makeup tends to separate first. The sides of your nose, chin creases, and hairline often harbor residual products or oils that cause new makeup to break down prematurely. Using lukewarm water rather than hot prevents stripping natural oils that keep skin balanced throughout the day.
Exfoliation Techniques for Smooth Application
Gentle exfoliation removes dead skin cells that create uneven texture under makeup. Chemical exfoliants containing AHA or BHA work more effectively than physical scrubs for pre-makeup prep, dissolving dead cells without creating micro-tears or irritation. Apply these products with clean hands, focusing on areas prone to dryness or flaking.
Timing matters when incorporating exfoliation. Doing this step the night before works best for sensitive skin, allowing any potential redness to subside overnight. For normal to oily skin types, exfoliating 30 minutes before makeup application provides immediate smoothing benefits. Always follow product instructions regarding frequency – over-exfoliation causes more texture issues than it solves.
The T-zone typically needs different attention than cheeks or jaw areas. Combination skin benefits from targeted exfoliation, using stronger formulas on oily zones while treating dry areas more gently. This customized approach prevents irritation while ensuring uniform texture across all facial zones.
Moisturizing for Long-Lasting Wear
Hydration creates the plump, smooth surface that glam makeup requires. Even oily skin needs moisture – skipping this step actually triggers excess oil production that breaks down makeup faster. Choose formulas based on your skin type, but ensure they absorb completely before moving forward.
Layering hydrating products provides better results than relying on one heavy cream. Start with a hydrating serum or essence, particularly one containing hyaluronic acid that draws moisture into skin cells. Follow with a lightweight moisturizer that seals in the serum’s benefits without creating a greasy film.
Consider these hydration tips for different skin concerns:
Dry Skin: Apply a facial oil before moisturizer for extra nourishment
Oily Skin: Use gel-based or water-cream formulas that hydrate without heaviness
Sensitive Skin: Choose fragrance-free options with calming ingredients
Mature Skin: Layer peptide serums under rich moisturizers for plumping effects
Primer Selection and Application
Primer bridges the gap between skincare and makeup, creating a smooth barrier that helps products adhere better and last longer. Different primers address specific concerns – pore-filling versions smooth texture, illuminating formulas add glow, and mattifying options control oil. Some women benefit from using multiple primers on different facial zones.
Application technique affects primer performance significantly. Rather than rubbing primer across your face like moisturizer, press it gently into skin using patting motions. This method fills pores and fine lines more effectively while preventing the primer from balling up or creating patchiness. Focus extra product on areas where makeup typically fades first.
Waiting two to three minutes after primer application allows the formula to set properly. This pause might feel unnecessary when you’re eager to continue, but it prevents foundation from sliding around during application. Use this time to prepare your other products, clean brushes, or perfect your workspace setup.
Creating the Perfect Glam Base
Foundation application separates amateur attempts from professional-looking glam makeup. The goal isn’t simply covering imperfections but creating dimensional skin that looks healthy and luminous. Building coverage strategically while maintaining skin-like texture requires specific techniques and patience. Your base sets the stage for every other element, making this step crucial for overall success.
Foundation Selection and Application Methods
Choosing foundation for glam differs from selecting your everyday formula. You need something with fuller coverage potential that still looks natural in various lighting. Long-wearing formulas prevent breakdown during extended wear, while buildable coverage allows customization for different facial areas. Testing foundation on your jawline in natural light ensures the best color match.
The application method you choose dramatically impacts the final appearance. Beauty sponges dampened with setting spray create an airbrushed finish that melts into skin. Start with small amounts of product, dotting foundation across your face before blending. This prevents waste and allows better control over coverage levels.
Working in sections produces more even results than attempting to blend your entire face simultaneously. Start with one cheek, perfect that area, then move to the next section. This systematic approach ensures thorough blending without missing spots or creating streaks. Natural light or a well-lit mirror helps identify any areas needing additional attention.
Foundation shouldn’t look the same thickness everywhere. Your T-zone might need fuller coverage while cheeks require less product to maintain dimension. Building thin layers achieves better results than applying one thick coat. Each layer should be completely blended before adding more, preventing that cakey appearance that plagues many glam attempts.
Strategic Concealer Placement
Concealer in glam makeup goes beyond covering dark circles. Strategic placement brightens specific areas, creating the lifted, awake appearance that defines this style. Using concealer one to two shades lighter than your foundation adds dimension while covering imperfections completely.
The inverted triangle technique under eyes remains popular for good reason. Drawing triangles with the point toward your cheeks, then blending outward and upward, lifts the entire eye area. This method covers darkness while creating a highlighting effect that opens up your face. Extend coverage to inner corners where shadows naturally fall.
Additional concealer placement enhances your bone structure before you even reach for contour products. Apply concealer down the bridge of your nose, creating a slimming effect. Dot some on your chin’s center to bring it forward. Place small amounts on your forehead’s center and blend outward for added dimension. These strategic highlights work with your contour to sculpt features dramatically.
Setting each concealer area immediately after blending prevents creasing and movement. Using a small, dense brush to press translucent powder into concealed areas locks everything in place. Focus particularly on under-eyes where product tends to settle into fine lines throughout the day.
Powder Techniques for Longevity
Setting powder serves multiple purposes in glam makeup beyond preventing shine. The right powder application creates a smooth canvas for additional products while ensuring your base lasts through photos, dancing, and long events. Different powder types suit different skin types and desired finishes.
Baking, a technique popularized by drag performers and adopted by mainstream makeup artists, involves applying generous amounts of loose powder to areas prone to creasing or fading. Let the powder sit for five to ten minutes while your body heat “bakes” it into the foundation and concealer underneath. After waiting, dust away excess with a fluffy brush, revealing creaseless, long-lasting coverage.
Not every area needs the same powder treatment. T-zones typically require more powder to control oil, while dry areas benefit from minimal application. Using different brushes helps control powder placement – dense brushes pack powder for baking, while fluffy brushes provide light, all-over setting.
Contour and Highlight Basics
Contouring creates shadows that define and reshape facial features, while highlighting brings forward areas you want to emphasize. These techniques transform flat, one-dimensional foundation into sculpted, photogenic skin. Cream products applied before powder or powder products applied after setting both work well, depending on your preference and skin type.
Contour placement depends entirely on your face shape and desired effect. Generally, contouring the hollows of cheeks, temples, jawline, and sides of the nose creates classic definition. Using cool-toned products mimics natural shadows better than warm browns that can appear muddy. Blend thoroughly – harsh contour lines immediately identify amateur application.
Highlighting requires restraint to avoid looking greasy rather than glowing. Focus on high points where light naturally hits: cheekbone tops, nose bridge, cupid’s bow, and brow bones. Layering cream and powder highlights creates intense glow perfect for photography. Start subtle and build intensity gradually until you achieve your desired level of radiance.
The key to natural-looking contour and highlight lies in blending boundaries until they disappear. No one should see where contour ends and foundation begins. Use clean brushes or sponges to soften edges, working in circular motions that diffuse harsh lines. Step back from your mirror frequently to assess overall balance and ensure features look sculpted rather than painted.
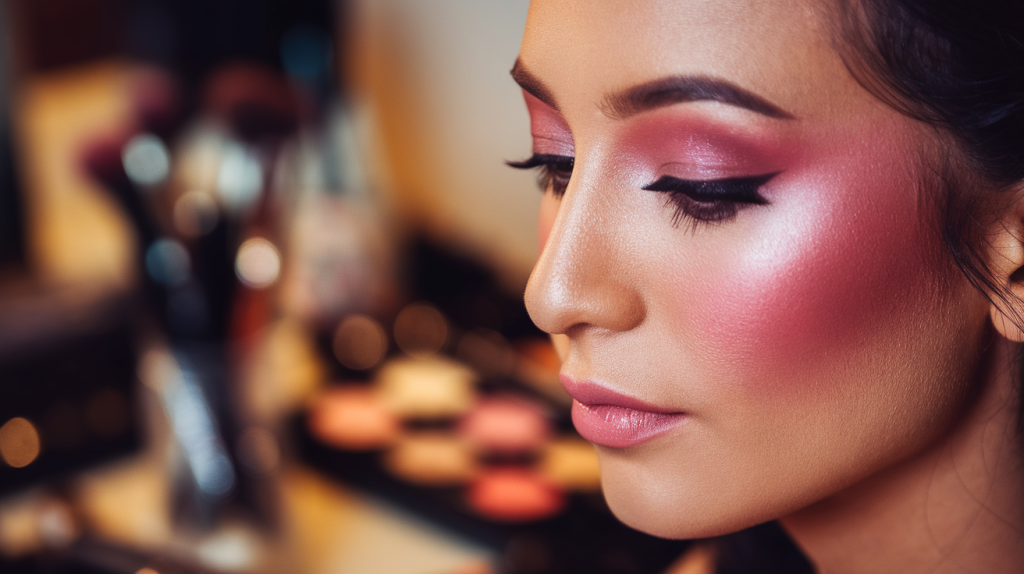
What Eye Makeup Techniques Define Glam?
Eyes command attention in any glam makeup look, requiring more time and precision than any other feature. The dramatic difference between everyday eye makeup and glam lies in color intensity, blend quality, and overall impact. Multiple products layer together creating depth, dimension, and drama that photographs beautifully while maintaining wearability throughout your event.
Color Selection and Placement Strategy
Choosing eyeshadow colors for glam involves considering your eye color, outfit, and desired mood. While neutral browns and champagnes work universally, adding unexpected pops of color creates memorable looks. Warm-toned shadows complement most skin tones, but cool-toned grays and silvers create striking contrast on warm complexions.
Your eye shape determines optimal color placement. Hooded eyes benefit from keeping dark colors closer to the lash line, while prominent eyes can handle dark shades across the entire lid. Deep-set eyes pop with lighter shades on the lid and darker colors in the crease. Understanding your anatomy prevents frustration and produces more flattering results.
Building color gradually produces better outcomes than attempting full intensity immediately. Start with transition shades slightly deeper than your skin tone, blending these through and above your crease. This creates a gradient that makes subsequent colors blend more easily. Add medium-toned shades to define the crease, then deepen outer corners for dimension.
Professional Blending Techniques
Blending separates mediocre eye looks from stunning ones. The goal involves creating seamless color transitions where you can’t identify where one shade ends and another begins. This requires patience, proper brushes, and understanding of how different formulas work together.
Circular motions with a clean blending brush soften harsh lines between colors. Work in small sections rather than aggressive sweeping motions that can muddy colors together. Adding transition shade to your blending brush helps marry different colors naturally. Think of blending like painting – you’re creating a gradient, not just mixing colors.
Windshield wiper motions work particularly well for crease definition. Moving your brush back and forth in small arcs deepens the crease while maintaining control. This technique prevents color from traveling too far up toward the brow or down onto the lid where you want to keep things lighter.
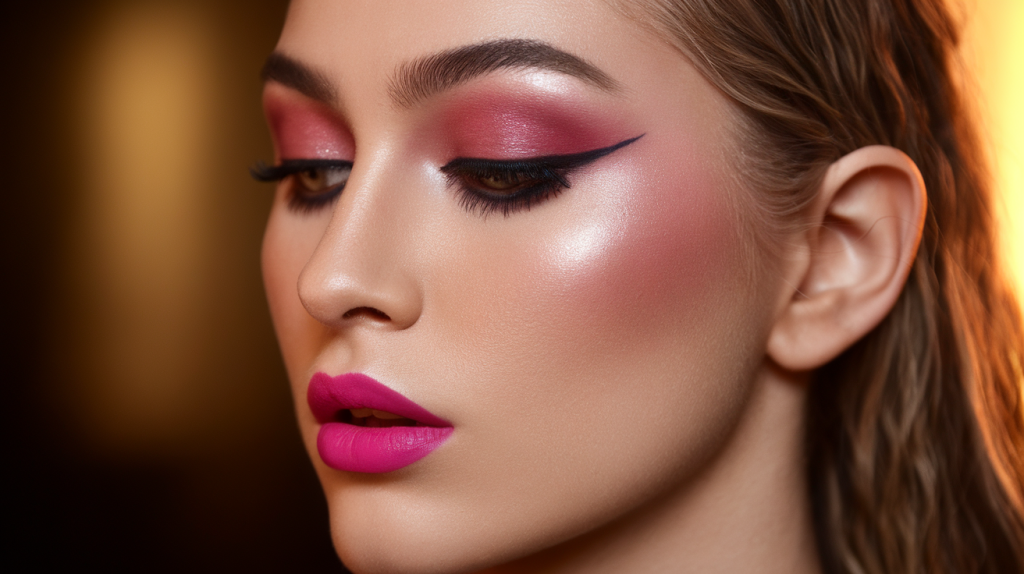
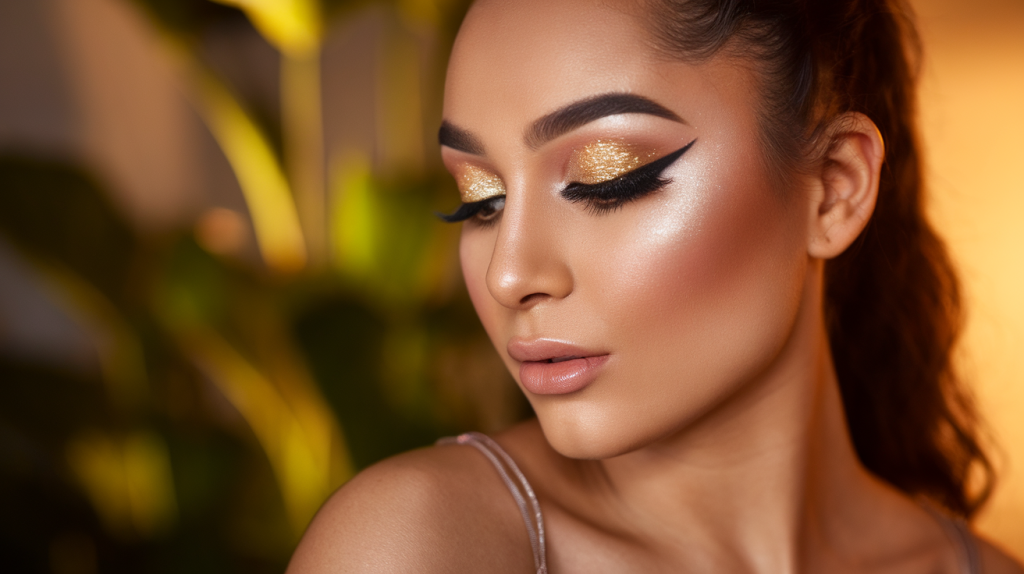
The outer V technique adds instant drama and eye-lifting effects. Focus deeper shades in a V-shape at your outer corner, blending inward and upward. This creates an elongated eye shape that photographs beautifully. Connect this V to your lower lash line for cohesive, professional-looking results.
Eyeliner Styles That Enhance
Eyeliner in glam makeup makes a bold statement rather than subtle definition. Whether you prefer dramatic wings, smoky smudged lines, or graphic shapes, precision matters. The style you choose should complement your eye shape while adding to the overall dramatic effect.
Winged liner requires steady hands and practice. Start by drawing the wing’s angle first, using your lower lash line as a guide for direction. Connect this line back to your upper lash line, then fill in the triangle. Building the wing gradually prevents making it too thick or dramatic initially.
Tightlining – applying liner between lashes – creates the illusion of fuller lashes without obvious liner. This technique works especially well when combined with dramatic lashes, eliminating any gaps between falsies and your natural lash line. Waterproof formulas prevent smudging in this sensitive area.
False Lash Application Mastery
No glam look feels complete without lashes that create serious impact. Whether you choose individual clusters, full strips, or magnetic options, proper application makes them look natural rather than obviously fake.
Measuring and trimming lashes to fit your eye prevents lifting corners and discomfort. Hold the lash strip against your eye before applying any glue, noting where trimming might be necessary. Always trim from the outer edge to maintain the lash’s natural graduation.
Quality lash glue makes application infinitely easier. Apply a thin line of adhesive to the lash band, waiting 30 seconds until it becomes tacky. This prevents sliding and allows precise placement. Looking down into a mirror rather than straight ahead provides better visibility for application.
Here’s the proper sequence for flawless lash application:
Wait for Tackiness: Let glue become slightly sticky before applying
Center First: Place the middle of the lash band at your lid’s center
Secure Corners: Press inner and outer corners down firmly
Blend Natural Lashes: Use mascara to marry your lashes with falsies
Final Adjustments: Pinch natural and false lashes together gently
After lashes set completely, apply black liner over the band to hide any visible glue or gaps. This final step creates seamless integration between falsies and your natural lash line.
How to Complete Your Glam Look?
The final touches transform good makeup into show-stopping glamour. These finishing elements pull everything together cohesively while adding polish that elevates the entire look. Lips, cheeks, and strategic highlighting require careful consideration to balance with dramatic eyes without overwhelming your features. Getting these final steps right ensures your glam makeup photographs beautifully and maintains impact throughout wear.
Selecting and Applying Statement Lips
Lip color choice dramatically affects your overall glam aesthetic. Bold reds and deep berries create classic glamour, while nude shades keep focus on dramatic eyes. Consider your outfit colors and event type when selecting shades. The finish – matte, satin, or glossy – also impacts the final impression.
Lip preparation ensures smooth, long-lasting color that won’t flake or feather. Gentle exfoliation removes dry skin that causes uneven application. Apply lip balm early in your routine, allowing it to absorb while completing other steps. Blot away excess balm before beginning lip color application to prevent slipping.
Precision matters more with bold glam lips than everyday application. Using lip liner throughout the entire lip, not just edges, creates a base that helps lipstick adhere better. Choose liner matching your lipstick or slightly deeper for added dimension. Overlining requires subtlety – going too far beyond natural lip borders looks obvious rather than plump.
Lipstick application techniques affect longevity and appearance. Apply one thin layer, blot with tissue, dust with translucent powder, then apply a second layer. This method locks color in place for hours. For ultra-precise edges, clean up with a small concealer brush dipped in foundation. This technique creates sharp definition that photographs professionally.
Perfecting Blush Placement
Blush brings life back to skin after foundation creates a uniform canvas. Placement varies based on face shape, but glam makeup typically features more dramatic color than daily wear. The key involves building intensity gradually while maintaining blend quality that looks natural despite being more pigmented.
Different face shapes benefit from customized blush placement. Round faces look best with blush applied slightly higher on cheekbones, creating a lifting effect. Oval faces can handle traditional apple-of-the-cheek placement. Square faces soften with blush swept from apples toward temples in a diagonal line.
Cream blush applied before powder creates a natural flush from within. Powder blush layered on top intensifies color while setting the cream underneath. This layering technique produces multidimensional color that lasts longer than either formula alone. Blend edges meticulously to avoid obvious demarcation lines.
Strategic Highlight Application
Highlighting in glam makeup goes beyond subtle glow to create stunning light reflection. Product choice affects intensity – powder highlights offer buildable shimmer while liquid formulas provide wet-look shine. Many glam looks combine both for maximum impact that catches every angle of light.
Application areas extend beyond typical cheekbone placement. Highlight the inner corners of eyes to brighten and open them further. Add shimmer to the center of your eyelids over eyeshadow for extra dimension. Place highlight on your collarbones and shoulders if they’ll be visible in your outfit.
Building highlight gradually prevents that sweaty rather than glowy appearance. Start with less product than you think you need, adding layers until achieving desired intensity. Using different textures on various areas creates interest – perhaps subtle shimmer on the nose bridge but intense metallic on cheekbones.
Setting Everything in Place
Setting spray locks all your hard work in place while melding powder and cream products together seamlessly. The right formula depends on your skin type and desired finish. Mattifying sprays control oil while dewy versions enhance glow.
Application technique affects setting spray effectiveness. Hold the bottle 8-10 inches from your face, misting in an X and T formation to ensure even coverage. Let the first layer dry completely before applying a second coat for extended wear. Avoid rubbing or touching your face while spray dries to prevent disrupting makeup underneath.
Final Assessment and Adjustments
Step back from your mirror to evaluate the complete look. Check balance between features – do dramatic eyes overpower subtle lips or vice versa? Assess whether contour appears natural in different lighting. Make small adjustments rather than major changes at this stage.
Photography reveals things mirrors might miss. Take a quick photo with flash to ensure no white cast from powder appears. Check that highlight translates as glow rather than obvious stripes. Make notes about what works for future reference.
Final touches might include cleaning up any eyeshadow fallout with a cotton swab, adding extra mascara to lower lashes, or intensifying inner corner highlight. These small refinements elevate good makeup to exceptional. Remember that glam makeup should make you feel confident and powerful – if something feels wrong, trust your instincts and adjust accordingly.
Your Glam Transformation Awaits
Creating show-stopping glam makeup becomes achievable when you break down the process into manageable steps and understand the purpose behind each technique. From thorough skin preparation through strategic color placement and careful finishing touches, every element contributes to that coveted professional appearance. The transformation from everyday to extraordinary doesn’t require professional training, just patience, practice, and the right approach to building dramatic features that photograph beautifully.
Your journey toward mastering glam makeup will include experiments, adjustments, and discovering what variations work best for your unique features. Some women find their signature look in bold eyes with nude lips, while others prefer balanced drama across all features. The beauty of glam lies in its versatility and ability to be customized while maintaining that essential wow factor. Start with these fundamental steps, then adjust techniques to create looks that make you feel like the best version of yourself whenever the occasion calls for something special.
Frequently Asked Questions
Q: How long does glam makeup typically last without touch-ups?
A: With proper skin preparation, quality setting products, and the layering techniques described, glam makeup can last 8-12 hours without major touch-ups. You might need minor powder touch-ups in the T-zone or lip color reapplication after eating.
Q: Can women with mature skin wear glam makeup without looking overdone?
A: Absolutely. The key lies in using hydrating formulas, avoiding excess powder in areas with fine lines, and focusing on cream products that meld with skin. Build coverage gradually and ensure thorough blending to maintain a youthful appearance.
Q: What’s the minimum number of eyeshadow shades needed for a glam eye look?
A: While professionals might use six or more shades, you can create beautiful glam eyes with four well-chosen colors: a transition shade, a lid color, a deeper crease shade, and a highlight for the inner corner and brow bone.
Q: Should glam makeup match my outfit colors exactly?
A: Not necessarily. While coordination creates cohesion, exact matching can appear dated. Instead, choose makeup colors that complement your outfit’s undertones or provide attractive contrast. Neutral glam looks pair well with any outfit color.
Q: How do I prevent false lashes from looking obvious or fake?
A: Choose lashes proportionate to your eye size, trim them properly, and ensure the band sits flush against your lash line. Using black liner to hide the band and mascara to blend your natural lashes with falsies creates seamless integration.
Q: Can I achieve glam makeup with drugstore products only?
A: Yes, many drugstore brands offer excellent formulas for glam makeup. Focus your budget on categories where quality matters most, like eyeshadow pigmentation and foundation coverage. Good application techniques matter more than product price points.
Q: What’s the biggest mistake beginners make with glam makeup?
A: Rushing the process or skipping skin preparation leads to most failures. Glam makeup requires time and patience. Each layer needs proper setting before adding the next, and thorough blending makes the difference between amateur and professional results.
Q: How do I know if my contour placement is correct?
A: Proper contour follows your natural bone structure and appears as shadow rather than obvious stripes. Suck in your cheeks to find hollow placement, and ensure contour on your nose follows natural shadow patterns. Take photos from different angles to check placement accuracy.