Makeup on dark skin has its own unique beauty and potential that often gets overlooked in mainstream beauty tutorials. While countless makeup guides flood social media daily, finding techniques and color recommendations specifically tailored for melanin-rich skin can feel like searching for a needle in a haystack. The truth is that dark skin tones offer an incredible canvas for both subtle and dramatic makeup looks, with the ability to carry colors and intensities that might overwhelm lighter complexions.
Many women with dark skin have experienced the frustration of following popular makeup tutorials only to find the results look completely different on their skin tone. This happens because standard makeup advice rarely accounts for the specific needs of deeper complexions – from foundation matching to color theory to highlighting techniques. The beauty industry has made progress, but there’s still a gap in education about what truly works for dark skin and why certain approaches yield better results than others.
The following sections will guide you through six creative makeup looks specifically designed to complement and enhance dark skin tones. From bold statement lips to subtle everyday looks, you’ll discover techniques that work with your natural beauty rather than against it. Each look has been carefully selected not just for its visual impact, but for its ability to boost confidence and make you feel like the best version of yourself. Let’s explore these transformative makeup ideas that celebrate the richness and versatility of dark skin.
Why Dark Skin Deserves Special Makeup Attention
Dark skin possesses unique characteristics that require specific makeup approaches and techniques. The higher melanin content affects how colors appear, how light reflects off the skin, and which products work most effectively. Understanding these differences transforms your makeup application from guesswork into an art form tailored specifically for your complexion.
Understanding melanin-rich skin undertones
Your undertone determines which colors harmonize with your skin and which ones clash. Dark skin typically falls into warm (golden, red, or peach), cool (blue or pink), or neutral undertones. To identify yours, look at your wrist veins in natural light – green veins suggest warm undertones, while blue or purple indicate cool undertones. If you see both equally, you likely have neutral undertones.
The jewelry test offers another clue. Gold jewelry tends to flatter warm undertones while silver complements cool undertones. Those with neutral undertones look equally good in both metals.
Common makeup mistakes to avoid
One frequent error involves using face powder that’s too light, creating an ashy or gray cast that dulls your natural radiance. This ghostly effect happens when products formulated for lighter skin get applied to deeper tones without consideration for how they’ll interact with melanin.
Another mistake is skipping color correcting before concealer application. Dark circles on deeper skin often have purple or deep brown tones that require orange or red color correctors before regular concealer. Without this step, concealer alone might appear gray or fail to provide adequate coverage.
The importance of the right products
Product formulation matters significantly for dark skin. Foundations need sufficient pigment density to provide coverage without looking chalky. Highlighters require warm undertones – those cool-toned, icy highlighters popular in many tutorials will look unnatural and ashy on deeper complexions.
Eyeshadows present their own challenges. Many palettes lack the pigmentation needed to show up vibrantly on dark skin. You need shadows with rich color payoff and often benefit from using a white or nude base to make colors pop. Cream formulas and loose pigments often perform better than pressed powders.
How lighting affects makeup on dark skin
Natural daylight reveals the true colors of your makeup, while artificial lighting can distort how products appear on deeper skin tones. Fluorescent lighting tends to wash out dark skin and make makeup appear flat. Warm incandescent bulbs can make your makeup look more orange than intended.
When applying makeup, position yourself near a window with natural light whenever possible. If you must use artificial light, LED bulbs with a color temperature around 5000K most closely mimic daylight. This ensures your makeup looks as intended when you step outside.
Flash photography presents another consideration. Many face powders contain SPF or light-reflecting particles that cause flashback – that white cast in photos. Testing your makeup with flash photography before important events prevents unfortunate surprises in pictures.
Different makeup looks require different lighting considerations. A dramatic evening look might appear perfect in dim restaurant lighting but overwhelming in bright daylight. Conversely, that subtle daytime look might disappear entirely under club lighting. Planning your makeup intensity based on where you’ll be ensures you always look your best.
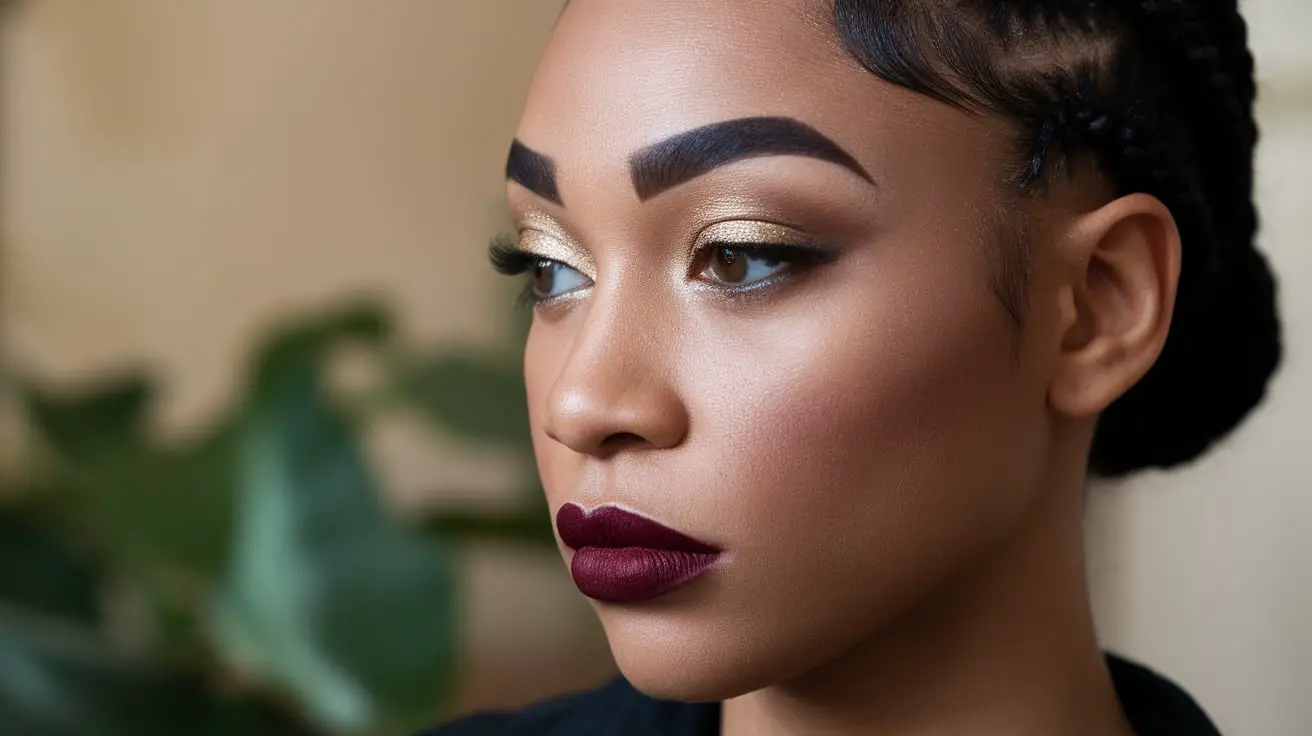
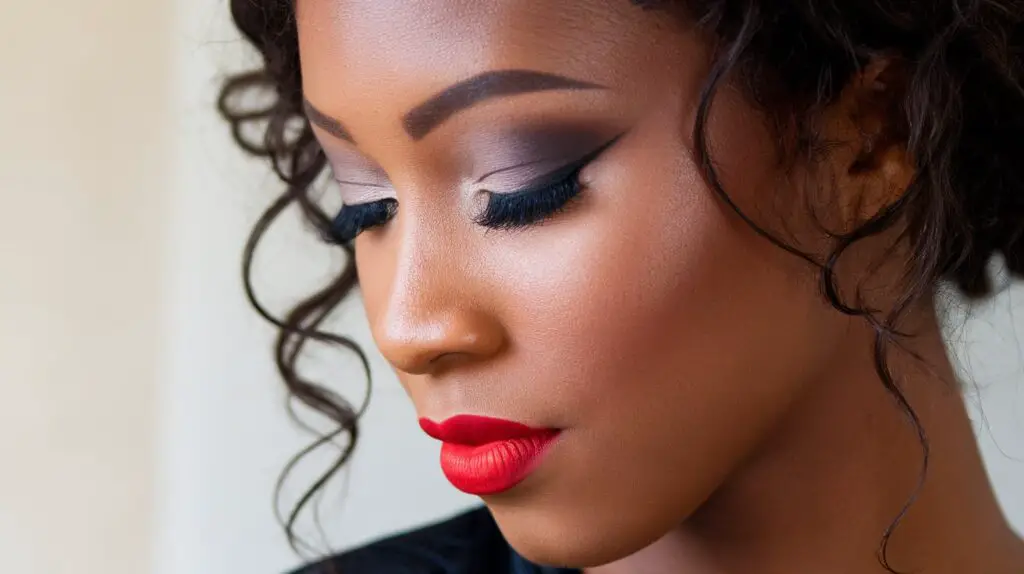
Bold Berry and Wine Lips That Pop
Deep berry and wine lip colors create stunning contrast against dark skin, offering a sophisticated alternative to traditional reds and pinks. These rich shades range from burgundy to plum to blackberry, each bringing its own mood and intensity to your overall look.
Choosing the right berry shades
Your specific skin tone guides which berry shades will look most flattering. Women with warmer undertones shine in berry shades with red or orange bases – think cranberry, warm burgundy, or reddish plum. Cool undertones pair beautifully with blue-based berries like blackberry, cool-toned wine, or purple-tinged plum shades.
The depth of your skin tone also influences shade selection. Medium-dark skin can carry both lighter raspberry tones and deeper wines effectively. Very deep skin tones often look spectacular in the richest, most saturated berry shades – those deep burgundies and blackberry hues that might overwhelm lighter complexions become perfectly balanced against deeper skin.
Testing shades in natural light remains crucial. What looks like a perfect berry in the store might pull too purple or too brown on your particular skin tone. Many makeup stores now offer samples or have generous return policies, allowing you to test shades at home before committing.
Application techniques for full coverage
Achieving that perfect bold lip requires proper preparation and technique. Start by gently exfoliating your lips with a sugar scrub or soft toothbrush to remove dead skin. Follow with a hydrating lip balm and let it absorb while you complete the rest of your makeup.
Before applying color, line your lips with a matching or slightly deeper liner. This step prevents feathering and helps your lipstick last longer. For the most precise application, use a lip brush rather than applying directly from the bullet.
Build color in thin layers rather than one thick application. Apply one layer, blot with tissue, then apply another layer. This technique creates longer-lasting color that won’t slip or slide throughout the day. For extra staying power, dust a small amount of translucent powder through a tissue after the first layer, then apply your final coat.
The ombré lip trend adapts beautifully to berry shades on dark skin. Apply a deeper wine shade to the outer corners and a lighter berry to the center, blending where they meet. This creates dimension and makes lips appear fuller.
Pairing with minimal eye makeup
Bold berry lips work best as the focal point of your makeup look. Keep eye makeup simple and sophisticated to avoid competition for attention. A neutral brown or bronze eyeshadow swept across the lid provides definition without distraction.
Consider these complementary eye makeup approaches:
Defined Lashes: Focus on perfectly curled and coated lashes with black mascara for definition
Subtle Shimmer: Add a touch of gold or bronze shimmer to the inner corner for brightness
Soft Liner: Use brown eyeliner instead of black for a softer frame around the eyes
Groomed Brows: Well-defined brows balance bold lips without adding complexity
Your complexion should appear flawless but not overdone. A natural-looking base with subtle contouring and a soft glow from highlighter creates the perfect canvas for statement lips. Skip bold blush – a gentle sweep of a shade close to your natural flush maintains balance.
Day to night transformation tips
That same berry lip can work for both professional settings and evening events with simple adjustments. For daytime, choose matte or satin finishes in lighter berry tones. Apply with a lighter hand, creating a stained effect rather than full opacity. Blot well and skip the liner for a more casual appearance.
Transforming this look for evening takes just minutes. Deepen the color by adding a darker berry shade to the outer corners of your lips. Add gloss to the center for dimension and light-catching shine. Redefine with liner for crisp edges that photograph beautifully.
Your supporting makeup can intensify too. Add a subtle smoky effect to your eyes using deep brown or plum shadows. Increase your highlighter for more dramatic cheekbones. The versatility of berry lips means one shade can anchor multiple looks throughout your day.
Golden Goddess Highlighting Techniques
The art of highlighting on dark skin requires abandoning those pearl and silver highlighters that dominate beauty counters. Golden, bronze, and copper tones create that lit-from-within glow that enhances rather than contradicts your natural warmth.
Finding your perfect gold tone
Gold highlighters span a spectrum from pale champagne gold to deep bronze gold, and finding your match depends on both your undertone and depth. Medium-dark skin glows with true gold and rose gold highlighters. Deeper skin tones shine with bronze-gold, copper, and even burgundy-toned highlighters that would look like bronzer on lighter skin.
Testing highlighter shades requires different techniques than testing foundation. Swatch potential shades on your cheekbone where you’ll actually wear them, not on your hand. Step into natural light to see how the product catches and reflects light. The right shade should look like your skin at its most radiant, not like an obvious stripe of product.
Strategic placement for maximum glow
Traditional highlighting placements need adjustment for different face shapes and features. While the basic high points remain the same – cheekbones, nose bridge, cupid’s bow – the intensity and precise placement vary.
Start with your cheekbones, sweeping highlighter from the highest point of your cheekbone toward your temple. This creates an uplifting effect that enhances your bone structure. On darker skin, you can extend this highlight slightly lower than typically recommended, as the contrast won’t be as stark.
The nose highlight requires restraint. A thin line down the bridge prevents your nose from appearing wider. Skip highlighting the tip unless you want to emphasize it. Instead, focus on the bridge for a subtle, refined glow.
Don’t forget often-overlooked areas that catch light naturally. A touch of highlighter on your collarbones and shoulders creates cohesion between your face and body makeup. The inner corners of your eyes benefit from a tiny dot of highlighter, opening up your entire eye area.
Blending techniques for seamless finish
Achieving that seamless glow requires proper blending tools and techniques. Synthetic brushes work best for cream and liquid highlighters, while natural bristles excel with powder formulas. Fan brushes create a diffused glow, while smaller, denser brushes provide more concentrated application.
The key lies in building gradually. Start with less product than you think you need. You can always add more, but removing excess highlighter often disturbs your underlying makeup. Use tapping motions rather than sweeping to deposit product precisely where you want maximum impact.
Cream highlighters beneath powder highlighters create incredible depth and longevity. Apply cream formula first, blend well, then set with a corresponding powder highlighter. This layering technique produces a glow that lasts through long days and humid weather.
Avoiding the ashy look
The dreaded ashy cast happens when highlighters with white or silver bases sit on top of dark skin rather than melding with it. Even some gold-toned highlighters contain white bases that create this unflattering effect.
Check ingredient lists and swatches carefully. Highlighters described as “universal” often contain those problematic white bases. Instead, look for products specifically formulated for deeper skin tones, which use gold and bronze bases that complement melanin-rich skin.
If you already own a highlighter that pulls slightly ashy, don’t discard it immediately. Try mixing it with a drop of facial oil or a bronze liquid highlighter to warm it up. Applying it over a bronze or gold cream base can also transform a too-light highlighter into something wearable.
Setting spray makes an enormous difference in how highlighter appears on dark skin. A few spritzes after application melds the product with your skin, eliminating any powdery finish and intensifying the glow. Choose setting sprays with a dewy finish rather than matte for the most goddess-like result.
Product textures that work best
Different highlighter textures create varying effects on dark skin. Powder highlighters offer the most control and build ability but can sometimes emphasize texture on mature skin. Look for finely milled formulas without chunks of glitter.
Cream highlighters meld beautifully with skin for a natural finish. They work particularly well on dry skin or during colder months when powder products might emphasize dry patches. Blend quickly, as creams can disturb foundation if overworked.
Liquid highlighters provide the most intense, wet-look glow. Mix them with foundation for an all-over radiance or use them alone for targeted highlighting. These formulas photograph beautifully and last longest on oily skin types.
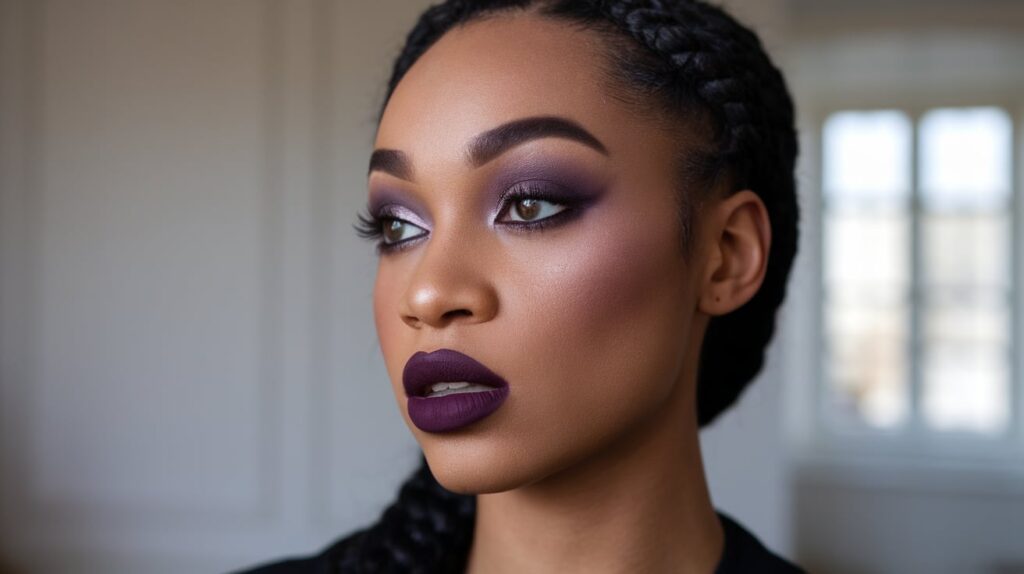
Vibrant Eye Color Combinations
Dark skin provides the perfect backdrop for bold, vibrant eye colors that might overwhelm lighter complexions. Those electric blues, rich purples, and warm oranges that seem intimidating in the palette become wearable art on deeper skin tones.
Colors that complement dark skin
Jewel tones shine brilliantly against dark skin. Emerald green, sapphire blue, and amethyst purple create stunning contrast while harmonizing with your natural depth. These rich shades don’t require a white base to show up vibrantly, making application quicker and easier.
Warm shades like orange, coral, and gold work magnificently because they echo the warm undertones present in most dark skin. Rather than clashing, these colors enhance your natural warmth. Burnt orange and terracotta shades that might look muddy on pale skin appear sophisticated and modern on deeper tones.
Don’t overlook unexpected shades like yellow, turquoise, or hot pink. These playful colors bring energy and creativity to your look. Yellow-based greens like chartreuse or lime create particularly striking effects. The key lies in choosing highly pigmented formulas that won’t disappear against your skin.
Sunset-inspired eye looks
Sunset eyes blend warm oranges, pinks, and purples to recreate that magical golden hour on your lids. Start with a warm orange or coral shade across your lid as the base. Build depth by adding a deeper rust or burgundy shade to your outer corner and crease.
Add dimension with strategic color placement. Pat a golden or champagne shade on the center of your lid for a spotlight effect. Blend a touch of purple or magenta along your lower lash line to echo sunset skies. The contrast between warm and cool tones creates visual interest without requiring precise lines or complex techniques.
For maximum impact, use your finger to apply metallic shades to the center of your lid. The warmth of your finger helps metallic formulas adhere better and appear more vibrant. This technique works particularly well with copper and bronze shades that complement the orange base.
Consider extending color beyond traditional boundaries. Bring your transition shade up toward your brow bone and out toward your temple. This editorial-inspired placement looks especially striking on dark skin where the contrast won’t appear too harsh.
Electric blue and purple combinations
Blue and purple combinations range from subtle to showstopping depending on your shade choices and application technique. Navy and plum create sophisticated everyday looks, while electric cobalt and violet make bold statements.
Layer different blue and purple tones for complexity. Start with a mid-tone purple across your lid, then deepen the outer corner with navy or indigo. Add electric blue to your lower lash line for an unexpected pop. This gradient effect creates depth while keeping the overall look cohesive.
Mixing finishes adds another dimension. Combine matte purples in your crease with metallic or shimmer blues on your lid. This contrast between textures creates visual interest and helps each shade stand out. Duochrome shadows that shift between blue and purple work particularly well on dark skin, as the color shift appears more dramatic.
Metallic finishes that shine
Metallic eyeshadows reach their full potential on dark skin. Those foiled finishes and pressed glitters that might look too intense on lighter skin become perfectly balanced against deeper complexions. Bronze, copper, and gold metallics enhance warm undertones, while silver and gunmetal create edgy, modern looks.
Application technique determines the intensity of metallic shadows:
Wet Application: Spray your brush with setting spray before picking up product for maximum color payoff and minimal fallout
Finger Application: Use your finger for the most intense metallic finish on the lid
Layering Method: Apply a cream shadow base in a similar shade before your metallic for longer wear
Glitter Primer: Use a tacky base specifically designed for glitters and metallics to prevent creasing
Rose gold metallics deserve special mention for dark skin. This shade bridges the gap between warm and cool, working with virtually any undertone. Layer rose gold over burgundy for depth or wear alone for a simple yet stunning look.
Blending tips for bold colors
Successful bold eye looks depend on seamless blending. Start with an eyeshadow primer to create a smooth base and prevent colors from becoming muddy. Set the primer with a translucent or nude powder that matches your skin tone – this provides a neutral base that makes blending easier.
Use transition shades to create gradients between bold colors. When working with bright blues, use a medium brown or tan in your crease first. This creates a buffer between your skin tone and the bright color, making blending smoother. For purples, peachy or pink transition shades work beautifully.
Work in thin layers, building intensity gradually. It’s much easier to add more color than to remove excess. Use a clean blending brush to soften harsh lines – keep several clean brushes nearby when working with multiple bold shades to prevent muddying.
Remember that bold colors can stain the skin, especially reds and pinks. Remove eye makeup first with an oil-based remover, then follow with your regular cleanser. This prevents temporary staining that might affect tomorrow’s makeup application.
The Power of a Perfectly Sculpted Brow
Well-groomed eyebrows frame your entire face and can transform your appearance more dramatically than any other single makeup element. For dark skin, the right brow shape and color create structure and polish that elevate every makeup look from bare-faced to full glam.
Finding your ideal brow shape
Your natural brow shape provides the best starting point for finding your ideal arch and thickness. Work with your natural growth pattern rather than against it for the most flattering and maintainable results. The classic rule of using a straight edge from your nostril to determine where brows should start, arch, and end still applies, but with flexibility based on your unique features.
Face shape influences which brow shape appears most harmonious. Round faces benefit from brows with a defined arch that adds angles and structure. Square faces look best with softer, curved brows that balance strong jawlines. Oval faces can carry almost any brow shape, while heart-shaped faces shine with softer, rounded brows that don’t compete with a pointed chin.
Brow thickness trends come and go, but choosing a width that balances your features matters more than following fashion. Larger eyes and fuller lips can support thicker brows, while delicate features might look overwhelmed by very full brows. The goal is proportion and balance with your overall face.
Professional shaping every few months can establish a template you maintain at home. Whether you prefer threading, waxing, or tweezing, communicate clearly about your desired shape and thickness. Bring photos of brows you admire on people with similar face shapes and features.
Between professional appointments, only remove obvious strays that fall outside your established shape. Over-plucking remains one of the most common brow mistakes and can take months to correct. When in doubt, leave that hair alone – a slightly fuller brow always looks better than patchy, over-tweezed arches.
Filling techniques for natural fullness
The goal of brow filling isn’t to draw on entirely new brows but to enhance what exists naturally. Start by brushing your brow hairs upward with a spoolie to see their natural pattern and identify sparse areas that need filling.
Use light, feathery strokes that mimic natural hair growth rather than drawing solid lines. Begin filling from the arch toward the tail where brows are typically sparser, using slightly more pressure for definition. The front of your brows should remain softest – concentrate product from the middle to the end for the most natural appearance.
Different areas of your brow might require different techniques. The tail often needs more definition and can handle a slightly heavier hand or a pencil for precision. The body of the brow looks most natural when filled with powder or pomade applied with an angled brush. The beginning of your brows should be the lightest, perhaps just brushed through with tinted gel.
Creating gradient brows adds dimension and prevents that painted-on look. Use a lighter shade or less product at the inner corners, gradually deepening toward the tail. This technique mimics how natural brows grow – sparser and lighter at the beginning, denser and darker toward the ends.
Choosing the right brow product shade
The old rule about choosing brow products two shades lighter than your hair doesn’t apply effectively to dark skin with black hair. Instead, match your brow product to your hair color or go one shade lighter maximum. Going too light creates an unnatural contrast that can appear gray or ashy.
For the most natural-looking brows on dark skin, consider these shade guidelines:
Black Hair: Use dark brown or soft black products, avoiding jet black which can look harsh
Dark Brown Hair: Match with chocolate or espresso brown shades
Color-Treated Hair: Adjust your brow shade slightly toward your current hair color while maintaining harmony with your skin
Undertones in brow products matter as much as depth. Warm-toned browns with red or golden undertones complement warm skin, while ash or neutral browns work better on cool-toned skin. Many brands now offer brow products specifically formulated for deeper skin tones with appropriate undertones.
Test brow products in natural light before purchasing. What appears to be the perfect match under store lighting might look too red or too ashy in daylight. Apply a small amount to one brow and step outside or near a window to evaluate the true color.
Setting your brows for all-day wear
Long-lasting brows require proper setting techniques, especially important for oily skin or humid climates. Start with clean brows – any residual skincare or makeup on your brow hairs prevents products from adhering properly.
After filling, set your work with a clear or tinted brow gel. Apply gel in upward strokes at the beginning of your brows, then follow the natural growth direction through the arch and tail. This keeps hairs in place while sealing in any powder or pencil underneath.
For bulletproof brows that survive workouts or long days, layer your products strategically. Begin with a waxy pencil or pomade that adheres well to skin and hair. Set with powder for a softer finish and additional staying power. Finish with waterproof brow gel that locks everything in place. This three-step process might seem excessive for everyday wear but proves invaluable for special events or challenging weather conditions.
Brow primers extend wear time significantly but remain underutilized. Apply primer to clean brows before any other product. This creates a tacky base that grabs onto color while preventing oils from breaking down your brow makeup throughout the day.
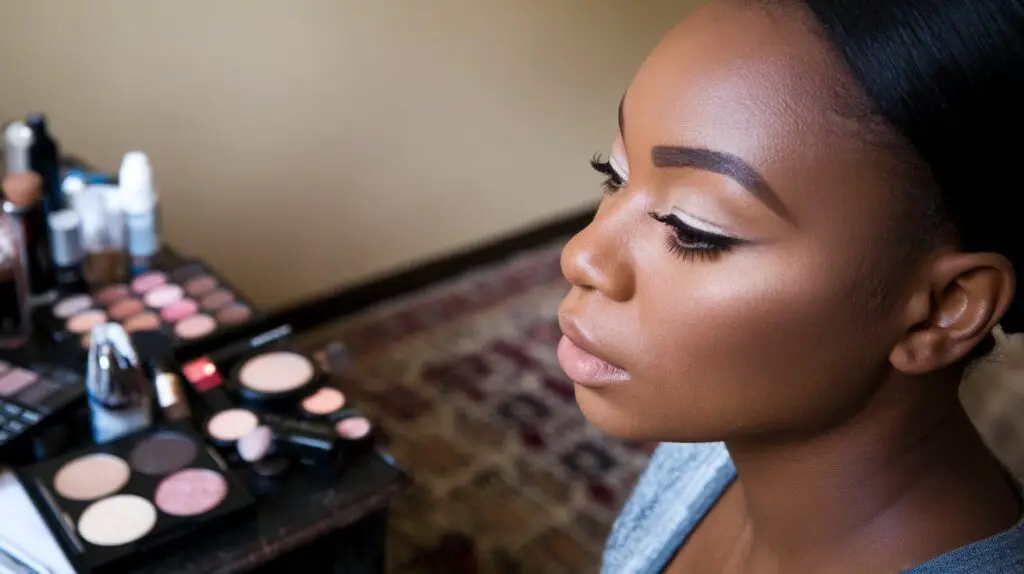
Natural No-Makeup Makeup Perfected
The no-makeup makeup look celebrates your natural beauty while subtly perfecting your complexion. On dark skin, this understated approach requires specific techniques and product choices to achieve that effortless, fresh-faced glow without looking washed out or underdone.
Creating the perfect base
Your base sets the foundation for the entire no-makeup look. Skip heavy coverage foundation in favor of skin tints, tinted moisturizers, or lightweight foundations that even out your complexion without masking your skin. The goal is skin that looks like skin – just on its best day.
Color correcting addresses specific concerns without requiring heavy concealer. Orange or red correctors neutralize dark circles and spots on deeper skin more effectively than concealer alone. Apply corrector only where needed, blend well, then follow with a concealer that matches your skin exactly.
Mix a drop of facial oil into your base product for an instant glow boost. This technique creates a luminous finish that mimics healthy, well-hydrated skin. Jojoba or squalane oils work well without disrupting makeup longevity.
Application method affects the final appearance significantly. Use a damp beauty sponge for the most natural finish, bouncing product into skin rather than dragging or rubbing. This technique ensures seamless blending while maintaining a skin-like texture. Alternatively, use your fingers – the warmth helps product meld naturally with your skin.
Set your base strategically rather than all over. Dust a tiny amount of translucent powder only in areas prone to excess shine, like your T-zone. Over-powdering eliminates that natural skin finish you’re trying to achieve. Choose a translucent powder formulated for dark skin to avoid any white cast.
Subtle enhancement techniques
No-makeup makeup doesn’t mean no makeup at all – it means strategic enhancement that looks effortless. Focus on defining features without obvious product placement.
For eyes, skip eyeshadow entirely or use a shade identical to your skin tone to even out your lids. Tightline your upper lash line with brown pencil for subtle definition that makes lashes appear naturally thicker. One coat of brown mascara defines without the drama of black.
Cream blush in brown-pink or berry tones creates the most natural flush on dark skin. Smile and apply to the apples of your cheeks, blending outward. The key is choosing a shade that mimics your natural flush after exercise or when you’re genuinely happy.
Choosing nude shades that actually work
Finding nude lip colors for dark skin requires abandoning traditional nude shades that look ashy or corpse-like on deeper tones. Your perfect nude might be brown, berry, terracotta, or even deep pink – any shade that enhances your natural lip color without adding obvious pigment.
Test nude lipsticks by applying and immediately blotting off most of the product. The stain left behind should enhance your lips without looking like you’re wearing lipstick. This stain test helps identify which “nude” shades truly complement your skin tone.
Layer different products for customized nudes:
Brown Liner Base: Line and fill lips with brown liner close to your natural lip color
Sheer Lipstick Layer: Add sheer pink or berry lipstick for subtle color
Gloss Finish: Top with clear or nude gloss for hydrated-looking lips
Balm Alternative: Use tinted lip balm for the most natural enhancement
Consider that your perfect nude might change with the seasons. As your skin deepens or lightens throughout the year, adjust your nude lip shade accordingly. Keep several options to ensure you always have a shade that works.
The secret to that fresh-faced glow
Achieving that lit-from-within radiance requires both skincare and makeup techniques. Start with well-hydrated skin – use a hydrating primer or facial mist before makeup application. This creates a smooth, plump canvas that naturally reflects light.
Strategic highlighting creates glow without obvious shimmer. Mix liquid highlighter with your foundation for all-over radiance, or apply cream highlighter before foundation for a subtle glow that seems to come from within. Choose golden or bronze tones that meld seamlessly with your skin.
Facial mists throughout the day revive the natural finish of your makeup. Keep a travel-size mist in your bag for quick refreshers that bring back that dewy glow. Look for mists with glycerin or hyaluronic acid that add hydration rather than just water.
Quick morning routine tips
Streamlining your no-makeup makeup routine makes it sustainable for busy mornings. Prep your skin the night before with good skincare – well-moisturized skin requires less makeup for a polished appearance.
Multi-tasking products speed up application. Tinted moisturizer with SPF combines three steps. Cream products that work on lips, cheeks, and eyes eliminate multiple products. Brown mascara that also works as brow gel reduces your kit.
Keep your routine to five minutes by focusing on essentials. Even out your complexion with tinted moisturizer, conceal only where absolutely necessary, add cream blush to cheeks and lips, define lashes with one coat of mascara, and finish with brow gel. This minimal approach looks fresh and modern while taking minimal time.
Organize products in the order you use them. Keep your five-minute face products separate from your full glam collection. This prevents decision fatigue and ensures you can execute your look quickly even when half-awake.
Your Confidence Transformation Awaits
These six makeup approaches offer more than just beauty techniques – they provide tools for self-expression and confidence building specifically designed for dark skin. Each look celebrates the unique beauty of deeper complexions while addressing the real challenges that come with finding appropriate products and techniques. Whether you choose bold berry lips for a power meeting or perfect your no-makeup makeup for weekend brunch, these methods work with your natural beauty rather than trying to change it.
The journey to makeup mastery is deeply personal, and what works for one person might need adjustment for another. Take these techniques as starting points and adapt them to your unique features, lifestyle, and preferences. Your ideal makeup look is the one that makes you feel most like yourself – confident, beautiful, and ready to take on your day. The beauty of dark skin lies not just in its rich tones but in its versatility and ability to carry both subtle and dramatic looks with equal grace.
Frequently Asked Questions
Q: What foundation undertone should I look for if my dark skin sometimes looks ashy with certain products?
A: Ashiness typically indicates you need warmer-toned foundations with yellow, golden, or red undertones. Even if you have cool undertones, foundations with very pink or blue bases can create that gray cast on deeper skin. Try foundations labeled “warm” or “golden” and test them in natural light before purchasing.
Q: Can I wear pastel eyeshadows on dark skin, or will they not show up?
A: Pastels can absolutely work on dark skin with the right technique. Use a white or light nude base first, then pack on the pastel shade with your finger or a damp brush for maximum color payoff. Choose pastels with good pigmentation and consider brands that specifically formulate for deeper skin tones.
Q: Why does my highlighter look like a stripe of shimmer instead of a natural glow?
A: This usually means the highlighter base is too light for your skin tone or contains white pigments. Switch to highlighters with gold, bronze, or copper bases. Also, try using less product and blending more thoroughly with a damp beauty sponge to meld the product with your skin.
Q: How do I prevent my lipstick from making my lips look darker around the edges?
A: This natural pigmentation is common in darker skin tones. Use a lip primer or concealer to neutralize the edges before lipstick application. Line your lips with a shade that matches your lipstick, and consider using slightly lighter shades in the center of your lips to create dimension while balancing the darkness.
Q: What’s the best way to make bright eyeshadows really pop on my dark eyelids?
A: Start with an eyeshadow primer, then set it with a light concealer or nude shadow that matches your skin. For maximum vibrancy, use a white or cream base just where you’ll place the bright color. Apply shadows with your finger or a damp brush, and choose formulas known for high pigmentation.
Q: Should I use black or brown mascara and eyeliner for everyday looks?
A: Brown mascara and liner create softer definition perfect for no-makeup makeup or professional settings. Black provides more drama and definition for evening or when you want your eyes to be the focus. Your choice depends on the overall look you’re creating rather than strict rules.
Q: How can I find the right nude lipstick when most look gray on my skin?
A: Your perfect nude likely contains brown, berry, or terracotta tones rather than traditional pink-beige nudes. Look for shades described as “deep nude,” “brown nude,” or “berry nude.” Test by applying the lipstick and seeing if it enhances your natural lip color without looking obviously lighter or darker.
Q: What’s the secret to making cream blush last all day on oily skin?
A: Set your cream blush with a matching powder blush for longevity. Apply cream blush after foundation but before setting powder, blend well, then dust translucent powder lightly over your face. Finally, add a touch of powder blush in the same shade on top for color that lasts through humidity and oil production.