Waterfall braids create an enchanting cascade of hair that looks far more complicated than the actual technique requires. This romantic hairstyle transforms ordinary locks into something that appears professionally styled, yet you can master it right at home with practice. The flowing strands that drop through the braid create visual interest while keeping hair partially secured – giving you the best of both worlds between an updo and wearing your hair down.
Many women assume waterfall braids belong exclusively in the salon or require years of hairstyling experience. The truth is, once you understand the basic mechanics, this technique becomes as simple as any three-strand braid with one key difference. Instead of continuously braiding all three sections, you strategically drop strands to create that signature cascading effect.
Ready to add this versatile style to your hair repertoire? The following sections break down everything from understanding the basics to mastering variations that suit different occasions. You’ll discover preparation tips, step-by-step instructions, creative adaptations, and maintenance strategies that keep your waterfall braid looking fresh all day.
What exactly is a waterfall braid?
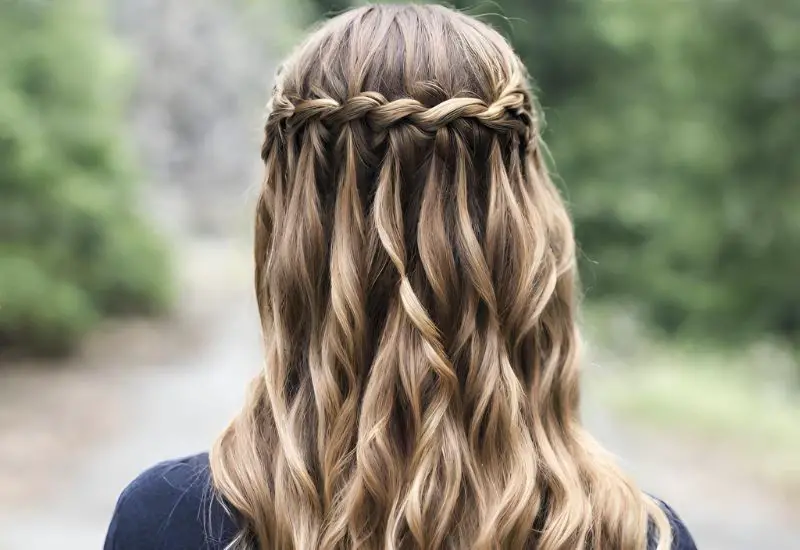
A waterfall braid creates the illusion of hair flowing through a horizontal or diagonal braid across your head. Unlike traditional braids that incorporate all hair into the weave, this style releases sections as you go, allowing strands to fall freely like water cascading over rocks. The remaining braid acts as a decorative band while the dropped pieces add movement and dimension to your hairstyle.
Basic definition and appearance
The waterfall braid combines elements of French braiding with a unique dropping technique. As you work across the head, you continuously pick up new hair from above while releasing the bottom strand. This creates a woven pattern that sits against the scalp with free-flowing hair beneath. The final look resembles a delicate headband made from your own hair, with loose strands creating texture and visual appeal.
The braid itself typically follows the curve of your head, starting near one temple and traveling toward the opposite ear. Some variations circle the entire head, while others stop midway for an asymmetrical look. The dropped strands can be left straight, curled, or waved depending on your preference and the occasion.
How it differs from regular braids
Traditional braids keep all hair contained within the weave from start to finish. French and Dutch braids add hair as you go but never release any strands. The waterfall technique breaks this rule by deliberately dropping the bottom section with each crossover.
Think of regular braiding like weaving a basket where every strand stays put. Waterfall braiding is more like creating a decorative net – some strands form the structure while others slip through the gaps. This fundamental difference changes both the braiding process and the final appearance.
The tension requirements also vary significantly. Regular braids often benefit from tighter weaving for security, but waterfall braids need a gentler touch. Too much tension prevents the dropped strands from falling naturally, ruining the cascading effect that gives this style its name.
When to wear waterfall braids
Waterfall braids suit numerous occasions, from casual weekend outings to formal events. For everyday wear, a simple side waterfall braid adds polish to your regular routine without appearing overdone. The style works particularly well for:
Date nights when you want something romantic yet unfussy. The flowing strands frame your face beautifully while the braid portion shows effort without looking overly styled. Wedding guest appearances benefit from this hairstyle’s elegance. It photographs wonderfully and stays put through hours of celebrating.
Professional settings welcome waterfall braids too. The style keeps hair controlled while maintaining a soft, approachable appearance. It strikes the perfect balance between creative and conservative, making it ideal for presentations or important meetings.
Hair types that work best
Medium to long hair provides the ideal canvas for waterfall braids. You need enough length for the dropped strands to create visual impact – typically hair that reaches at least past your shoulders. Shorter hair can work with modifications, but the cascading effect becomes less pronounced.
Hair texture plays a significant role in both execution and final appearance. Straight to wavy hair often proves easiest for beginners since the strands separate cleanly and the braid pattern shows clearly. Curly hair creates gorgeous waterfall braids too, though the technique requires slight adjustments to work with natural curl patterns.
Fine hair benefits from texturizing products before braiding to add grip and prevent slipping. Thick hair might need sectioning into smaller pieces for manageable braiding. Each hair type brings unique advantages – fine hair creates delicate, ethereal braids while thick hair produces bold, statement-making styles.
Time commitment needed
Creating your first waterfall braid typically takes 15-20 minutes as you learn the rhythm. With practice, most women complete a basic side waterfall braid in 5-7 minutes. More elaborate variations naturally require additional time.
The learning curve varies by person, but most find success within 3-4 attempts. The trickiest part involves coordinating the dropping motion while maintaining consistent tension. Once muscle memory develops, the process becomes almost automatic.
Consider practicing when you’re not rushed. Weekend mornings or quiet evenings provide ideal learning opportunities. Having a mirror setup that shows multiple angles helps tremendously during initial attempts. Some women find practicing on others easier than working on their own hair at first.
What tools and preparation do you need?
Success with waterfall braids starts long before you begin braiding. Having the right tools within reach and properly preparing your hair eliminates frustration and produces professional-looking results. This preparation phase determines whether your braid holds beautifully all day or unravels within hours.
Essential tools checklist
Before starting any waterfall braid, gather these basic supplies. A rattail comb helps create clean sections and parts with its pointed end. The fine teeth smooth hair before braiding begins. Clear elastic bands secure your finished braid invisibly – avoid thick elastics that create obvious bumps.
Bobby pins matching your hair color prove invaluable for securing loose pieces or reinforcing the braid’s end. Keep at least 10-15 pins nearby since you might need several attempts at placement. A hand mirror allows you to check your progress from different angles, especially helpful when braiding the back sections.
Hair clips or sectioning clamps keep unused hair out of your working area. These temporary holders prevent tangling and make the dropping technique cleaner. Choose clips that won’t leave dents in your hair.
A spray bottle filled with water helps manage flyaways and refreshes hair texture as you work. Some women prefer adding a small amount of leave-in conditioner to the water for extra slip and moisture.
Hair preparation steps
Start with clean, dry hair for optimal results. Freshly washed hair often proves too slippery, so day-old hair typically braids better. If you must braid immediately after washing, apply texturizing spray or dry shampoo for added grip.
Detangle thoroughly using a wide-tooth comb or detangling brush. Work from ends to roots, removing every knot. Tangled hair makes the dropping technique nearly impossible and creates an uneven, messy braid. Pay special attention to the crown area where most waterfall braids begin.
Apply a lightweight styling product based on your hair type. Fine hair benefits from volumizing mousse at the roots and light-hold hairspray throughout. Medium to thick hair often needs smoothing serum or cream to control frizz and add shine. Curly hair responds well to curl-defining cream that prevents frizz while maintaining natural texture.
Create your desired hair texture before braiding. Straight hair can be left natural or enhanced with a flat iron for ultra-smooth results. Waves or curls should be styled first since manipulating the hair after braiding disturbs the pattern.
Product recommendations
The right products make waterfall braiding significantly easier. Here are specific recommendations for different hair types and desired outcomes:
Light-hold products: Sea salt spray adds texture without stiffness. Apply to damp hair and let dry naturally or blow-dry for enhanced grip during braiding.
Medium-hold options: Texturizing cream provides control while maintaining movement. Work a small amount through mid-lengths and ends before braiding.
Strong-hold selections: Hair wax or pomade helps extremely slippery or fine hair hold the braid pattern. Use sparingly to avoid greasiness.
Finishing touches: Flexible-hold hairspray sets your completed braid without crunchiness. Choose formulas that brush out easily for style changes.
Setting up your workspace
Position yourself in front of a well-lit mirror at comfortable height. Natural light from a window provides the best visibility for seeing hair sections clearly. If braiding at night, ensure overhead lighting doesn’t create shadows on your work area.
Arrange your tools within easy reach on a counter or table. Standing while braiding often works better than sitting since you can move around to access different angles. If you must sit, choose a swivel chair or stool that allows rotation.
Keep your shoulders relaxed and elbows close to your body to prevent fatigue. Braiding with arms extended causes unnecessary strain and shaky hands. Take breaks every few minutes to shake out tension.
A three-way mirror setup helps tremendously, though not everyone has access to one. Alternatively, use your phone’s camera in selfie mode to check back sections. Some women record themselves braiding to review technique afterward.
Common mistakes to avoid
Several errors frequently sabotage waterfall braid attempts. Understanding these pitfalls helps you avoid frustration and achieve better results from the start.
Grabbing sections that are too large makes the braid bulky and difficult to manage. Stick to sections approximately 1-2 inches wide for optimal control. Thicker sections also make the dropping technique harder to execute smoothly.
Braiding too tightly prevents the characteristic flow of a waterfall braid. The dropped strands need freedom to fall naturally. Maintain gentle, even tension throughout – tight enough to hold the pattern but loose enough for movement.
Forgetting to drop strands consistently creates an uneven appearance. Every single crossover should include dropping the bottom strand and picking up a new top strand. Missing even one drop breaks the pattern noticeably.
Starting too high on the head often causes problems. Begin at temple height or slightly lower for easier handling. You can always work your way up to crown-starting braids once you master the basic technique.
How do you create a basic waterfall braid?
Now comes the exciting part – actually creating your waterfall braid. This section breaks down each step in detail, helping you understand not just what to do but why each action matters. Take your time with these instructions, pausing to practice individual movements before combining them into the full technique.
Starting position and sectioning
Begin by creating a deep side part on your preferred side. Most right-handed people find starting on the left side easier, but experiment to discover your natural preference. Brush all hair smooth and decide where you want your braid to begin – typically about an inch above your ear at temple height.
Section off a piece of hair approximately 2-3 inches wide where you’ll start braiding. This initial section determines your braid’s thickness, so keep it manageable. Divide this section into three equal strands, holding them between your fingers like you would for a regular braid.
The hand positioning matters more than you might expect:
Top strand: Hold between thumb and index finger
Middle strand: Controlled by middle finger
Bottom strand: Secured with ring and pinky fingers
Your non-dominant hand acts as an assistant, temporarily holding strands and helping with the pickup process. Keep both hands close to your scalp for better control. Working too far from your head creates loose, messy results.
The dropping technique explained
Here’s where waterfall braiding diverges from traditional techniques. Start with a standard braid motion – cross the top strand over the middle, then prepare for the key difference. Instead of crossing the bottom strand over as usual, you’ll drop it completely.
Let that bottom strand fall against the rest of your hair. Don’t try to incorporate it back into the braid. This dropped strand becomes part of the “waterfall” effect. Immediately pick up a new section of hair from directly behind the dropped strand to replace it.
The new section should be approximately the same thickness as your original strands. Consistency in section size creates an even, professional-looking braid. This new piece becomes your new bottom strand, ready to be dropped in the next sequence.
Continue this pattern across your head: cross top over middle, drop bottom strand, pick up new section from behind. Each repetition adds to both the braid structure and the cascading effect below. The rhythm becomes natural after a few cycles.
Maintaining even tension
Consistent tension throughout your braid prevents loose spots and maintains the pattern’s integrity. The challenge lies in keeping gentle pressure without pulling too tight. Your dropped strands need freedom to fall naturally while the braid itself requires enough tension to hold its shape.
Focus on keeping the working strands (the ones currently in your hands) at equal tightness. When one strand becomes looser than others, the braid develops bumps or gaps. Check your tension after each drop-and-pickup sequence by gently tugging all three strands.
Adjust your hand position as you work across your head. What feels comfortable at your temple might strain your wrists by the time you reach your ear. Rotate your wrists and reposition your fingers to maintain control without creating fatigue.
The picked-up sections often determine overall tension. Grabbing too much hair creates bulk that’s difficult to manage. Taking too little makes weak spots in your braid. Aim for sections that match your starting strands in thickness.
Securing the braid properly
Once you reach your desired endpoint – typically behind the opposite ear – you need to secure the braid without creating an obvious transition. Several methods work depending on your hair length and style preference.
For a classic finish, continue braiding the three remaining strands into a regular braid for another inch or two. This creates a gradual transition from the waterfall section. Secure with a clear elastic band, wrapping it multiple times for hold without bulk.
Bobby pin securing offers an invisible finish. After your last drop, twist the remaining strands together and pin them behind your ear or under a section of loose hair. Cross two pins in an X formation for extra security. This method works especially well when you want all hair to remain down.
Some women prefer incorporating the braid end into another style element. You might twist it into a small bun, blend it into loose curls, or connect it to another braid. These creative finishes add personality while hiding the elastic or pins.
A light mist of hairspray over the entire braid sets your work without stiffness. Focus extra spray on the starting and ending points where loosening typically begins. Allow the spray to dry completely before touching or styling the loose hair beneath.
Troubleshooting common issues
Even experienced braiders encounter challenges with waterfall braids. Understanding solutions to frequent problems saves frustration and improves your results.
If your braid appears loose or gaps develop, you’re likely dropping strands before fully incorporating them. Complete each crossover motion before releasing the bottom strand. The dropped piece should fall from its crossed position, not from your hand mid-motion.
Bumpy or uneven braid texture usually indicates inconsistent section sizes. Use your rattail comb to measure sections visually, aiming for uniform width. When picking up new hair, match the thickness of your dropped strand as closely as possible.
Strands refusing to stay dropped often result from too much product or static. Smooth each dropped piece with your fingers as you release it, encouraging it to fall away from the braid. A light mist of water or anti-static spray helps stubborn pieces cooperate.
If your braid curves unexpectedly or won’t follow your desired path, check your sectioning angle. The direction you pull each new section determines the braid’s trajectory. Pull sections straight back for a horizontal braid, or angle downward for a diagonal effect.
What are the best waterfall braid variations?
Once you master the basic waterfall braid, a world of creative variations opens up. Each style builds on the fundamental dropping technique while adding unique elements that suit different occasions and preferences. These variations range from simple modifications to elaborate combinations that showcase your braiding skills.
Side waterfall braid
The side waterfall braid remains the most popular variation for good reason. Starting at one temple and ending behind the opposite ear creates a romantic, asymmetrical look that flatters most face shapes. This version works beautifully with side-swept bangs or face-framing layers.
Position your braid slightly above ear level for the most flattering placement. This height showcases the cascade effect without overwhelming your features. The braid acts like a natural headband, keeping hair off your face while maintaining femininity.
For extra impact, curl the loose hair beneath your waterfall braid. The combination of structured braiding and soft waves creates gorgeous contrast. Use a curling iron on medium heat, wrapping sections away from your face for the most flattering effect.
This variation suits virtually any occasion. Dress it up with decorative pins or small flowers for weddings. Keep it simple for everyday wear. The versatility makes this style a go-to choice for women mastering waterfall braiding.
Double waterfall braid
Creating two parallel waterfall braids amplifies the style’s impact dramatically. This variation requires more time and skill but produces absolutely stunning results. The double braid effect works especially well on thick hair that can support multiple sections.
Start your first braid slightly higher than usual, about two inches above your ear. Complete it as normal, securing the end invisibly. Then begin the second braid an inch below the first, following the same path. The key lies in keeping both braids evenly spaced throughout.
The dropped strands from your first braid will fall through the second braid’s sections. This creates an intricate woven appearance that looks far more complex than the actual technique. Some women prefer picking up the dropped strands from the first braid when creating the second for an interconnected look.
Consider these placement options for double waterfall braids:
Parallel placement: Both braids follow the same curve around your head
Converging design: Start braids on opposite sides, meeting at the back
Asymmetrical style: One braid travels horizontally while the other angles down
Crown formation: Both braids begin at the crown, flowing down each side
Waterfall braid with curls
Combining waterfall braids with curled hair creates a formal style worthy of special occasions. The key lies in curling your hair before braiding, as manipulating the dropped strands afterward disturbs the braid structure.
Create your curls using your preferred method – curling iron, hot rollers, or overnight techniques all work well. Aim for uniform curl size throughout for the most polished appearance. Let curls cool completely before beginning your braid to ensure they hold their shape.
When braiding through curled hair, work gently to preserve the curl pattern. The natural spring in curled hair actually helps hold the braid structure, making this combination easier than it might appear. Take slightly smaller sections than usual to maintain control through the textured hair.
The finished look combines structured and romantic elements beautifully. The braid provides a polished frame while cascading curls add movement and softness. This variation photographs exceptionally well, making it perfect for formal events or photo shoots.
Half-up waterfall style
The half-up waterfall style offers the best of both worlds – an elegant braid detail with the freedom of wearing hair down. Instead of ending behind your ear, this variation continues around the back of your head, connecting to a small bun, ponytail, or another decorative element.
Begin your waterfall braid as usual at one temple. Continue the dropping technique as you work around the side and toward the back of your head. The challenge comes in maintaining the pattern as you reach areas harder to see and access.
Once you reach the center back of your head, several finishing options exist. Secure the braid temporarily with a clip while you create a matching braid from the opposite side. When both braids meet, combine them into a small messy bun for casual elegance. Alternatively, blend both braids into a single fishtail or regular braid flowing down your back.
This style particularly flatters women with very long or thick hair. It reduces bulk around the face while showcasing length and texture. The contained yet flowing nature makes it appropriate for both professional and social settings.
Waterfall crown braid
The waterfall crown braid creates a complete halo effect around your head. This advanced variation requires patience and practice but produces absolutely breathtaking results. The continuous braid gives you an ethereal, goddess-like appearance perfect for weddings or formal events.
Starting at one ear, create your waterfall braid following your hairline around the entire head. The challenge lies in maintaining consistent tension and section size throughout the complete circle. Your arms will need frequent position changes to reach all areas comfortably.
As you work around your head, the braid naturally curves to follow your hairline. Keep sections small for easier handling – about one inch wide works best. The dropped strands create a curtain of hair all around, making this style especially stunning on long hair.
Connecting the braid end to the beginning requires careful planning:
Gradual blend: Slowly decrease section size as you approach the start
Tucked finish: Hide the end under the beginning of your braid
Decorative join: Use a beautiful pin or small flower to disguise the connection point
Seamless loop: Carefully weave the end strands into the starting braid
The crown braid variation takes 20-30 minutes for most women to complete. The time investment pays off in a hairstyle that lasts all day and generates countless compliments. Practice on relaxed days when you can take breaks as needed.
How can you make your waterfall braid last all day?
A beautiful waterfall braid means nothing if it falls apart within hours. The secret to all-day hold lies in preparation, technique, and smart finishing touches. These strategies ensure your hard work pays off in a hairstyle that looks as fresh at sunset as it did that morning.
Pre-styling preparation
Long-lasting waterfall braids start with properly prepped hair. The texture and condition of your hair before braiding determines how well the style holds. Skip washing your hair the morning of styling – slightly dirty hair provides better grip than squeaky-clean strands.
If you must wash your hair, use a volumizing shampoo and lightweight conditioner. Apply conditioner only to mid-lengths and ends, avoiding roots where you need maximum texture. Rinse thoroughly to prevent product buildup that makes hair slippery.
Blow-dry your hair completely before braiding. Even slight dampness causes the braid to loosen as it dries throughout the day. Use a round brush while drying to create smooth sections that braid more easily. Direct the airflow down hair shafts to minimize frizz.
Apply texturizing products strategically based on your hair type. Fine hair benefits from root-lifting spray and dry shampoo at the crown. Medium hair responds well to lightweight mousse throughout. Thick hair might need smoothing serum on ends while keeping roots product-free for grip.
Consider your day’s activities when prepping hair. Outdoor events in humidity require anti-frizz products. Air-conditioned offices might need extra moisturizing to prevent static. Athletic activities demand stronger-hold products and extra securing methods.
Product application techniques
The way you apply products matters as much as which products you choose. Even the best texturizing spray won’t help if applied incorrectly. These techniques maximize product effectiveness for lasting braids.
Distribute products evenly through sections you’ll be braiding. Spray products from 6-8 inches away, using a sweeping motion for even coverage. Cream or serum products work best when emulsified between palms first, then smoothed through hair in sections.
Focus extra product on areas that typically loosen first – around your hairline, behind ears, and at the nape of your neck. These spots experience the most movement throughout the day. A light coating of hairspray on your fingertips while braiding adds invisible hold to each section.
Layer products strategically for maximum benefit without weighing hair down:
Base layer: Volumizing mousse or texturizing spray for grip
Working layer: Light-hold gel or cream on sections as you braid
Finishing layer: Flexible-hold hairspray over completed braid
Securing methods that work
Beyond the basic elastic band, several securing techniques ensure your waterfall braid stays put. Combining methods provides extra insurance against loosening, especially for special events.
Clear elastic bands remain the gold standard for invisible securing. Wrap the band 4-5 times for firm hold without creating a bump. For extra security, add a bobby pin through the elastic, anchoring it to hair beneath. This prevents the elastic from sliding down throughout the day.
Strategic bobby pin placement reinforces weak spots without showing. Slide pins under the braid at stress points – typically where the braid curves or changes direction. Insert pins at an angle, opening them slightly to grab more hair. Match pin color exactly to your hair for true invisibility.
For formal events, consider these advanced securing methods. Sew your braid in place using clear thread and a small needle, catching just a few hairs with each stitch. This time-intensive method creates bombproof hold. Alternatively, use tiny clear rubber bands every few inches along the braid’s length, hidden under the top strands.
The “anchor braid” technique provides exceptional security. Before beginning your waterfall braid, create a tiny regular braid at your starting point. Use this stable base to begin your waterfall pattern. The anchored start prevents the entire braid from loosening.
Touch-up strategies
Even perfectly executed braids might need minor adjustments throughout the day. Knowing quick fix techniques helps you maintain a polished appearance without completely redoing your style.
Carry a small kit with emergency supplies: travel-size hairspray, bobby pins matching your hair color, a small mirror, and clear elastics. This fits easily in most purses and provides tools for any quick fixes needed.
If sections begin loosening, don’t panic. Gently tug the braid tighter at the loose spot, then secure with a strategically placed bobby pin. Spray the area lightly and smooth with your fingers. This spot treatment takes less than a minute.
Flyaways and frizz respond well to these quick fixes:
Smoothing method: Spray hairspray on a clean toothbrush, then gently brush over problem areas
Control technique: Rub a tiny amount of hand lotion between palms, then smooth over frizzy sections
Static solution: Run a dryer sheet lightly over your hair to eliminate static
For dropped strands that won’t stay down, twist them gently and pin them under the loose hair. This creates intentional-looking texture while managing unruly pieces. Sometimes incorporating the “mistake” looks better than fighting it.
Overnight preservation tips
When you’ve created a particularly beautiful waterfall braid, you might want to preserve it for the next day. While sleeping in any braid isn’t ideal for hair health, occasional overnight preservation works well with proper precautions.
First, assess whether your braid can handle overnight wear. Very tight braids or those causing scalp tension should be removed before bed. Comfortable braids that allow scalp movement can potentially last through gentle sleep.
Protect your braid with a silk or satin pillowcase that reduces friction. Cotton pillowcases create frizz and loosen braids through friction. If you don’t have silk pillowcases, wrap your braid loosely in a silk scarf, securing it with bobby pins rather than tight ties.
Before bed, reinforce your braid’s weak points with extra bobby pins. Add pins wherever the braid touches the pillow when you lie down. Spray the entire braid lightly with flexible-hold hairspray, allowing it to dry completely before getting into bed.
In the morning, refresh your preserved braid carefully. Remove any bobby pins that shifted overnight. Smooth flyaways with the hairspray-and-toothbrush method. Re-curl any dropped strands that lost their shape. Most waterfall braids can be successfully refreshed in under five minutes.
Remember that preserved braids won’t look as fresh as newly created ones. The slightly lived-in texture actually appeals to many women, creating a romantic, bohemian vibe. If perfectection matters for your event, plan time for a fresh braid rather than relying on overnight preservation.
Mastering waterfall braids
Mastering waterfall braids opens up a world of hairstyling possibilities that once seemed reserved for salon professionals. From the basic side-swept version to elaborate crown designs, each variation you’ve discovered builds on simple techniques that become second nature with practice. Remember that your first attempts might feel awkward – those fingers will soon move through the motions smoothly, creating cascading styles that draw compliments wherever you go.
The key to success lies in patient practice and finding the variations that suit your hair type, lifestyle, and personal style. Whether you choose a romantic side braid for date night or an elegant crown braid for special occasions, these techniques adapt to your needs while keeping you looking polished and put-together. Your investment in learning these skills pays off every time you create a gorgeous waterfall braid in just minutes.
Frequently Asked Questions
Q: Can you create a waterfall braid on short hair?
A: Yes, waterfall braids work on hair that reaches at least to your chin. You’ll need to take smaller sections and might only achieve a partial waterfall effect, but the style still looks beautiful on shorter lengths.
Q: Why does my waterfall braid keep falling out after an hour?
A: Your hair likely needs more texture or better securing methods. Try using dry shampoo before braiding, maintaining consistent tension throughout, and securing with both clear elastics and bobby pins at stress points.
Q: Is it easier to do a waterfall braid on myself or someone else?
A: Most people find braiding on others easier initially since you can see the entire process clearly. However, with practice, self-braiding becomes natural as you develop muscle memory for the movements.
Q: Can you waterfall braid wet hair?
A: While possible, wet hair makes waterfall braiding much more difficult. Wet strands stick together, making the dropping technique messy. Always work with completely dry hair for best results.
Q: What’s the difference between a waterfall braid and a cascade braid?
A: These terms are often used interchangeably. Both describe the same technique where you drop strands while braiding to create a flowing effect beneath the braid.
Q: How do you hide the elastic band at the end of a waterfall braid?
A: Wrap a small section of hair around the elastic and secure with a bobby pin underneath. Alternatively, tuck the braid end under loose hair and pin in place for an invisible finish.
Q: Can you add extensions to a waterfall braid?
A: Yes, clip-in extensions work beautifully with waterfall braids. Attach them before starting your braid, ensuring they’re secure. The dropping technique actually helps blend extensions naturally with your real hair.
Q: Why does my waterfall braid look messy instead of neat?
A: Messy results usually come from inconsistent section sizes or uneven tension. Focus on taking equal sections each time and maintaining the same gentle tension throughout the entire braid.