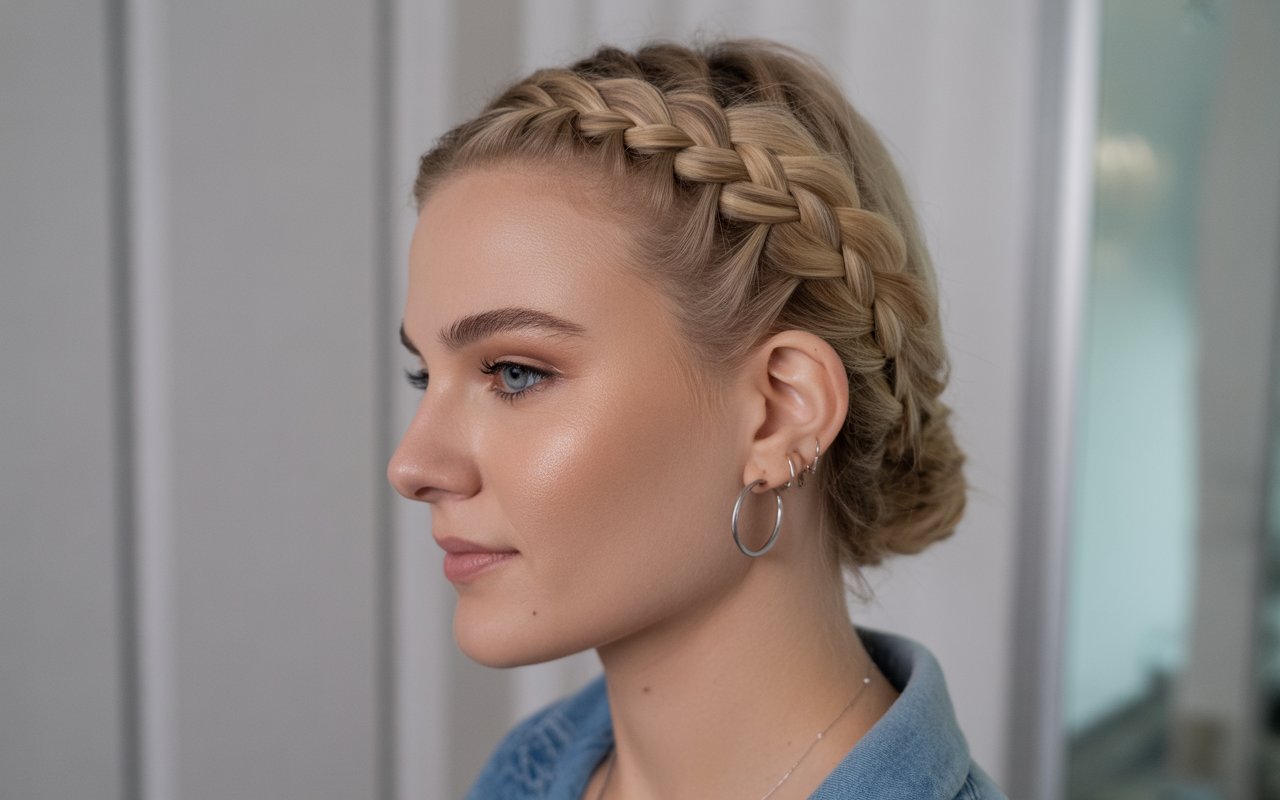
The Dutch braid stands as one of the most striking hairstyles in the braiding world, offering a raised, three-dimensional appearance that catches the eye from every angle. Unlike traditional braids that sit flat against the head, this technique creates an elevated pattern that seems to float above the scalp, making any hairstyle instantly more sophisticated. Whether you’re heading to the gym or attending a formal event, mastering this versatile braiding method opens up countless styling possibilities.
Many women feel intimidated by the Dutch braid at first glance, assuming it requires professional-level skills or years of practice. The truth is far more encouraging – with the right guidance and a bit of patience, anyone can create stunning Dutch braids at home. The technique simply reverses the standard braiding motion, crossing strands under rather than over, which produces that signature raised effect that makes this style so captivating.
In the following sections, we’ll walk through everything from the fundamental techniques to advanced variations that will transform your hair game completely. You’ll discover how to prep your hair for the best results, master the basic braiding motion, and create various styles suitable for any occasion. Ready to unlock the secrets of this gorgeous braiding technique? Let’s start your journey to becoming a Dutch braid expert.
What Makes Dutch Braids Stand Out
The Dutch braid possesses a distinctive quality that sets it apart from every other braiding style in your repertoire. This technique creates a braid that sits proudly on top of your hair rather than nestling into it, giving you that Instagram-worthy look that turns heads wherever you go. The secret lies in the reverse braiding motion, which pushes the braid outward instead of pulling it inward.
The inverted braiding technique
Understanding the mechanics behind Dutch braiding makes the entire process much simpler. While French braids involve crossing strands over each other, Dutch braids require you to cross them underneath. This subtle change in direction creates dramatic results. Your hands perform the same basic movements, just in reverse order.
Think of it like building a bridge versus digging a tunnel. French braids create a smooth path that follows the natural curve of your head, while Dutch braids construct an elevated pathway that stands out from the surface. This architectural difference gives Dutch braids their characteristic bold appearance.
The learning curve might feel steep initially, especially if you’re accustomed to traditional braiding methods. Your muscle memory needs time to adjust to the new motion. Start by practicing on a friend or mannequin head before attempting to braid your own hair. This approach helps you understand the hand positioning without the added challenge of working behind your head.
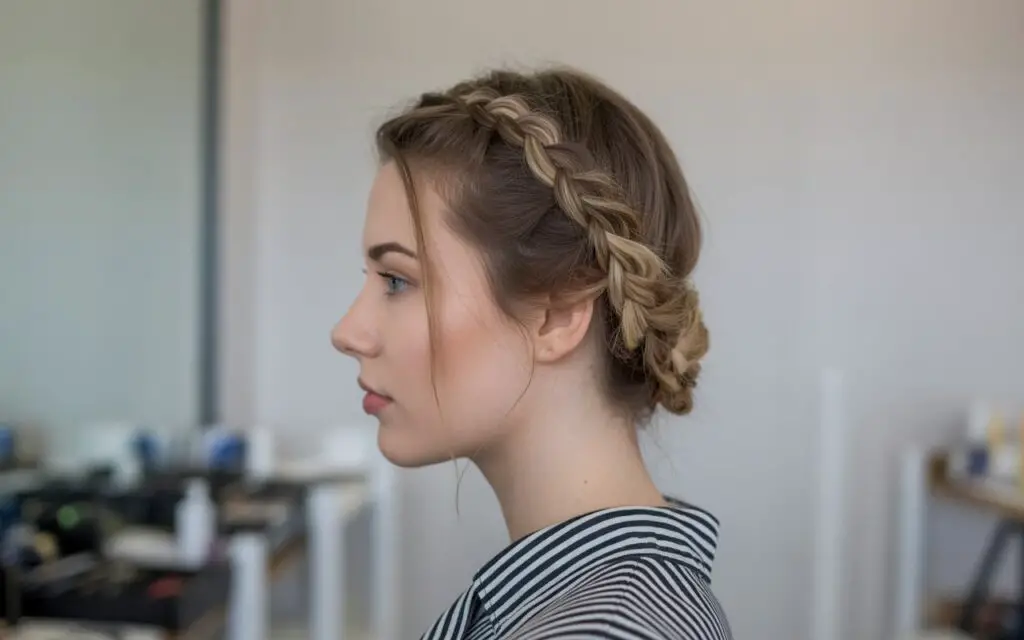
Visual impact and 3D effect
The three-dimensional quality of Dutch braids creates stunning visual interest that photographs beautifully from every angle. Light catches the raised sections differently than flat braids, producing shadows and highlights that add depth to your hairstyle. This dimensional effect works particularly well with highlighted or multi-toned hair, where the braiding pattern showcases different color variations.
The raised structure also makes thin or fine hair appear fuller and more voluminous. By lifting the braid away from the scalp, you create an illusion of thickness that flat braids can’t achieve. This optical trick has made Dutch braids a favorite among women looking to add body to their hairstyles without using heat tools or products.
Versatility in styling options
Dutch braids adapt to virtually any hair length beyond shoulder-length, making them accessible to most women. Short bobs might struggle with the technique, but medium to long hair provides ample length for creative styling. The basic technique serves as a foundation for countless variations.
You can create a single Dutch braid down the center for a bold mohawk-inspired look, or opt for two braids for a more balanced appearance. Side-swept versions offer romantic appeal, while crown braids provide an ethereal, goddess-like quality. The technique also combines beautifully with other styling elements – try incorporating twists, regular braids, or leaving sections loose for added texture.
Suitable hair types and textures
Different hair textures interact uniquely with Dutch braiding techniques. Straight hair showcases the clean lines and precise pattern of the braid most clearly. The smooth texture allows for tight, neat braids that maintain their shape throughout the day. However, straight hair might require some texturizing spray or dry shampoo to prevent slipping.
Wavy and curly hair brings natural volume and texture to Dutch braids, creating a fuller, more romantic look. The inherent texture provides grip, making the braiding process easier and helping the style last longer. Curly-haired women often find that Dutch braids offer an excellent protective style that minimizes frizz while looking polished.
Here’s what works best for different hair types:
Fine Hair: Add volumizing mousse before braiding and gently tug at the edges afterward for fullness
Thick Hair: Section carefully to maintain even braid thickness and use smoothing serum to control flyaways
Curly Hair: Work with slightly damp hair or use leave-in conditioner for easier handling
Straight Hair: Apply texturizing spray or dry shampoo for better grip and longevity
Color-treated or damaged hair benefits from the gentle nature of Dutch braids. Unlike heat styling, braiding doesn’t cause additional damage while still creating a polished look. The technique works equally well on natural hair colors and bold fashion shades, with the raised structure showcasing color dimensions beautifully.
Essential Steps for Perfect Dutch Braids
Creating flawless Dutch braids requires more than just knowing where to place your fingers. The journey to a perfect braid starts long before you begin sectioning your hair. Success depends on proper preparation, consistent technique, and attention to detail throughout the entire process.
Preparing your hair properly
Clean, dry hair provides the ideal canvas for Dutch braiding, though second-day hair often works even better due to its natural texture and grip. If you’ve just washed your hair, the silky smoothness might cause sections to slip through your fingers. A light mist of texturizing spray or a small amount of styling cream can provide the friction needed for secure braiding.
Detangling plays a crucial role in achieving smooth, even braids. Work through your hair with a wide-tooth comb or detangling brush, starting from the ends and gradually moving upward. Pay special attention to the nape of your neck and behind your ears, where tangles often hide. Any knots or snags will become magnified once incorporated into your braid.
Consider your desired final look when preparing your hair. For a sleek, polished braid, apply a smoothing serum to tame flyaways. If you prefer a more relaxed, bohemian style, skip the serum and work with your hair’s natural texture. Some women find that braiding slightly damp hair gives them more control, especially when dealing with shorter layers or baby hairs around the hairline.
The basic braiding motion
Starting your Dutch braid correctly sets the foundation for the entire style. Begin by taking a section of hair at your crown – about two to three inches wide works well for most hair types. Divide this section into three equal strands, holding them between your fingers with comfortable tension.
The key motion involves crossing the outer strands under the middle strand rather than over it. Take your right strand and pass it underneath the center strand, then repeat with the left strand. This creates the signature raised effect. As you continue down your head, incorporate small sections of hair from either side into your outer strands before crossing them under.
Your hands should maintain a consistent rhythm throughout the braiding process. Think of it as a dance – right under middle, left under middle, add hair to right, cross under middle, add hair to left, cross under middle. This repetitive pattern becomes second nature with practice. Keep your hands close to your head to maintain control and create a tight, defined braid.
Maintaining consistent tension
Tension control separates amateur Dutch braids from professional-looking results. Too loose, and your braid appears messy and won’t hold its shape. Too tight, and you’ll experience discomfort while risking breakage. The sweet spot lies in firm, even pressure that keeps the braid secure without causing pain.
Each section you add should match the size of previous sections to create a uniform appearance. Use your pinky fingers to separate new sections while your other fingers maintain hold on the existing braid. This technique prevents you from losing tension while gathering hair.
Watch for common tension mistakes like gradually tightening as you work down the braid or creating loose spots where you’ve added new sections. If you notice inconsistencies, it’s better to undo a few crosses and correct the tension rather than continuing with an uneven braid.
Common mistakes to avoid
Learning what not to do proves just as valuable as mastering proper technique. One frequent error involves taking sections that are too large, creating a bulky, uneven braid. Smaller, consistent sections produce a more refined result that showcases the braiding pattern clearly.
Another pitfall occurs when people forget to keep adding hair as they braid downward. This results in a Dutch braid that transitions awkwardly into a regular braid midway through. Continue incorporating hair until you reach the nape of your neck for a cohesive look.
Many beginners struggle with hand positioning, especially when braiding their own hair. Your arms will tire quickly if held too high. Instead, keep your elbows relaxed at your sides and tilt your head forward slightly. This position reduces fatigue and gives you better access to all sections of hair.
Rushing the process almost always leads to disappointing results. Dutch braids require patience and methodical movement. Set aside adequate time for your braiding session rather than trying to squeeze it into a hurried morning routine. Your careful attention will show in the final result.
Finishing touches for a polished look
Once you’ve completed the main braid, several finishing techniques can elevate your style from good to gorgeous. Secure the end with a clear elastic or one that matches your hair color. Avoid using rubber bands, which can cause breakage and create unsightly kinks in your hair.
The “pancaking” technique adds volume and drama to your completed braid. Gently tug at the outer edges of each braid section, working from bottom to top. This loosens the braid slightly while maintaining its structure, creating a fuller, more romantic appearance. Start with subtle pulls – you can always make it messier, but you can’t make it neater once loosened.
Address any flyaways or baby hairs according to your style preference. For a polished look, smooth them down with a small amount of hair gel on a clean mascara wand or toothbrush. For a more casual vibe, let them frame your face naturally. A light mist of hairspray helps your braid maintain its shape throughout the day without creating stiffness or crunch.
Consider adding subtle accessories to complete your look. Small flowers tucked into the braid create a whimsical touch, while metallic hair rings threaded through sections add modern edge. Whatever finishing touches you choose, remember that Dutch braids make a statement on their own – sometimes simple truly is best.
Creative Dutch Braid Variations

Once you’ve mastered the basic Dutch braid, a world of creative possibilities opens before you. These variations transform the fundamental technique into diverse styles suitable for every personality and occasion. Each adaptation maintains the signature raised appearance while offering its own unique flair.
Side Dutch braids
The side Dutch braid creates an asymmetrical look that frames your face beautifully. Start by creating a deep side part, then begin your braid at the heavier side of the part. Follow the curve of your hairline, incorporating hair as you work diagonally across your head toward the opposite shoulder.
This variation particularly flatters round and square face shapes by creating diagonal lines that elongate facial features. The asymmetry adds visual interest while maintaining the sophistication of the traditional Dutch braid. You can keep the braid tight against your head for a sleek appearance or loosen it for a more romantic feel.
For added drama, try starting with a small section near your temple and gradually incorporating larger sections as you move across your head. This creates a braid that grows progressively thicker, adding dimensional interest to the style. The ending position over one shoulder makes this variation perfect for showcasing statement earrings or necklines.
Some women prefer to stop adding hair once they reach their ear, allowing the remainder to fall into a regular three-strand braid. Others continue the Dutch technique all the way to the opposite shoulder, creating a dramatic crown effect. Experiment with both approaches to discover which suits your style best.
Double Dutch braids
Two Dutch braids offer balanced symmetry and practical hair management, making them ideal for active lifestyles. Part your hair straight down the middle from forehead to nape, securing one side while you work on the other. This style keeps hair completely controlled while maintaining an fashionable appearance.
The key to professional-looking double Dutch braids lies in creating perfectly even sections. Use a rat-tail comb to ensure your center part runs completely straight. Take your time with this step – an uneven part will remain visible throughout the wearing of this style. Each braid should mirror the other in size, tension, and placement.
Working with one side at a time prevents confusion and maintains neater sections. Complete the first braid entirely before starting the second. This approach also helps you match the tension and size of your sections, creating symmetrical results. If you’re braiding your own hair, use a hand mirror to check the back periodically.
Double Dutch braids offer excellent versatility in styling. Wear them straight back for athletic activities, angle them slightly for a softer look, or wrap the ends into buns for an updo variation. This style typically lasts several days with proper nighttime protection, making it an efficient choice for busy women.
Dutch braid crown
The Dutch braid crown creates an ethereal, goddess-like appearance perfect for special occasions. This variation involves braiding around your head’s circumference, creating a halo effect. Start behind one ear and work your way around, keeping the braid close to your hairline.
Planning your sections becomes crucial with crown braids. You’ll need to reserve enough hair to complete the full circle while maintaining consistent braid thickness. Section your hair horizontally around your head before beginning, using clips to keep unused portions separate. This preparation prevents running out of hair midway through your crown.
The direction of your braid determines the final look. Braiding clockwise versus counterclockwise creates subtle differences in how the raised sections catch light. Most women find one direction more comfortable than the other based on their dominant hand. Practice both to determine your preference.
Incorporating accessories and ribbons
Accessories transform basic Dutch braids into personalized works of art. The raised structure of these braids provides perfect anchor points for various decorative elements. Small flowers, pearls, or metallic accents can be tucked into the braid sections after completion or woven throughout during the braiding process.
Ribbon weaving adds color and whimsy to Dutch braids. Choose ribbon slightly narrower than your braid sections for easy incorporation. Add the ribbon to one of your three strands at the beginning, treating it as part of that section throughout the braiding process. Satin ribbons provide shine and slip easily through hair, while grosgrain ribbons offer more grip and texture.
Hair rings and cuffs designed specifically for braids clip easily onto completed sections. These metallic accessories range from simple bands to ornate designs featuring gems or patterns. Space them evenly throughout your braid for a bohemian look, or cluster them near the crown for concentrated glamour.
Consider these creative accessory ideas:
Fresh Flowers: Baby’s breath or small daisies for romantic appeal
Metallic Thread: Woven throughout for subtle shimmer
Beads: Threaded onto small sections before braiding
Chains: Delicate jewelry chains draped between braid sections
Colored Extensions: Added for temporary pops of color
The key to successful accessory incorporation lies in selecting elements proportionate to your braid size. Oversized accessories overwhelm delicate braids, while tiny accents get lost in thick braids. Match your accessories to both the braid scale and the occasion for cohesive styling.
Seasonal themes offer inspiration for accessory choices. Spring calls for fresh flowers and pastel ribbons, summer suits bright colors and beach-themed elements, fall welcomes warm tones and natural materials, while winter sparkles with metallic accents and jeweled pieces. Let your creativity guide you while maintaining balance between decoration and the natural elegance of the Dutch braid itself.
Styling Dutch Braids for Different Occasions
The adaptability of Dutch braids makes them suitable for virtually any event on your calendar. By adjusting factors like tightness, positioning, and finishing touches, you can create looks ranging from gym-ready to red-carpet worthy. Understanding how to modify this versatile technique helps you maximize your styling options.
Casual everyday looks
Your daily Dutch braid should balance style with practicality. A slightly looser interpretation works wonderfully for running errands, meeting friends for coffee, or casual office environments. Start with a Dutch braid positioned slightly off-center for an effortlessly chic appearance that doesn’t scream “I spent hours on my hair.”
The lived-in look has become increasingly popular, and Dutch braids excel at achieving this aesthetic. After completing your braid, gently tug at small sections to create subtle messiness. Pull out a few face-framing pieces for added softness. This relaxed approach prevents the style from appearing too formal for everyday wear.
Morning routines often demand quick solutions. Master the art of the partial Dutch braid – starting at your crown and transitioning to a regular braid or ponytail halfway down. This hybrid style takes less time while still showcasing the distinctive raised pattern that makes Dutch braids special. Perfect for those days when you want to look put-together without the full commitment.
Consider your outfit when styling casual Dutch braids. A sleek, tight braid pairs beautifully with minimalist clothing, while a messier version complements bohemian or relaxed styles. The beauty lies in the technique’s ability to adapt to your personal aesthetic without requiring complete restyling.
Professional and workplace styles
Office-appropriate Dutch braids require a more polished approach. Focus on creating clean lines and controlling flyaways to project professionalism. A single Dutch braid straight back into a low bun combines sophistication with the interesting texture of the raised braid technique.
The Dutch braid offers an elegant solution for women transitioning between workout and work. Braid your hair before your morning gym session, then simply smooth any flyaways and add a professional touch like a silk scarf tied at the base. This approach saves precious morning minutes while maintaining a put-together appearance.
For important meetings or presentations, consider a Dutch braid crown that keeps hair completely off your face while adding a touch of personality to standard professional attire. This style reads as both creative and controlled – perfect for industries that value innovation alongside professionalism. Ensure the braid remains close to your hairline for the most refined result.
Industry culture should guide your styling choices. Creative fields often welcome more elaborate Dutch braid variations, while conservative environments might call for simpler interpretations. When in doubt, opt for sleeker versions that showcase the technique’s elegance without drawing excessive attention.
Special event braids
Formal occasions call for Dutch braids that make a statement. These events provide opportunities to showcase intricate variations and incorporate elegant accessories. A Dutch braid woven into an updo creates texture and visual interest far beyond a simple chignon or bun.
Wedding guest hairstyles benefit from the romantic quality of loosened Dutch braids. Create a side Dutch braid that wraps around into a low, messy bun, leaving curled tendrils to frame your face. This style photographs beautifully and holds up throughout long celebrations. Add pearl pins or delicate flowers to coordinate with formal attire.
For your own special events – whether prom, wedding, or gala – Dutch braids provide a foundation for elaborate styles. Multiple small Dutch braids can be woven together into complex patterns, creating looks worthy of any red carpet. These intricate styles often benefit from professional execution, but with practice, ambitious home stylists can achieve stunning results.
The longevity of Dutch braids makes them ideal for events lasting many hours. Unlike curls that fall or updos that loosen, a well-executed Dutch braid maintains its shape from ceremony through late-night dancing. Set with appropriate products and the style withstands humidity, movement, and time.
Athletic and active wear styles
Athletes and fitness enthusiasts particularly appreciate Dutch braids for their security and style combination. The technique keeps every strand controlled while avoiding the headache-inducing tightness of some athletic hairstyles. Double Dutch braids have become synonymous with serious athletic performance while maintaining feminine appeal.
Different activities benefit from specific Dutch braid variations:
High-Impact Sports: Two tight Dutch braids prevent any movement or distraction
Yoga/Pilates: A single loose Dutch braid allows for comfort in inverted poses
Swimming: Dutch braid into a bun minimizes tangling and chlorine exposure
Running: Side Dutch braid keeps hair off the neck while preventing bounce
The raised nature of Dutch braids promotes air circulation against the scalp, reducing sweat accumulation during intense workouts. This practical benefit, combined with the style’s durability, explains why many professional athletes choose Dutch braids for competition. The look has become so associated with athletic prowess that it projects strength and determination even outside the gym.
Post-workout transitions become simpler with Dutch braids as your base style. A quick refresh with dry shampoo and some strategic loosening transforms your gym look into something appropriate for brunch or errands. This versatility makes Dutch braids invaluable for women balancing busy schedules with active lifestyles.
Mastering Advanced Dutch Braid Techniques
Taking your Dutch braiding skills to the next level requires understanding subtle techniques that separate amateur attempts from salon-quality results. These advanced methods focus on manipulating texture, working with challenging hair types, and achieving specific aesthetic goals that go beyond basic braiding.
Adding volume and texture
Creating dimensional Dutch braids involves more than just the initial braiding technique. Strategic preparation and post-braiding manipulation transform flat braids into voluminous masterpieces. Start by applying mousse or volumizing spray to your roots before braiding, focusing on the crown area where height makes the most impact.
The technique of backcombing or teasing sections before incorporating them into your braid adds incredible fullness. Gently tease each section at the roots before adding it to your braid. This creates a cushion of volume that maintains height throughout the day. Be gentle to avoid damage – you want texture, not tangles.
After completing your braid, the pancaking technique becomes your best friend for added dimension. Work systematically from the bottom of your braid upward, gently pulling at the outer edges of each section. Focus on pulling outward rather than apart to maintain the braid’s integrity while maximizing its size. The raised nature of Dutch braids makes them particularly responsive to this technique.
For extreme volume, try the bubble effect. After securing your completed braid, gently push sections upward toward the crown, creating compressed areas that puff outward. Secure these bubbled sections with clear elastics hidden within the braid. This creates an almost mohawk-like raised effect perfect for dramatic evening styles.
Working with different hair lengths
Short hair presents unique challenges for Dutch braiding, but creative solutions exist. For hair that barely reaches the shoulders, focus on partial Dutch braids that transition into other styles. A Dutch braid crown works wonderfully on shorter lengths since you’re working horizontally rather than vertically.
The key with shorter hair lies in maintaining tension and control over smaller sections. Use a light-hold gel or cream to help grip those shorter pieces that want to escape. Working with slightly damp hair also provides better control. Don’t expect the same lengthy braid as longer-haired women – instead, focus on the textured, raised effect the technique provides.
Medium-length hair offers the perfect balance for Dutch braiding. You have enough length for full braids while maintaining manageability. This length particularly suits Dutch braid pigtails or side braids that don’t require extensive length to look complete. Experiment with ending your braids at different points – sometimes a shorter braid makes a stronger statement than one trailing down your back.
Long hair provides endless possibilities but requires extra attention to sectioning and tension. The weight of long hair can pull Dutch braids flat if not properly anchored. Counter this by creating smaller, tighter sections at the scalp and gradually increasing section size as you work downward. This creates a stable base that supports the length without sacrificing the raised effect.
Creating messy versus sleek finishes
The finish you choose dramatically alters the overall impression of your Dutch braid. Sleek finishes require meticulous preparation and execution. Apply smoothing serum before braiding, use a fine-tooth comb for precise sectioning, and keep tension consistent throughout. A boar bristle brush helps smooth each section before incorporation.
For the sleekest possible finish, mist each section with shine spray as you braid. This prevents any frizz or flyaways from developing during the braiding process. Complete the look with a light application of hair gel on a toothbrush to smooth baby hairs and create sharp, clean edges around your hairline.
Messy finishes celebrate texture and movement. Begin with texturizing spray throughout your hair, scrunching to enhance natural waves or curls. As you braid, allow smaller pieces to escape naturally rather than forcing every strand into place. The key to attractive messiness lies in intentionality – strategic imperfection rather than actual sloppiness.
After completing a messy Dutch braid, enhance the effect by gently pulling apart sections and allowing tendrils to fall naturally. Twist escaped pieces around a curling iron for romantic spirals that complement the textured braid. This finish works particularly well for special occasions where you want an effortlessly elegant appearance.
Tips for braiding your own hair
Self-braiding Dutch style requires patience, practice, and some helpful strategies. Your biggest challenge comes from working behind your head where visibility is limited. Set up mirrors that allow you to see multiple angles – a three-way mirror works ideally, but two mirrors positioned strategically can suffice.
Arm fatigue becomes a real issue when braiding your own hair. Combat this by keeping your elbows low and close to your body rather than raised high. Take breaks if needed – it’s better to pause and rest than to rush through with tired arms creating uneven tension. Some women find sitting down provides better arm support than standing.
Muscle memory develops faster than you might expect. Practice the hand motions without actually braiding first. Sit comfortably and repeat the under-crossing motion until it feels natural. Then practice with yarn or rope before attempting on your own hair. This progressive approach builds confidence alongside skill.
Here are essential self-braiding strategies:
Sectioning Clips: Pre-section your hair and secure with clips for easier handling
Texture Spray: Provides grip that prevents sections from slipping
Practice Runs: Start with partial braids before attempting full styles
Video Recording: Record your successful attempts to review your technique
Patience: Allow double the time you think you’ll need initially
The angle of your head significantly impacts your braiding success. Tilting forward helps when starting at the crown, while turning to each side assists with Dutch braid pigtails. Don’t fight against comfortable positioning – adjust your head angle as needed throughout the process. Your neck will thank you, and your results will improve.
Remember that everyone’s first attempts at self-braiding look imperfect. The raised nature of Dutch braids actually makes minor imperfections less noticeable than with flat braids. Focus on maintaining consistent tension and hand positioning rather than achieving absolute perfection. With regular practice, your hands will develop the dexterity needed for creating salon-worthy Dutch braids at home.
The Dutch Braid Technique
The Dutch braid technique opens doors to countless styling possibilities that go far beyond simple hair management. From casual morning looks to elegant evening styles, this versatile method adapts to every aspect of your life while adding sophisticated dimension to any hairstyle. The raised, three-dimensional effect creates visual interest that flat braids simply cannot match, making mastery of this technique a valuable addition to your styling repertoire.
Practice remains your greatest ally in perfecting Dutch braids. Start with basic variations and gradually progress to more complex styles as your confidence grows. Remember that every expert braider started with clumsy fingers and uneven sections – persistence and patience transform beginners into skilled stylists. Your hands will develop muscle memory, making each attempt smoother than the last. Soon, creating beautiful Dutch braids will become second nature, allowing you to style your hair quickly and confidently for any occasion.
Frequently Asked Questions
Q: How long does my hair need to be for Dutch braids?
A: Your hair should ideally reach at least shoulder length for full Dutch braids. Shorter hair can work for partial braids or crown styles, but you’ll need enough length to grip and cross sections effectively.
Q: Why does my Dutch braid look flat instead of raised?
A: You’re likely crossing the strands over instead of under. Remember, Dutch braids require passing the outer strands underneath the middle strand. Also, maintain firm tension and avoid pulling the braid too close to your scalp.
Q: Can I sleep in Dutch braids?
A: Yes, Dutch braids make excellent protective overnight styles. Wrap your braids in a silk scarf or use a satin pillowcase to minimize frizz. The braids often look even better the next day with a slightly lived-in texture.
Q: How do I prevent my Dutch braid from hurting my scalp?
A: Avoid pulling too tightly at the roots. Maintain firm but comfortable tension, and take breaks if you feel discomfort. Braiding slightly looser near the hairline also reduces tension headaches.
Q: What’s the difference between Dutch braids and boxer braids?
A: They’re essentially the same technique! “Boxer braids” became a trendy term for double Dutch braids worn straight back. The technique remains identical regardless of what you call them.
Q: How can I make my Dutch braids last longer?
A: Start with day-old hair for better grip, use texturizing products before braiding, and secure with quality elastics. Set with light hairspray and protect overnight with a silk scarf for multi-day wear.
Q: Which face shapes suit Dutch braids best?
A: Dutch braids flatter all face shapes when positioned correctly. Round faces benefit from height at the crown, while angular faces look great with softer, loosened braids. Adjust placement and tension to complement your features.
Q: Can I Dutch braid wet hair?
A: While possible, wet hair is more fragile and prone to breakage. If you must braid damp hair, apply leave-in conditioner first and braid loosely. For best results and hair health, wait until hair is at least 80% dry.