
Twist braids stand as one of the most accessible protective styles for anyone starting their natural hair journey. Unlike more complex braiding techniques that require years of practice or professional help, twists offer a simple yet effective way to protect your hair while looking polished and put-together. The beauty of this style lies in its forgiving nature – even if your first attempts aren’t perfect, they’ll still look intentional and stylish.
Many women hesitate to try protective styles because they worry about the learning curve or potential damage from tight styling. Twist braids eliminate both concerns by using a gentle technique that works with your hair’s natural texture rather than against it. Whether you have thick coils, loose waves, or anything in between, this versatile style adapts to your specific hair type while promoting healthy growth and moisture retention.
In the following sections, you’ll discover everything from the basic tools needed to professional-level techniques that transform your hair care routine. We’ll walk through preparation methods that set you up for success, share insider tips for achieving salon-worthy results at home, and reveal maintenance secrets that extend the life of your style. Ready to master a protective style that saves time, money, and promotes healthier hair? Let’s get started with your complete guide to creating beautiful twist braids.
What Are Twist Braids and Why Choose Them?
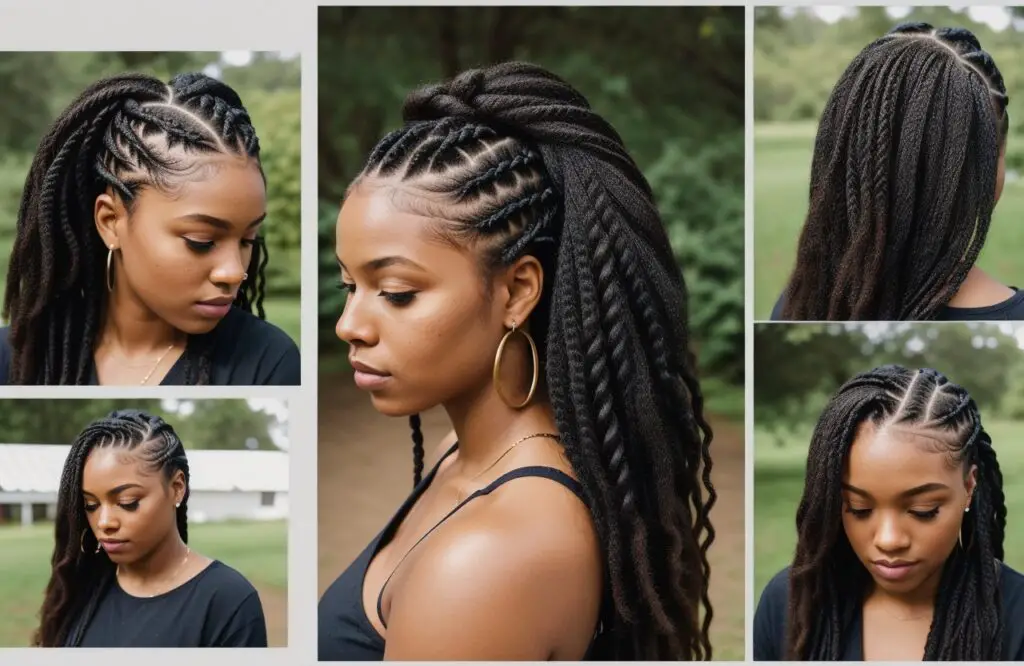
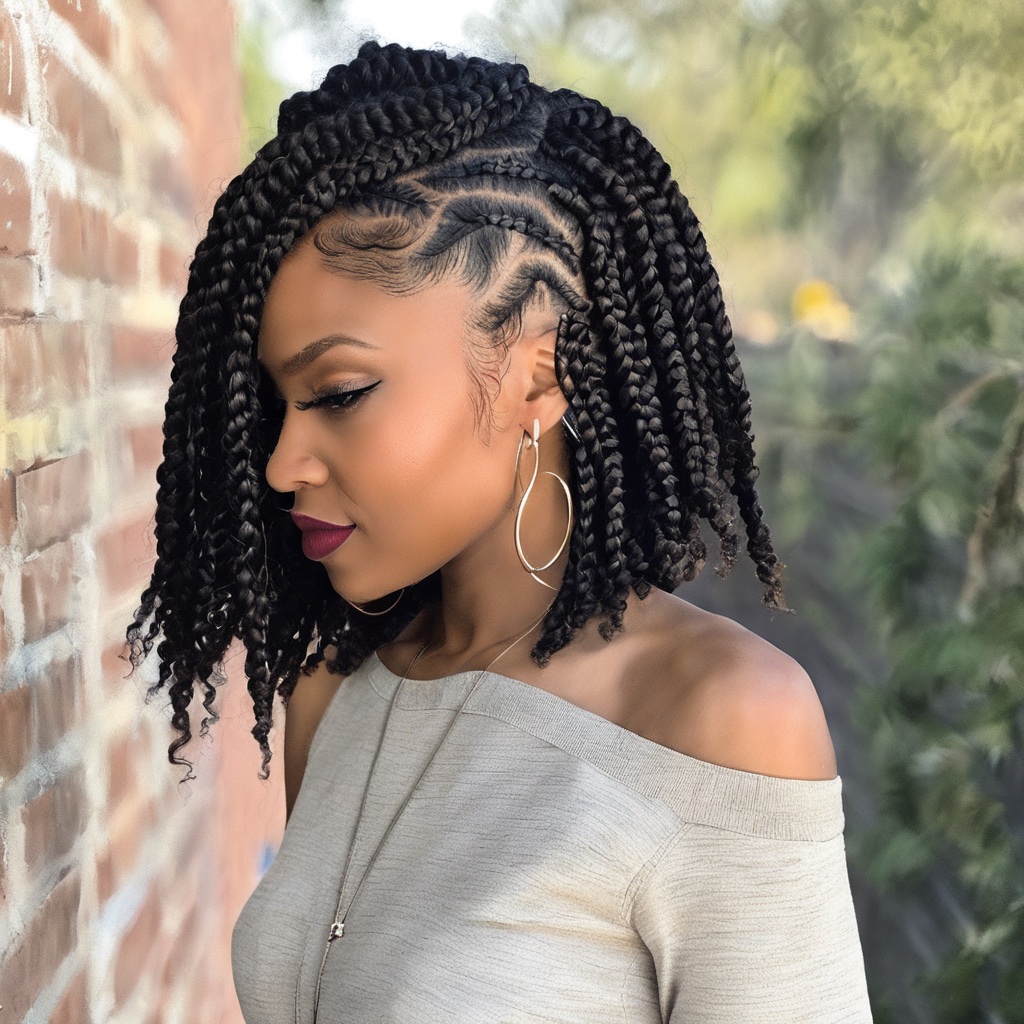
Twist braids involve wrapping two sections of hair around each other in a rope-like pattern, creating a protective style that locks in moisture while minimizing manipulation. Unlike traditional three-strand braids that require intricate weaving patterns, twists use a simple rotating motion that anyone can master with basic practice. This fundamental difference makes them particularly appealing for beginners who want professional-looking results without extensive training.
Definition and basic concept
The technique involves dividing hair into sections, then continuously wrapping two strands around each other from root to tip. Each twist creates a spiral pattern that naturally holds itself in place, especially as your hair texture grips onto itself. The size can range from tiny micro-twists to chunky statement pieces, depending on your preference and the time you want to invest.
Benefits for hair health
Your strands receive significant protection when tucked into twists, shielding them from environmental damage and reducing daily manipulation. The style promotes length retention by keeping ends tucked away from friction against clothing and pillows. Natural oils can travel more easily down the hair shaft when it’s in a twisted formation, leading to better moisture distribution throughout each strand.
Hair breakage decreases dramatically when you’re not constantly combing, brushing, or restyling your hair every morning. The low-manipulation nature of this protective style gives your strands a chance to rest and recover from any previous damage.
Versatility and styling options
Once your twists are installed, the styling possibilities multiply exponentially. You can wear them down for a casual look, pin them up into elegant updos, or create side-swept styles for special occasions. Some women prefer to curl the ends with hot water for a more finished appearance, while others appreciate the natural, textured look of unsealed ends.
The style transitions seamlessly from workout sessions to board meetings, making it perfect for busy lifestyles. You can accessorize with headbands, scarves, or decorative pins to change your look without redoing the entire style.
Time and maintenance advantages
Morning routines become remarkably simple when your hair is already styled in twists. You might spend five minutes arranging them instead of the usual thirty to forty-five minutes required for daily styling. This time-saving aspect particularly benefits those with demanding schedules or anyone who prefers extra sleep over elaborate morning hair routines.
The initial installation time varies based on hair length and twist size, typically ranging from two to six hours. However, considering the style can last several weeks with proper care, the time investment pays off significantly compared to daily styling efforts.
Different hair types that work well
Contrary to popular belief, twist braids aren’t exclusive to one particular texture. Type 3 curls create beautiful, defined twists that showcase curl patterns, while Type 4 hair produces stunning results with excellent longevity. Even those with chemically treated or heat-damaged hair find success with this protective style, as it helps rehabilitate compromised strands.
The key lies in understanding your specific hair characteristics and adjusting the technique accordingly. Finer textures might benefit from smaller sections to ensure the twists hold, while thicker hair can support larger, more dramatic twists. Mixed textures throughout your head aren’t a problem either – simply adjust your approach for different sections as needed.
Essential Tools and Products You’ll Need
Starting your twist braid journey requires gathering the right supplies, but you don’t need to break the bank buying professional-grade equipment. Most items are probably already in your bathroom cabinet or available at any beauty supply store. Having these essentials on hand before you begin prevents frustrating interruptions mid-styling and ensures your twists turn out exactly as planned.
Basic tools for twisting
A rat-tail comb becomes your best friend for creating clean, precise parts throughout your hair. The pointed end allows you to section with accuracy, while the comb side helps smooth each section before twisting. Wide-tooth combs work better for initial detangling, preventing unnecessary breakage that fine-tooth options might cause on textured hair.
Your fingers actually serve as the primary tools for creating twists. Clean hands with trimmed nails prevent snagging and allow for smooth, consistent tension throughout the twisting process. Some people prefer using latex gloves for better grip, especially when working with slippery products.
Hair preparation products
A quality leave-in conditioner forms the foundation of well-moisturized twists that last. Look for formulas that provide slip without leaving residue, making the twisting process smoother while keeping hair hydrated. Protein-moisture balanced products work particularly well, strengthening strands while maintaining flexibility.
Detangling sprays can save significant time and reduce breakage during the preparation phase. These products typically contain ingredients that smooth the hair cuticle and reduce friction between strands.
Moisturizers and sealants
Water-based moisturizers should be your go-to for maintaining hydration without creating buildup. Creams work wonderfully for thicker textures, while lighter lotions suit finer hair types better. The goal is finding products that absorb well without leaving your twists feeling sticky or weighted down.
Natural oils or butters seal in that moisture, creating a protective barrier that extends the life of your style. Shea butter, coconut oil, and argan oil remain popular choices, though lighter oils like grapeseed or jojoba work better for those prone to buildup. Apply these products sparingly – a little goes a long way in maintaining soft, pliable twists.
Sectioning clips and combs
Here’s what you’ll need for precise sectioning:
- Duck bill clips: These flat clips hold sections securely without creating dents or marks in your hair
- Butterfly clamps: Perfect for holding larger sections when working on different areas of your head
- Small elastic bands: Useful for temporarily securing completed twists if you need to take breaks
- Spray bottle: Keeps hair damp and manageable throughout the styling process
The right clips make an enormous difference in your styling efficiency. Cheap clips that slip or break mid-styling create unnecessary frustration and can compromise your results.
Edge control and finishing products
Edge control products help create a polished look by smoothing baby hairs and the hairline area. Gel-based formulas provide stronger hold for stubborn edges, while cream-based options offer a softer, more natural finish. Choose based on your preference and how long you need the hold to last.
Setting sprays or light-hold mousses can help your twists maintain their shape, particularly useful for looser curl patterns that might unravel easily. These products add just enough grip without the crunchiness associated with heavy gels.
Some stylists swear by twisting butter or specialized twisting creams designed specifically for this purpose. These products typically combine the benefits of moisturizers and hold products, streamlining your routine while delivering consistent results.
How to Prepare Your Hair Before Twisting
Proper preparation determines whether your twists will last two days or two weeks. Taking shortcuts during this crucial phase leads to frizzy, unraveling twists that look messy within days. The time invested in thoroughly preparing your hair pays dividends in both the appearance and longevity of your finished style. Think of this stage as laying the foundation for a house – without solid groundwork, everything else becomes unstable.
Washing and deep conditioning
Clean hair provides the best canvas for long-lasting twists. Start with a clarifying shampoo to remove product buildup, followed by a moisturizing shampoo that won’t strip natural oils. Focus on massaging your scalp to remove dirt and stimulate blood flow, which promotes healthy growth while your hair remains protected.
Deep conditioning treatments restore moisture and strengthen strands before the protective styling process. Apply your treatment in sections, ensuring every strand receives coverage. Sitting under a hooded dryer or using a heated cap for 20-30 minutes helps the treatment penetrate deeply.
Detangling techniques
Working through knots and tangles requires patience and the right approach to minimize breakage. Start from the ends and work your way up to the roots, never yanking or forcing the comb through resistant sections. Dividing hair into four to six large sections makes the process more manageable.
Apply a detangling product with good slip to each section before attempting to comb through. Your fingers can often work through knots more gently than any tool, so use them first to separate major tangles. Only bring in the wide-tooth comb once you’ve loosened the worst snarls.
Detangling in the shower while conditioner coats your strands often works more effectively than battling dry, tangled hair. The water and product combination provides maximum slip, reducing friction and breakage.
Stretching methods
Stretched hair creates more uniform twists and shows length better than shrunken strands. Several methods achieve this without heat damage, though each works differently depending on your texture and preference.
Banding involves wrapping small elastic bands down the length of sections, gently elongating the hair as it dries. This method works particularly well for tighter curl patterns that experience significant shrinkage. African threading achieves similar results using thread wrapped around sections.
Blow-drying on cool or low heat with a tension method stretches hair quickly when time is limited. Always use heat protectant and keep the dryer moving to prevent damage. The goal isn’t bone-straight hair but rather elongated strands that are easier to work with.
Proper sectioning strategies
Creating uniform sections ensures your twists look neat and professional rather than haphazard. Use your rat-tail comb to create parts, working systematically from one side of your head to the other. The size of each section depends on your desired twist size – smaller sections create more defined, longer-lasting twists.
Consider your hair density when planning sections. Thicker areas might need smaller sections to match the size of twists in less dense areas. This attention to proportion creates a balanced, uniform appearance throughout your style.
Some people prefer the grid method, creating square or rectangular sections in organized rows. Others like the organic look of triangular or diamond-shaped parts. Neither approach is wrong – choose based on your aesthetic preference and the final look you want to achieve.
Moisture and product application
Properly moisturized hair holds twists better and looks healthier throughout the wearing period. Apply your leave-in conditioner to damp, not soaking wet hair. This moisture level allows products to absorb without dilution while preventing the excessive drying time that can lead to frizz.
Layer your products strategically, starting with the lightest formulas and building up to heavier sealants. A typical sequence might include: leave-in conditioner, moisturizing cream, twisting butter, then a light oil to seal. Adjust quantities based on your hair’s absorption rate and porosity level.
The shingling method ensures even product distribution – smooth products down each section with your hands, almost like painting. This technique prevents some areas from being over-saturated while others remain dry. Pay special attention to your ends, which tend to be the driest and most fragile part of the hair shaft.
Step-by-Step Twisting Techniques for Beginners
Creating your first set of twist braids might feel intimidating, but breaking down the process into manageable steps transforms this seemingly complex style into an achievable goal. Each twist you complete builds muscle memory and confidence, so by the time you reach the back of your head, your hands will move with surprising efficiency. The technique itself is remarkably straightforward – the challenge lies in maintaining consistency and developing your personal rhythm.
Basic two-strand twist method
Begin by taking your prepared section and dividing it into two equal parts. Hold one subsection in each hand, positioning your hands close to the scalp. The right strand crosses over the left while simultaneously rotating each subsection away from your face. This dual motion – crossing over while twisting individual strands – creates the rope-like appearance that characterizes this style.
Continue this pattern down the entire length of the section, maintaining steady tension without pulling too tightly. Your grip should be firm enough to keep the twist intact but gentle enough to avoid stress on your scalp. As you work down each section, the twist naturally tightens and begins holding its shape.
Creating even sections
Uniformity throughout your head requires careful attention during the sectioning phase. Use the width of your comb as a measuring guide, creating parts that are consistently spaced. If you notice one twist looking significantly thicker than its neighbors, don’t hesitate to unravel and re-section – fixing mistakes early prevents frustration later.
The amount of hair in each section directly impacts the final look. Grabbing random amounts creates an uneven, messy appearance that screams amateur. Take time to feel each section before twisting, adjusting if necessary to match the density of surrounding twists.
Working in good lighting makes an enormous difference in achieving even results. Natural daylight or bright LED bulbs help you see exactly what you’re doing, especially in the crown and back areas where you’re working by feel. Consider using a hand mirror to check your progress periodically.
Tension and grip techniques
Finding the sweet spot between too loose and too tight takes practice, but your scalp will guide you. Proper tension creates neat, defined twists without causing discomfort or those tiny bumps that appear when hair is pulled too tightly. Start with medium tension at the roots, then gradually lighten your grip as you work down the shaft.
Your grip should feel controlled but relaxed. Tensing your hands leads to fatigue and inconsistent results, especially during longer styling sessions. Take breaks every 30-45 minutes to stretch your fingers and reset your grip strength.
Different areas of your head might require adjusted tension. The hairline and nape areas contain more sensitive skin, so use a lighter touch there. The crown can usually handle slightly firmer tension, which helps those twists last longer in this high-friction area.
Securing the ends properly
The method you choose for securing your ends impacts both the appearance and longevity of your style. Several options work well, each with distinct advantages:
- Natural seal: Simply twist to the very end and allow your hair’s texture to hold
- Perm rod set: Roll the ends on small rods for a curly finish
- Hot water seal: Dip ends in hot water for a permanent seal (for added hair only)
- Rubber band method: Secure with small, snag-free elastics
- Product seal: Use gel or beeswax to hold ends together
Your hair type and personal preference determine the best method. Coarser textures often hold naturally without additional securing, while silkier textures might require products or bands to prevent unraveling.
Common mistakes to avoid
Twisting on completely dry hair ranks among the most frequent errors beginners make. Dry hair lacks the flexibility needed for smooth twisting and is more prone to breakage. Always work with damp or well-moisturized hair for best results.
Rushing through the process guarantees disappointing results. Quality twists require time and attention – trying to speed through will show in uneven sections, loose roots, and twists that unravel within days. Set aside adequate time or break the process into multiple sessions rather than rushing.
Using too much product creates heavy, greasy twists that attract lint and never quite dry. Start with less than you think you need – you can always add more if necessary. Heavy product application also causes buildup that makes your next wash day unnecessarily difficult.
Neglecting the back section happens frequently when people attempt their first set alone. This area requires patience and sometimes creative positioning with mirrors. Don’t assume it looks fine just because you can’t see it directly – take photos or ask someone to check your progress.
Twisting in the wrong direction confuses many beginners. Generally, twisting away from your face creates the most flattering fall pattern, but consistency matters more than direction. Pick one direction and stick with it throughout your entire head for a cohesive look.
How Long Do Twist Braids Last and Maintenance Tips
The lifespan of your twist braids depends on multiple factors including your hair texture, daily activities, and maintenance routine. While some women keep their twists fresh for six weeks or longer, others prefer to redo them every two weeks for a consistently neat appearance. Understanding what affects longevity helps you set realistic expectations and develop a care routine that maximizes your style’s duration without compromising hair health.
Average lifespan of twists
Most twist styles remain presentable for two to four weeks, though this varies significantly based on individual factors. Tighter curl patterns typically hold twists longer than looser textures, as the hair naturally grips itself better. Smaller twists generally last longer than larger ones, though they require more initial time investment.
Your lifestyle plays a major role in determining how long your style stays fresh. Regular exercise, swimming, or humid environments can cause twists to frizz and loosen more quickly. People who sleep restlessly might notice their edges and nape area becoming fuzzy faster than those who sleep peacefully.
Product selection during installation significantly impacts longevity. Using products with good hold extends wear time, while very light products might mean redoing your style sooner. Finding the right balance between hold and moisture keeps twists looking fresh without becoming stiff or dry.
Nighttime protection methods
Protecting your twists while sleeping prevents premature frizzing and maintains neat edges. Satin or silk pillowcases reduce friction that causes frizz and breakage, making them worthwhile investments for anyone who regularly wears protective styles. The smooth surface allows your hair to glide rather than catch and tangle.
Bonnets and scarves provide additional protection, especially for those who move frequently during sleep. Look for options with comfortable elastic that won’t leave marks on your forehead. Some women prefer loose satin bonnets that cover all their twists, while others like scarves tied at the nape for a more secure fit.
For longer twists, the pineapple method works wonderfully. Gather twists loosely at the crown of your head with a soft scrunchie, creating a pineapple-like shape. This technique keeps twists from getting flattened or tangled while you sleep, and you’ll wake up with maintained volume and shape.
Moisturizing routine
Keeping your scalp and hair moisturized prevents itching and extends your style’s life. Develop a routine that works for your specific needs – some people require daily moisture, while others find twice-weekly applications sufficient.
Water-based sprays make excellent daily refreshers without causing buildup. Mix water with a small amount of leave-in conditioner in a spray bottle for a customized moisture mist. Focus on your scalp and the length of your twists, avoiding oversaturation that could cause unraveling.
Oil your scalp every few days to prevent dryness and maintain healthy growth. Light oils penetrate better without weighing down your style. Apply oils with a nozzle-tip bottle or your fingertips, gently massaging to stimulate circulation without disturbing your parts.
Refreshing your twists
Minor touch-ups extend the neat appearance of your style without complete reinstallation. Focus on the perimeter – edges, nape, and any twists around your part typically need attention first. Retwisting just these visible areas can add another week or two to your style’s lifespan.
When individual twists become loose at the root, you can carefully retwist just that section. Dampen the loose area slightly, apply a small amount of twisting cream, and retwist from the root down to where the original twist remains intact. This targeted approach saves time while maintaining overall neatness.
Frizz can be managed with edge control or gel applied carefully to problem areas. Use a small brush or your fingers to smooth down flyaways without disturbing the twist pattern. Some people prefer using a silk scarf to tie down freshly smoothed areas for 10-15 minutes, setting the hair in place.
When to take them down
Several signs indicate it’s time to remove your twists and give your hair a break. Excessive frizz that can’t be tamed with refreshing techniques suggests the style has run its course. If you’re spending more time trying to make them look presentable than you initially spent creating them, removal makes more sense than continued maintenance.
Product buildup becomes inevitable after several weeks, appearing as white residue or a sticky feeling. Your scalp might start itching more than usual, signaling the need for a thorough cleansing. Visible new growth creating a fuzzy halo around your roots also indicates sufficient time has passed.
Matting or locking at the roots requires immediate attention. If your twists start joining together or your hair begins forming locs unintentionally, remove them promptly. The longer you wait, the more difficult and potentially damaging the removal process becomes.
Pay attention to any thinning around your edges or signs of tension damage. Protective styles should never cause hair loss or breakage – if you notice these issues, remove the twists immediately and give your hair recovery time before attempting another protective style.
Your Twist Braid Journey Starts Now
Mastering twist braids opens up a world of protective styling possibilities that benefit both your hair’s health and your daily routine. The techniques shared throughout this guide provide you with professional-level knowledge that transforms how you approach natural hair care. From understanding the basic mechanics to perfecting your personal maintenance routine, you now possess the tools needed to create stunning twists that protect your strands while simplifying your life.
The journey from twist braid beginner to confident stylist happens one section at a time, with each attempt teaching you something new about your hair’s unique characteristics and preferences. Your first set might not achieve salon perfection, but it represents an important step toward hair independence and healthier strands. As you continue practicing these techniques and discovering which products and methods work best for your specific texture, you’ll develop a personalized approach that delivers consistent, beautiful results every time you decide to install this versatile protective style.
Frequently Asked Questions
Q: Can I wash my hair while wearing twist braids?
A: Yes, you can wash your twists carefully using diluted shampoo focused mainly on your scalp. Squeeze the suds gently through your twists without rubbing or scrubbing, then rinse thoroughly to prevent product buildup and follow with a light leave-in conditioner.
Q: How do I prevent my twists from unraveling at the roots?
A: Start each twist as close to the scalp as possible with firm but comfortable tension, and ensure your hair is properly moisturized but not soaking wet during installation. Using a holding product like twisting butter or gel at the roots also helps maintain grip.
Q: What’s the difference between twists and braids for hair protection?
A: Twists use two strands of hair wrapped around each other while braids use three strands woven together. Twists are generally gentler on your hair, easier to install and remove, but may not last quite as long as traditional braids.
Q: Should I twist my hair wet or damp?
A: Damp hair works best for most textures as it’s pliable enough to manipulate without breaking but not so wet that drying takes forever. Soaking wet hair can lead to mildew if twists don’t dry completely and may cause excessive shrinkage.
Q: How small should I make my sections for beginner-friendly twists?
A: Start with medium-sized sections about the width of your thumb for manageable twists that don’t take too long to install. Smaller sections last longer but require more time and skill, while larger sections are quicker but may unravel sooner.
Q: Can I exercise and sweat with twist braids?
A: Absolutely! After working out, use a clean towel to pat your scalp dry and apply a light astringent or witch hazel to refresh your scalp. Allow your twists to air dry completely and maintain your regular moisturizing routine to prevent dryness from salt buildup.
Q: What should I do if my scalp starts itching badly?
A: Light scalp massages with oil containing tea tree or peppermint can provide relief, or try patting (not scratching) itchy areas. If itching persists or becomes severe, it might indicate product buildup, an allergic reaction, or that it’s time to remove the twists.
Q: How do I prevent my twists from looking old and fuzzy?
A: Sleep with a satin bonnet or pillowcase nightly, avoid excessive manipulation during the day, and smooth edges with a small amount of edge control when needed. Regular moisturizing and retwisting your edges every 7-10 days also maintains a fresh appearance.