Braided buns have become the go-to hairstyle for women seeking both elegance and practicality in their daily looks. This sophisticated combination merges the intricate beauty of braids with the polished finish of a bun, creating styles that work equally well for casual brunches or formal events. The versatility of these hairstyles means you can adapt them to match your mood, outfit, or occasion without spending hours in front of the mirror.
The beauty of braided buns lies in their ability to keep hair secure while looking effortlessly stylish. Unlike simple ponytails or basic buns that can feel mundane, these intricate styles add texture and visual interest to your overall appearance. They also protect your hair from environmental damage and reduce daily manipulation, making them an excellent choice for women focused on maintaining healthy hair while staying fashionable.
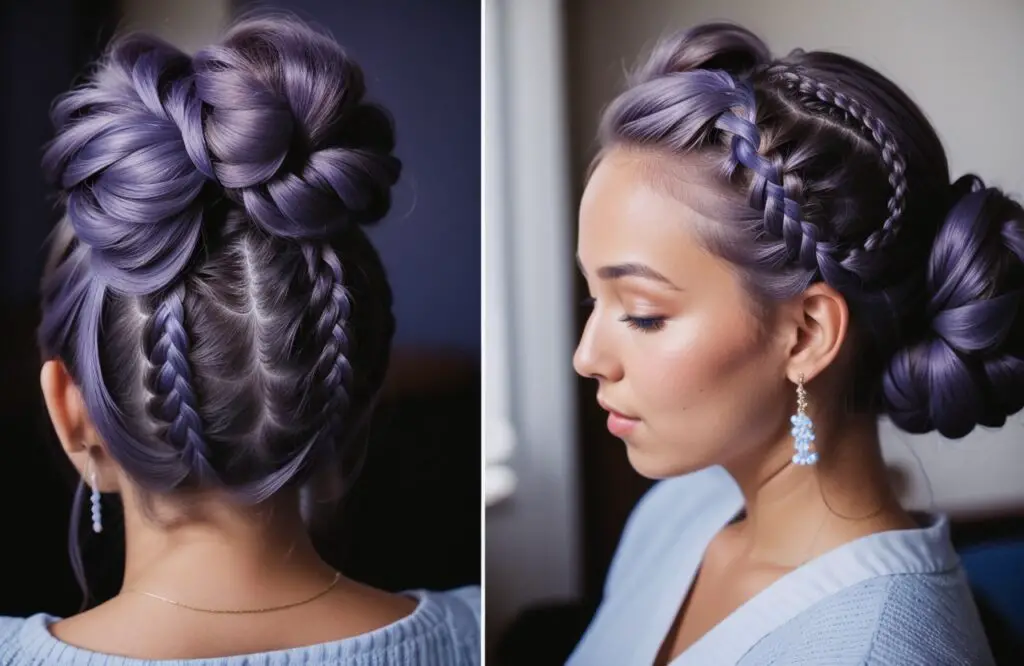
From classic crown braids wrapped into elegant buns to modern bubble braid variations, the options available today cater to every taste and skill level. In the following sections, you’ll discover various braided bun styles, learn techniques tailored to different hair types, and pick up professional tips that will transform your hairstyling routine. Whether you’re a braiding beginner or looking to expand your repertoire, these hairstyles will become your new favorites.
- What Makes Braided Buns the Perfect Hairstyle Choice
- Classic Braided Bun Styles That Never Go Out of Fashion
- Modern Braided Bun Trends Taking Over This Year
- How to Create the Perfect Braided Bun for Your Hair Type
- Styling Tips and Tricks for Long-Lasting Braided Buns
- Your Braided Bun Journey Starts Now
- Frequently Asked Questions
What Makes Braided Buns the Perfect Hairstyle Choice
Braided buns offer more than just aesthetic appeal – they provide practical solutions for busy women who want to look polished without sacrificing time or comfort. The combination of braiding and bunning creates a secure style that can withstand long workdays, intense workout sessions, or unpredictable weather conditions. This durability makes them particularly valuable for women with active lifestyles who need their hair to stay put throughout various activities.
Versatility for Different Occasions
The adaptability of braided buns means you can wear them anywhere. A sleek, tight braided bun works perfectly in professional settings, projecting competence and attention to detail. For weekend outings, loosening the braid and pulling out a few face-framing pieces creates a relaxed, approachable look. Evening events call for more elaborate versions with multiple braids or decorative elements that catch the light and draw admiration.
Hair Protection Benefits
Your hair receives significant protection when styled in braided buns. The technique minimizes exposure to environmental stressors like sun, wind, and pollution that can cause dryness and breakage. Additionally, keeping your ends tucked away prevents them from rubbing against clothing or getting caught in zippers and jewelry.
The protective nature extends beyond environmental factors. By reducing the need for daily heat styling and excessive brushing, braided buns help maintain your hair’s natural moisture and strength. Women who regularly wear these styles often notice improved hair health over time, with less breakage and better length retention.
Time-Saving Aspects
Once you master the basic techniques, creating a braided bun becomes surprisingly quick. Many styles can be completed in under ten minutes, making them ideal for rushed mornings. The longevity of these hairstyles means you might even stretch them across multiple days with minor touch-ups, saving precious morning preparation time.
Suitable for Various Hair Types
Contrary to popular belief, braided buns work beautifully on diverse hair textures and lengths. Fine hair gains the appearance of fullness through strategic braiding techniques. Thick hair becomes more manageable when sectioned and braided before bunning. Even women with shoulder-length hair can create stunning braided bun variations using specific methods designed for shorter lengths.
The key lies in understanding which techniques complement your specific hair characteristics. Some women find that slightly dirty hair provides better grip for braiding, while others prefer working with freshly washed strands. Experimentation helps you discover what works best for your unique hair type.
Classic Braided Bun Styles That Never Go Out of Fashion
Timeless braided bun styles have graced women’s heads for centuries, and their enduring popularity speaks to their universal appeal. These classic variations form the foundation of braided bun artistry, and mastering them opens doors to countless creative possibilities. Each style carries its own character and suits different face shapes and personal preferences.
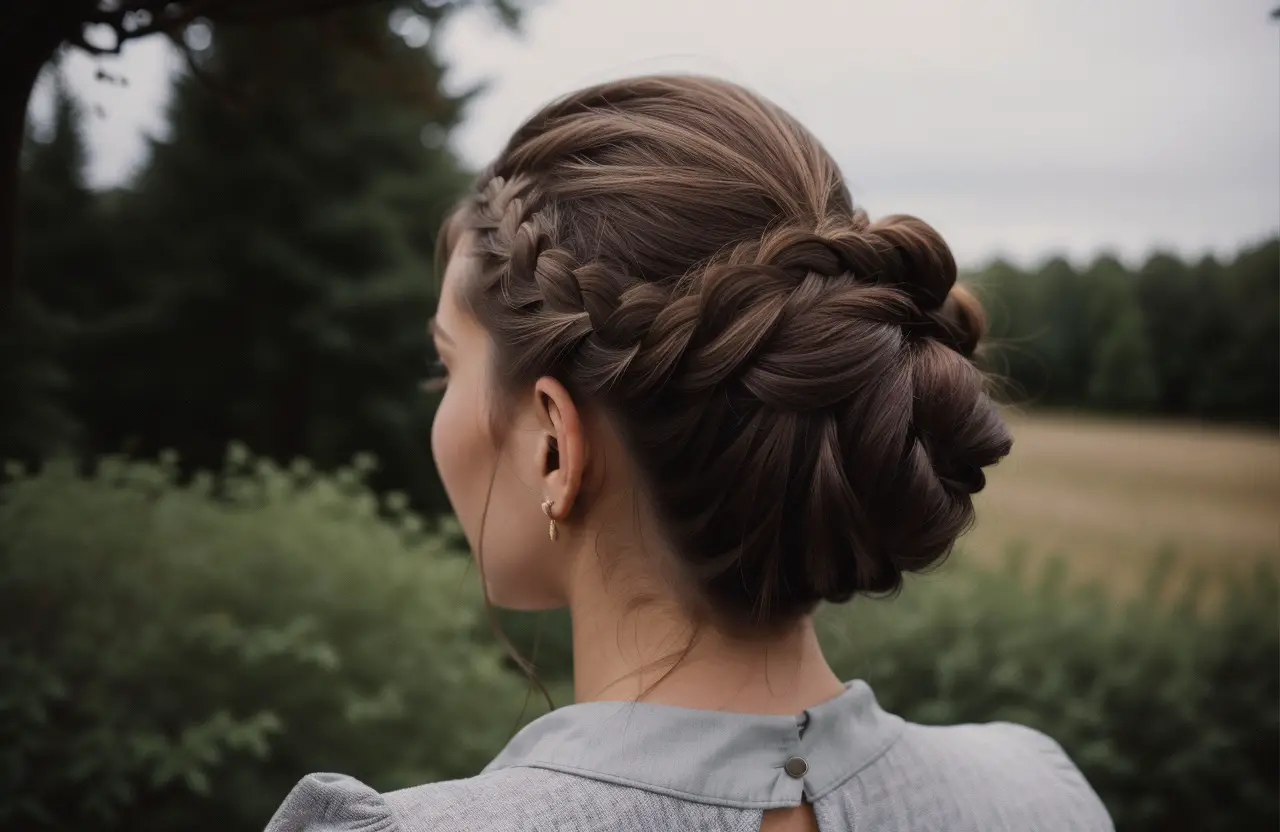
The Traditional Crown Braid Bun
The crown braid bun creates a regal appearance that frames your face beautifully. Starting at one ear, the braid travels around your head like a headband before the remaining hair gets twisted into a bun at the nape. This style works exceptionally well for special occasions or when you want to feel particularly elegant.
Creating this look requires sectioning your hair horizontally across the crown area. The braiding begins at one side and incorporates small sections of hair as it progresses around your head. Once the braid reaches the starting point, the loose ends combine with the rest of your hair to form a low bun. The result looks complex but becomes manageable with practice.
Women with round faces particularly benefit from this style, as the height at the crown creates a lengthening effect. Adding subtle volume at the crown before braiding enhances this flattering aspect even further.
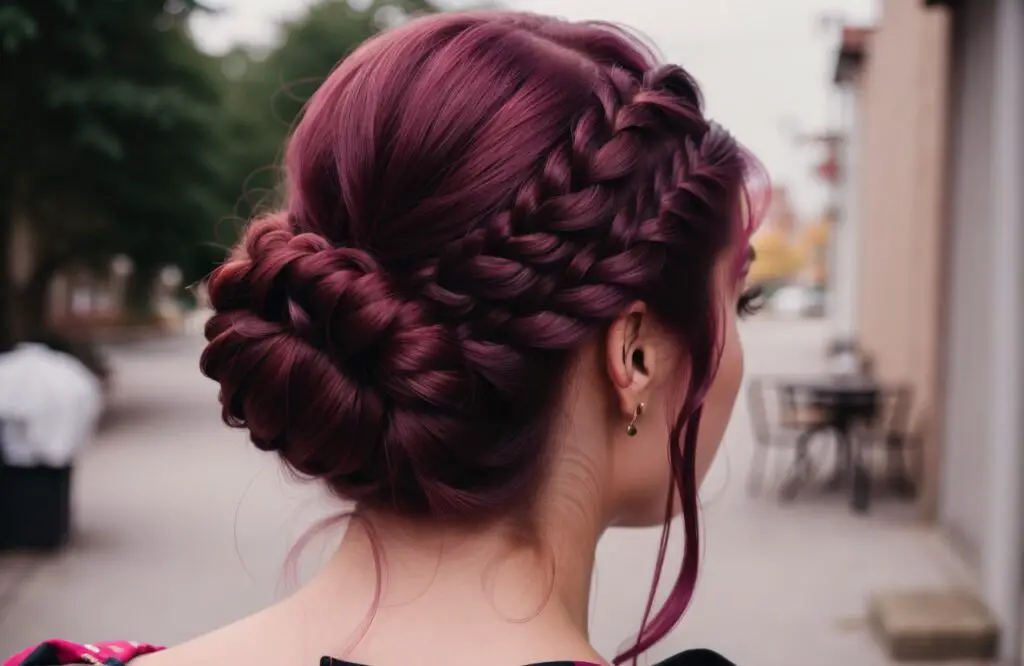
Low Braided Chignon
The low braided chignon exudes sophistication and works beautifully in professional environments. This style involves creating one or more braids that feed into a low, side-swept bun positioned at the nape of your neck. The asymmetrical placement adds modern interest to this otherwise classic style.
Start by creating a deep side part and braiding sections of hair loosely. These braids then wrap around each other or incorporate into a twisted bun shape. The key to achieving the perfect chignon lies in maintaining some looseness – overly tight execution can appear severe rather than elegant.
Side-Swept Braided Bun
Drama and romance define the side-swept braided bun. This asymmetrical style draws the eye and creates beautiful movement in photographs. The braid typically begins at the opposite temple from where the bun will sit, creating a diagonal line across the back of your head.
French Braid Into Bun
Perhaps the most recognized combination, the French braid into bun offers endless variations. You might create a single French braid down the center of your head, ending in a bun at the nape. Alternatively, two French braids on either side can meet at a central bun, creating a more balanced look.
The technique involves gradually incorporating hair sections as you braid downward, maintaining even tension throughout. Once you reach the nape area, the remaining length twists into a bun and secures with pins. This versatile style transitions seamlessly from gym sessions to dinner dates with just a few adjustments to the finishing touches.
Dutch Braid Bun Variation
Dutch braids, sometimes called reverse French braids, create raised texture that adds dimension to your hairstyle. Instead of crossing sections over each other, you cross them under, causing the braid to sit on top of your hair rather than blending in. This technique produces a bold, defined look that photographs beautifully.
Multiple Dutch braids can converge into a single bun, or one statement Dutch braid can spiral into a bun shape. The raised nature of Dutch braids makes them ideal for women with fine hair seeking to create the illusion of thickness and volume.
Modern Braided Bun Trends Taking Over This Year
Contemporary interpretations of braided buns reflect current fashion sensibilities while maintaining the practical benefits of traditional styles. These modern variations often incorporate unexpected elements or relaxed finishing techniques that align with today’s preference for effortless-looking beauty. Social media has accelerated the spread of these innovative styles, with new variations appearing regularly.
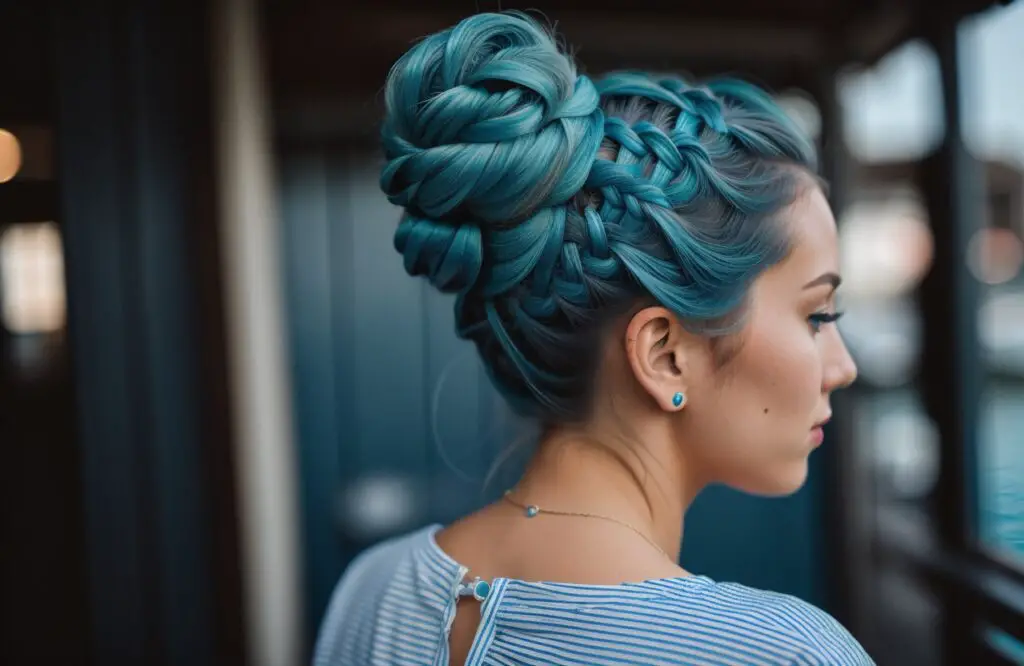
Messy Textured Braided Buns
Perfect imperfection defines the messy textured braided bun trend. This style intentionally incorporates loose pieces, varied braid tensions, and tousled finishing for a lived-in appearance. The look suggests you threw your hair up casually, despite requiring careful technique to achieve the right balance of messiness and structure.
Achieving this style starts with adding texture through braiding spray or dry shampoo. Braids are created loosely, then gently tugged apart to create fullness and dimension. The final bun sits loosely, with strategic pieces left out to frame the face.
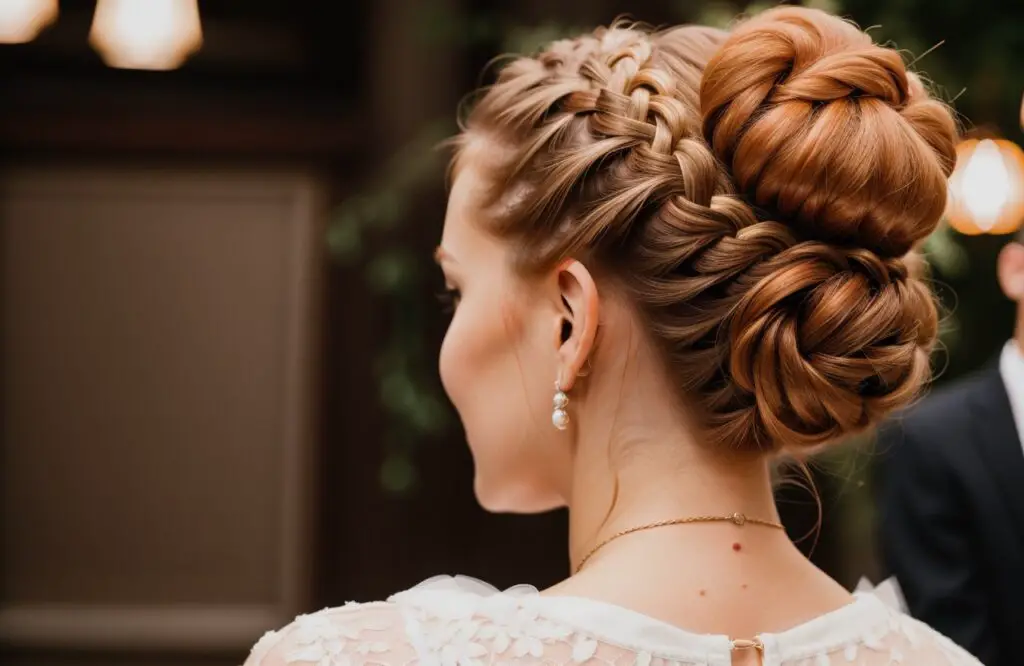
Double Braid Buns
Why choose one when you can have two? Double braid buns, whether positioned high like space buns or low for a more sophisticated look, have gained tremendous popularity. This playful style allows for creativity in placement and size, making it adaptable to various age groups and style preferences.
The symmetry required for double braid buns demands careful sectioning from the start. Part your hair cleanly down the middle, then create matching braids on each side before forming the buns. Some women prefer keeping the braids visible as they wrap into buns, while others tuck them completely for a cleaner finish.
Young professionals have adopted this style for casual Fridays, proving that playful elements can still maintain appropriateness in relaxed work environments. The key lies in keeping the execution neat and the buns proportional to your head size.
Bubble Braid Buns
Bubble braids create a unique texture that adds whimsy to traditional bun styles. This technique involves creating ponytail sections separated by elastic bands, then gently pulling each section to create bubble-like shapes. These textured lengths then wrap into buns, maintaining their distinctive bubble appearance.
Here’s how to achieve the perfect bubble effect:
Section Spacing: Keep bubbles evenly sized for a polished look or vary them for artistic interest.
Pulling Technique: Gently tug each bubble section outward rather than upward to maintain roundness.
Elastic Selection: Clear or color-matched elastics create seamless transitions between bubbles.
Final Shaping: Adjust bubble fullness after securing the bun for balanced proportions.
Half-Up Braided Bun Styles
The half-up braided bun combines the elegance of an updo with the softness of flowing hair. This versatile style works particularly well for women wanting to showcase their hair length while keeping some hair away from their face. The upper section incorporates various braiding techniques before forming a bun, while the lower portion remains loose.
This style suits various hair textures beautifully. Women with naturally wavy or curly hair find that the contrast between the structured braided bun and their natural texture creates stunning visual interest. Those with straight hair might add waves to the loose section for similar effect.
Accessories and Embellishments
Modern braided buns often incorporate decorative elements that personalize the style. Hair rings threaded onto braids before bunning add metallic accents. Delicate pins scattered throughout the bun create constellation-like patterns. Silk scarves woven through braids introduce color and luxury.
The current trend favors minimal, purposeful decoration over excessive ornamentation. A single statement pin or a few coordinated rings typically provide sufficient interest without overwhelming the hairstyle’s natural beauty.
How to Create the Perfect Braided Bun for Your Hair Type
Understanding your hair’s unique characteristics helps you select and modify braided bun techniques for optimal results. Each hair type presents specific challenges and advantages that influence how you approach these styles. Rather than forcing your hair into unsuitable styles, working with its natural properties produces more beautiful, longer-lasting results.
Techniques for Fine Hair
Fine hair often struggles with maintaining volume and grip in braided styles. However, several techniques can help you achieve full-looking braided buns that stay secure throughout the day. Preparation becomes particularly important, as fine hair benefits from added texture and grip before styling begins.
Start by applying volumizing mousse to damp hair, focusing on the roots. Blow-dry with your head upside down to maximize lift at the scalp. Before braiding, use texture spray or dry shampoo throughout your lengths – this provides the grip necessary for braids to hold without slipping.
When braiding fine hair, avoid pulling too tightly, as this emphasizes thinness. Instead, braid loosely and use the pancaking technique, gently pulling braid edges outward to create width and fullness. Secure your bun with numerous bobby pins inserted at various angles for maximum hold without relying on hair thickness for security.
Working With Thick Hair
Thick hair presents different challenges, primarily related to weight and bulk management. The abundance of hair can create heavy buns that cause discomfort or refuse to stay in place. Strategic sectioning and gradual building become essential for managing thick hair in braided bun styles.
Divide your hair into smaller, manageable sections before beginning any braiding. Creating multiple smaller braids that feed into the bun distributes weight more evenly than attempting one large braid. This approach also provides more styling options and creates intricate-looking results.
Consider using lightweight styling products that won’t add unnecessary weight. A small amount of smoothing serum helps manage flyaways without the heaviness of thick creams or gels. When securing the bun, use longer bobby pins designed for thick hair, and don’t hesitate to use more pins than seems necessary.
Curly Hair Considerations
Curly hair brings beautiful texture to braided buns but requires specific handling to maintain curl pattern and prevent frizz. The key lies in working with your curls rather than against them, allowing their natural volume and texture to enhance the final style.
Begin with well-moisturized hair, as dry curls become frizzy and difficult to manage during braiding. Apply a curl-defining cream or gel to damp hair, then allow it to air dry or diffuse until about 80% dry. This moisture level provides flexibility for braiding while maintaining curl definition.
Avoid over-manipulating curly hair during the braiding process. Loose braids that incorporate your natural curl pattern create more interesting texture than trying to smooth curls completely. The resulting bun will have beautiful dimension and movement that straight hair cannot replicate.
Short Hair Adaptations
Shoulder-length or shorter hair can still achieve beautiful braided bun styles with clever adaptations. The secret lies in creating the illusion of length and using techniques specifically designed for shorter hair. Strategic pin placement and creative braiding directions maximize what you have.
Focus on braids that travel horizontally rather than vertically, as these require less length. Crown braids, side braids, and braids that wrap around your head work particularly well. For the bun portion, create a twisted rather than wrapped style, securing sections as you go rather than relying on length to hold the shape.
Bobby pins become your best friends when working with shorter hair. Use them liberally to secure any pieces that won’t stay in place naturally. Consider incorporating a small hair donut or padding for the bun if your hair lacks the length to create substantial volume on its own.
Products and Tools Needed
Success with braided buns depends partially on having the right tools and products available. Quality tools make the process easier and help achieve professional-looking results at home.
Essential items include a rat-tail comb for precise sectioning, clear elastic bands for securing braid ends, and various sizes of bobby pins for different hair sections. A hand mirror helps check the back of your head during styling. For product selection, texture spray, light-hold hairspray, and smoothing serum cover most styling needs. Women with specific hair concerns might add volumizing mousse for fine hair or anti-humidity spray for frizz-prone hair.
Styling Tips and Tricks for Long-Lasting Braided Buns
Creating a braided bun that maintains its beauty throughout the day requires more than just good technique. Professional stylists use specific strategies to ensure their creations withstand time, movement, and various environmental conditions. These insider tips will help your braided buns last from morning meetings through evening events without requiring major touch-ups.
Preparation Techniques
The foundation for a long-lasting braided bun begins before you pick up your comb. Hair condition, product application, and timing all influence how well your style holds. Starting with day-old hair often provides better grip than freshly washed strands, though this varies by hair type.
Apply products systematically, beginning at the roots with volumizing or texturizing products, then working through the mid-lengths with smoothing products if needed. Allow products to absorb for a few minutes before beginning your style. This prevents product buildup in certain areas and ensures even distribution.
Heat can be your ally when used strategically. A quick pass with a flat iron on sections you plan to braid creates smoothness and helps hair hold its shape better. For naturally textured hair, this step might be skipped in favor of preserving natural grip.
Securing Methods
The way you secure each element of your braided bun determines its longevity. Every transition point – from loose hair to braid, from braid to bun – requires careful attention to prevent loosening throughout the day.
When starting braids, anchor them firmly without creating painful tension. A clear elastic at the base provides security that fingers alone cannot maintain. As you braid, maintain consistent tension, neither too tight nor too loose. Varying tension creates weak points where the style may fail.
For bun formation, the wrapping technique matters significantly. Rather than hastily twisting and pinning, take time to wrap sections deliberately, securing with pins as you go. Insert bobby pins in an X formation for maximum hold, with one pin going in the direction of the wrap and another crossing it.
Hidden elastics at strategic points provide insurance against style failure. A clear elastic at the base of the bun, concealed by wrapped hair, adds security without visible evidence. This proves particularly helpful for thick or heavy hair that tends to sag.
Adding Volume and Texture
Volume and texture make the difference between a flat, uninspiring bun and one that catches attention. Several techniques can add dimension to your braided bun without compromising its structure.
Backcombing or teasing at the crown before beginning your braids creates height that lasts. Focus on the under-layers rather than the visible top layer to maintain smoothness while building volume. A light mist of hairspray on teased sections helps them maintain their lift.
The pancaking technique transforms tight braids into full, romantic styles. After completing each braid, gently pull the edges outward, working from bottom to top. This gradual stretching creates even fullness rather than irregular bumps. Stop before the braid loses its definition – finding this balance takes practice.
Quick Fixes for Common Problems
Even well-executed braided buns sometimes need minor adjustments. Knowing how to address common issues prevents panic and maintains your polished appearance:
Sliding Bobby Pins: Spray pins with hairspray before insertion for extra grip.
Loosening Braids: Tighten specific sections by gently pulling the braid below the loose area.
Flyaway Hairs: Smooth with a toothbrush sprayed with hairspray rather than applying product directly.
Sagging Buns: Add additional pins at the base, inserting them upward to provide lift.
Visible Elastics: Wrap a small piece of hair around exposed elastics and secure with a bobby pin.
Keep a small emergency kit in your bag containing extra bobby pins, a travel-size hairspray, and clear elastics. These tools allow for quick repairs without returning home to completely restyle.
Overnight Preservation Tips
Sometimes you want to preserve elements of your braided bun for the next day, particularly if you have an early morning event. While sleeping in a full bun isn’t recommended, you can maintain braided portions overnight with proper protection.
Wrap your braided sections in a silk or satin scarf, focusing on preserving the braid structure rather than the bun shape. In the morning, you’ll only need to recreate the bun portion, saving significant styling time. This technique works particularly well for elaborate braiding that takes considerable time to execute.
Apply a light mist of water mixed with leave-in conditioner to refresh the braids in the morning. This revives the style without completely starting over. Add fresh product only where needed to avoid buildup that can make hair look greasy or weighed down.
For special occasions where you want your braided bun to last through a full day and evening, consider setting the style with a light-hold hairspray applied from a distance. This creates a protective shield without the helmet-like stiffness of heavy-hold products. Touch up with additional spray only as needed to maintain movement and natural appearance.
Your Braided Bun Journey Starts Now
Mastering braided buns opens up a world of styling possibilities that can transform your daily hair routine. These versatile styles offer solutions for every occasion, hair type, and skill level, proving that elegant hair doesn’t require salon visits or hours of preparation. The techniques and tips shared here provide a foundation for creating countless variations suited to your personal style and needs.
The journey from basic braids to elaborate braided buns happens gradually, with each attempt building your confidence and skill. Start with simpler styles and progressively challenge yourself with more complex variations as your fingers develop muscle memory for braiding movements. Your unique hair characteristics will guide you toward the styles that work best, and soon you’ll develop signature looks that become your go-to options for different occasions. The beauty of braided buns lies not just in their appearance but in their ability to make you feel polished and put-together with relatively minimal effort.
Frequently Asked Questions
Q: How long does my hair need to be to create a braided bun?
A: Most braided bun styles work well with shoulder-length hair or longer. However, creative techniques and strategic pin placement allow you to achieve beautiful braided buns with hair as short as chin-length. The key is choosing styles that work horizontally rather than vertically.
Q: Can I create braided buns with layered hair?
A: Yes, layered hair can create beautiful, textured braided buns. Shorter layers might pop out of braids, but you can either incorporate them into the style for a romantic, messy look or secure them with bobby pins for a sleeker finish. Using a bit of styling gel or pomade helps keep shorter pieces in place.
Q: How do I prevent my braided bun from giving me a headache?
A: Headaches from braided buns usually result from excessive tension at the scalp. Avoid pulling too tightly when creating initial braids, and distribute the weight of your bun evenly with multiple anchor points. If you feel discomfort developing, slightly loosen the braids at the scalp without undoing the entire style.
Q: What’s the best way to remove a braided bun without damaging my hair?
A: Start by carefully removing all pins and elastics, working slowly to avoid tangles. Gently unravel the bun first, then work through braids from bottom to top. Use your fingers to separate sections before using a wide-tooth comb, and apply a detangling spray if you encounter knots.
Q: Should I braid wet or dry hair for the best results?
A: Generally, slightly damp or completely dry hair works better for braided buns than wet hair. Wet hair can be slippery and difficult to manage, plus it may not hold the style well as it dries. If you must work with damp hair, use a styling product that provides grip and allow extra drying time.
Q: How often can I wear braided buns without damaging my hair?
A: You can safely wear braided buns several times per week as long as you vary the placement and tension points. Avoid creating the exact same style in the exact same position repeatedly, as this can cause breakage at stress points. Give your hair breaks between styles and maintain proper moisture levels.
Q: What’s the difference between a French braid bun and a Dutch braid bun?
A: The main difference lies in the braiding technique. French braids cross sections over each other, creating a braid that sits flush with your head. Dutch braids cross sections under each other, creating a raised braid that appears to sit on top of your hair. Dutch braids typically create more dramatic, defined looks in bun styles.
Q: Can I sleep in a braided bun?
A: While it’s possible to sleep in a loose braided bun, it’s not recommended for hair health or comfort. The constant pressure and friction can cause breakage and tangles. If you want to preserve your style overnight, consider taking down just the bun portion and protecting the braids with a silk scarf or bonnet.