Stitch braids have quietly revolutionized protective styling over the past few months, offering a fresh take on traditional braiding techniques. These intricate patterns combine the practicality of cornrows with artistic precision that turns heads wherever you go. The clean lines and geometric designs create a sophisticated look that works equally well in boardrooms and beach vacations.
Unlike conventional braiding methods, this technique uses a specific feed-in approach that creates raised patterns across the scalp. The result looks almost like embroidery on fabric – hence the name. This precision styling has captured attention across social media platforms, with women discovering how these braids offer both protection and undeniable style appeal.
In the following sections, we’ll break down everything you need to know about this trending protective style. From understanding which patterns complement your features to mastering maintenance routines, you’ll discover why stitch braids have become the go-to choice for women seeking both hair health and head-turning style this season.
- What Makes Stitch Braids the Perfect Modern Protective Style
- How to Choose the Right Stitch Braid Pattern for Your Face Shape
- Which Hair Types Work Best with Stitch Braids This Season
- Styling Stitch Braids for Different Occasions
- How Long Do Stitch Braids Last and Maintenance Tips
- Final Thoughts on Mastering Stitch Braids
- Frequently Asked Questions
What Makes Stitch Braids the Perfect Modern Protective Style
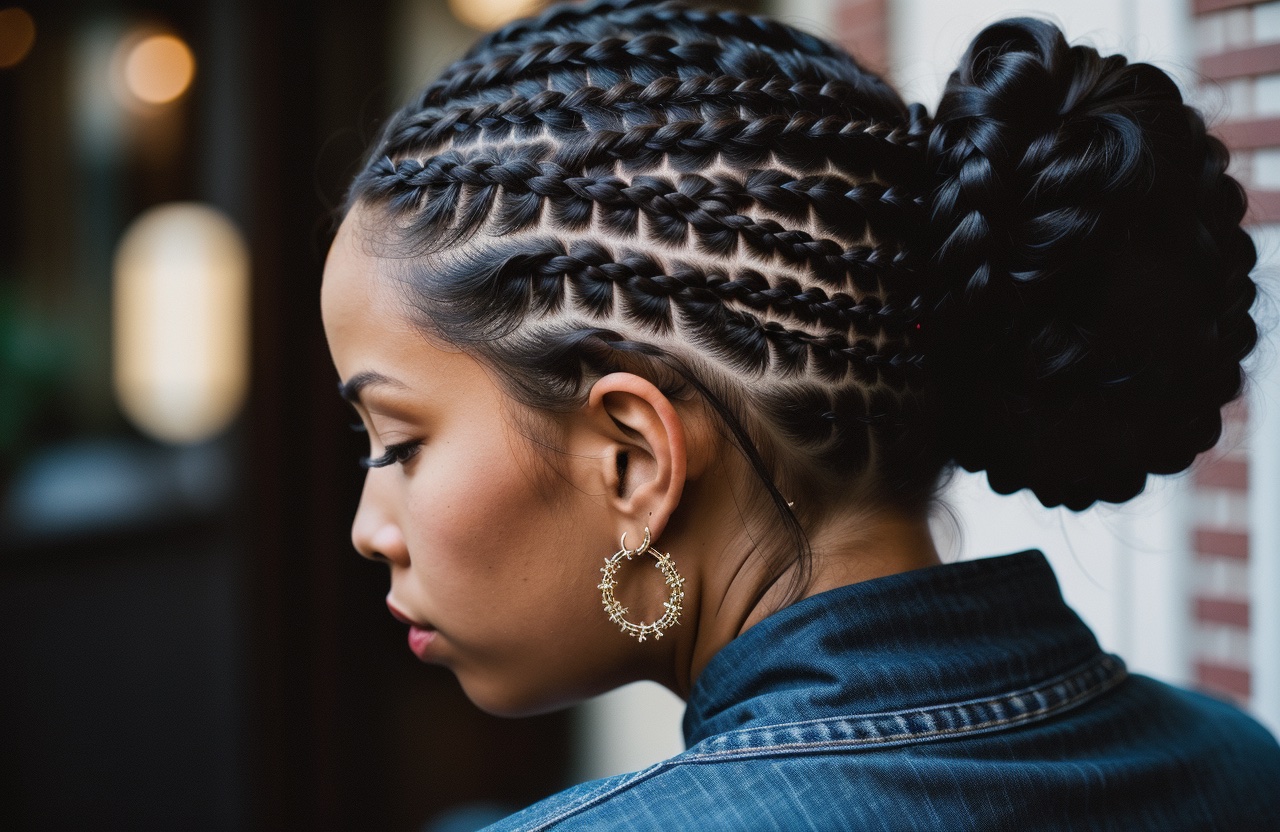
The beauty of stitch braids lies in their unique construction method. Rather than traditional braiding that pulls all hair from the start, this technique gradually adds synthetic hair in small sections. This creates clean, raised lines that form intricate patterns across your scalp. The precision required means each braid sits perfectly aligned, creating geometric designs that look almost architectural.
Definition and technique breakdown
Understanding the technical aspects helps you appreciate why this style stands apart. Your stylist sections hair into precise parts, often using a rat-tail comb to create perfectly straight lines. They then begin each braid with your natural hair, gradually feeding in extensions as they work down the length. This feed-in method reduces tension at the roots, making the style more comfortable than traditional box braids or cornrows.
The “stitch” element comes from the horizontal lines connecting the main braids. These connections create patterns ranging from simple straight lines to complex zigzags and curves. Some stylists use colored thread or thin synthetic hair to highlight these connections, adding another dimension to the overall design.
Benefits for hair health
Your natural hair receives exceptional protection with this braiding method. The gradual feed-in technique minimizes stress on your edges and hairline – areas particularly vulnerable to traction alopecia. Since the braids start small and gradually increase in size, weight distribution stays balanced throughout wear time.
The neat sectioning also promotes healthy hair growth. With clear parts between each braid, you can easily apply growth oils and treatments directly to your scalp. This accessibility makes maintaining moisture levels simple, preventing the dryness that often accompanies other protective styles.
Versatility in styling
Once installed, these braids offer numerous styling possibilities. You can wear them flowing freely, gather them into high ponytails, or create elegant updos for formal occasions. The structured nature of the braids means they hold their shape well in various configurations.
Many women appreciate how this style transitions seamlessly between different settings. Morning gym sessions, afternoon meetings, and evening social events all become easier when your hair looks polished without daily manipulation. The geometric patterns add visual interest even in the simplest ponytail or bun.
Maintenance advantages
Daily care for stitch braids requires minimal effort compared to other protective styles. The tight, neat construction means fewer flyaways and less frequent touch-ups. Most women find they can maintain the fresh-from-salon look for weeks with basic care routines.
Key maintenance benefits include:
Scalp Access: Clear parts between braids make oil application straightforward
Durability: Properly installed braids resist loosening at the roots
Easy Cleaning: Diluted shampoo reaches the scalp easily through defined sections
Night Protection: Simple satin scarf or bonnet preserves the style overnight
Weather Resistance: Humidity and rain don’t significantly affect the braid structure
Cost and time considerations
While installation requires more time than simpler braiding styles, the longevity justifies the investment. Sessions typically run 4-6 hours depending on pattern complexity and hair length. However, with proper care, these braids last 6-8 weeks – making the per-day cost quite reasonable.
The precision required means choosing an experienced stylist becomes crucial. Their skill level directly impacts both installation time and how long your style maintains its crisp appearance. Research local braiders who specialize in this technique, checking their portfolio for consistent, clean work.
Initial costs might seem higher than basic protective styles, but factor in the extended wear time and reduced need for salon visits. Many women find they actually save money long-term while enjoying a more sophisticated look throughout the wearing period.
How to Choose the Right Stitch Braid Pattern for Your Face Shape
Selecting patterns that complement your features transforms good braids into great ones. The geometric nature of this style means strategic pattern placement can highlight your best features while creating visual balance. Understanding your face shape provides the foundation for making informed pattern choices.
Understanding face shapes
Before diving into specific patterns, accurately identifying your face shape helps narrow options. Stand before a mirror with your hair pulled back, observing the widest part of your face and your jawline’s shape. Most faces fall into categories of oval, round, square, heart, or diamond shapes.
Professional stylists often recommend taking a photo straight-on to analyze proportions objectively. The relationship between forehead width, cheekbone position, and jaw structure determines which patterns will enhance your natural beauty. Don’t worry if you fall between categories – many women have combination face shapes that benefit from mixed styling approaches.
Patterns for oval faces
Oval faces enjoy the most flexibility with stitch braid patterns. Your balanced proportions mean both straight-back styles and side-parted designs work beautifully. Consider incorporating curved patterns that echo your face’s natural lines, or try angular designs for striking contrast.
Medium-sized patterns often work best, avoiding extremes that might overwhelm or underwhelm your features. Stylists frequently suggest starting with classic straight-back braids featuring subtle zigzag stitches. This creates interest without competing with your naturally harmonious features. As you become comfortable with the style, experimenting with more elaborate patterns becomes easier.
Side patterns particularly flatter oval faces. Try designs that begin with a deep side part, incorporating diagonal stitches that draw the eye across rather than down. This technique adds asymmetrical interest while maintaining overall balance.
Patterns for round faces
Creating the illusion of length becomes key for round faces. Vertical patterns and high styles naturally elongate your appearance. Avoid horizontal lines across the forehead or too many curved patterns that might emphasize roundness.
Start braids slightly off your hairline to add height at the crown. Patterns that incorporate upward angles near the temples create lift and dimension. Many stylists recommend incorporating a few face-framing braids that fall at angles, breaking up the circular silhouette.
The stitching patterns themselves can contribute to a lengthening effect. Choose designs with vertical or diagonal connecting lines rather than horizontal ones. Zigzag patterns work particularly well when they run from front to back rather than side to side. This directional emphasis guides the eye upward and back, creating desired elongation.
Patterns for square faces
Softening angular features while maintaining the strong beauty of square faces requires thoughtful pattern selection. Curved stitching patterns and rounded edges in your braid design create gorgeous contrast with your natural bone structure.
Avoid patterns that run straight across the forehead or create harsh horizontal lines at your jawline level. Instead, choose designs incorporating S-curves or gentle waves. These softer elements balance angular features without diminishing their striking quality.
Central parts often work better than severe side parts for square faces. Consider patterns that gradually curve from center to sides, creating a gentle frame around your face. Adding height through raised patterns at the crown also helps elongate the overall silhouette. Stylists might suggest incorporating baby hairs styled in soft curves to further soften the hairline.
Customization tips
Personal style preferences matter just as much as face shape guidelines. Work with your stylist to modify traditional patterns to reflect your personality. Adding pops of colored thread to highlight certain stitches, varying braid thickness within the same style, or incorporating unique symbols all personalize the look.
Consider your lifestyle when choosing pattern complexity. Intricate designs look stunning but might feel too elaborate for conservative work environments. Simple patterns with one statement element often provide the perfect balance between professional polish and personal expression.
Don’t forget practical considerations like your sleeping position. Side sleepers might prefer patterns concentrated toward the crown, minimizing pressure on intricate side designs during rest. Similarly, if you wear glasses regularly, ensure patterns around the temple area won’t interfere with comfortable frame placement.
Which Hair Types Work Best with Stitch Braids This Season
Hair texture and condition significantly impact how well stitch braids install and how long they last. Understanding your hair’s unique characteristics helps set realistic expectations and ensures the best possible outcome. While this versatile style works across various textures, certain preparations and considerations optimize results for different hair types.
Natural hair textures
Type 4 hair (kinky/coily) often responds best to stitch braids due to its natural grip on extensions. The texture provides excellent hold without requiring excessive tension during installation. Your stylist can work with your natural curl pattern, using it to secure the foundation of each braid effectively.
Type 3 hair (curly) also works well, though stylists might use slightly different techniques. The looser curl pattern may require careful sectioning to ensure braids stay neat. Some professionals recommend stretching type 3 hair through blow-drying or banding before installation. This creates more length to work with and helps achieve cleaner parts.
Those with type 2 (wavy) or type 1 (straight) hair can absolutely rock this style, though additional considerations apply. Your stylist might use specialized holding products or adjust their technique to ensure proper grip. The key lies in finding a braider experienced with various textures who can adapt their method accordingly.
Length requirements
Contrary to popular belief, you don’t need extremely long hair for beautiful stitch braids. Most stylists can work with hair as short as 2-3 inches, though 4 inches or more provides more styling flexibility. The feed-in technique means extensions carry most of the length, so your natural hair primarily provides the anchor.
Shorter hair actually offers some advantages. Less bulk at the roots creates flatter, neater braids that lie closer to the scalp. This can result in more defined patterns and longer-lasting styles. However, very short hair requires an experienced stylist who can grip and braid small sections securely.
For those with longer natural hair, discuss with your stylist whether to incorporate all your length or tuck some away. Extremely long natural hair can create bulk that affects pattern precision. Some women prefer braiding their natural hair partially down each section, then tucking the remainder for a cleaner finish.
Hair preparation methods
Proper preparation makes the difference between average and exceptional results. Start preparing your hair at least a week before your appointment. Deep conditioning treatments restore moisture and improve elasticity, making your hair more pliable during braiding.
Clean hair provides the best foundation, but avoid conditioning immediately before braiding. Most stylists prefer hair washed 1-2 days prior, allowing natural oils to return slightly. This provides grip without excessive slipperiness that might complicate the braiding process.
Consider these preparation steps for optimal results:
Protein Treatment: Strengthen hair strands 1-2 weeks before braiding
Clarifying Wash: Remove product buildup 3-4 days prior
Light Moisturizer: Apply leave-in conditioner the night before
Gentle Detangling: Work through knots carefully to minimize breakage
Trim Ends: Remove split ends that might worsen during protective styling
Common mistakes to avoid
Several missteps can compromise your results or damage your hair. Over-manipulating hair before braiding ranks among the most common errors. Excessive combing, brushing, or heat styling weakens strands right before they need maximum strength.
Another frequent mistake involves arriving with heavily producted hair. While moisture is important, greasy or product-laden hair makes braiding difficult and can lead to slippage. Aim for clean, lightly moisturized hair that feels soft but not slick.
Tension preferences also require honest communication. Some women request extremely tight braids believing they’ll last longer, but this often backfires. Excessive tension damages follicles and can cause permanent hair loss. Trust your stylist’s judgment on appropriate tightness that balances longevity with hair health.
Chemical processing presents additional considerations. If you’ve recently relaxed, colored, or otherwise chemically treated your hair, wait at least two weeks before braiding. Chemical treatments temporarily weaken hair structure, making it more susceptible to breakage under braiding tension.
Professional vs DIY considerations
While tutorials make DIY stitch braids seem achievable, the precision required usually demands professional expertise. The intricate patterns and consistent tension throughout each braid challenge even experienced at-home braiders. Most women find professional installation worth the investment.
If you’re determined to try DIY installation, start with simple patterns on willing friends or family members. Practice creating clean parts and maintaining consistent tension before attempting your own hair. Keep in mind that the back sections present particular challenges when self-braiding.
Professional braiders bring years of muscle memory and technique refinement. They work efficiently, reducing the time your hair endures manipulation. Their experienced eyes also spot potential issues – like thinning edges or weak spots – adjusting their technique to protect vulnerable areas.
Cost considerations might tempt DIY attempts, but factor in potential damage from improper technique. One professional installation lasting 6-8 weeks often proves more economical than multiple DIY attempts that need redoing. Your hair health deserves the same investment you’d make in quality skincare or other self-care practices.
Styling Stitch Braids for Different Occasions
The true versatility of stitch braids shines through their adaptability to various settings and occasions. From casual weekend errands to formal galas, these braids transform with just a few styling tweaks. Understanding how to modify your look helps maximize this investment while keeping your appearance fresh and appropriate for every situation.
Everyday casual looks
Daily styling should feel effortless while still looking polished. Most mornings, simply releasing your braids from their nighttime wrap creates an instant style. The structured nature means they fall into place naturally, requiring minimal adjustment. For variety, alternate between wearing them loose and creating simple ponytails or buns.
Low ponytails offer understated elegance perfect for running errands or casual lunches. Position the elastic at your nape, allowing some braids to fall freely around your face. This relaxed gathering keeps hair off your neck during active days while maintaining sophistication. Wrapping one braid around the elastic hides it for a more finished appearance.
Space buns have gained popularity among younger women styling their stitch braids. This playful option involves parting braids horizontally and creating two high buns. The geometric patterns visible on the scalp add extra visual interest to this fun style. For less dramatic versions, try half-up space buns leaving some length flowing.
Headbands and scarves instantly change your look without manipulating the braids themselves. Wide fabric headbands push braids back while adding color near your face. Silk scarves tied at the nape or worn as headbands introduce pattern and movement. These accessories protect edges while diversifying your style rotation.
Professional workplace styles
Office-appropriate styling balances creativity with convention. Low buns remain the classic choice, gathering all braids at the nape into a neat coil. The clean lines of stitch patterns complement this polished style perfectly. Secure with multiple bobby pins matching your braid color for all-day hold.
High ponytails work well in less conservative environments. Position them at crown height rather than the very top of your head for professional polish. Smooth edges with light gel and a soft brush, creating a sleek perimeter. Some women prefer wrapping the ponytail base with a coordinating scarf for added sophistication.
Side-swept styles offer another professional option. Gather braids to one side, securing behind your ear with discrete pins. This asymmetrical look feels modern while remaining workplace appropriate. The exposed patterns on one side add subtle interest without appearing too casual.
For important presentations or client meetings, consider a braided crown. Pull front braids across your head like a headband, pinning securely at the opposite ear. This keeps hair completely away from your face while showcasing the intricate patterns. The remaining braids can hang freely or gather into a low style.
Evening and special events
Special occasions call for elevated styling that showcases your braids’ artistic elements. Updos become sculptural pieces, with patterns visible from multiple angles. Work with your braids’ natural movement, creating shapes that highlight the geometric stitching.
High buns positioned for maximum impact make stunning evening styles. Instead of smooth gathering, allow some texture by loosely twisting sections before pinning. Pull a few face-framing pieces free for softness. Decorative pins or small flowers tucked strategically add special-occasion glamour.
Braided mohawk styles create dramatic silhouettes perfect for parties or concerts:
Center Section: Gather braids from ear to ear into a high ponytail
Side Braids: Cornrow or flat-twist the side sections upward
Volume Building: Gently tug the center section for fullness
Securing Method: Use multiple elastics down the length for stability
Finishing Touches: Smooth edges and add shimmer spray for evening glow
Goddess-inspired styles work beautifully for formal events. Create loose, romantic shapes by pinning braids in curved patterns around your head. Leave strategic pieces falling to frame your shoulders. This approach feels both elegant and effortless, perfect for weddings or galas.
Seasonal adaptations
Weather changes call for practical yet stylish adjustments. Summer heat makes high styles essential for comfort. Topknots keep every braid off your neck while showcasing scalp patterns. For beach days, consider protective styles that minimize sun exposure to your scalp partings.
Fall and winter allow for more down styles since warmth becomes welcome. Loose braids draped over scarves and turtlenecks create cozy sophistication. Some women enjoy incorporating seasonal accessories like jeweled pins shaped like autumn leaves or snowflakes.
Rainy seasons require strategic planning. High buns and ponytails prevent braids from getting wet and potentially smelling musty. Keep a silk-lined rain hat handy for unexpected downpours. The structured nature of these braids means they bounce back quickly from minor weather exposure.
Spring calls for fresh, light styles reflecting the season’s renewal. Half-up styles letting some braids flow freely capture this transitional energy. Incorporate pastel accessories or fresh flowers for special spring occasions like Easter or garden parties.
Accessory options
The right accessories elevate basic styles into statement looks. Metal cuffs designed for braids slide onto individual sections, adding shine and movement. Start with a few strategically placed pieces rather than overwhelming the overall design.
Threads wrapped around select braids introduce color without commitment. Your stylist can add these during installation, or you can carefully wrap them yourself later. Choose colors that complement your wardrobe or upcoming events. Metallic threads catch light beautifully for evening occasions.
Beads offer another customization option, though use them sparingly with stitch braids. The patterns themselves provide ample visual interest, so beads work best as subtle accents. Small wooden or metal beads at braid ends create gentle sound and movement.
Hair jewelry continues evolving with new options appearing seasonally. Delicate chains designed to drape across braided styles, minimalist wire accessories that highlight specific patterns, and custom-made pieces that clip securely all expand your styling arsenal. Investment in quality accessories pays off through extended wear and versatility across different occasions.
How Long Do Stitch Braids Last and Maintenance Tips
Understanding the lifespan of your stitch braids helps you plan ahead and maintain your investment properly. Most women enjoy 6-8 weeks of wear with proper care, though individual experiences vary based on hair type, lifestyle, and maintenance dedication. Recognizing signs of needed removal protects your natural hair from damage.
Expected lifespan
The precision installation of stitch braids contributes to their impressive longevity. When properly installed with appropriate tension, these braids maintain their neat appearance weeks longer than many protective styles. The feed-in technique reduces stress at roots, allowing comfortable extended wear.
Your hair’s growth rate significantly impacts how long the style looks fresh. Average growth of half an inch monthly means visible new growth appears around week 3-4. This natural growth doesn’t necessarily mean immediate removal – many women comfortable with some visible growth extend wear to 8 weeks.
Lifestyle factors also influence longevity. Active women who exercise frequently might notice faster loosening due to increased scalp sweating. Those who swim regularly should factor in chlorine or salt water exposure. Office workers in climate-controlled environments often enjoy the full 8-week potential.
Daily care routine
Consistent daily maintenance keeps your braids fresh and your scalp healthy. Morning care starts with removing your protective night covering and gently shaking braids loose. Check for any braids that might have loosened overnight, making note for potential touch-ups.
Scalp care remains crucial throughout wear time. Apply light natural oils to visible partings every 2-3 days. Jojoba, argan, or specially formulated braid sprays work well without creating buildup. Focus application on the scalp rather than the braids themselves to avoid attracting lint and dust.
Keep edges moisturized and neat with dedicated edge control products. Apply sparingly with a soft brush or fingertips, avoiding heavy gels that flake or build up. Many women find success with natural alternatives like aloe vera gel mixed with essential oils.
Evening routines prove equally important. Before bed, loosely gather braids to prevent tangling. Mist lightly with a water-based moisturizer if braids feel dry. This prevents the synthetic hair from becoming brittle and maintains flexibility.
Night protection methods
Protecting your investment during sleep significantly extends style longevity. Satin or silk scarves remain the gold standard, reducing friction that causes frizz and loosening. Wrap scarves to cover edges and partings completely while allowing braid length to move freely.
Bonnets offer convenient alternatives for restless sleepers. Choose sizes that accommodate your braid volume without crushing. Some women prefer bonnets with elastic bands that won’t leave marks, while others like drawstring styles for adjustable security. Having multiple options ensures consistent protection even during laundry cycles.
Satin pillowcases provide backup protection when scarves or bonnets slip off. They also benefit facial skin and any exposed natural hair. Consider satin sheets for full-body coverage if you move significantly during sleep.
Pineapple methods adapted for braids prevent awkward bends and crimps. Gather braids very loosely at the crown, using soft scrunchies rather than tight elastics. This elevation keeps length off your shoulders and pillow while maintaining style shape.
Signs it’s time to remove
Recognizing removal indicators protects your natural hair from potential damage. Excessive frizz that doesn’t respond to touch-ups suggests your natural hair has grown enough to destabilize the foundation. While some frizz is normal, widespread loosening means removal time approaches.
Persistent itching beyond the first week warrants attention. While initial itching from new braids is common, continued discomfort might indicate product buildup, allergic reactions, or tension damage. Don’t suffer through excessive discomfort hoping it will improve.
Visible thinning around edges or partings demands immediate action:
Breakage Signs: Short broken hairs around braid bases
Traction Indicators: Soreness or bumps along hairline
Balding Patches: Any areas where scalp shows through unexpectedly
White Bulbs: Hair falling out with root bulbs attached
Persistent Pain: Headaches or scalp tenderness lasting beyond installation week
Odor development despite regular cleansing suggests trapped moisture creating bacterial growth. This typically occurs when braids stay wet too long or product buildup prevents proper drying. Once odor develops, removal becomes necessary to restore scalp health.
Removal process
Proper removal preserves the health gains achieved during protective styling. Never rush this process – plan several hours for careful braid removal. Starting with adequate time prevents frustration-driven rough handling that damages hair.
Begin by cutting braids to manageable lengths, being extremely careful not to cut your natural hair. Leave several inches of extension attached to distinguish from your hair. Work systematically from back to front or in quadrants to track progress.
Gently unravel each braid, using fingers to separate synthetic hair from natural. Apply conditioner or oil to stubborn tangles rather than forcing separation. Patience during this stage prevents unnecessary breakage and preserves length retention.
After removing all braids, resist immediately shampooing. First, gently finger-detangle accumulated shed hair – this is normal and doesn’t indicate damage. Apply a pre-shampoo treatment or oil to restore moisture before cleansing. Deep condition afterward to replenish nutrients.
Post-removal care continues for several days. Your scalp might feel tender or sensitive after weeks of braiding. Gentle massages with nourishing oils promote circulation and recovery. Wait at least two weeks before installing another protective style, allowing complete recovery time.
Final Thoughts on Mastering Stitch Braids
Stitch braids represent more than just another protective style option – they offer a perfect blend of hair health preservation and artistic expression. The geometric patterns and clean lines create sophisticated looks that transition seamlessly from boardroom meetings to weekend adventures. This versatility, combined with the 6-8 week wear time, makes them an intelligent choice for busy women seeking low-maintenance elegance.
Your journey with this protective style becomes more rewarding when you understand the fundamentals – from choosing patterns that flatter your features to establishing maintenance routines that preserve your investment. Whether you’re drawn to simple straight-back designs or intricate zigzag patterns, remember that the best style is one that makes you feel confident while protecting your natural hair. The beauty of stitch braids lies not just in their appearance, but in their ability to give your hair a healthy break while you continue living your fullest life.
Frequently Asked Questions
Q: What’s the average cost for professional stitch braid installation?
A: Professional installation typically ranges from $150-$350 depending on your location, stylist experience, pattern complexity, and braid length. Some stylists charge separately for hair, while others include it in their service price.
Q: Can I wash my hair while wearing stitch braids?
A: Yes, you should cleanse your scalp every 2-3 weeks using diluted shampoo in an applicator bottle. Focus on the scalp and partings, then rinse thoroughly and follow with light oil application.
Q: How do I prevent my edges from thinning with this style?
A: Request looser tension around your hairline during installation, moisturize edges daily with specialized products, and avoid constantly pulling braids into tight ponytails or buns that stress the hairline.
Q: What’s the minimum hair length needed for stitch braids?
A: Most experienced stylists can work with hair as short as 2-3 inches, though 4 inches provides more flexibility. The feed-in technique means your natural length primarily anchors the style while extensions create the desired length.
Q: Will stitch braids work on relaxed or color-treated hair?
A: Yes, but wait at least 2 weeks after chemical processing before braiding. Chemically treated hair requires extra gentle handling and possibly adjusted tension to prevent breakage.
Q: How do I keep my braids from getting frizzy?
A: Consistent night protection with satin scarves or bonnets prevents most frizz. Apply mousse or braid spray to smooth flyaways, and schedule touch-up appointments around week 4 if needed.
Q: Can I swim with stitch braids?
A: Swimming is possible but requires precautions. Wet hair before entering pools or ocean water, apply conditioner as a barrier, wear a swim cap when possible, and rinse immediately afterward.
Q: What should I do if my scalp becomes itchy?
A: Light itching during the first week is normal as your scalp adjusts. For persistent itching, apply tea tree oil mixed with carrier oil, use anti-itch braid sprays, or consult your stylist about possible allergic reactions.