Hair color has the power to change how you feel about yourself. A new shade or combination can brighten your face, add dimension to your style, and give you confidence you didn’t know you had. Highlights work magic by adding depth and movement to your natural hair color. They can be as bold or as soft as you want them to be.
Women have more options than ever before. You can go for warm tones that bring out the gold in your complexion. You can choose cool shades that create an icy effect. You can add just a few pieces around your face or paint color throughout your entire head. The possibilities are endless, and that’s what makes this so exciting.
Here’s some stunning highlight combinations that are turning heads right now. These looks range from soft and natural to bold and dramatic. Each one brings something different to the table, and each one has the potential to transform your appearance completely.
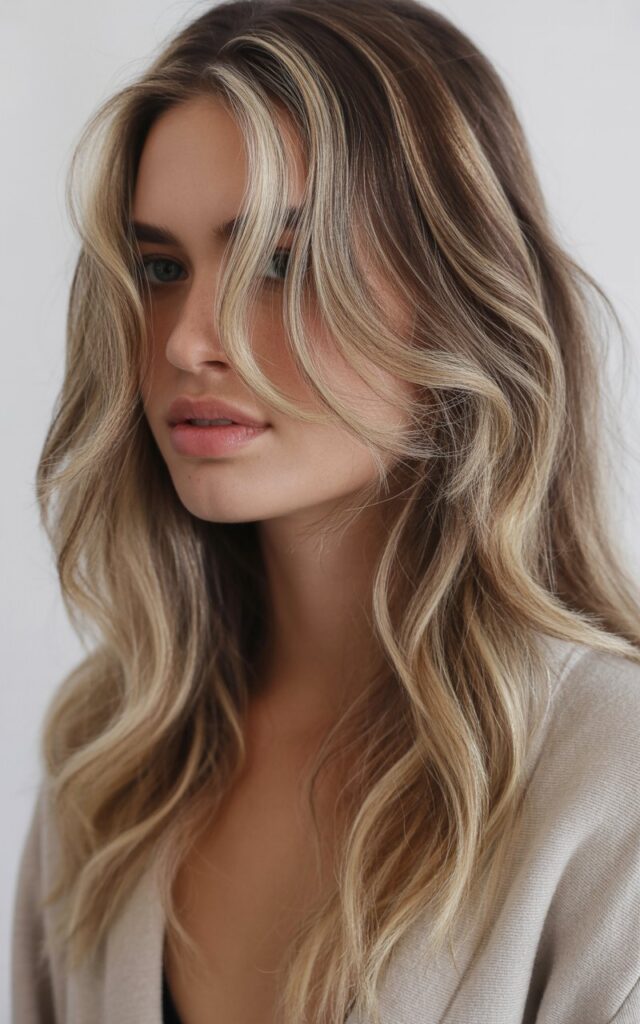
Caramel Balayage on Dark Brown Base
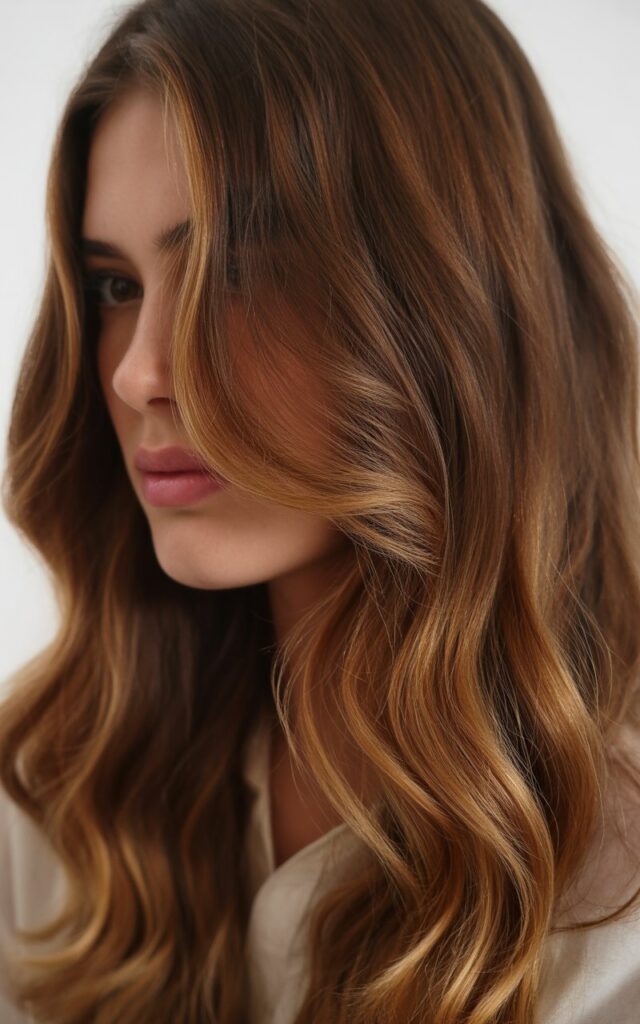
This combination has been dominating salons for good reason. The hand-painted technique creates a natural gradient that looks like the sun has kissed your hair. Your colorist will paint caramel tones onto your darker base, focusing on the mid-lengths and ends.
Why This Works
Dark brown hair can sometimes look flat. Adding caramel changes everything. The warm tones bring life to your hair and create dimension you can see from every angle. This isn’t about harsh lines or obvious streaks. The transition is smooth and blended.
Best Features
The maintenance is low. Your roots grow out naturally without creating a harsh line. You can go months between salon visits. This saves you time and money. The caramel tones work with almost every skin tone. Warm complexions love the golden undertones. Cool complexions can ask for slightly ashier caramel shades.
Your hair looks thicker with this color. The different tones create an illusion of volume. Light reflects off the caramel pieces differently than the dark base. This reflection tricks the eye into seeing more hair than you actually have.
Application Tips
Your colorist will section your hair carefully. They’ll paint the color freehand, which means no foils. The product sits on your hair for about 30-45 minutes. Some salons use toners afterward to perfect the shade. The entire process takes 2-3 hours.
You should use color-safe products at home. Purple shampoo isn’t necessary for this look. Regular moisturizing shampoo and conditioner work fine. Deep condition once a week to keep the color vibrant.
This works on straight hair, wavy hair, and curly hair. The texture doesn’t matter. What matters is the base color starting dark enough to create contrast. If your natural hair is very light, you’ll need a different approach.
Styling Recommendations
Beach waves show off this color beautifully. Use a large-barrel curling iron or wand. Wrap sections away from your face. Don’t curl too tightly. You want loose, relaxed waves. The caramel pieces will catch the light as you move.
Straight hair works too. Blow dry with a round brush. Focus on getting your roots smooth and lifted. The ends should have slight movement. Add a shine serum to make the color pop.
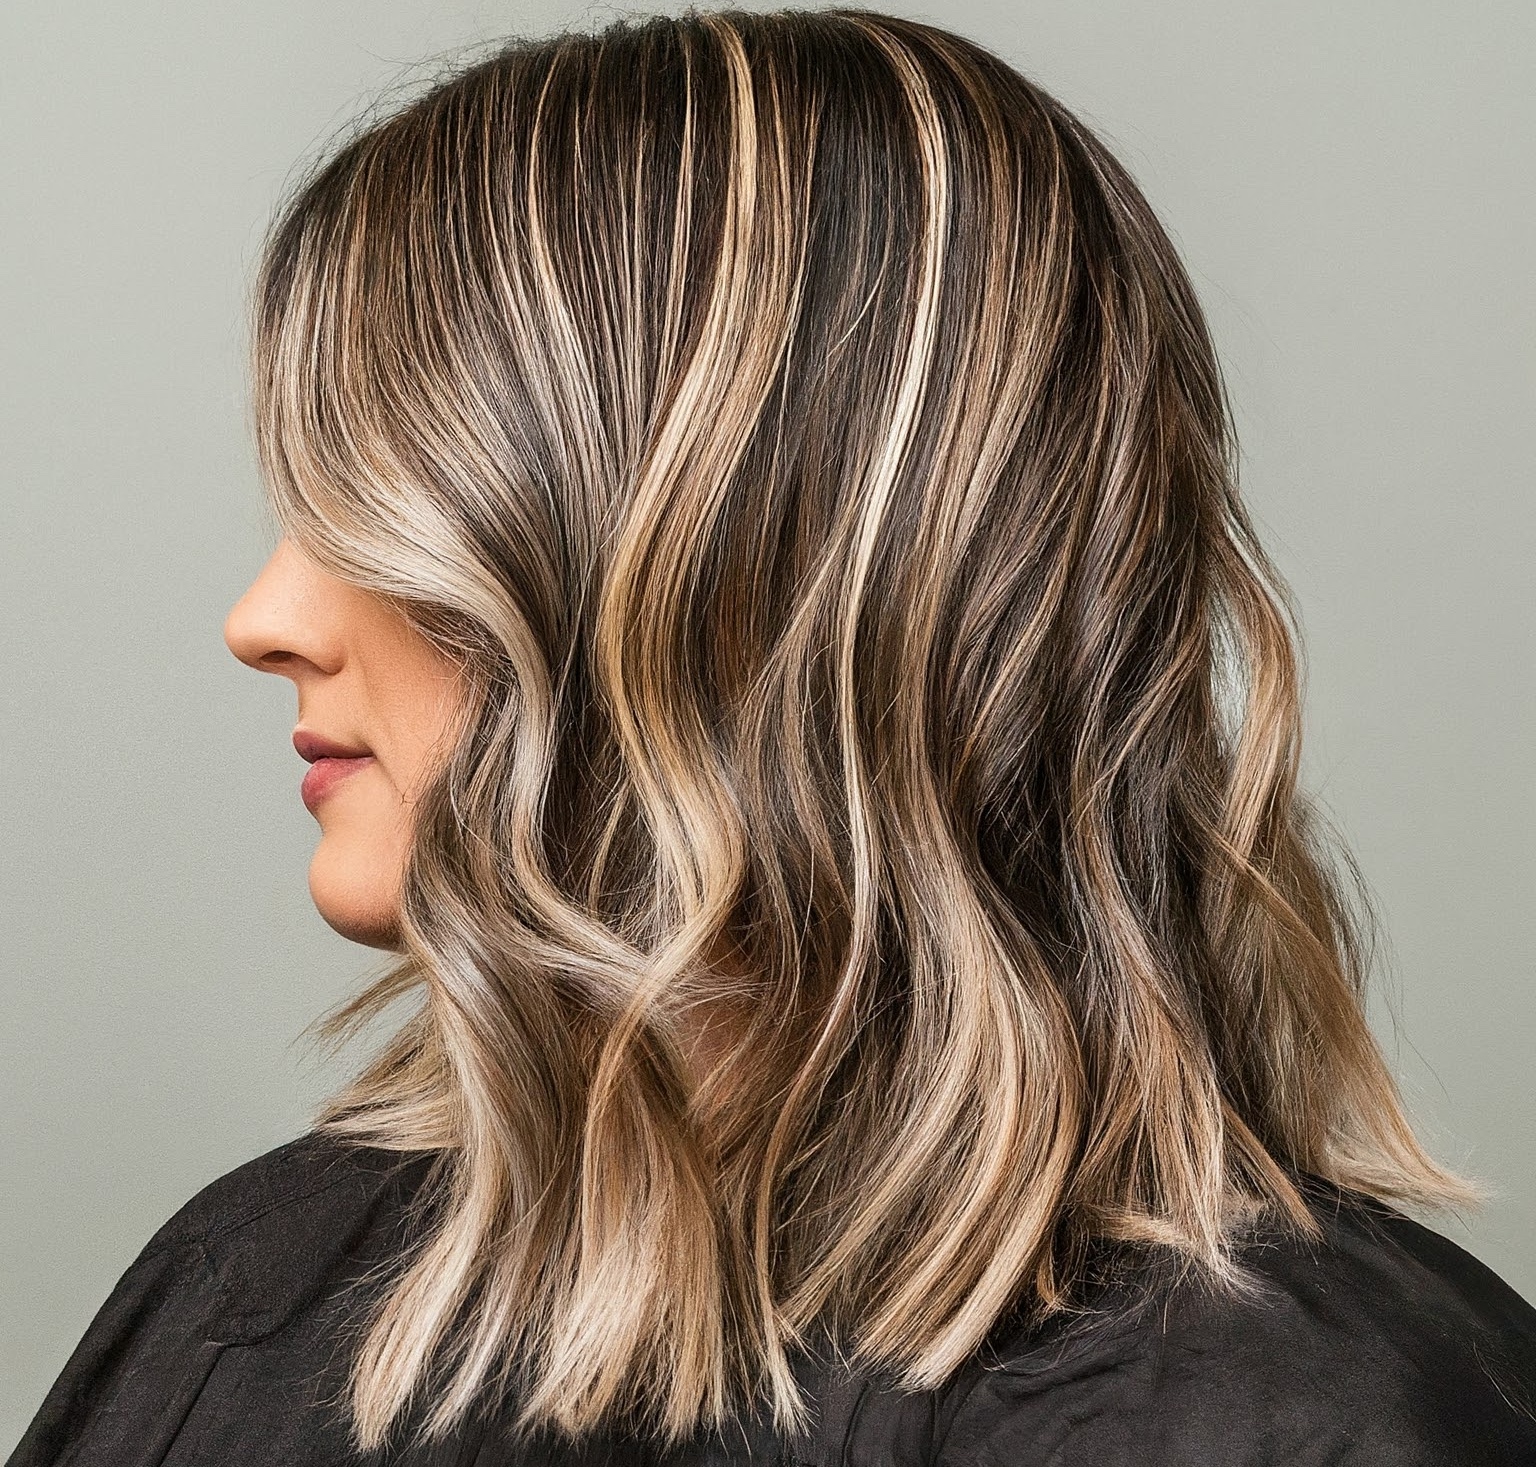
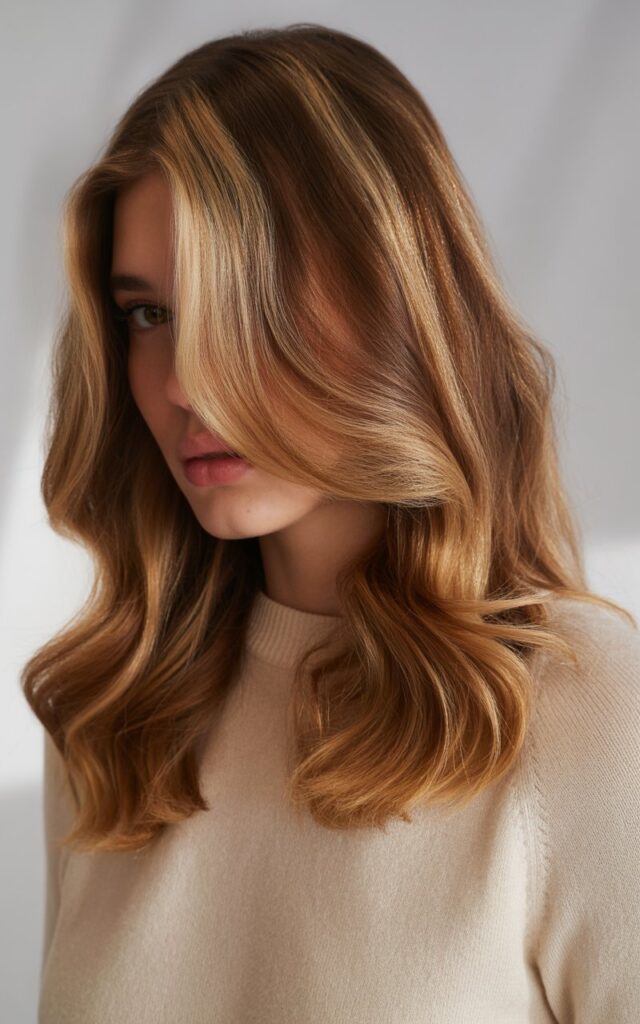
Honey Blonde with Ash Lowlights
Here’s a combination that creates serious depth. Honey blonde is warm and golden. Ash lowlights are cool and muted. Together, they create balance that looks expensive and intentional.
Understanding the Contrast
Honey blonde sits on top. Your colorist places these highlights throughout your hair, focusing on the surface layers and around your face. The ash lowlights go underneath. They add shadows and create dimension. This multi-tonal approach makes your hair look thick and healthy.
The cool and warm tones balance each other out. Neither one dominates. You get warmth without looking brassy. You get coolness without looking washed out.
Maintenance Requirements
This combination needs more upkeep than some others. The blonde pieces require toning every 6-8 weeks. Without toning, they can turn yellow. The ash lowlights fade more slowly, but they still need refreshing.
You’ll want to invest in good products. Purple shampoo helps keep the blonde pieces bright. Use it once or twice a week. Don’t overdo it, or your hair will look purple. A hydrating mask is important because blonde requires some lifting.
Your salon visits will happen every 8-12 weeks for color touch-ups. Between visits, you might need a gloss treatment. This refreshes the tone without changing the color placement. Many salons offer glosses as a quick service.
Who Should Try This
Fair to medium skin tones look amazing with this combination. The honey brings warmth to pale skin. The ash keeps it from looking too yellow. If you have pink undertones in your skin, the ash lowlights complement them beautifully.
This works best on medium to thick hair. The combination shows up more clearly when there’s enough hair to see the different tones. Very fine hair might look too busy with this many tones.
Your starting point matters. Natural blondes and light brunettes can achieve this in one session. Darker hair needs pre-lightening first. That means more time in the salon and potentially more damage. Talk to your colorist about realistic expectations based on your current color.
Consider these key features:
Dimensional Look: Multiple tones create depth that flat color can’t match.
Versatile Styling: Works with any hairstyle from sleek to messy.
Face-Framing Effect: The blonde brightens your features naturally.
Copper and Red Highlights on Brunette
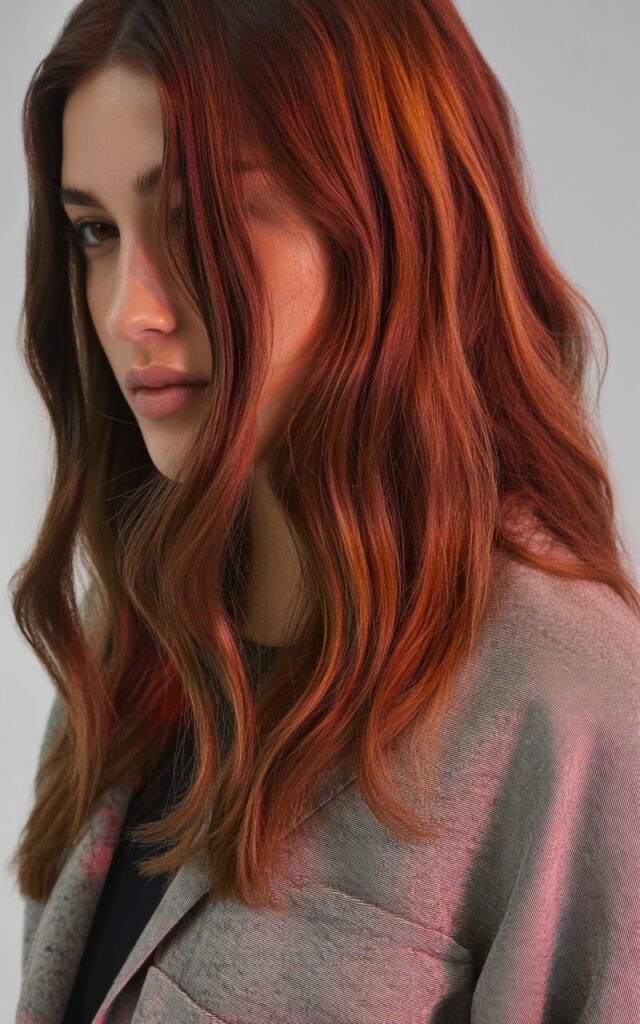
Red tones are having a major moment. Copper highlights add warmth and vibrancy to brown hair. This isn’t about going full red. It’s about adding strategic pieces that catch the light and create interest.
Your colorist will mix copper and red shades together. The copper is more orange-toned and bright. The red is deeper and richer. Together, they create a fiery effect that still looks wearable.
How to Achieve This Look
The process starts with lifting your natural color. Brown hair needs lightening before the copper and red can show up properly. Your colorist might use foils or balayage technique, depending on the placement you want. Foils create more dramatic contrast. Balayage creates a softer blend.
The color develops for 30-45 minutes. Afterward, a gloss locks in the tone and adds shine. The entire appointment takes 2.5-4 hours depending on your hair length and thickness.
Maintenance and Care
Red fades faster than other colors. This is just a fact of hair color chemistry. You’ll see fading after 3-4 weeks. Using color-depositing shampoo helps extend the life of your color. Look for formulas specifically made for red hair.
Wash your hair less frequently. Every other day is ideal. The more you wash, the faster the color fades. When you do wash, use lukewarm water. Hot water opens the hair cuticle and allows color to escape.
Heat styling accelerates fading. Use a heat protectant every single time you use hot tools. Air drying is better when possible. If you must use heat, keep the temperature under 350 degrees.
Styling Ideas
Loose curls make this color combination shine. The red and copper pieces blend together beautifully when your hair has movement. Use a 1.25-inch curling iron. Curl away from your face. Let the curls cool completely before touching them.
Half-up styles show off the color throughout your hair. You can see the different tones from the top and bottom layers. Add a simple twist or braid to the section you pin back.
Straight hair works if you want drama. The color creates enough interest on its own. A sleek, straight style lets people really see the copper and red tones. Just make sure your hair is healthy and shiny. Damaged hair won’t show the color as beautifully.
These highlights complement warm and neutral skin tones best. The orange and red undertones bring out the warmth in your complexion. Very cool skin tones might find this too warm for their coloring.
This option requires confidence. People will notice your hair. The color is bold without being unnatural. You’re not hiding in the crowd with copper and red highlights.
Face-Framing Money Piece Highlights
Sometimes you don’t want color all over. You just want your face to look brighter and more awake. Face-framing highlights, also called money pieces, do exactly that. These are bright sections placed directly around your face.
What Makes This Different
Traditional highlights go throughout your entire head. Money pieces focus only on the front. Your colorist will lighten just the pieces that frame your face, usually starting at your part and going down to your collarbone or beyond.
The contrast is intentional. Your natural color stays throughout the rest of your head. Only the front gets lighter. This creates a frame that draws attention to your features. It brightens your complexion without requiring a full head of highlights.
The Process
This is one of the quickest color services you can get. Your colorist will section out the front pieces. They’ll paint lightener on these sections and let it develop. The whole process takes 1-2 hours, which is much faster than full highlights.
You can choose how bright you want to go. Some women go several shades lighter. Others go just a bit lighter for a more natural effect. The width of the pieces matters too. Thinner pieces look more natural. Thicker pieces make more of an impact.
Benefits and Drawbacks
The main benefit is low commitment. If you’re not sure about going lighter all over, this lets you test the waters. You can always add more highlights later. It’s also more affordable than full highlights because less color is used.
The face-framing effect is instantly visible. Your face looks brighter in photos. Makeup looks better because the light color draws attention upward. You might even find you need less makeup because your features naturally pop more.
The downside is your hair looks different when you pull it back. The front is light, the back is dark. Some women love this contrast. Others find it jarring. Try wearing your hair up before committing to this style.
Upkeep is reasonable. You’ll need touch-ups every 10-12 weeks as your roots grow out. Between appointments, a gloss can refresh the tone. The grow-out is more noticeable than with all-over color because the contrast is so stark.
Best Candidates
This works for any hair color. Brunettes see the most dramatic change. The contrast between dark and light is significant. Blondes can still do this by going platinum or adding icy tones to the front pieces.
Hair texture doesn’t matter. Straight, wavy, and curly hair all show off face-framing highlights well. Short hair can do this too, though you’ll have less length to work with.
Your lifestyle matters. If you always wear your hair up in a ponytail, you won’t see these highlights much. They’re best for women who wear their hair down most of the time.
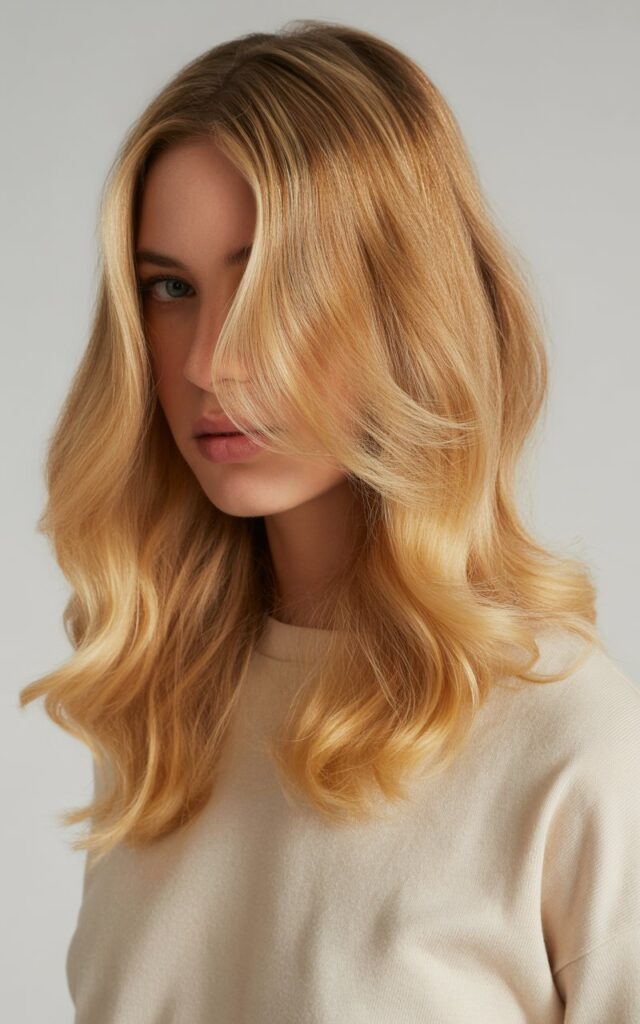
Bronde (Blonde + Brown) Blend
Bronde is exactly what it sounds like – a perfect mix of blonde and brown. Neither color dominates. The result is a neutral shade that works on almost everyone. This isn’t new, but the techniques for achieving it have gotten better.
How Bronde Works
Your colorist will mix blonde and brown tones together. The blonde adds lightness. The brown adds depth. The ratio depends on your starting color and desired result. Most bronde looks have slightly more brown than blonde.
The technique matters. Balayage creates the most natural bronde. Your colorist paints the color freehand, focusing on creating a soft transition. There are no harsh lines. You can’t tell where one color ends and another begins.
Some colorists use foils for bronde. This creates more definition between the blonde and brown sections. The result is less blended but still beautiful. Talk to your colorist about which technique matches your vision.
Why Women Love This
Bronde is universally flattering. The neutral tone works with every skin tone. Warm skin looks great with golden bronde. Cool skin looks great with ashy bronde. Neutral skin can go either way.
The maintenance is minimal. Your roots grow out naturally because the color is close to most natural shades. You can go 12-16 weeks between appointments. This makes it perfect for busy women.
Your hair looks healthy with this color. The multiple tones create shine and dimension. Light reflects off the different colors, making your hair look glossy. Damaged hair won’t pull off bronde as well because it needs to reflect light properly.
Achieving the Perfect Shade
Start with realistic expectations. Very dark hair might not reach true bronde in one session. The lifting process can damage hair if rushed. You might need 2-3 sessions to get there safely.
Natural blondes and light brunettes have the easiest time. The colorist can add lowlights or highlights as needed. The process is straightforward and the results are immediate.
Styling and Maintenance
Bronde looks good with any style. Beachy waves are popular because they show off the different tones. Each wave catches the light differently. Straight hair works too. The color creates enough interest without additional styling.
Here are care tips that will extend your color:
Use Sulfate-Free Shampoo: Sulfates strip color faster than anything else.
Deep Condition Weekly: Keeps hair healthy and color vibrant.
Limit Heat Styling: Heat fades color and damages hair texture.
Your colorist might recommend a gloss treatment between major color appointments. Glosses add shine and adjust tone slightly. They’re quick and affordable. Most women get them every 6-8 weeks.
The color works year-round. You don’t need to switch it up seasonally. Some women go slightly lighter in summer and slightly darker in winter. This keeps the look fresh without major changes.
Peekaboo Highlights with Vibrant Colors
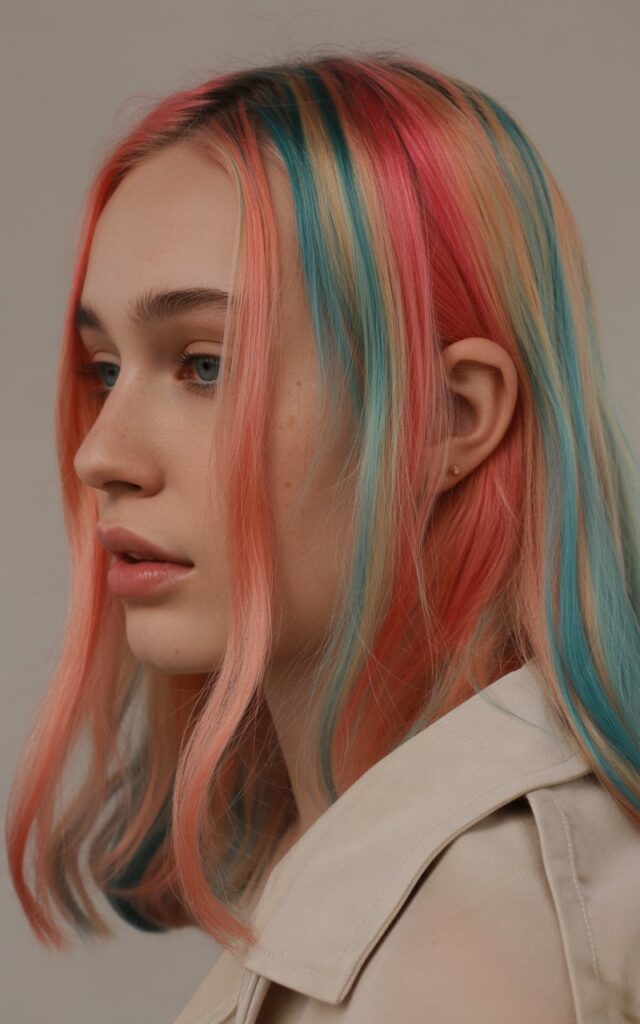
Ready for something fun? Peekaboo highlights hide underneath your top layers. You only see them when you move your hair or style it certain ways. The color can be anything – pink, blue, purple, green. This is your chance to experiment.
Your colorist will section your hair horizontally. The top layer stays your natural color. Underneath, they’ll add the bright colors. When your hair is down and straight, the color is mostly hidden. When you curl it, put it up, or flip it, the color shows.
Who Should Try This
This is perfect if you work in a conservative environment. The bright colors stay hidden during work hours. After hours, you can style your hair to show them off. It’s the best of both worlds.
You need some length for this to work well. Short hair doesn’t have enough layers to hide the color effectively. Medium to long hair is ideal. The more layers you have, the more you can hide the bright colors.
Your natural color should be dark enough to create contrast. The hidden colors pop more against dark hair. Very light hair won’t hide the colors as effectively.
Color Options
The possibilities are endless. Popular choices include:
Jewel Tones: Emerald green, sapphire blue, and amethyst purple look rich and luxurious.
Pastels: Soft pink, lavender, and mint create a dreamy effect.
Neon Brights: Hot pink, electric blue, and lime green make a bold statement.
You can do one color or multiple colors. Some women do a rainbow effect with several different shades. Others stick to one color family for a more cohesive look.
Maintenance Reality
Bright colors fade quickly. This is especially true for reds and pinks. You’ll see fading after 2-3 weeks. Blues and greens last slightly longer. To extend the life of your color, wash your hair in cold water. Hot water opens the cuticle and lets color escape.
Color-depositing conditioners help maintain vibrancy. These are conditioners with color pigment mixed in. You use them once or twice a week to refresh your color between salon visits.
Your hair needs to be lifted to almost white before adding bright colors. This means bleaching. Bleach damages hair. You’ll need to use deep conditioning treatments regularly. Leave-in conditioner becomes your best friend.
Touch-ups are necessary every 6-8 weeks. The color fades and your roots grow out. Some women let the peekaboo highlights fade completely between sessions. This gives their hair a break from processing.
Styling to Show Off the Color
Braids are perfect for displaying hidden colors. A French braid pulls sections from underneath, showing off the bright pieces. Fishtail braids do the same thing. Even a simple side braid reveals the hidden color.
Messy buns and top knots show the underneath layers naturally. The bright colors peek out at the bottom of the bun. This creates an unexpected pop of color.
Curls and waves mix the bright colors with your natural shade. The colors weave throughout your hair as it moves. This creates a beautiful blended effect that changes as you move.
Babylights with Natural Base
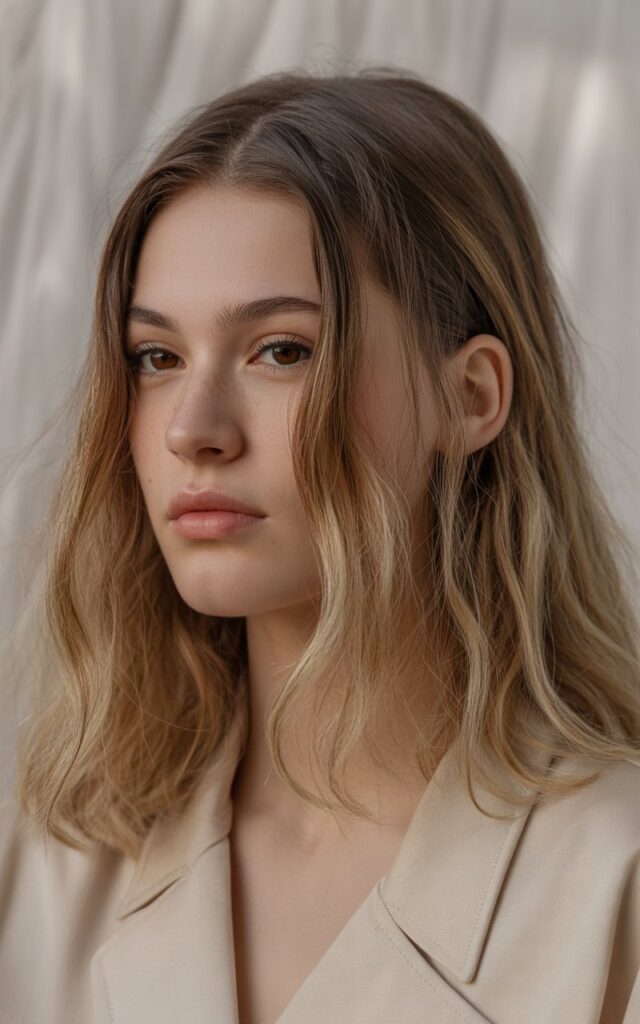
Babylights are the most natural-looking highlights you can get. The name comes from how they mimic the natural highlights in children’s hair. These are tiny, delicate pieces of color woven throughout your head. The result is soft and sun-kissed.
The Babylight Technique
Your colorist will use very thin sections of hair. They’ll take sections that are much thinner than traditional highlights. The color is usually just one or two shades lighter than your natural color. This creates dimension without obvious streaks.
The placement is key. Babylights go throughout your entire head, from roots to ends. They’re concentrated around your face and on the surface layers. This is where the sun would naturally lighten your hair.
The process takes time. Each section is tiny, so there are more sections to do. A full head of babylights takes 3-4 hours. Your colorist needs patience and precision. Not every stylist specializes in this technique, so choose carefully.
Why Choose Babylights
The grow-out is virtually invisible. Because the pieces are so fine and close to your natural color, you can’t see a harsh line as your roots grow. Many women go 16-20 weeks between appointments. This makes babylights cost-effective despite the initial time investment.
Your hair looks naturally lightened by the sun. There’s no obvious “I colored my hair” effect. People might compliment your hair without realizing you had work done. That’s the goal with babylights – natural beauty enhancement.
The color works with any base shade. Blondes can add platinum babylights. Brunettes can add caramel or honey tones. Redheads can add copper pieces. The technique is versatile and adapts to your coloring.
Care and Maintenance
Babylights are low-maintenance compared to other highlighting techniques. You don’t need special shampoos or treatments. Regular color-safe products work fine. The pieces are so fine and natural that they don’t require intensive care.
A gloss treatment once every few months keeps the tone fresh. This adds shine and adjusts any brassiness that might develop. Glosses are quick and affordable. They’re done at the salon and take about 20 minutes.
Heat styling won’t ruin babylights the way it might ruin more dramatic color. The pieces are so subtle that slight fading isn’t noticeable. Still, use heat protectant to keep your hair healthy overall.
Best Results
This works on all hair lengths. Short hair shows babylights beautifully because every piece is visible. Long hair creates a cascading effect where the light pieces are scattered throughout.
Straight hair and wavy hair both showcase babylights well. Very curly hair might not show the individual pieces as clearly, but the overall lightening effect still works. The texture of curly hair creates its own dimension.
Your starting color should be relatively close to your desired result. Babylights are about enhancement, not transformation. If you want dramatic change, consider a different highlighting technique. If you want natural beauty, babylights are perfect.
The technique works for all ages. Younger women love the natural look. Older women appreciate how babylights blend gray hairs without obvious color. The fine pieces disguise gray effectively while still looking natural.
Your Hair, Your Choice
Finding the right highlight combination changes everything. Your hair frames your face every single day. The right color makes you feel confident and beautiful. The wrong color makes you feel self-conscious and unhappy.
These seven combinations offer something for everyone. Maybe you want the low-maintenance beauty of caramel balayage. Maybe you’re ready for the boldness of copper and red. Maybe you want to hide bright colors underneath your natural shade. All of these options are available to you. The choice is yours, and that’s exciting. Talk to your colorist about your lifestyle, your budget, and your vision. They can help you choose the combination that fits your life perfectly.
Frequently Asked Questions
Q: How long do hair highlights typically last?
A: Most highlights last 8-12 weeks before needing a touch-up. However, this varies based on the technique used and how fast your hair grows. Babylights and balayage last longer because the grow-out is less noticeable. Face-framing highlights and peekaboo colors need more frequent maintenance.
Q: Will highlights damage my hair?
A: Any chemical process involves some damage. Highlights require lightening your hair, which opens the cuticle and can cause dryness. However, a skilled colorist minimizes damage by using quality products and proper techniques. Regular deep conditioning treatments help keep highlighted hair healthy. The amount of damage depends on your starting color and desired result.
Q: Can I get highlights if I have dark hair?
A: Yes, dark hair can be highlighted. However, achieving very light highlights on very dark hair requires more processing. This increases the risk of damage. Your colorist might recommend gradually going lighter over multiple sessions. Caramel, copper, and honey tones show up beautifully on dark hair with less processing than platinum shades.
Q: How much do hair highlights cost?
A: Prices vary widely based on location, salon, and technique. Expect to pay $100-$300 for highlights in most cities. Face-framing highlights cost less because they use less product and take less time. Full babylights or complex color combinations cost more due to the time and skill required.
Q: Should I wash my hair before getting highlights?
A: No, come to your appointment with hair that hasn’t been washed for 24-48 hours. Your scalp’s natural oils protect your scalp during the coloring process. Clean hair can be more sensitive. However, don’t use heavy styling products before your appointment. Light product is fine, but avoid anything thick or greasy.
Q: How do I maintain my highlights at home?
A: Use sulfate-free, color-safe shampoo and conditioner. Wash your hair less frequently – every other day or every third day is ideal. Use lukewarm or cool water instead of hot water. Apply a deep conditioning mask once a week. Use heat protectant before styling with hot tools. Avoid chlorine and salt water when possible, or wear a swim cap.
Q: Can I get highlights if I’m pregnant?
A: This is a personal decision to discuss with your doctor. Many doctors say highlights are safer than all-over color because the chemicals don’t touch your scalp. The fumes are the main concern. Some women choose to wait until after the first trimester. Others avoid hair color completely during pregnancy. Natural highlighting techniques like balayage keep chemicals away from the scalp.
Q: Will highlights cover gray hair?
A: Highlights can blend gray hair effectively, especially techniques like babylights that create multiple tones. However, highlights don’t cover gray the way all-over color does. If you have significant gray, you might need lowlights combined with highlights. This creates dimension while providing more coverage. Talk to your colorist about your specific situation.