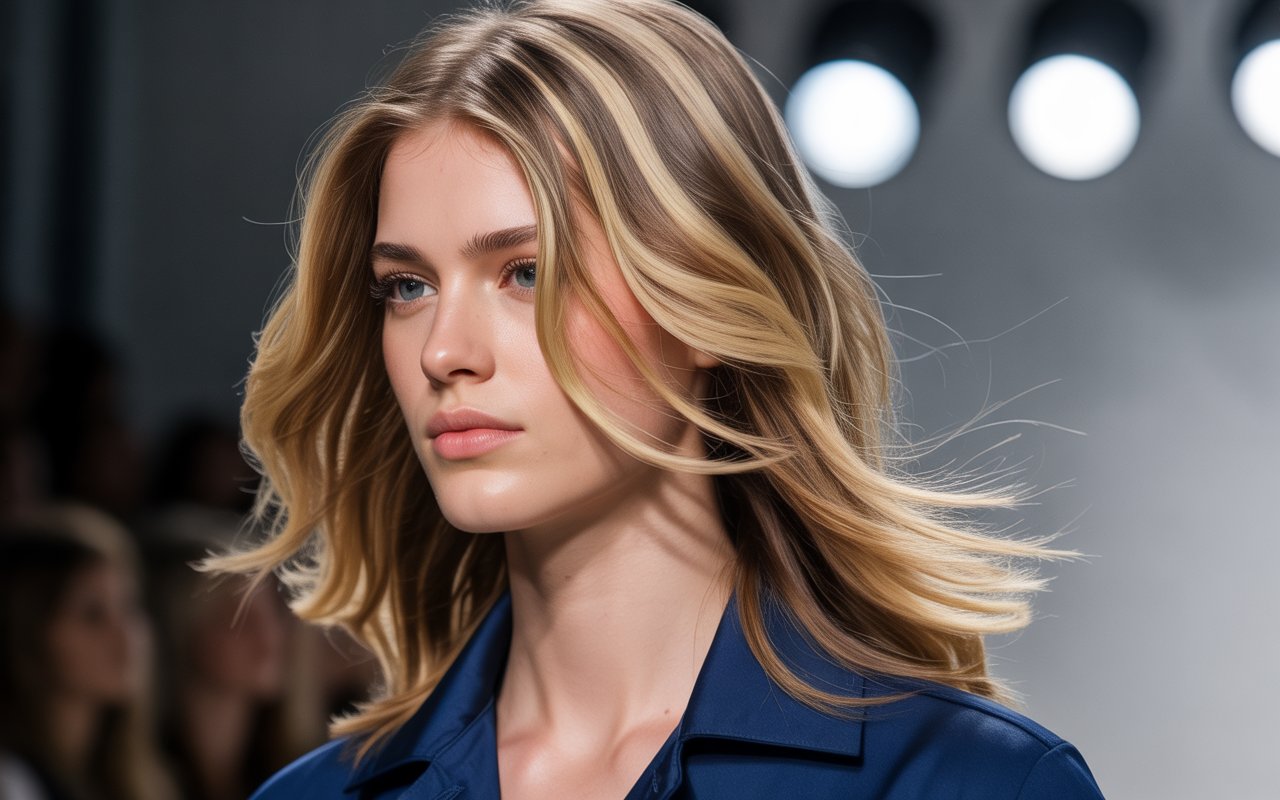
Hair highlights can transform your appearance in ways a single shade never could. The right combination adds depth, movement, and dimension that catches light from every angle. Women choose highlights to add interest without committing to a complete color change, and the options available today go far beyond simple streaks.
Choosing between warm caramels and cool ash tones, or deciding whether to go bold with contrasting colors or subtle with blended shades, depends on your skin tone, natural base color, and maintenance preferences. Some combinations require frequent salon visits, while others grow out gracefully. The placement matters too – face-framing pieces brighten your complexion, while all-over application creates a sun-kissed effect.
From classic blonde and caramel blends to daring combinations like black and deep blue, there’s a highlight pairing for every style preference. Some add warmth to your look, others create an edgy, modern vibe. You’ll find options that work with every hair length, texture, and lifestyle. Let’s look at ten combinations that consistently draw compliments and make styling easier.
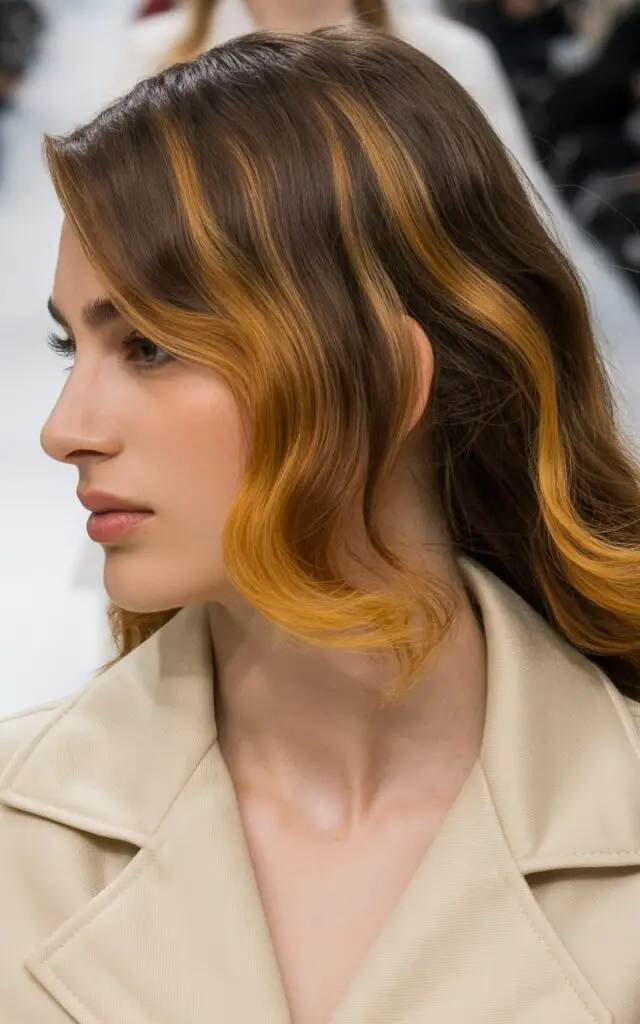
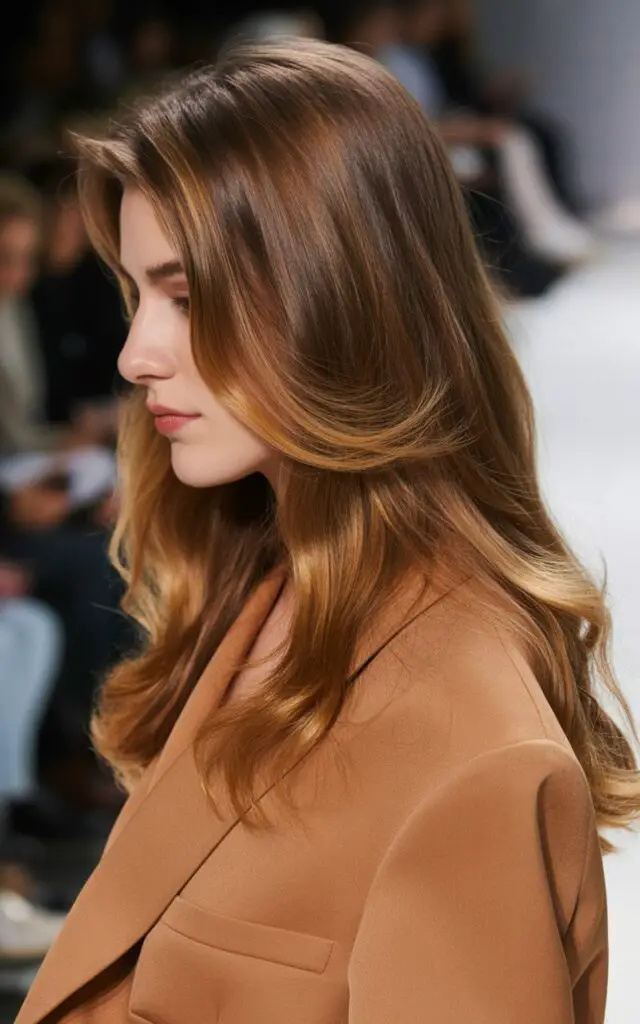
Balayage Blonde and Caramel

Blonde and caramel create one of the most requested color combinations in salons. This pairing works because the warm caramel tones blend seamlessly with lighter blonde pieces, mimicking how the sun naturally lightens hair. You get dimension without harsh lines or obvious grow-out.
Why This Pairing Works
The contrast between blonde and caramel isn’t too dramatic, which makes it flattering for most skin tones. Warm undertones in the caramel complement golden or olive complexions beautifully. The blonde pieces brighten your face, while deeper caramel adds richness at the roots and throughout the mid-lengths.
Application Techniques
Your stylist will likely use balayage to paint these tones onto your hair. This freehand technique creates a natural gradient. The caramel goes in first as a base, then blonde gets strategically placed around the face and on surface layers. The result looks lived-in from day one.
Maintenance Considerations
This combination grows out gracefully, which means fewer touch-ups. You can typically wait 10-12 weeks between appointments. Purple shampoo keeps the blonde from turning brassy, while color-safe products protect the caramel from fading.
How do you maintain the vibrancy between salon visits? Here are some essential tips:
Tone Weekly: Use purple shampoo once per week to neutralize yellow tones in the blonde sections.
Protect from Heat: Apply a heat protectant before styling to prevent color fade and damage.
Deep Condition: Use a hydrating mask every two weeks to keep highlighted hair soft and shiny.
Limit Washing: Wash hair 2-3 times per week to preserve the color and natural oils.
This style suits medium to long hair best, as the length allows for proper color placement and blending. Short hair can work, but you’ll have less space for the gradient effect. Fine hair benefits from the added dimension, while thick hair looks more manageable with the lightened pieces throughout.
Platinum and Silver
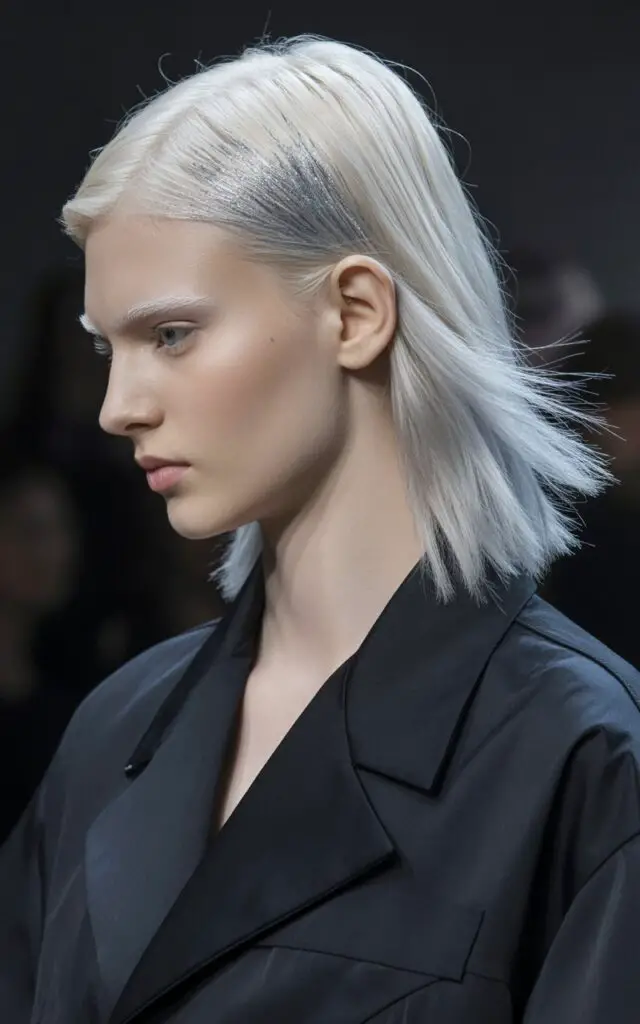
Cool metallic tones have gained popularity for their modern, edgy appearance. Platinum and silver together create an icy effect that looks sophisticated and fashion-forward. This isn’t a subtle choice – it’s a statement.
The Cool-Toned Appeal
These shades work best on women with cool or neutral undertones. Pink, blue, or neutral undertones in your skin will complement the icy hues. Warm undertones might clash, making you look washed out rather than striking.
Silver pieces add depth to an all-over platinum base. Without the silver, platinum can look flat. The varying tones create movement and interest, especially in sunlight or under different lighting conditions.
Who Should Try It
This combination requires commitment. Your hair needs to be very light – almost white – to achieve true platinum and silver tones. That means significant bleaching, which can damage your strands if not done properly. Starting with naturally light hair makes the process easier.
You’ll need to be okay with frequent maintenance. These shades show yellow or brassy tones quickly, requiring regular toning treatments. If you’re not ready for that level of upkeep, consider a different option.
Upkeep Requirements
Toning becomes part of your routine. You might need professional toning every 4-6 weeks, with at-home purple or blue shampoo in between. The bleaching process also means your hair needs extra moisture. Deep conditioning treatments aren’t optional – they’re necessary to keep your hair healthy.
Root touch-ups depend on your natural color. Dark roots create a shadow root effect that some women love, while others prefer to keep everything light. Budget for salon visits every 6-8 weeks if you want to maintain the full platinum and silver effect.
Quality matters with this look. Cheap products will strip the tone quickly. Invest in professional shampoos, conditioners, and styling products formulated for color-treated or bleached hair. Your wallet might hurt initially, but your hair will thank you.
Chocolate and Honey
Rich chocolate brown with honey highlights creates warmth without going too light. This combination adds brightness while keeping things natural-looking. It’s perfect if you want noticeable dimension without dramatic contrast.
Creating Natural Depth
Chocolate serves as the base color, providing depth and richness. Honey highlights get woven throughout, concentrating around the face and on top layers. The warmth in both shades ensures they complement each other rather than clash.
This pairing flatters warm and neutral skin tones particularly well. The golden undertones in honey bring out warmth in your complexion. If you have hazel or brown eyes, this combination makes them pop.
Placement Strategies
Face-framing pieces in honey brighten your features instantly. Your stylist might also add honey throughout the crown and ends for an all-over glow. The key is keeping the chocolate dominant – you want honey as an accent, not the main color.
Babylights work well with this combination. These ultra-fine highlights mimic childhood hair, creating subtle dimension that looks completely natural. Alternatively, chunkier highlights create more drama while still maintaining a cohesive look.
Long-Term Benefits
One major advantage? This grows out beautifully. The chocolate and honey blend creates a gradient that doesn’t show harsh lines as your roots grow. You can stretch appointments to 12-16 weeks if needed, making it budget-friendly.
Color longevity is another plus. Chocolate and honey don’t require as much maintenance as lighter shades. Standard color-safe shampoo and conditioner keep them vibrant. You won’t need special toning products or weekly treatments. Here’s what helps maintain this look:
Use Sulfate-Free Products: These prevent color from washing out prematurely and keep hair healthier.
Limit Sun Exposure: UV rays can lighten honey tones too much, so wear a hat or use UV protection spray.
Gloss Treatments: Get a gloss every 6-8 weeks to refresh shine and color vibrancy.
Medium to thick hair showcases this combination best. The chocolate and honey need some volume to really shine and create that dimensional effect. Fine hair can still work, but you might need more honey pieces to achieve visible contrast.
Red and Copper
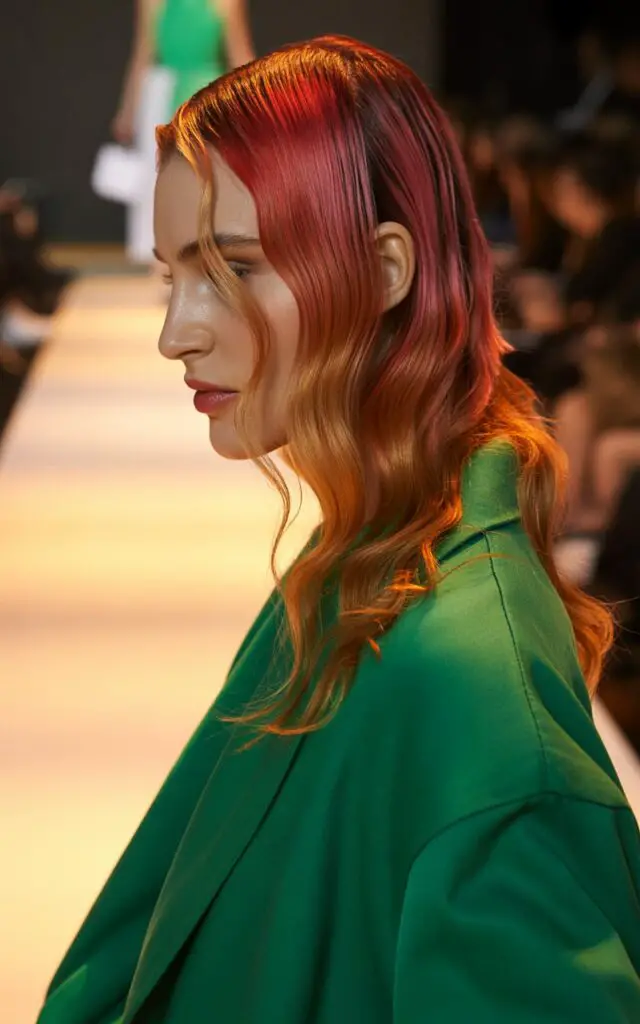
Bold and fiery, red with copper highlights creates an intense look that’s hard to ignore. This combination brings energy and warmth, turning your hair into a focal point of your entire appearance.
Understanding the Intensity
Red as a base color makes a strong statement on its own. Adding copper highlights takes it further by introducing lighter, brighter pieces that catch light beautifully. The copper reflects more light than the deeper red, creating contrast and movement.
This works exceptionally well for fair to medium skin tones with warm undertones. The red and copper enhance natural warmth in your complexion. Cool skin tones can pull it off too, but you’ll want to lean toward cooler reds rather than orange-based ones.
Color Variations
Not all reds are the same. You might choose a deep burgundy red with bright copper, or a vibrant cherry red with subtle copper pieces. The depth of your base red determines how dramatic the copper appears. Darker bases make copper stand out more.
Auburn bases with copper create a softer version of this look. It’s still warm and noticeable but less intense than true red. This might be a better starting point if you’re nervous about going too bold.
The Reality of Red Hair
Red fades faster than any other color. That’s just the nature of red pigment molecules – they’re larger and wash out more easily. You’ll need to refresh the color every 4-6 weeks to keep it vibrant. Color-depositing shampoos help between appointments.
Copper fades too, often turning brassy or orange. Regular toning keeps it looking fresh. Budget for both color maintenance and toning when considering this combination. It’s high-maintenance but stunning when properly cared for.
What products help maintain this vibrant combination?
Color-Depositing Conditioner: Use weekly to refresh red tones without a full salon visit.
Cool Water Rinses: Hot water opens cuticles and releases color faster, so wash with lukewarm or cool water.
Minimal Heat Styling: Excessive heat fades red shades quickly, so air-dry when possible.
Red-Specific Shampoo: Formulas designed for red hair deposit pigment while cleansing.
This combination works on all hair lengths and textures. Short hair can look particularly striking with this bold color choice. Curly hair shows off the dimension beautifully as the copper catches light differently on each curl.
Ash Brown and Cool Blonde
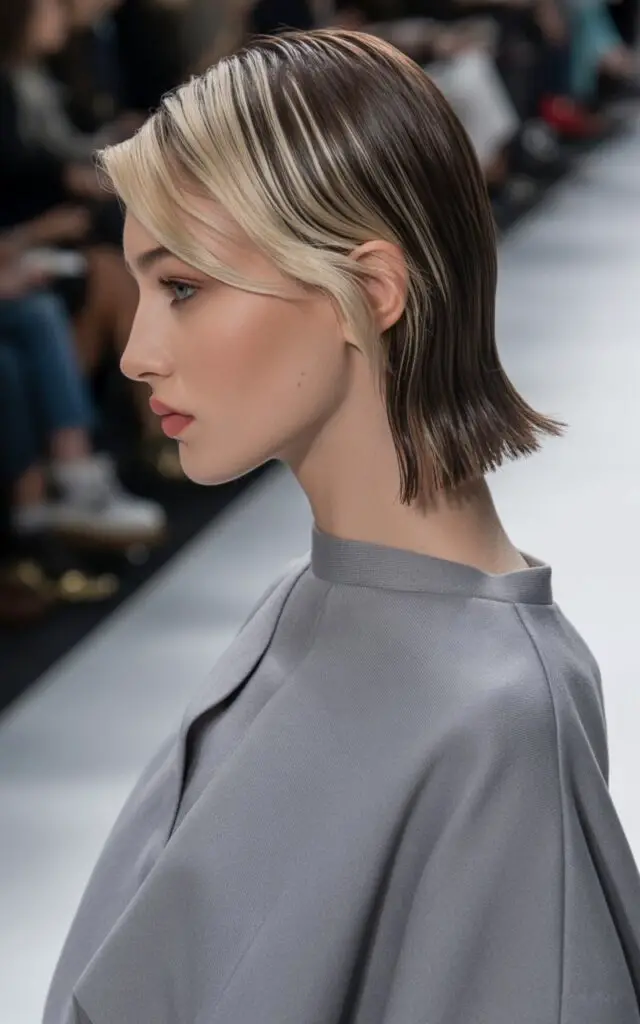
For a sophisticated, understated look, ash brown with cool blonde highlights delivers. This combination avoids warmth entirely, creating a modern, neutral palette that looks polished and refined.
The Appeal of Ash Tones
Ash tones contain blue or green undertones that neutralize warmth. Ash brown appears grayish-brown rather than chocolate or golden brown. Cool blonde has a similar quality – it’s not buttery or honey-toned, but rather neutral to slightly silver.
Together, these shades create a cohesive, cool-toned look. This flatters women with cool or neutral skin undertones beautifully. Pink or blue undertones in your skin will complement the ash and cool blonde perfectly.
Achieving the Right Balance
The ratio matters. Too much cool blonde on an ash brown base can look washed out. Your stylist should keep the brown dominant, using blonde strategically for brightness. Face-framing pieces and surface highlights work well.
Starting with naturally dark blonde or light brown hair makes this easier to achieve. Very dark hair requires significant lightening to reach cool blonde, which can cause damage. Talk to your stylist about realistic expectations based on your starting point.
Preventing Warmth
The biggest challenge with ash tones? Warmth creeps in quickly. Minerals in water, sun exposure, and even some styling products can add unwanted warmth. You’ll need purple or blue shampoo to counteract this and keep the tones cool.
Professional toners every 6-8 weeks help maintain the ash quality. At-home maintenance is crucial between appointments. Using the right products isn’t just recommended – it’s necessary to preserve the look you paid for.
Does your hair texture affect how this looks? Absolutely. Straight hair shows the cool tones most clearly, with light reflecting evenly across each strand. Wavy hair adds movement that makes the color transition more dynamic. Curly hair can make the ash and blonde blend together, creating an overall lighter appearance rather than distinct highlights.
Daily styling impacts the color too. If you use heat tools regularly, invest in quality heat protection. The high temperatures can shift ash tones toward warmth, undoing your colorist’s work. Here’s how to protect your investment:
Blue or Purple Shampoo: Alternate between these to neutralize both yellow (purple) and orange (blue) tones.
Filter Your Water: Install a shower filter to remove minerals that add warmth to ash tones.
Avoid Chlorine: Pool water is particularly harsh on cool-toned colors, so wear a cap or wet hair with clean water first.
Rose Gold and Peachy Tones
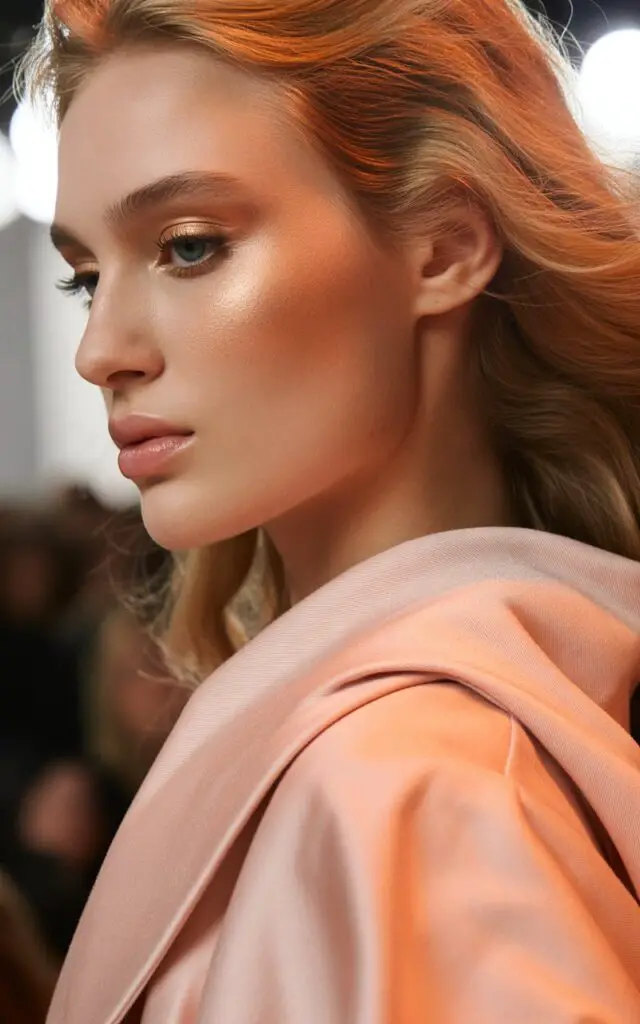
Soft, romantic, and feminine, rose gold paired with peachy highlights creates a warm yet delicate look. This combination has a subtle metallic quality that adds interest without being too bold.
Why These Tones Work Together
Rose gold contains pink and gold undertones, creating a unique shade that’s neither fully pink nor fully blonde. Peachy tones complement this with orange and pink undertones of their own. The result is cohesive and harmonious, with enough variation to create dimension.
This flatters a wide range of skin tones, particularly fair to medium complexions. The warmth brightens your face without overwhelming it. If you have naturally rosy cheeks or pink undertones in your skin, this combination enhances those features beautifully.
Application Methods
The base color is typically a strawberry blonde or light golden blonde. Rose gold gets applied as highlights, with peachy tones added for extra dimension. Some stylists reverse this, using rose gold as the base with peachy highlights. Either approach works.
The key is keeping everything in the same tonal family. All the shades should have pink or peach undertones. Mixing in anything too cool-toned or ashy will disrupt the harmony and make the color look patchy rather than blended.
Maintenance Requirements
These delicate shades require care to maintain. The pink tones in rose gold fade quickly, often leaving behind just the gold. Regular color-depositing treatments help preserve the rose quality. Some women use pink shampoo or conditioner weekly to refresh the color.
Peachy tones can turn too orange if not maintained properly. Toning appointments every 6-8 weeks keep everything balanced. The good news? This combination grows out softly, without harsh lines or obvious roots.
What type of hair works best? Fine to medium hair shows these delicate shades beautifully. The lightness creates volume and movement, making fine hair appear fuller. Very thick or coarse hair might need more aggressive lightening to achieve true rose gold and peach tones, which could cause damage.
How do you keep these soft tones looking fresh?
Color-Safe Products Only: Regular shampoos strip delicate tones faster than anything else.
Weekly Masks: Hydration prevents fading and keeps hair healthy after the lightening process.
Minimize Washing: The less you wash, the longer the color lasts – aim for 2-3 times per week.
Cold Water Final Rinse: This seals the cuticle and locks in color better than warm water.
Styling is simple with this color. Beach waves and soft curls show off the dimension beautifully. Straight styles work too, especially if your highlights are placed strategically around your face. The soft, romantic quality of rose gold and peach suits relaxed, natural styling better than severe, structured looks.
Dark Brown and Burgundy

Sophisticated and rich, dark brown with burgundy highlights adds depth without extreme brightness. This combination works for women who want dimension but prefer to keep things relatively dark and subtle.
Creating Subtle Dimension
Dark brown serves as a nearly black base in most cases. Burgundy highlights peek through, adding a hint of color that’s noticeable in certain lighting. This isn’t an in-your-face look – it’s refined and understated.
The burgundy contains both red and purple undertones. Against very dark brown, it appears almost black in low light but reveals its true color in bright light or sunlight. This creates an element of surprise that makes your hair interesting without being loud.
Best Candidates
This combination flatters olive, tan, and deep skin tones particularly well. The richness of both shades complements darker complexions beautifully. Fair skin can work too, especially if you have strong features and want a dramatic, high-contrast look.
Women with naturally dark hair find this easier to achieve than those with lighter starting points. The dark brown base is close to many natural hair colors, requiring minimal processing. Even the burgundy doesn’t need excessive lightening on dark bases – your colorist can deposit it directly in many cases.
Placement Techniques
Strategic placement makes this combination work. Too much burgundy overwhelms the dark base and looks more like all-over red hair. Your stylist should add burgundy sparingly – face-framing pieces, peek-a-boo sections underneath, or scattered throughout for subtle dimension.
Babylights in burgundy create the most natural effect. These fine highlights add interest without looking striped or chunky. Alternatively, larger sections underneath create a hidden color effect that shows when you move or style your hair up.
Longevity and Care
Burgundy fades like all red-based colors, but against a dark base, the fading is less noticeable. As it lightens, it might shift toward reddish-brown, which still looks intentional against dark brown. You can typically go 8-10 weeks between color refreshes.
Standard color-safe products work well for maintenance. You don’t need specialized purple shampoos or extensive toning routines. A color-depositing conditioner in burgundy or red helps refresh the highlights between salon visits.
Does hair texture matter? Curly and wavy hair show this combination particularly well. The curves and movement of textured hair make the burgundy peek out in interesting ways. Straight hair works too but might require more strategic highlight placement to avoid a flat appearance. Consider these maintenance approaches:
Red-Depositing Conditioner: Helps maintain burgundy vibrancy between color appointments.
Gentle Cleansing: Sulfate-free formulas prevent color from washing out too quickly.
UV Protection: Sun exposure fades burgundy faster, so use products with UV filters or wear hats.
This combination suits professional environments well. It’s bold enough to show personality but subtle enough to remain workplace-appropriate. The dark base keeps it grounded while the burgundy adds just enough interest to set you apart.
Golden Blonde and Buttery Highlights
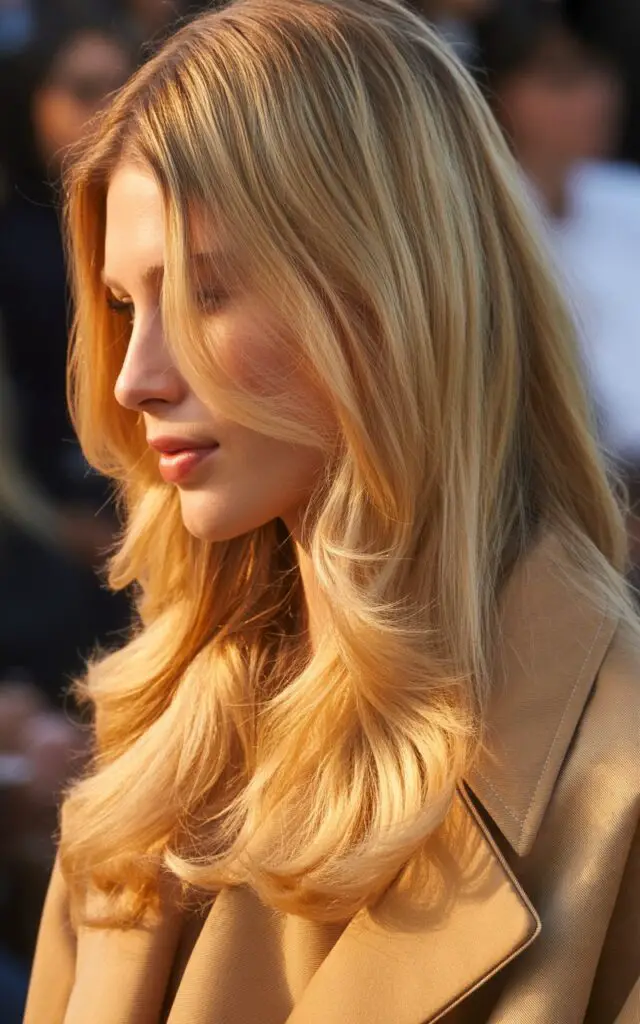
Warm, sun-kissed, and natural-looking, golden blonde with buttery highlights creates the quintessential California girl effect. This combination radiates warmth and makes you look like you spend all your time at the beach.
The Warmth Factor
Golden blonde has yellow undertones that give it a warm, inviting quality. Buttery highlights take this further – they’re even lighter and warmer, creating bright pieces that catch light beautifully. Together, they build on each other’s warmth for maximum glow.
This flatters warm and neutral skin tones best. Golden and olive undertones in your complexion will harmonize with the warmth in your hair. Fair skin with yellow undertones looks particularly radiant with this combination. Cool skin tones might find it too warm, though some women love the contrast.
Achieving the Look
Your starting color matters. Naturally blonde or light brown hair reaches golden blonde and buttery tones more easily than dark hair. Going this light on dark hair requires significant bleaching, which can compromise hair health.
The buttery highlights get concentrated around the face and on top layers where they’ll be most visible. Some women prefer an all-over approach with varying shades of golden blonde and butter throughout. Both methods create dimension, just with different intensity levels.
Maintenance Expectations
These warm tones don’t require purple shampoo – in fact, purple shampoo can make them look dull or ashy. Instead, use color-safe products designed for warm blondes. Some women like gold-toning shampoos that enhance the warmth rather than neutralize it.
Root maintenance depends on your natural color. If you’re naturally blonde, roots might blend seamlessly. Darker roots create contrast but can still look intentional with the right placement strategy. Plan for touch-ups every 8-12 weeks.
How does styling affect the look? Loose waves and beachy texture show off the dimension best. The varying shades catch light differently on each wave, creating movement and interest. Straight styles work too, especially if you have lots of layers that allow the different tones to show through.
What keeps this combination looking fresh and vibrant?
Warm-Toned Products: Use shampoos and conditioners specifically for warm blondes to maintain the golden quality.
Hydrating Treatments: Bleaching can dry out hair, so weekly moisture masks are essential.
Limit Heat Damage: High heat can alter the warm tones, making them brassy rather than golden.
Fine hair benefits from this combination because the lighter color creates the illusion of fullness. Thick hair looks more manageable and less heavy with the brightened pieces throughout. Medium hair gets the best of both worlds – enough thickness to show dimension but not so much that it looks bulky.
Black and Deep Blue
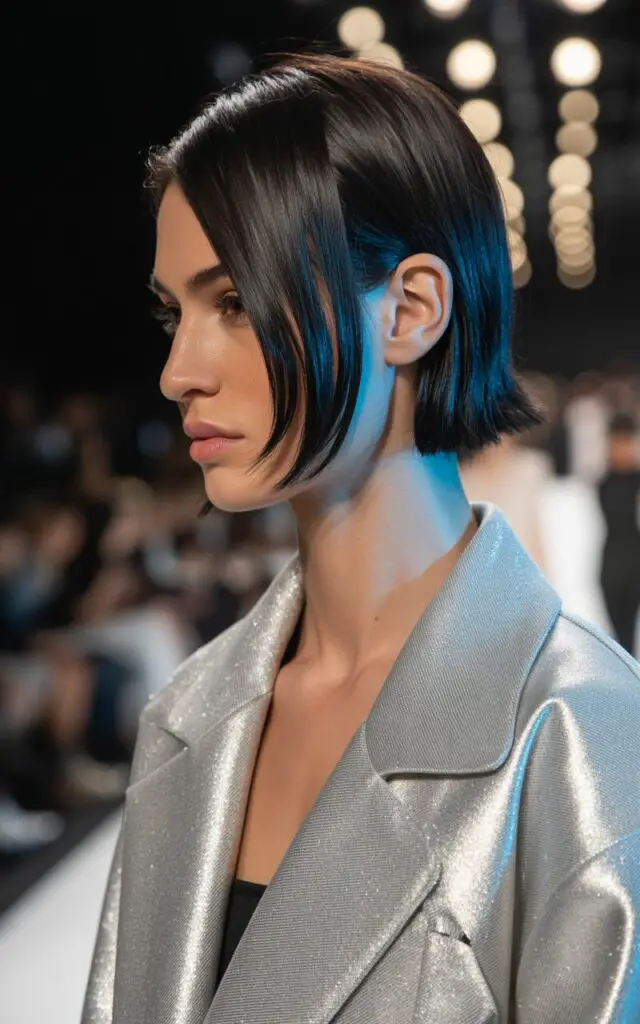
Edgy and unconventional, black with deep blue highlights creates a modern, artistic look. This combination appeals to women who want something different, something that stands out from typical brown or blonde options.
Why This Works
Black provides the ultimate contrast for any highlight color. Deep blue against black creates subtle dimension that reveals itself in certain lighting. In low light, it might look entirely black. In bright light or sunlight, the blue comes alive.
The blue should be deep – midnight blue or navy rather than bright blue. Lighter blues create too much contrast and can look costume-like rather than sophisticated. Deep blue maintains an air of mystery and elegance.
Who Can Pull This Off
This combination works on all skin tones, though the effect varies. Fair skin creates high contrast with black hair, making the blue highlights more noticeable. Darker skin tones create a more subtle, blended look where the blue adds interest without overwhelming.
You need confidence to wear this. It’s not a safe choice – it’s a statement. If you’re in a conservative profession, consider how this might be received. Some workplaces embrace creative expression, others don’t.
Application Considerations
Black dye is permanent and difficult to remove. If you’re not naturally black-haired, understand that going back to your original color requires significant effort and potential damage. The blue highlights also use permanent or semi-permanent dye in most cases.
Placement determines how bold the look appears. Face-framing blue creates maximum impact. Blue underneath or scattered throughout creates a more subtle effect. Some women prefer an ombre approach with blue concentrated at the ends.
Color Maintenance
Black hair dye can fade to a reddish or brownish tone over time. Regular color refresh keeps it true black. The blue fades too, often turning greenish or gray. Blue-depositing shampoos and conditioners help maintain vibrancy between appointments.
Sun exposure affects blue more than black. The blue can lighten significantly with regular sun exposure, losing its deep quality. UV protection products help, as does wearing hats when possible.
Does this damage your hair? Darkening hair to black typically causes less damage than lightening, though it’s still chemical processing. The blue might require lightening the black first in some application methods, which does cause damage. Discuss options with your stylist to minimize harm.
Special care requirements include:
Color-Depositing Blue Shampoo: Refreshes the blue tone without a full color treatment.
Cold Water Washing: Hot water fades both black and blue faster, so keep water temperature low.
Deep Conditioning: Any color treatment benefits from regular moisture infusion to maintain hair health.
Sulfate-Free Everything: Sulfates strip color aggressively, so avoid them in all hair products.
This combination suits all hair lengths, but longer hair shows more of the blue highlights. Short hair can work beautifully with strategic placement around the face or at the ends. Texture doesn’t matter much – straight, wavy, or curly hair all showcase this pairing well.
Chestnut and Toffee
Natural and understated, chestnut brown with toffee highlights creates gentle warmth and dimension. This combination looks like your hair color could naturally vary this way, making it perfect for women who want enhancement without obvious coloring.
Natural-Looking Dimension
Chestnut brown is a medium brown with subtle red undertones. Toffee adds lighter, warmer pieces with golden and caramel qualities. The shades are close enough to blend beautifully but different enough to create visible dimension.
This works for nearly all skin tones because the contrast isn’t extreme. Warm skin tones look particularly radiant, but cool and neutral tones can wear this combination successfully too. The toffee brightens without being too light, and the chestnut adds depth without being too dark.
Highlighting Techniques
Balayage creates the most natural effect with these shades. The hand-painted technique allows for soft blending and custom placement. Your stylist can concentrate toffee pieces where they’ll flatter your features most – around your face, at your crown, or scattered throughout.
Foil highlights work too, especially if you want more uniform color distribution. Babylights in toffee throughout chestnut brown create subtle, all-over lightness that mimics sun exposure. The choice depends on whether you want concentrated brightness or gentle, even dimension.
Grow-Out Considerations
This is one of the most forgiving color combinations for grow-out. The chestnut and toffee blend creates a gradient that doesn’t show harsh lines as roots appear. Many women stretch their appointments to 12-16 weeks without looking obviously grown out.
If your natural color is close to chestnut, roots will blend seamlessly. Even if your natural color is darker or lighter, the transition won’t be jarring. This makes it budget-friendly and low-maintenance compared to more dramatic color combinations.
Care and Styling
Standard color-safe products maintain this combination well. You don’t need purple shampoos, toning treatments, or specialized care routines. A good sulfate-free shampoo and moisturizing conditioner keep the color vibrant and hair healthy.
Heat styling doesn’t significantly affect these shades. You can use flat irons, curling wands, or blow dryers without worrying about drastic color changes. Just use heat protectant to maintain hair health.
How does hair type influence the results?
Fine Hair: The dimension creates fullness and makes hair appear thicker and more voluminous.
Thick Hair: The lighter toffee pieces prevent the hair from looking too heavy or one-dimensional.
Wavy or Curly Hair: The texture shows off the color variation beautifully as light hits different angles.
Straight Hair: The smooth surface reflects light evenly, making the toffee highlights particularly noticeable.
Styling versatility is a major benefit. This combination looks great straight, wavy, or curly. Updos show off the dimension nicely, with toffee pieces peeking through the chestnut base. Simple styles like ponytails or buns even gain interest from the varied tones. Consider these care approaches:
Regular Trims: Keeps ends healthy and prevents the toffee pieces from looking brassy or damaged.
Gloss Treatments: Add shine and enhance both the chestnut and toffee tones every 6-8 weeks.
Sun Protection: While this combination is relatively sun-stable, UV protection prevents unwanted lightening.
Making Your Highlight Choice Last
Choosing the right highlight combination sets you up for success, but maintaining it keeps you looking fresh. Different color pairings require different care levels. Understanding what your chosen combination needs helps you budget time and money appropriately.
Professional products make a real difference. Drugstore options might seem tempting, but they often contain harsh ingredients that strip color quickly. Investing in quality shampoos, conditioners, and treatments extends the life of your highlights and protects your investment. Your colorist can recommend specific products for your combination, whether that’s purple shampoo for cool blondes or color-depositing conditioner for reds.
Frequently Asked Questions
Q: How often should I tone my highlights?
A: Toning frequency depends on your color combination. Cool-toned highlights like platinum and silver need toning every 4-6 weeks to prevent brassiness. Warm tones like golden blonde or caramel can go 8-10 weeks between toning treatments. At-home toning shampoos extend professional toning sessions.
Q: Can I switch from one highlight combination to another?
A: Yes, but the ease of switching depends on your current and desired colors. Going darker is generally easier than going lighter. Changing from warm to cool tones or vice versa might require color correction. Consult your stylist about the best approach to minimize damage during the transition.
Q: How much damage do highlights cause?
A: Lightening hair always causes some damage by opening the cuticle and removing natural pigment. Darker highlights on dark hair cause less damage than platinum highlights on dark hair. Proper care, deep conditioning treatments, and avoiding excessive heat styling minimize damage. Quality application by a skilled colorist also reduces harm.
Q: Will highlights work on very short hair?
A: Yes, though placement options are more limited. Short hair works best with face-framing highlights or all-over color rather than complex blending techniques. Very short pixie cuts might show highlights as distinct sections rather than blended dimension. Discuss realistic expectations with your stylist based on your hair length.
Q: How do I prevent highlights from turning brassy?
A: Brass happens when warm tones develop in cool-toned highlights. Purple shampoo neutralizes yellow brass in blonde highlights. Blue shampoo counteracts orange brass. Use these products once or twice weekly, not daily. Quality water filters remove minerals that contribute to brassiness. Avoid excessive sun exposure and chlorine.
Q: Can I highlight my hair at home?
A: Home highlighting is possible but risky. Professional colorists understand color theory, placement techniques, and how to minimize damage. DIY highlighting often results in uneven color, excessive damage, or unwanted tones. If you choose to highlight at home, start with subtle, face-framing pieces rather than all-over application. Follow instructions precisely and do a strand test first.
Q: How long do highlights last before needing a refresh?
A: Most highlights need refreshing every 8-12 weeks. Natural-looking combinations like chestnut and toffee can go 12-16 weeks. High-maintenance options like platinum and silver need attention every 4-6 weeks. Your natural hair growth rate and color difference between your base and highlights affect timing.
Q: Do certain highlight combinations work better for specific face shapes?
A: Face-framing highlights brighten all face shapes. The placement matters more than the color combination. Round faces benefit from highlights concentrated around the face to add length. Long faces look balanced with highlights throughout rather than just at the face. Your stylist can customize placement to flatter your features.
Q: What’s the difference between highlights and balayage?
A: Highlights traditionally use foils to lighten sections of hair from root to tip, creating more uniform color. Balayage is a freehand painting technique that creates softer, more natural-looking dimension with varied lightness throughout each strand. Balayage typically requires less maintenance and grows out more gracefully than traditional foil highlights.
Q: How do I choose between warm and cool highlight tones?
A: Your skin undertones guide this decision. Cool or pink undertones in your skin suit cool highlights like ash blonde or platinum. Warm or yellow undertones complement warm highlights like caramel or honey. Neutral undertones can wear either warm or cool colors. Test by holding gold and silver jewelry near your face – whichever looks better indicates your undertone.