Deep conditioning has become a cornerstone of healthy hair care routines, transforming dry, brittle strands into soft, manageable locks. While regular conditioner provides surface-level smoothing, deep conditioning penetrates the hair shaft to deliver intense moisture and repair. The difference between hair that simply looks good and hair that feels genuinely healthy often comes down to this crucial treatment step.
Your hair faces daily challenges from heat styling, environmental damage, chemical processing, and even simple brushing. These stressors strip away natural oils and break down the protective outer layer of each strand. Deep conditioning works to reverse this damage by infusing hair with concentrated nutrients, proteins, and moisture that standard conditioners can’t provide during a quick shower application.
Understanding which treatments work best for your specific hair needs can transform your entire hair care routine. In the following sections, we’ll explore everything from the science behind these intensive treatments to professional options worth trying, DIY recipes that rival salon formulas, application techniques that maximize results, and mistakes that might be sabotaging your efforts. Ready to discover the path to genuinely soft, smooth hair? Let’s begin this comprehensive guide to deep conditioning success.
- What Makes Deep Conditioning Different from Regular Conditioning
- DIY Deep Conditioning Recipes for Every Hair Type
- Professional Deep Conditioning Treatments Worth Trying
- How to Apply Deep Conditioning Treatments for Best Results
- Common Deep Conditioning Mistakes to Avoid
- Your Path to Lasting Softness
- Frequently Asked Questions
What Makes Deep Conditioning Different from Regular Conditioning
The distinction between deep conditioning and your everyday conditioner goes far beyond application time. Deep conditioners contain smaller molecules that penetrate the hair cuticle, reaching the cortex where real repair happens. Regular conditioners primarily smooth the outer layer, providing temporary shine and manageability without addressing underlying damage.
The science behind deep conditioning
Hair consists of three layers: the medulla at the center, the cortex providing strength and color, and the protective cuticle on the outside. When cuticles become damaged, they lift away from the cortex, creating rough texture and allowing moisture to escape. Deep conditioning treatments contain ingredients like hydrolyzed proteins and fatty acids specifically formulated to penetrate these lifted cuticles.
The molecular structure of deep conditioners includes both large and small particles. Smaller molecules slip through damaged areas to strengthen the cortex, while larger molecules seal the cuticle layer. This dual action creates both immediate smoothness and long-term repair. Standard rinse-out conditioners lack this sophisticated molecular composition, which explains why they can’t achieve the same restorative results.
pH levels also play a crucial role in deep conditioning effectiveness. Most treatments have slightly acidic pH levels between 4.5 and 5.5, which helps close lifted cuticles and lock in moisture. This acidic environment also enhances the bonding between conditioning agents and hair proteins, creating lasting improvements in texture and strength.
How often should you deep condition
Frequency depends entirely on your hair’s current condition and daily styling habits. Damaged or chemically processed hair benefits from weekly treatments, while healthy hair might only need monthly sessions. Pay attention to how your strands respond rather than following rigid schedules.
Color-treated hair particularly benefits from regular deep conditioning every 5-7 days. The chemical processes that deposit or lift color create microscopic holes in the hair shaft, making strands more porous and prone to dryness. These intensive treatments help fill those gaps while preserving color vibrancy.
Natural hair textures, especially coily and kinky patterns, typically require more frequent deep conditioning. The curved structure of these hair types prevents natural oils from traveling down the shaft, leading to inherent dryness. Bi-weekly treatments often work well, though some women with extremely dry hair benefit from twice-weekly sessions.
Signs your hair needs deep conditioning
Your strands communicate their needs through various signals. Excessive tangling indicates lifted cuticles that catch on each other, while persistent dullness suggests moisture depletion. If your hair feels rough even immediately after washing, or if it breaks easily when brushing, these intensive treatments should become a priority.
Static and frizz that won’t respond to styling products often indicate severe dehydration within the hair shaft. Similarly, if your hair takes forever to dry or conversely dries too quickly, the porosity balance has been disrupted. Deep conditioning helps normalize this porosity, allowing hair to maintain proper moisture levels.
Split ends that seem to appear overnight, elasticity loss where hair snaps instead of stretching, and styling products that sit on top rather than absorbing all point to the need for intensive treatment. When multiple signs appear simultaneously, consider increasing both the frequency and intensity of your deep conditioning routine.
Different types of deep conditioning treatments
Protein treatments rebuild hair’s structural integrity by filling gaps in damaged cuticles with hydrolyzed proteins. These treatments work best for hair weakened by chemical processing, heat damage, or mechanical stress. However, too much protein creates brittleness, so balance is essential.
Moisture-focused treatments prioritize hydration over structure, perfect for naturally dry hair or strands suffering from environmental damage. These formulas typically contain humectants like glycerin and honey that attract and retain water molecules. They also include emollients such as natural oils and butters that smooth and seal the cuticle layer.
Some treatments combine both protein and moisture, offering balanced care for hair with multiple concerns. These hybrid formulas work well for those unsure of their hair’s specific needs or dealing with combination issues like dry ends with oily roots.
Clay and mud treatments represent another category, drawing out impurities while depositing minerals. These work particularly well for those dealing with product buildup or hard water damage. The minerals in clay treatments can strengthen hair while removing residue that prevents other treatments from working effectively.
DIY Deep Conditioning Recipes for Every Hair Type
Creating your own deep conditioning treatments allows complete control over ingredients while often costing significantly less than commercial products. Kitchen staples and natural ingredients can deliver salon-quality results when combined correctly.
For dry and damaged hair
Avocado and coconut oil create an intensely moisturizing treatment that rivals expensive masks. Mash one ripe avocado until completely smooth, then mix with two tablespoons of melted coconut oil. The fatty acids in avocado penetrate deeply while coconut oil’s small molecular structure allows it to reach the cortex. Add a tablespoon of honey for extra humectant properties that attract and lock in moisture.
Banana and olive oil combinations work wonders for severely damaged strands. Blend one overripe banana with three tablespoons of extra virgin olive oil until no lumps remain. Bananas contain potassium and natural oils that strengthen hair, while olive oil provides vitamins A and E for repair. This mixture works particularly well for hair damaged by bleaching or excessive heat styling.
For color-treated hair
Yogurt-based treatments protect color while providing gentle conditioning. Mix half a cup of plain Greek yogurt with one tablespoon of apple cider vinegar and two tablespoons of argan oil. The lactic acid in yogurt smooths cuticles without stripping color, while vinegar helps seal the cuticle to lock in both moisture and pigment.
Egg and mayonnaise create a protein-rich treatment perfect for maintaining color vibrancy. Whisk one egg with two tablespoons of full-fat mayonnaise and one teaspoon of lemon juice. The lecithin in egg yolks strengthens hair without the harshness of commercial protein treatments. Apply this mixture to damp hair, focusing on mid-lengths and ends where color typically fades first.
For maximum color protection, consider adding these ingredients to any DIY treatment:
- Vitamin E oil: Protects against UV damage that fades color
- Green tea: Contains antioxidants that prevent color oxidation
- Aloe vera gel: Maintains pH balance to keep cuticles sealed
- Chamomile tea: Enhances golden tones while conditioning
For fine and oily hair
Fine hair requires lightweight treatments that won’t weigh down delicate strands. Aloe vera gel mixed with rice water provides conditioning without heaviness. Soak half a cup of rice in water for 30 minutes, strain, then mix the water with three tablespoons of pure aloe gel. Rice water contains inositol, which repairs hair while adding volume rather than weight.
Beer rinses might sound unconventional, but they work brilliantly for fine, limp hair. Mix flat beer with one tablespoon of jojoba oil and an egg white. The proteins in beer add body while the egg white provides lightweight conditioning. Jojoba oil closely mimics natural scalp sebum, making it ideal for those with oily roots.
Natural ingredient combinations that work
Certain ingredients create synergistic effects when combined properly. Shea butter and castor oil together provide both sealing and growth-promoting properties. Melt two tablespoons of shea butter and mix with one tablespoon of castor oil for a treatment that smooths while potentially stimulating follicles.
Honey and cinnamon create an unexpected but effective combination. Mix three tablespoons of raw honey with one teaspoon of cinnamon powder. Cinnamon stimulates blood circulation to the scalp while honey provides deep moisture. This mixture works particularly well for those experiencing both dryness and slow growth.
Green tea and coconut milk offer antioxidant protection alongside conditioning. Brew strong green tea, let it cool, then mix equal parts with coconut milk. Add a tablespoon of your favorite oil for extra conditioning power. This combination fights free radical damage while providing proteins and fatty acids.
Application techniques for maximum results
Sectioning hair before applying DIY treatments ensures even distribution. Divide hair into four to six sections, securing each with clips. Apply your mixture systematically, starting from the bottom sections and working upward. This methodical approach prevents missing spots and reduces mess.
Using a tinting brush or pastry brush helps spread thick mixtures evenly. These tools offer better control than fingers alone, especially with treatments containing ingredients like avocado or banana that can create lumps. Brush from mid-shaft to ends first, then work remaining product through roots if needed.
Temperature matters significantly with natural treatments. Slightly warming ingredients helps them penetrate better, but avoid making mixtures too hot. Test temperature on your wrist before application. After applying, cover hair with a shower cap and wrap a warm towel around your head. The gentle heat opens cuticles for better absorption.
Timing varies based on ingredients and hair condition. Most DIY treatments work best when left on for 20-45 minutes. Protein-heavy treatments like those containing eggs shouldn’t exceed 30 minutes to prevent protein overload. Purely moisturizing treatments can stay on longer, even overnight for extremely dry hair.
Professional Deep Conditioning Treatments Worth Trying
Professional-grade treatments offer concentrated formulas and advanced technology that can dramatically transform hair texture and health. While pricier than DIY options, these products often deliver faster, more dramatic results.
Protein treatments vs moisture treatments
Understanding the difference between protein and moisture treatments prevents choosing the wrong type for your hair’s needs. Protein treatments contain keratin, silk, or wheat proteins that temporarily fill gaps in damaged cuticles. Your hair needs protein if it feels mushy when wet, stretches excessively before breaking, or has lost its natural curl pattern.
Moisture treatments focus on hydration through ingredients like hyaluronic acid, glycerin, and botanical oils. These suit hair that feels brittle, snaps easily without stretching, or has become increasingly tangled and static-prone. Most professional moisture treatments also include ceramides that help rebuild the hair’s natural lipid barrier.
The key lies in maintaining proper protein-moisture balance. Too much protein creates stiff, brittle strands that break easily. Excessive moisture without enough protein leads to limp, overly elastic hair that won’t hold styles. Professional stylists often recommend alternating between both types or using balanced formulas.
Some advanced treatments now use bond-building technology that goes beyond simple protein or moisture. These treatments, like those containing bis-aminopropyl diglycol dimaleate, actually reconnect broken disulfide bonds within the hair structure. This technology, originally developed for salon use, now appears in take-home treatments.
Heat-activated conditioning systems
Heat-activated treatments use thermal energy to enhance penetration and effectiveness. These systems typically include a specially formulated conditioning product designed to work with heat tools. The warmth opens cuticles while helping smaller conditioning molecules penetrate deeper into the cortex.
Steam treatments represent one popular heat-activated option. Professional hair steamers create moist heat that’s gentler than dry heat from hair dryers. The steam helps treatments penetrate while adding moisture simultaneously. Many salons offer steam treatments, but portable steamers make this technology accessible for home use.
Thermal conditioning caps provide another heat-activated option. These electric caps maintain consistent temperature throughout treatment time, ensuring even heat distribution. Some newer models offer multiple heat settings and automatic timers. The controlled environment these caps create often produces better results than makeshift methods.
Hot oil treatments, modernized with professional formulas, remain highly effective. Today’s versions go beyond simple warmed oils, incorporating advanced ingredients that activate at specific temperatures. Some include color-protecting molecules that only release when heated, making them ideal for processed hair.
Salon treatments you can do at home
Many previously salon-exclusive treatments now come in consumer-friendly versions. Brazilian keratin treatments, once requiring professional application, now offer formaldehyde-free versions safe for home use. These treatments smooth frizz and reduce styling time for up to three months.
Glossing treatments that once required salon visits now come in user-friendly formats. These treatments deposit clear or tinted glazes that smooth cuticles and enhance shine. Unlike permanent color, glosses gradually fade over several weeks without leaving obvious roots or demarcation lines. Professional brands often offer better longevity and shine than drugstore alternatives.
How to choose the right professional treatment
Selecting appropriate professional treatments starts with honest hair assessment. Consider your hair’s porosity, density, and current damage level. High porosity hair absorbs products quickly but also loses moisture fast, requiring heavier, more occlusive treatments. Low porosity hair needs lighter formulas with smaller molecules that can penetrate tightly closed cuticles.
Price doesn’t always indicate quality, but professional treatments typically use higher concentrations of active ingredients. Read ingredient lists carefully, looking for proven components like hydrolyzed proteins, ceramides, and natural oils in the first five ingredients. Avoid treatments where silicones dominate the ingredient list, as these provide temporary smoothness without actual repair.
Your lifestyle and maintenance commitment also influence treatment choice. Some professional treatments require specific aftercare, like sulfate-free shampoos or avoiding heat styling for certain periods. Others demand precise application timing or techniques. Choose treatments that fit realistically into your routine rather than ambitious options you won’t maintain.
Consider starting with sample sizes or travel versions when trying expensive professional treatments. Many brands offer smaller sizes that let you test effectiveness before committing to full-size products. This approach proves especially smart for treatments costing over fifty dollars.
Hair thickness and texture greatly influence which professional treatments work best. Fine hair often responds better to spray or serum formats that won’t weigh strands down. Thick, coarse hair typically needs cream or butter textures that provide enough weight to smooth stubborn cuticles. Curly and coily textures usually require the richest formulas to combat inherent dryness.
Watch for professional treatments containing innovative ingredients like plant stem cells, peptides, or marine extracts. While these cutting-edge components often carry premium prices, they can deliver unique benefits traditional ingredients don’t provide. Research shows certain peptides can actually stimulate hair growth while conditioning.
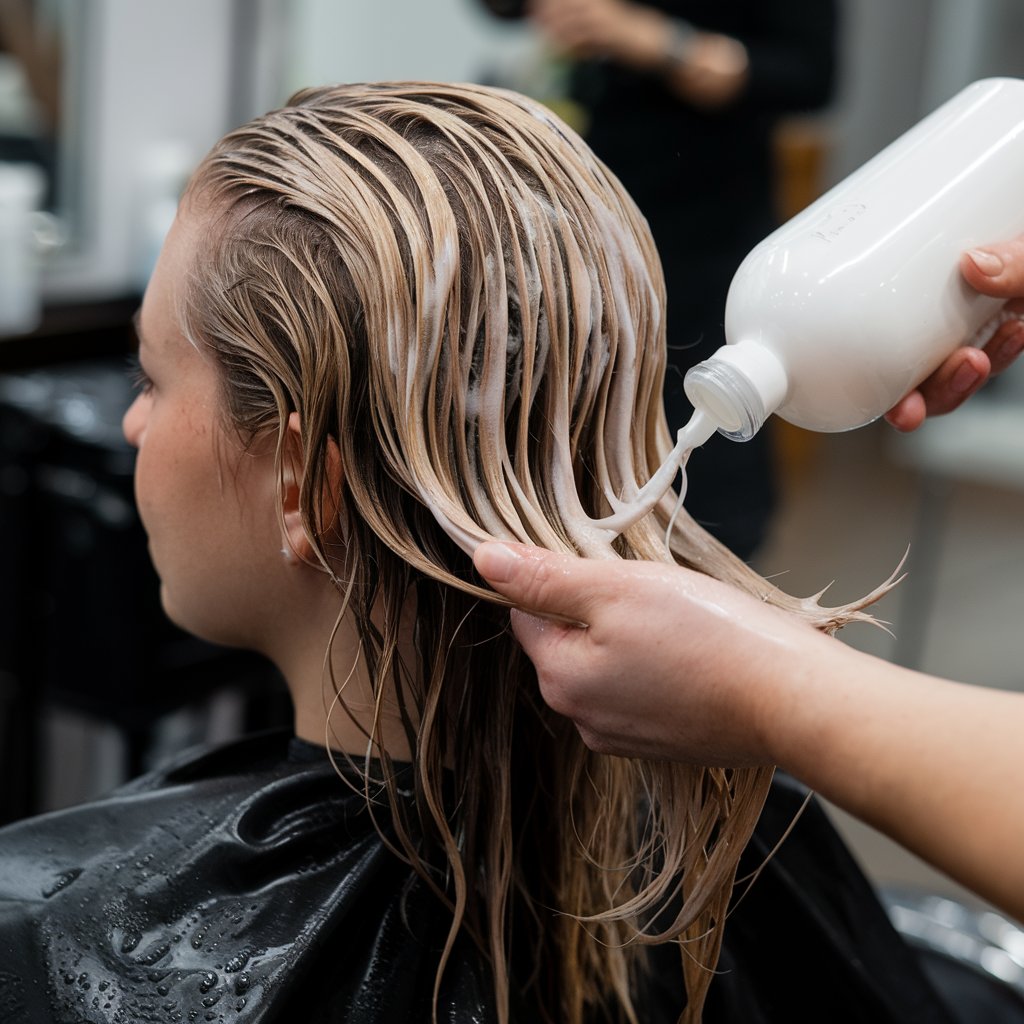
How to Apply Deep Conditioning Treatments for Best Results
The application method matters just as much as the product itself when pursuing truly soft, smooth hair. Even the most expensive treatment won’t deliver optimal results with improper application technique.
Pre-treatment preparation
Starting with properly cleansed hair allows treatments to work most effectively. Use a clarifying shampoo once monthly to remove buildup that creates barriers between treatments and your hair. However, avoid clarifying immediately before protein treatments, as slightly dirty hair provides protection against potential protein overload.
Water temperature during pre-treatment washing affects how well products penetrate. Lukewarm water opens cuticles gently without causing damage or excessive swelling. Very hot water can lift cuticles too aggressively, potentially causing more harm than good. After shampooing, squeeze out excess water but leave hair damp enough that products spread easily.
Detangling before applying treatments prevents product waste and ensures even distribution. Use a wide-tooth comb or detangling brush, working from ends upward to minimize breakage. This step proves especially important for curly or tangled hair where products might otherwise concentrate in knots rather than coating strands evenly.
Some professionals recommend applying a light leave-in conditioner to the very ends before deep treatment. This technique, called “barrier method,” protects the most fragile parts of hair from potential protein overload while still allowing treatment benefits. This works particularly well for those with damaged ends but healthier roots and mid-lengths.
Application methods that maximize absorption
The “praying hands” method ensures even product distribution without disturbing natural curl patterns. Smooth product between palms, then glide hands down sections of hair with gentle pressure. This technique works especially well for wavy and curly textures that frizz easily with excessive manipulation.
For straight or relaxed hair, the “smoothing” technique often works better. Apply product to sections, then use a fine-tooth comb to distribute from roots to ends. This combing action helps product penetrate while smoothing cuticles in the proper direction. Follow with gentle squeezing to encourage absorption.
Using a processing cap or plastic wrap creates a greenhouse effect that enhances treatment effectiveness. The warmth from your scalp becomes trapped, gently opening cuticles for better penetration. Some women layer a plastic cap with a thermal cap or warm towel for enhanced results. This combination proves especially beneficial during colder months when natural body heat alone might not suffice.
Timing and temperature considerations
Most treatments require 15-30 minutes for full effectiveness, though timing varies by formula and hair condition. Protein treatments generally shouldn’t exceed recommended times, as protein buildup creates brittleness. Moisturizing treatments offer more flexibility – severely dry hair might benefit from extended application up to several hours.
Body heat typically provides sufficient warmth for treatment activation. However, sitting under a hooded dryer for 10-15 minutes can boost results for particularly stubborn hair. If using heat, maintain medium temperature rather than high settings that might damage hair or degrade treatment ingredients.
Cold weather affects treatment performance more than many realize. During winter, consider warming your bathroom before application or wearing a thermal processing cap longer. Cold temperatures can prevent proper cuticle opening, limiting how deeply treatments penetrate. Some women find winter requires leaving treatments on 5-10 minutes longer for comparable results to summer applications.
Overnight treatments work wonderfully for extremely damaged hair but require proper protection. Cover treated hair with a silk or satin bonnet rather than cotton, which absorbs product and creates friction. Place an old towel over your pillow for additional protection. Rinse thoroughly in the morning with cool water to seal cuticles.
Post-treatment care and maintenance
Rinsing technique significantly impacts treatment longevity. Start with lukewarm water to remove excess product, then finish with cool water to seal cuticles. This temperature variation helps lock in conditioning benefits while promoting shine. Avoid hot water, which can strip away treatment benefits you just worked to achieve.
The products you use immediately after treatment influence results. Skip heavy styling products for 24 hours when possible, allowing treatment benefits to fully set. When you must style, choose lightweight products that won’t create buildup on freshly treated hair:
- Leave-in sprays: Provide protection without weight
- Hair oils: Seal in moisture when applied sparingly to ends
- Cream-based products: Work well for thicker textures needing extra moisture
- Alcohol-free gels: Define curls without drying effects
Protective styling between treatments extends benefits significantly. Loose braids, low buns, or silk scarves prevent friction damage that undoes treatment progress. Avoid tight elastics or metal accessories that can break fragile, freshly treated strands. Consider sleeping on silk or satin pillowcases to minimize overnight friction.
Scheduling your next treatment depends on how quickly your hair loses softness and smoothness. Most people need retreatment every 1-2 weeks initially, extending to monthly once hair health improves. Mark treatment days on your calendar to maintain consistency. Document which treatments you use and results achieved to identify what works best over time.
Diet and hydration support treatment effectiveness from within. Drinking adequate water helps maintain hair’s moisture balance between treatments. Foods rich in omega-3 fatty acids, biotin, and protein provide building blocks for healthy hair growth. While treatments repair existing damage, proper nutrition prevents future issues.
Common Deep Conditioning Mistakes to Avoid
Even with the best intentions and products, certain errors can sabotage your deep conditioning efforts. Understanding these pitfalls helps achieve the soft, smooth results you’re seeking.
Overconditioning and its effects
More conditioning doesn’t always equal better results. Overconditioning, also called hygral fatigue, occurs when hair absorbs too much moisture too quickly. The repeated swelling and contracting weakens the hair shaft, leading to mushy, limp strands that won’t hold styles.
Signs of overconditioning include hair that feels gummy when wet, extreme softness without strength, and loss of natural texture or curl pattern. Your strands might stretch significantly before breaking, indicating too much moisture without adequate protein support. Colors may also fade faster on overconditioned hair due to raised cuticles that can’t properly seal.
Recovery from overconditioning requires temporarily reducing moisture while adding protein. Switch to protein-based treatments for 2-3 weeks, avoiding heavy moisturizing products. Clarify hair to remove product buildup, then gradually reintroduce moisture once strength returns. This process typically takes 3-4 weeks for complete recovery.
Prevention starts with paying attention to your hair’s responses. If hair feels consistently mushy or overly soft, reduce treatment frequency or duration. Most healthy hair needs deep conditioning only weekly or bi-weekly. Daily conditioning treatments, despite marketing claims, rarely benefit anyone and often cause more problems than they solve.
Wrong product selection for your hair type
Choosing treatments meant for different hair types creates disappointing results or actual damage. Fine hair suffocates under heavy butters designed for coarse textures, while thick hair won’t respond to lightweight formulas created for delicate strands.
Protein sensitivity affects many people without their knowledge. Some hair types, particularly certain curl patterns, respond poorly to protein regardless of damage level. These individuals experience immediate brittleness and breakage after protein treatments. If this sounds familiar, focus exclusively on moisture-based treatments regardless of traditional recommendations.
Porosity mismatch represents another selection error. Low porosity hair needs lightweight, liquid-based treatments with smaller molecules. High porosity hair requires heavier creams and butters that fill gaps in damaged cuticles. Using products designed for opposite porosity levels wastes money while delivering minimal benefits.
Silicone-heavy treatments create specific problems worth avoiding. While silicones provide immediate smoothness, they build up quickly, preventing future treatments from penetrating. This creates a cycle where hair needs increasingly heavy products just to appear conditioned. Look for water-soluble silicones or silicone-free options for better long-term results.
Improper application and removal
Applying treatments to soaking wet hair dilutes their effectiveness significantly. Hair should be damp but not dripping for optimal product absorption. Squeeze out excess water with a microfiber towel or t-shirt before application. This allows treatments to adhere properly rather than sliding off with water.
Focusing only on ends while ignoring mid-shaft areas creates uneven results. While ends typically need the most attention, the entire length benefits from treatment. Apply product systematically from mid-shaft to ends first, then distribute remaining product through roots if needed. This ensures complete coverage without overwhelming the scalp area.
Insufficient product quantity prevents proper conditioning regardless of quality. Using tiny amounts to extend expensive products proves counterproductive. Hair should feel fully coated and slippery with treatment applied. If you can’t easily run fingers through treated hair, add more product for complete saturation.
Poor rinsing techniques negate treatment benefits entirely. Leaving residue creates buildup that dulls hair and prevents future treatments from working. Conversely, rinsing with very hot water strips away conditioning agents before they fully bond with hair. Rinse thoroughly with lukewarm water until hair feels clean but still smooth.
Frequency mistakes that damage hair
Daily deep conditioning treatments cause more harm than good for most hair types. This excessive frequency leads to hygral fatigue, where constant moisture exposure weakens the hair structure. Even damaged hair rarely needs more than twice-weekly intensive treatments.
Conversely, treating hair only when it feels extremely dry means damage has already progressed significantly. Preventive conditioning maintains hair health rather than constantly playing catch-up with damage. Establish a regular schedule based on your hair’s needs rather than waiting for obvious problems.
Seasonal adjustments often get overlooked despite their importance. Winter air and indoor heating require more frequent conditioning, while humid summer months might need less. Adjust your treatment schedule based on current conditions rather than following the same routine year-round.
Ignoring the cumulative effect of treatments creates imbalanced hair. If you use protein treatments weekly without incorporating moisture, brittleness develops gradually. Track what types of treatments you use to ensure proper rotation between protein, moisture, and balanced formulas. This awareness prevents slowly developing problems that suddenly seem to appear overnight.
Your Path to Lasting Softness
The journey toward soft, smooth hair through deep conditioning isn’t complicated once you understand the fundamentals. Whether you choose professional treatments or DIY recipes, success comes from matching treatments to your hair’s specific needs, applying them correctly, and maintaining consistency in your routine. The transformation from dry, unmanageable strands to silky, healthy hair happens gradually but surely with the right approach.
Your hair deserves the focused attention that deep conditioning provides. By avoiding common mistakes, selecting appropriate treatments, and following proper application techniques, you’ll achieve results that last well beyond wash day. The investment of time and effort in regular deep conditioning pays dividends through improved manageability, enhanced shine, and the confidence that comes with truly healthy hair.
Frequently Asked Questions
Q: Can I deep condition my hair too often?
A: Yes, overconditioning can lead to hygral fatigue, making hair limp, mushy, and unable to hold styles. Most hair types benefit from weekly or bi-weekly treatments, with damaged hair occasionally needing twice-weekly sessions.
Q: Should I use heat with every deep conditioning treatment?
A: Heat isn’t necessary for every treatment. Your body heat under a shower cap usually provides sufficient warmth. Reserve additional heat from dryers or thermal caps for monthly intensive treatments or when dealing with particularly stubborn dryness.
Q: What’s the difference between a hair mask and a deep conditioner?
A: The terms are often used interchangeably, though masks traditionally contain higher concentrations of active ingredients. Both provide intensive conditioning beyond regular daily conditioners. The key difference lies in specific formulation and concentration rather than function.
Q: Can I leave deep conditioner in my hair overnight?
A: Moisturizing treatments can safely stay overnight on very dry or damaged hair. However, protein treatments should never exceed recommended times (usually 20-30 minutes) as protein buildup causes brittleness and breakage.
Q: How do I know if my hair needs protein or moisture?
A: Perform a strand test: stretch a wet hair strand. If it stretches significantly before breaking or feels mushy, you need protein. If it snaps immediately without stretching or feels brittle and straw-like, you need moisture.
Q: Can I mix different deep conditioning treatments?
A: Yes, you can customize treatments by mixing products, but avoid combining strong protein treatments with other proteins to prevent overload. Mixing a protein treatment with a moisturizing one often creates a nice balance.
Q: Why does my hair still feel dry after deep conditioning?
A: Several factors could be responsible: product buildup preventing absorption, using the wrong treatment type for your porosity, insufficient application time, or needing clarification before treatment. Try clarifying first, then ensure you’re using appropriate products for your hair type.
Q: Should I deep condition before or after coloring my hair?
A: Deep condition one week before coloring to strengthen hair, but wait 48-72 hours after coloring before deep conditioning to allow color to fully set. This prevents premature fading while maintaining hair health.