Straight, silky hair without the damage of hot tools sounds too good to be true, but millions of women have discovered the secret to achieving smooth locks without ever plugging in a flat iron. No-heat hair straightening methods have quietly revolutionized hair care routines, offering a gentler approach that preserves hair health while delivering impressive results. These techniques work with your hair’s natural properties rather than against them, using time-tested methods that stylists have perfected over decades.
The beauty of heat-free straightening lies in its simplicity and accessibility. You likely already have most of the tools needed in your bathroom cabinet, and the techniques themselves require no special skills or expensive equipment. Whether your hair is naturally wavy, curly, or somewhere in between, these methods can help you achieve the smooth, polished look you want without exposing your strands to damaging temperatures that can reach up to 450 degrees Fahrenheit.
In the following sections, we’ll talk about everything from understanding the science behind no-heat straightening to mastering specific techniques that work for different hair types. You’ll discover which products actually make a difference, learn step-by-step methods that deliver salon-worthy results, and find out how to make your newly straightened hair last for days. Ready to transform your hair care routine and say goodbye to heat damage forever? Let’s get started.
- What is No-Heat Hair Straightening and Why Your Hair Will Thank You
- Essential Products and Tools for Heat-Free Straightening
- Step-by-Step Methods to Straighten Hair Without Heat
- How to Make Your Straight Hair Last Longer
- Common Mistakes That Sabotage Your No-Heat Results
- Mastering Your Heat-Free Hair
- Frequently Asked Questions
What is No-Heat Hair Straightening and Why Your Hair Will Thank You

No-heat hair straightening refers to any method that smooths and straightens hair texture without using heated styling tools like flat irons, blow dryers on hot settings, or hot rollers. These techniques rely on physical manipulation, product application, and strategic drying methods to encourage hair to dry in a straighter pattern. The concept isn’t new – women have been wrapping, rolling, and setting their hair for centuries before electric styling tools became mainstream.
The Science Behind Heat-Free Methods
Your hair’s shape is determined by hydrogen bonds within the hair shaft, which can be temporarily altered when hair is wet. As hair dries, these bonds reform in whatever position the hair is held. This fundamental principle makes no-heat straightening possible. By keeping hair stretched and smooth while it dries, you encourage those bonds to set in a straighter pattern.
The process works because water acts as a natural plasticizer for hair, making it pliable and moldable. When you apply tension and control the drying process, you’re essentially training your hair to take on a new shape temporarily. This approach is far gentler than using heat, which forcibly breaks down the hair’s protein structure to achieve straightness.
Why Your Hair Prefers the Cool Approach
Heat damage is cumulative and irreversible. Every time you apply high heat to your hair, you’re essentially cooking the proteins that give hair its strength and elasticity. Over time, this leads to breakage, dryness, split ends, and that telltale fried texture that no amount of conditioning can fully repair.
No-heat methods preserve your hair’s natural moisture balance and protein structure. Without the stress of extreme temperatures, your hair retains its natural oils and protective outer layer (the cuticle) remains intact. This means shinier, healthier-looking hair that’s less prone to breakage and split ends. Women who switch to heat-free methods often report that their hair feels softer, looks glossier, and grows longer because they’re not constantly battling damage from hot tools.
Different Approaches for Different Hair Types
The versatility of no-heat straightening makes it suitable for virtually any hair type, though the specific method you choose should match your hair’s unique characteristics. Fine hair responds quickly to gentle wrapping techniques, while thicker textures might need more strategic sectioning and product support. Curly hair benefits from methods that provide sustained tension, while wavy hair often needs just light guidance to fall into a straighter pattern.
Setting Realistic Expectations
While no-heat methods can dramatically smooth and straighten hair, they won’t produce the pin-straight, glass-like finish that a 400-degree flat iron creates. Instead, you’ll achieve a more natural-looking straightness with movement and body. For many women, this softer result actually looks more flattering and less severe than the ultra-flat style that heat tools produce. The trade-off of slightly less dramatic results for significantly healthier hair is one that more women are choosing every day.
Essential Products and Tools for Heat-Free Straightening
Success with no-heat straightening starts with having the right arsenal of products and tools at your disposal. Unlike heat styling, which often requires just a flat iron and heat protectant, heat-free methods benefit from a more diverse toolkit. Each item serves a specific purpose in the straightening process, working together to create smooth, sleek results without any thermal damage.
Hair Wraps and Specialized Accessories
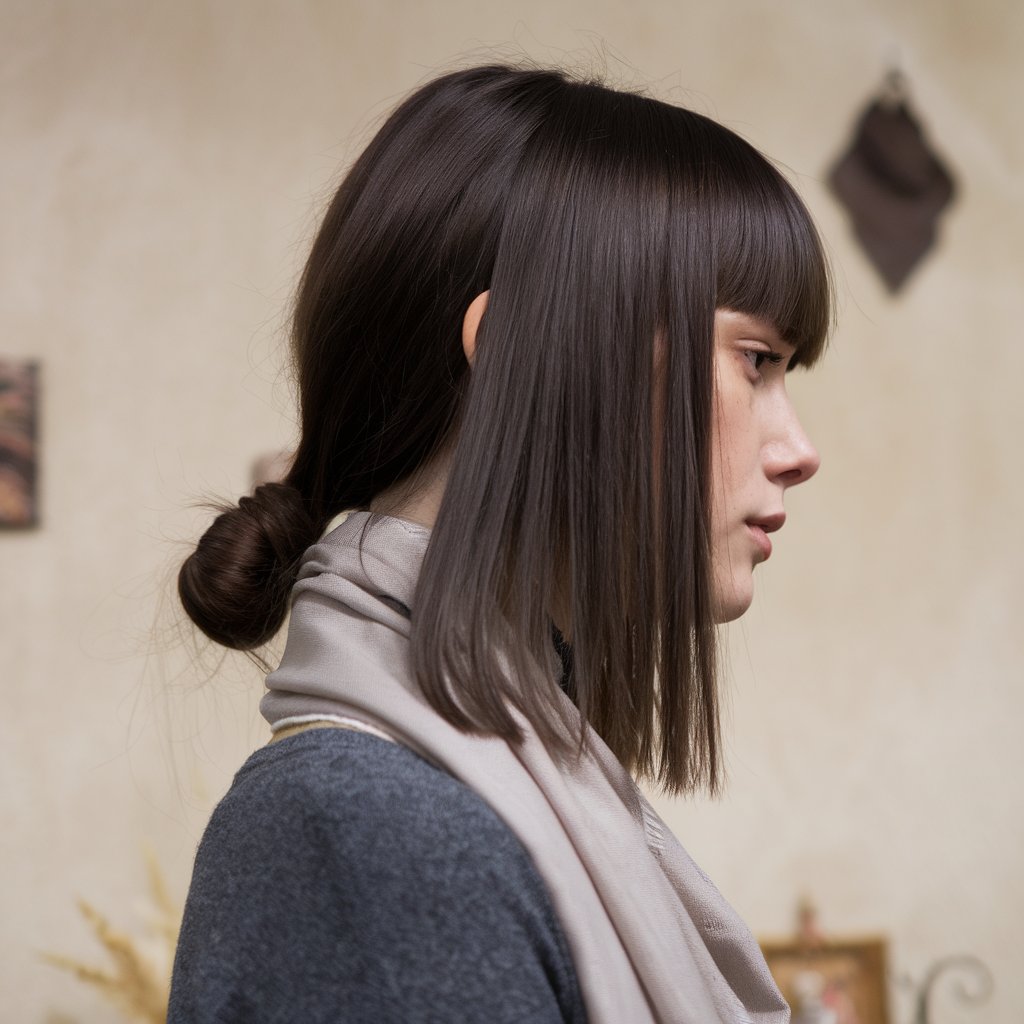
Silk or satin hair wraps have become the cornerstone of many no-heat straightening routines. These smooth fabrics create the perfect surface for hair to glide against as it dries, preventing frizz and encouraging straightness. The key is finding wraps long enough to accommodate your hair length – typically 35-40 inches works for most women. Some wraps come with elastic edges or velcro closures, making them easier to secure throughout the night.
Beyond basic wraps, specialized straightening caps and turbans designed specifically for this purpose have entered the market. These products often feature internal structures that help maintain tension on the hair while you sleep or go about your day.
The Product Foundation
Choosing products specifically formulated for smoothing and straightening makes a significant difference in your results. Look for leave-in treatments and serums that contain ingredients like cyclopentasiloxane or dimethicone – these create a protective film around each strand that encourages smooth drying.
Straightening creams work differently from serums. While serums coat the hair shaft, creams often contain polymers that help temporarily reshape the hair’s structure as it dries. Apply these products to damp (not soaking wet) hair, focusing on mid-lengths to ends. The roots typically need less product to avoid a greasy appearance.
Setting lotions, though old-fashioned sounding, remain incredibly effective for no-heat straightening. Modern formulations provide hold without the crunchiness associated with vintage versions. These products help your straightened style last longer by providing memory to the hair.
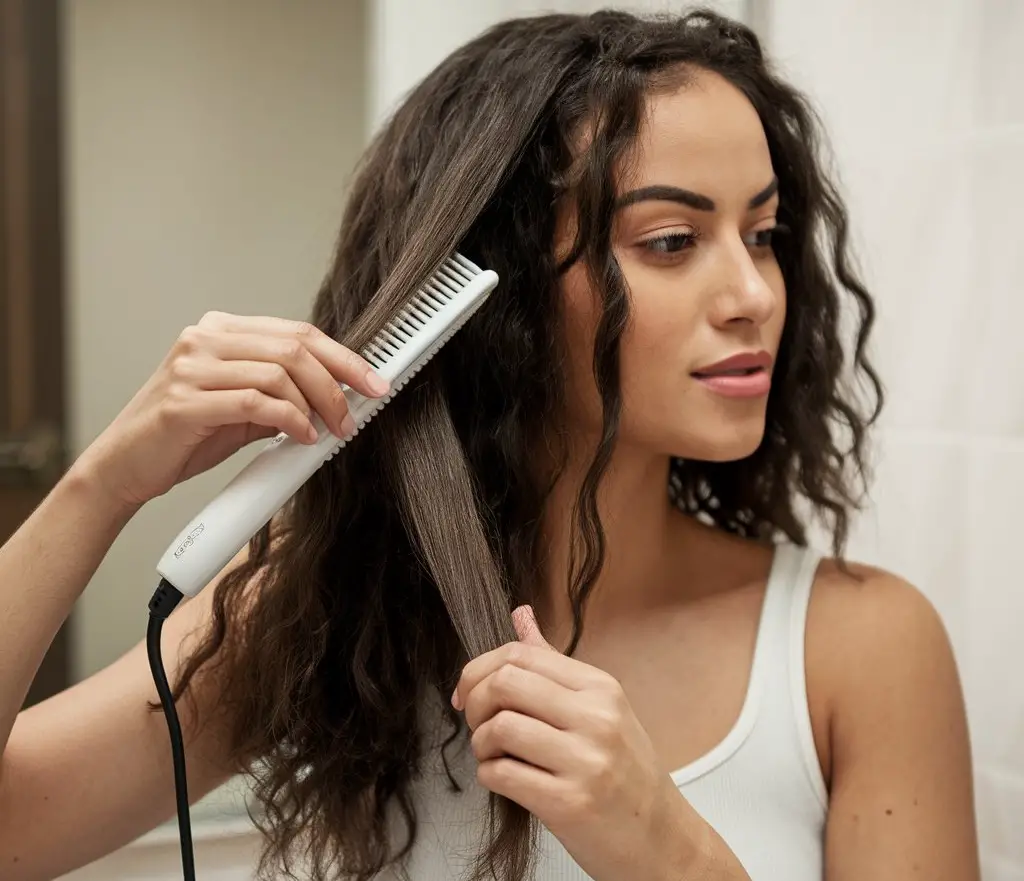
Combs, Brushes, and Tension Tools
The right tools for detangling and creating tension are crucial. A wide-tooth comb should be your starting point for working through wet hair without causing breakage. For the actual straightening process, you’ll need tools that can create and maintain tension:
Paddle Brushes: Large, flat brushes that cover more surface area and create even tension
Denman Brushes: Classic styling brushes with rigid bristles perfect for smoothing sections
Rat-tail Combs: Essential for creating precise parts and sections
Bobby Pins: The unsung heroes of no-heat straightening, used to secure wrapped sections
Soft Hair Ties: Snag-free elastics that won’t leave dents in your straightened hair
Strategic Product Combinations
The magic often happens when you layer products strategically. A typical routine might include a smoothing serum applied to damp hair, followed by a straightening cream on the most resistant sections, and finished with a light setting spray. This layering approach addresses different aspects of the straightening process – the serum reduces friction, the cream helps reshape, and the setting spray provides hold.
Some women find that mixing a tiny amount of light oil (like argan or marjoram) into their straightening cream creates the perfect consistency for their hair type. Experimentation helps you discover what combination works best for your specific needs.
Unexpected Helpers
Several household items can enhance your no-heat straightening routine. Magnetic rollers, though typically associated with curling, can actually help straighten hair when used strategically on just the ends. Soft foam rollers wrapped in the opposite direction can help smooth persistent waves. Even simple items like clean knee-high stockings can serve as gentle hair wraps that create minimal friction while maintaining tension overnight.
Step-by-Step Methods to Straighten Hair Without Heat

Now that you have your products and tools ready, let’s walk through the actual techniques that transform wavy or curly hair into smooth, straight styles. Each method offers different advantages, and you might find that combining elements from various techniques gives you the best results. The key is patience and practice – these methods might take longer than heat styling initially, but they become second nature with repetition.
The Classic Wrap Method
This time-honored technique involves wrapping damp hair around your head, creating a smooth cap that encourages straightness as it dries. Start with freshly washed, conditioned hair that’s been gently squeezed (never rubbed) with a microfiber towel.
While hair is still damp, apply your smoothing products evenly through the lengths. Create a deep side part, then begin brushing all your hair in one direction around your head, following the shape of your skull. Think of it as creating a hair helmet. Use a paddle brush to smooth each section as you go, maintaining tension to keep everything flat against your head.
As you wrap, secure sections with bobby pins every few inches. The pins should lie flat against your scalp, holding the hair taut but not pulling uncomfortably. Once all hair is wrapped, cover with a silk scarf or specialized wrap, ensuring all edges are tucked in. You can sleep this way or let it air dry for several hours during the day.
Wet Setting for Maximum Smoothness
Wet setting takes more time but often produces the smoothest results. This method works exceptionally well for hair that tends to frizz or has particularly stubborn waves. Begin with hair that’s about 70% dry – damp but not dripping.
Section your hair into 4-6 parts, depending on thickness. Working with one section at a time, comb through with a fine-tooth comb while pulling the hair taut. The tension is crucial here. Place large magnetic or velcro rollers at the ends of each section, but instead of rolling up, pull the hair straight down and roll just the very ends under slightly. This creates weight that pulls the hair straight as it finishes drying.
Secure each roller with clips if needed, ensuring the hair remains stretched. The beauty of wet setting is that you can target problem areas specifically. If your hair tends to wave at the crown, spend extra time ensuring those sections are pulled extra taut.
The Banding Technique
Perfect for longer hair, banding involves using soft hair ties to create gentle tension down the length of your hair. After applying products to damp hair, create a low ponytail at the nape of your neck. Add another hair tie about 2-3 inches down, then another, continuing until you reach the ends.
Here’s what makes this method effective:
Even Distribution: The bands create consistent tension throughout the hair length
Flexibility: You can sleep comfortably with bands in place
Minimal Marks: Using soft, seamless ties prevents denting
Easy Removal: Simply slide the bands off in the morning
Between each band, gently tug the hair to ensure it’s lying straight. Some women find that wrapping each banded section in a silk scarf provides even better results. In the morning, carefully remove the bands starting from the bottom, then finger-comb through for a naturally straight look.
Overnight Pin-Straight Method
This technique combines elements from various methods for overnight straightening. After washing and conditioning, let hair air dry until it’s about 50% dry. Apply a straightening cream focusing on areas that tend to be most resistant to straightening.
Divide hair into 6-8 vertical sections. Take the first section and comb it perfectly straight, then twist it very loosely – just enough to keep the hair together but not enough to create texture. Pin this twisted section flat against your head using bobby pins placed every 2 inches. The twist should lie completely flat, creating no bumps or ridges.
Continue with each section, alternating the direction of the twists to ensure even results. Cover everything with a silk bonnet or wrap. By morning, your hair will have dried in an elongated position, resulting in straighter strands with minimal effort needed to style.
The Cold Air Blow Dry Method
While technically using a blow dryer, this method uses only cool air, preserving the no-heat benefit. After applying smoothing products, use your blow dryer on the cold setting while brushing hair straight with a paddle brush. The cool air speeds up drying time while the brushing action encourages straightness. This method works particularly well for those who don’t have time for overnight treatments or need a quicker solution. Work in sections, always brushing in a downward motion while following with the cool air flow.
How to Make Your Straight Hair Last Longer
Achieving straight hair without heat is only half the battle – maintaining that smoothness for days requires strategy and the right techniques. Unlike heat-styled hair that often holds its shape through sheer force, no-heat straightening needs more thoughtful preservation. With proper care, you can extend your straight style for up to a week, making the initial time investment worthwhile.
Nighttime Protection Strategies
Your nighttime routine determines whether you wake up with smooth hair or a tangled mess. The friction from cotton pillowcases can rough up hair cuticles and create frizz overnight, undoing all your straightening efforts. Switching to silk or satin pillowcases creates a smooth surface that lets hair glide rather than catch and tangle.
For extra protection, consider the pineapple method adapted for straight hair. Gather hair very loosely at the very top of your head with a soft scrunchie – the goal is to keep hair off your face and neck without creating any bends or kinks. Some women prefer wrapping hair in a loose bun secured with spin pins, which maintains straightness without the ponytail marks that elastic bands can leave.
Product Selection for Longevity
The products you use after straightening matter just as much as those used during the process. Anti-humidity sprays create an invisible shield that prevents moisture from penetrating the hair shaft and causing reversion to your natural texture. Apply these lightly, focusing on the outer layer of hair that’s most exposed to environmental factors.
Dry shampoo becomes your best friend when maintaining straight hair. Not only does it absorb excess oil that can weigh hair down and create kinks, but it also adds volume at the roots that helps maintain the overall straight appearance. Apply dry shampoo before bed rather than in the morning – this gives it time to fully absorb oils and prevents the white residue that can occur with rushed morning applications.
Light-hold hairsprays designed for flexible hold help maintain straightness without the stiffness that can make hair look unnatural. Spray from at least 10 inches away to ensure even distribution without creating wet spots that could cause hair to curl as it dries.
Weather Defense Tactics
Humidity is the nemesis of straightened hair, but you can fight back with smart strategies. On particularly humid days, apply a small amount of anti-frizz serum to dry hair before leaving the house. Focus on the perimeter of your hairstyle – the baby hairs and face-framing pieces that tend to react first to moisture.
For rainy days, keeping a compact umbrella handy prevents the disaster of rain-induced frizz. If you do get caught in unexpected weather, resist the urge to touch or run your fingers through damp hair. Instead, let it dry naturally without manipulation, then smooth with a boar bristle brush once completely dry.
Quick Touch-Up Techniques
Even with the best preservation tactics, some areas might need minor touch-ups after a few days. Rather than redoing your entire style, target just the pieces that need attention. For face-framing layers that have developed a slight wave, try this technique:
Dampen just those sections with water in a spray bottle, then smooth with a fine-tooth comb while pulling taut. Secure flat against your face with bobby pins and let dry for 20-30 minutes. This mini-treatment refreshes problem areas without disturbing the rest of your style.
Some women keep silk scarves strategically placed – one in the car, one at the office – for quick wrapping sessions during the day. Even 15 minutes of wrapping while commuting or during lunch can refresh straightness in hair that’s starting to wave.
Lifestyle Adjustments for Better Results
Small changes in your daily routine can significantly impact how long your straight style lasts. Avoid touching your hair throughout the day – the oils from your hands can cause certain sections to revert to their natural texture faster than others. When working out, use a loose, high ponytail or clip to keep hair off your neck without creating permanent bends.
Consider your shower routine too. If you’re not washing your hair, protect it completely with a shower cap, ensuring no steam can penetrate. Some women double up with a silk scarf under the shower cap for extra protection. The steam from hot showers can undo straightening faster than almost any other factor.
Common Mistakes That Sabotage Your No-Heat Results
Even with the best intentions and techniques, certain mistakes can prevent you from achieving the straight, smooth hair you’re after. Understanding these common pitfalls helps you troubleshoot when results aren’t meeting expectations and ensures you get the most from your no-heat straightening efforts. Most of these mistakes are easily correctable once you know what to watch for.
Starting with the Wrong Foundation
One of the biggest errors happens before you even begin straightening – starting with hair that’s too wet or too dry. Hair that’s dripping wet will take forever to dry in a straightened position and might develop an unpleasant smell from being damp too long. Conversely, hair that’s nearly dry has already begun to set in its natural pattern, making it resistant to reshaping.
The sweet spot is hair that’s about 60-70% dry – damp enough to be moldable but not so wet that products slip off or dilute. You should be able to run your fingers through without water dripping, but hair should still feel cool to the touch. Getting this moisture level right makes everything else easier.
Product Overload Problems
More product doesn’t equal straighter hair. In fact, using too much product is one of the quickest ways to sabotage your results. Excess product weighs hair down, making it look greasy and limp rather than smooth and bouncy. It can also prevent hair from drying properly, leading to a style that falls flat within hours.
Start with less product than you think you need – you can always add more to stubborn sections. A pea-sized amount of serum is usually sufficient for medium-length hair. Creams and lotions should be diluted slightly with water in your palms before application to ensure even distribution. If your hair feels sticky or coated after product application, you’ve used too much.
Tension and Sectioning Errors
Insufficient tension during the wrapping or setting process leads to lackluster results. Many women worry about pulling too hard and causing damage, but gentle, consistent tension is necessary for effective straightening. The pull should be firm enough that you feel a slight stretch in the hair, but never painful or uncomfortable at the scalp.
Poor sectioning is another common issue. Trying to work with sections that are too large means the interior hair doesn’t receive the same straightening effect as the outer layer. This creates a style that looks smooth on top but remains wavy underneath. Take time to create clean, even sections no wider than 2 inches for best results.
Timing Misjudgments
Impatience ruins more no-heat straightening attempts than any other factor. Removing wraps, bands, or rollers before hair is completely dry guarantees that your style won’t last. Hair might feel dry on the outside while still retaining moisture at the roots or in thicker sections. When in doubt, give it extra time.
If you must check progress, do so carefully without completely undoing your setup. Gently touch the roots and thickest parts of your hair through the wrap. If they still feel cool or damp, continue drying. For overnight methods, going to bed too early with very wet hair can result in an uncomfortable night’s sleep and hair that’s still damp by morning.
Environmental Oversight
Ignoring your environment while hair dries can undo all your careful work. Cooking over a steamy stove, exercising, or even sitting in a humid bathroom while hair is setting introduces moisture that encourages natural texture to return. During the drying phase, stay in climate-controlled environments as much as possible.
Similarly, going to bed with perfectly wrapped hair but using the wrong bedding creates problems:
Cotton Pillowcases: Create friction that disturbs wraps and causes frizz
Low Thread Count Sheets: Rough textures that catch and pull at hair
Synthetic Materials: Can create static that makes hair flyaway
Worn Out Bedding: Pills and rough patches that snag hair
Neglecting Hair Health
Attempting no-heat straightening on damaged, dry hair yields disappointing results. Split ends don’t smooth down properly, creating a frizzy appearance no matter how careful your technique. Overly porous hair from chemical processing absorbs too much moisture from the air, causing rapid reversion to natural texture.
Regular trims every 6-8 weeks keep ends healthy and more receptive to straightening. Deep conditioning treatments once a week improve hair’s overall texture and manageability. Without this foundation of healthy hair, even perfect technique won’t produce the silky results you’re seeking.
Mastering Your Heat-Free Hair
No-heat hair straightening opens up a world of possibilities for achieving gorgeous, straight hair while maintaining its health and integrity. By choosing these gentle methods over daily heat styling, you’re investing in your hair’s long-term beauty and strength. The techniques we’ve covered – from the classic wrap method to strategic product application – give you the tools to create smooth, silky styles that rival any salon blowout.
The process to perfecting your personal no-heat routine might take some experimentation, but the payoff is worth it. Your hair will thank you with improved texture, increased shine, and better overall health. As you continue practicing these methods, you’ll discover which combinations work best for your unique hair type and lifestyle. Whether you’re wrapping your hair for overnight straightening or perfecting your tension techniques, each attempt brings you closer to mastering this gentle approach to hair styling.
Frequently Asked Questions
Q: How long do no-heat straightening results typically last?
A: With proper maintenance and nighttime protection, no-heat straightened hair can last anywhere from 3-7 days. The exact duration depends on your hair type, the humidity in your environment, and how well you preserve the style while sleeping.
Q: Can no-heat methods work on very curly or kinky hair textures?
A: Yes, but extremely curly textures may need to combine multiple methods for best results. Using the banding technique followed by wrapping, along with stronger hold products, can help achieve significant straightening even on very textured hair.
Q: Will my hair eventually become naturally straighter if I consistently use no-heat methods?
A: No, these methods only temporarily alter your hair’s appearance. Your natural texture remains unchanged, and hair will revert to its original pattern once it gets wet or is exposed to humidity.
Q: What’s the best method for someone with limited time in the morning?
A: The overnight wrap method or banding technique works best for busy mornings since all the work happens while you sleep. You can wake up, remove the wrap or bands, and simply finger-comb through for an instantly polished look.
Q: Do I need to wash my hair before every no-heat straightening session?
A: Not necessarily. You can refresh previously straightened hair by lightly misting with water and smoothing products, then re-wrapping for a shorter period. This extends the time between washes while maintaining your straight style.
Q: Can I use no-heat methods on chemically treated or colored hair?
A: Absolutely! No-heat methods are actually preferable for chemically treated hair since they won’t cause additional damage. Just ensure you’re using products designed for your specific hair treatment to maintain color and chemical integrity.
Q: What should I do if my hair develops kinks from hair ties or pins?
A: Lightly dampen just the kinked area with water, smooth with a small amount of serum, and hold taut for a few minutes until it dries. For prevention, use seamless hair ties and place bobby pins carefully to avoid creating dents.
Q: Is it normal for no-heat straightened hair to have more volume than heat-straightened hair?
A: Yes, this is completely normal and actually one of the benefits. No-heat methods preserve your hair’s natural body while smoothing the texture, resulting in straighter hair that still has movement and volume rather than lying completely flat.