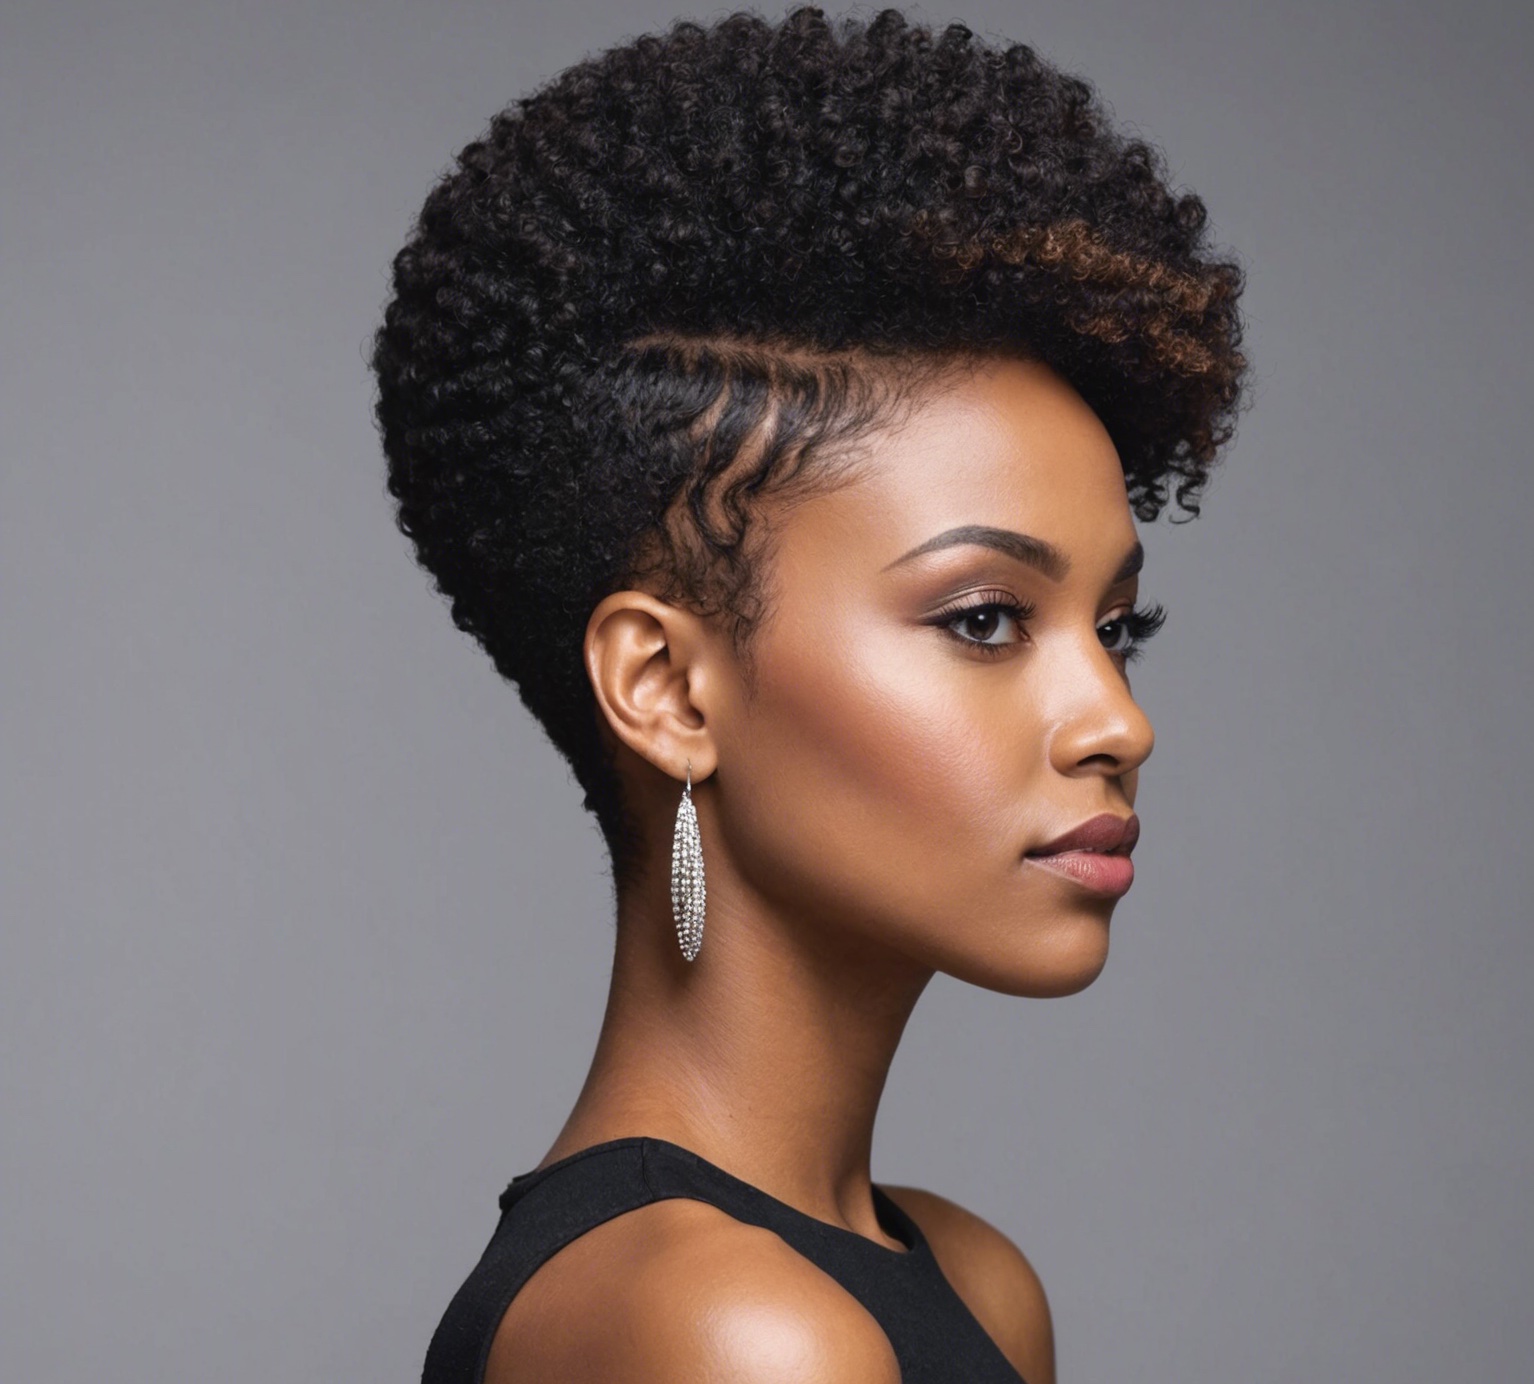
Looking to transform your natural hair with a fresh, modern style? A taper cut offers the perfect balance of sophistication and practicality for afro-textured hair. This versatile haircut has become increasingly popular among women who want a low-maintenance yet stylish option that showcases their natural texture beautifully.
The taper cut works exceptionally well with afro hair because it celebrates the unique texture while providing structure and shape. Unlike traditional cuts that might fight against natural curl patterns, this style works harmoniously with coily and kinky textures. The gradual fade from longer hair on top to shorter sides creates a flattering silhouette that frames the face while making daily styling remarkably simple.
In the following sections, we’ll walk through everything you need to know about achieving the perfect taper cut for afro hair. From understanding why this cut works so well with natural texture to mastering the cutting techniques and maintenance routines, you’ll discover how to create and maintain this stunning style. Whether you’re considering doing it yourself or want to better communicate with your barber, these insights will help you achieve the look you want.
What Makes a Taper Cut Perfect for Afro Hair?
The unique structure of afro hair creates natural volume and texture that pairs beautifully with tapered styles. Unlike straight or wavy hair that might fall flat, afro-textured hair maintains its shape and provides the perfect canvas for creating dimensional, sculptured looks. The coily nature of each strand allows for precise shaping that holds its form throughout the day without constant styling.
Understanding the Natural Texture of Afro Hair
Afro hair consists of tightly coiled strands that grow in a spiral pattern from the scalp. This structure creates natural lift at the roots, which becomes an advantage when creating tapered styles. The hair’s inherent density provides excellent coverage even when cut short, eliminating concerns about visible scalp that might occur with finer hair types.
Each curl pattern, whether 4A, 4B, or 4C, responds differently to tapering techniques. Type 4A hair with its visible S-pattern creates softer gradients, while 4C’s tighter zigzag pattern offers crisp, defined lines. Understanding your specific texture helps determine the best approach for your cut.
How Taper Cuts Work with Coily and Kinky Textures
The spring-like structure of coily hair actually makes blending easier during the tapering process. As the hair gradually shortens down the sides and back, the natural texture creates seamless transitions without harsh lines. This organic blending quality means you won’t need excessive product or heat styling to achieve a polished look.
Kinky textures particularly benefit from the graduated length of a taper. The varying heights allow different curl patterns to shine – tighter coils at the shorter sections and looser patterns where the hair is longer. This variation adds visual interest and dimension to the overall style.
The Difference Between Taper Cuts and Other Short Styles
While buzz cuts maintain uniform length all over and fades create dramatic contrasts, taper cuts offer subtle graduation. This gradual transition starts with longer hair at the crown and slowly decreases in length toward the neckline and ears. The result looks more refined and feminine than a traditional fade while still providing the ease of short hair.
TWAs (Teeny Weeny Afros) differ from tapers in their uniformity – they maintain consistent length throughout. A tapered style, however, creates shape and movement through its varying lengths. This distinction makes tapers more versatile for different face shapes and personal preferences.
Why Tapers Complement Facial Features
The graduated nature of a taper cut naturally draws attention upward, highlighting eyes and cheekbones. For round faces, the added height on top creates length and balance. Square faces benefit from the softened edges that the gradual fade provides. Oval faces can experiment with different taper heights to accentuate their naturally balanced proportions.
The ability to customize where the taper begins allows for strategic framing. Starting the graduation higher creates a more dramatic look that emphasizes the upper face, while lower tapers maintain fullness around the temples and crown for a softer appearance.
Maintenance Benefits for Natural Hair
One of the greatest advantages of choosing a taper cut lies in its low-maintenance nature. The shorter sides and back require minimal daily styling – often just a quick brush or finger-combing suffices. This reduction in manipulation means less stress on the hair, promoting healthier growth and retention.
The style also significantly reduces product usage. Where longer natural styles might require multiple products for definition and hold, a well-executed taper needs only light moisturizer and perhaps some edge control. This simplicity saves both time and money while keeping hair healthy.
Wash days become remarkably quick with a tapered cut. The shorter sections dry rapidly, reducing the risk of hygral fatigue from prolonged wetness. Detangling takes minutes rather than hours, and deep conditioning treatments penetrate more effectively through the shorter lengths.
Essential Tools and Preparation for Taper Cutting
Creating a professional-looking taper cut requires specific tools designed to handle afro-textured hair effectively. The right equipment makes the difference between a smooth, even cut and an uneven, frustrating experience. Having everything prepared before starting ensures the process flows smoothly from start to finish.
Professional Clippers and Guards Needed
Quality clippers form the foundation of any successful taper cut. Look for professional-grade clippers with powerful motors that won’t bog down in thick, textured hair. Cordless options provide better maneuverability, especially when working around the ears and neckline.
Your clipper set should include multiple guard sizes, typically ranging from #1 (1/8 inch) to #8 (1 inch). These guards create the graduated lengths essential for tapering. Some stylists prefer magnetic guards over plastic ones, as they stay more secure during cutting and provide more precise length control.
The blade quality matters significantly when cutting afro hair. Ceramic or titanium-coated blades stay cooler during use and maintain their sharpness longer. Regular blade oil keeps them running smoothly and prevents pulling or snagging, which can be particularly uncomfortable with tightly coiled hair.
Consider investing in a smaller trimmer for detail work around the hairline and ears. These precision tools allow for cleaner lines and more refined edges, elevating the overall look of your taper.
Sectioning Clips and Combs for Afro Texture
Wide-tooth combs specifically designed for afro hair prevent breakage while sectioning. Metal picks or rattail combs help create precise parts, but always choose ones with smooth, rounded teeth to protect the hair shaft. The wider spacing accommodates the hair’s natural volume without forcing it through tight spaces.
Here are essential combing tools for taper cutting:
Duck Bill Clips: These flat clips hold thick sections securely without leaving marks or dents in the hair
Butterfly Clamps: Perfect for keeping larger sections out of the way while working on specific areas
Spray Bottles: Fine mist options help maintain moisture without oversaturating the hair
Sectioning Combs: Featuring both wide and fine teeth for versatility in different hair densities
Preparing the Hair Before Cutting
Clean, detangled hair provides the best foundation for an even cut. Wash with a clarifying shampoo to remove product buildup, which can interfere with the clippers’ movement. Follow with a lightweight conditioner to soften the hair without weighing it down.
Allow the hair to dry completely before cutting, unless you’re experienced with wet cutting techniques. Afro hair shrinks significantly when dry, so cutting it wet can lead to unexpectedly short results. If the hair needs moisture during cutting, use a spray bottle for light misting rather than soaking.
Thoroughly detangle from ends to roots using your wide-tooth comb. Work in sections to ensure no knots remain that could catch in the clippers. This preparation step might take time, but it prevents painful pulling and ensures even cutting.
Setting Up Your Workspace Properly
Good lighting prevents shadows that can obscure your cutting lines. Natural light works best, but if that’s not available, position multiple light sources to illuminate all angles. A well-lit mirror setup allows you to check your progress from different perspectives.
Keep all tools within easy reach on a clean surface. Organize guards by size, have your combs and clips readily accessible, and keep a towel nearby for wiping away loose hair. This organization prevents interruption of your cutting flow to search for tools.
The cutting chair should allow full access around the head. Adjustable height ensures comfortable working positions that prevent back strain during the cutting process. If cutting your own hair, consider using multiple mirrors to see all angles clearly.
Safety Considerations When Cutting
Always test clippers on a small, hidden section first to ensure they’re cutting properly and at the desired length. This test run helps avoid accidentally cutting too short in visible areas. Check that guards are securely attached before each pass to prevent them from shifting mid-cut.
Keep the scalp taut when cutting to prevent nicks, especially around the ears and neckline where skin is more delicate. Move clippers slowly and steadily rather than rushing through sections. Quick, jerky movements increase the risk of uneven cuts or skin irritation.
Sanitize all tools before and after use, particularly if sharing equipment. Clean clippers remove bacteria and prevent folliculitis or other scalp infections. Replace dull blades promptly, as they can pull hair and cause unnecessary discomfort.
Take regular breaks during the cutting process. This prevents hand fatigue that could lead to mistakes and gives you opportunities to step back and assess your progress. Fresh eyes often catch unevenness that might be missed during continuous work.
How Do You Create the Perfect Taper Gradient?
Achieving a flawless gradient requires understanding how to blend different lengths seamlessly into one another. The technique differs slightly for afro hair compared to other textures, as the natural volume and density require specific approaches. Mastering these methods transforms a basic haircut into a work of art.
Starting with the Baseline Cut
Your baseline establishes the shortest point of the taper, typically at the neckline and around the ears. This foundation determines how dramatic or subtle your gradient will appear. Most tapers for women start with a #1 or #2 guard at the baseline, though personal preference and face shape influence this choice.
Begin at the nape of the neck, moving the clippers upward in smooth, controlled strokes. Follow the natural hairline rather than creating artificial straight lines. The goal is enhancement, not complete reshaping of your natural hair growth pattern.
Work systematically around the perimeter, maintaining consistent pressure and angle. Rushing through this stage often results in uneven patches that become more obvious as you build the gradient. Take your time to ensure the baseline sits evenly all around.
Establishing Your Fade Lines
Creating fade lines involves planning where each guard length will transition into the next. For a standard taper, you might use three to four different lengths, each blending into the one above it. Mark these transition points mentally or with light clipper passes before fully committing.
The first transition line typically sits about an inch above the baseline. This placement can vary based on head shape and desired style – higher placement creates a more dramatic look, while lower placement maintains a conservative appearance. Consider how the transition will look from both profile and back views.
Each subsequent line should maintain proportional spacing. If your first transition is one inch up, the next might be another inch or inch-and-a-half higher. This consistent spacing creates a smooth, professional-looking gradient rather than abrupt steps.
Blending Techniques for Afro Texture
The rocking motion works particularly well with coily hair. Instead of straight upward passes, gently rock the clippers outward as you reach each transition line. This technique creates a softer blend by gradually reducing how much hair the clipper blades catch.
Clipper-over-comb provides precise control for stubborn sections. Hold your comb at the desired angle and run the clippers over it, using the comb as a guide. This method works especially well for creating subtle transitions in areas where the hair grows in different directions.
The stretching technique involves gently pulling sections taut before cutting. This reveals the hair’s true length and ensures even cutting across different curl patterns. Be gentle to avoid discomfort, using just enough tension to straighten the hair temporarily.
Working with Different Curl Patterns
Tighter curl patterns at the nape might require shorter guard settings to achieve the same visual length as looser curls at the crown. Adjust your technique accordingly, perhaps using a #1 guard where 4C texture dominates but a #2 where the pattern loosens.
Pay attention to growth direction changes, particularly around the crown and temples. These areas often feature swirls or changes in curl pattern that can create unexpected volume. Work with these natural patterns rather than fighting against them.
Some sections might have varying density within the same curl pattern. Thinner areas may appear shorter even with the same guard length. Compensate by leaving these sections slightly longer or using feathering techniques to create visual balance.
Areas where different textures meet require special attention. Blend these junctions carefully using a combination of techniques – perhaps clipper-over-comb at the intersection with standard passes on either side. This prevents harsh lines where textures change.
Common Mistakes to Avoid
Creating too steep a gradient ranks among the most frequent errors. While dramatic fades can look striking, they require more frequent maintenance and might not suit all face shapes. Start conservative – you can always go shorter, but you can’t add length back.
Overlooking the natural hairline shape leads to artificial-looking results. Forcing a perfectly straight edge or overly rounded shape appears unnatural. Instead, clean up the existing hairline while maintaining its character.
Using guards that jump more than two sizes between transitions creates visible lines rather than smooth blends. If you’re using a #2 guard, the next section should use a #3 or #4, not a #6. These gradual increases ensure seamless blending.
Neglecting to check your work from multiple angles results in uneven spots. What looks perfect from the back might appear lopsided from the side. Use mirrors or ask someone to check areas you can’t see clearly. Taking photos from different angles helps identify areas needing touch-ups.
Styling and Maintenance Tips for Your Taper Cut
Maintaining the sharp, clean look of a taper cut doesn’t require complicated routines or expensive products. The key lies in establishing consistent care habits that preserve the cut’s shape while keeping your hair healthy. With the right approach, your style can look freshly cut for weeks between barber visits.
Daily Styling Routine for Tapered Afro Hair
Morning styling for tapered hair typically takes less than five minutes. Start by lightly misting your hair with water or a leave-in conditioning spray to reactivate any product from the previous day. This moisture also helps reshape any areas that may have flattened during sleep.
Use a soft-bristle brush or sponge brush to train the hair in your desired direction. For the longer sections on top, gentle circular motions create uniform texture and fullness. The shorter tapered sides usually just need light brushing following the growth pattern.
A small amount of lightweight holding product goes a long way. Warm a pea-sized amount between your palms and smooth it over the surface, paying extra attention to the edges and any areas prone to frizzing. The goal is definition without stiffness or buildup.
Products That Work Best with Short Natural Hair
Less is more when selecting products for tapered styles. Heavy butters and thick gels that work well on longer natural hair can weigh down shorter lengths and leave residue. Instead, choose formulations specifically designed for shorter styles.
Water-based moisturizers absorb quickly without leaving a greasy film. Look for ingredients like aloe vera, glycerin, and light oils such as argan or grapeseed. These provide necessary hydration without the weight that can make short hair appear flat or separated.
For hold and definition, consider these product categories:
Foaming Wraps: Provide light hold while maintaining softness and movement
Texture Powders: Add volume and grip without visible product residue
Light Pomades: Offer moldable hold perfect for creating different looks
Edge Tamers: Keep hairlines neat without the crunchiness of heavy gels
Finishing Sprays: Set your style while adding subtle shine
How Often to Trim and Maintain the Shape
The frequency of maintenance trims depends on how quickly your hair grows and how crisp you prefer your lines. Most women find that touching up the edges every two to three weeks keeps the style looking fresh. The overall shape typically needs professional attention every four to six weeks.
Between professional cuts, you can maintain the neckline and around the ears yourself with a trimmer. These areas show growth first and keeping them clean makes a significant difference in the overall appearance. Always trim conservatively – it’s better to remove too little than too much.
Watch for signs that indicate it’s time for a trim. When the taper lines begin to blur together or the shape starts looking rounder rather than graduated, schedule your appointment. Waiting too long makes it harder to maintain the original style and might require starting over with a shorter cut.
Protecting Edges and Preventing Breakage
The shorter hair along your edges and neckline needs extra protection to prevent thinning or breakage. Avoid excessive manipulation of these areas – constant brushing or touching can stress the follicles. When applying products, use gentle patting motions rather than rubbing.
Protect your edges during sleep by wearing a satin or silk scarf, bonnet, or pillowcase. These smooth materials reduce friction that can cause breakage and help maintain moisture. For added protection, apply a light oil to the edges before covering.
Be mindful of styling tool temperatures if you occasionally use heat. The shorter lengths around the perimeter heat up faster and can suffer damage more quickly. Always use heat protectant and keep tools on lower settings for these delicate areas.
Regular scalp massages promote healthy growth and can prevent thinning edges. Use your fingertips to gently massage in circular motions for a few minutes daily. This stimulation increases blood flow to the follicles while distributing natural oils.
Night Care Routine for Preserving the Style
Evening preparation significantly impacts how your style looks the next morning. Before bed, ensure your hair is completely dry – sleeping on damp hair can create flat spots and unusual texture patterns that are difficult to correct.
Apply a light moisturizer or oil, focusing on areas that tend to dry out overnight. The amount should be just enough to maintain moisture without creating buildup. Remember that your scalp continues producing oils during sleep, so the longer top sections usually need less product than the shorter, more exposed areas.
Your covering method affects tomorrow’s styling time. A well-fitted satin bonnet maintains the overall shape while protecting from friction. If you prefer a scarf, wrap it carefully to avoid creating lines or indentations. Some women find that sleeping on a satin pillowcase alone provides sufficient protection for very short tapers.
Consider your sleeping position’s impact on your style. Side sleepers might notice more flattening on one side, while back sleepers may experience flattening at the crown. Adjusting your covering technique or using a silk-covered neck roll can help maintain shape regardless of sleep position.
Customizing Your Taper Cut Style
The beauty of a taper cut lies in its versatility – no two need to look exactly alike. By adjusting various elements like height, angles, and additional design features, you can create a signature look that perfectly suits your personality and lifestyle.
Different Taper Heights and Their Effects
Low tapers begin just above the ears and neckline, maintaining maximum length through the middle sections of the head. This conservative option works wonderfully for professional settings or women transitioning from longer styles. The subtle graduation provides polish without dramatic contrast.
Mid-level tapers start around the temple area, creating more noticeable graduation while still maintaining substantial coverage. This height strikes a balance between edgy and elegant, offering enough variation to create visual interest without appearing too bold for conservative environments.
High tapers begin well above the ears, sometimes reaching the upper temple area. This placement creates a striking contrast between the longer top sections and closely cropped sides. The dramatic difference in lengths makes a bold statement and particularly flatters women with strong facial features.
Adding Designs and Creative Elements
Carved designs add artistic flair to your taper cut. Simple lines or geometric patterns carved into the shorter sections create visual interest without overwhelming the overall style. These designs typically last two to three weeks before growing out, making them perfect for special occasions or temporary personal expression.
Color provides another customization option. The varying lengths of a taper create natural dimension that color enhancement can amplify. Highlights on the longer top sections contrast beautifully with the darker, shorter sides. Temporary colors offer risk-free experimentation.
Part variations change the entire feel of your cut. A sharp side part creates asymmetry and sophistication, while a curved part adds softness. Some women incorporate zigzag or curved parts for added personality. The flexibility to change parts means you can alter your look without cutting.
Combining Tapers with Other Natural Styles
Tapered sides paired with twist-outs or braid-outs on top create textured contrast. The defined pattern on top plays beautifully against the clean, graduated sides. This combination allows you to showcase your natural texture while maintaining the easy maintenance of shorter sides.
Bantu knots or coils on the longer sections create height and drama. The structured style on top emphasizes the clean lines of the taper, resulting in a look that’s both playful and polished. This versatility means you can transform your style for different occasions without changing the cut.
Finger waves or pin curls on the crown sections add vintage glamour to modern tapered sides. This unexpected combination bridges classic and contemporary aesthetics. The shorter sides keep the overall look current while the styled top adds elegance.
Choosing the Right Taper for Your Face Shape
Round faces benefit from higher tapers that add vertical lines and length. Keeping more height on top while closely tapering the sides creates an elongating effect. Avoid tapers that maintain too much width at the temples, as this can emphasize roundness.
Square faces look stunning with softer, gradual tapers that don’t emphasize angular features. Starting the taper lower and maintaining gentle transitions prevents the cut from appearing too harsh. Slightly rounded shapes at the temples soften strong jawlines.
Heart-shaped faces suit tapers that maintain some fullness at the temples while gradually decreasing toward the nape. This approach balances a wider forehead with a narrower chin. Avoiding extremely high tapers prevents emphasizing the forehead’s width.
Long faces work well with conservative tapers that maintain width through the sides. Lower taper points and less dramatic gradients prevent additional elongation. Keeping some fullness at the sides creates balanced proportions.
Seasonal Adjustments and Variations
Summer calls for cleaner, shorter tapers that provide cooling relief. Consider starting your gradient slightly higher or using shorter guards overall. The reduced length means less heat retention while maintaining style. Many women find that tighter tapers during hot months reduce the need for frequent washing.
Winter modifications might include maintaining slightly more length for warmth. The longer top sections provide some insulation while the tapered sides still offer easy maintenance. This seasonal adjustment doesn’t compromise style while acknowledging practical needs.
Humidity considerations influence product choices more than cut structure. In humid seasons, slightly shorter sides prevent excessive volume expansion. Anti-humidity finishing products become essential for maintaining the clean lines of your taper.
During grow-out seasons, strategic tapering maintains shape while allowing length gain. Rather than growing everything uniformly, maintaining tapered sides while letting the top flourish creates intentional style rather than awkward growth phases. This approach keeps you looking polished throughout the transition.
Final Thoughts on Mastering Your Taper Cut
A well-executed taper cut transforms natural hair care from a time-consuming routine into a simple, enjoyable process. The combination of professional appearance and minimal maintenance makes this style perfect for busy women who refuse to compromise on looking polished. Whether you’re cutting your own hair or working with a barber, understanding the techniques and maintenance requirements ensures you’ll always look your best.
The journey to finding your perfect taper involves experimentation with different heights, gradients, and styling approaches. What works beautifully for one person might not suit another, and that’s the beauty of this versatile cut. Trust your instincts about what makes you feel confident, and don’t hesitate to adjust elements until you find your signature version. With proper care and regular maintenance, your taper cut will continue to turn heads while giving you more time to focus on what truly matters in your daily life.
Frequently Asked Questions
Q: How is a taper cut different from a fade on afro hair?
A: A taper maintains gradual length reduction with hair still visible at the shortest points, while a fade blends down to skin. Tapers generally look softer and more conservative, making them popular among women who want a polished but not too dramatic look.
Q: Can you do a taper cut on 4C hair yourself?
A: Yes, with proper tools and patience, self-tapering is possible. Start conservatively with longer guards, work in good lighting with multiple mirrors, and consider having someone help with the back sections for best results.
Q: How long does a taper cut last before needing a trim?
A: Edge touch-ups every 2-3 weeks keep the style crisp, while the overall shape typically needs professional attention every 4-6 weeks, depending on your growth rate and desired sharpness.
Q: What’s the best moisturizer for short tapered natural hair?
A: Lightweight, water-based moisturizers work best for short styles. Look for products with aloe vera, light oils like grapeseed, and glycerin that won’t weigh down your hair or leave residue.
Q: Will a taper cut damage my edges?
A: When done correctly with proper maintenance, taper cuts shouldn’t damage edges. Avoid excessive tension during cutting, protect edges at night with satin/silk, and moisturize regularly to maintain healthy hairlines.
Q: Do I need different products for the tapered sections versus the top?
A: Not necessarily different products, but different amounts. The shorter tapered sections need less product than the longer top. Focus heavier application on the longer sections while using minimal product on the closely cut areas.
Q: What guard sizes work best for a feminine taper?
A: Most feminine tapers use #1 or #2 guards at the baseline, gradually increasing to #4-#6 at transition points. The top length varies based on preference but typically maintains at least an inch for styling versatility.
Q: How do I prevent my taper from looking masculine?
A: Keep softer, more gradual transitions rather than sharp lines, maintain longer length on top, consider adding curved rather than straight parts, and style with products that create texture rather than slicked-down looks.