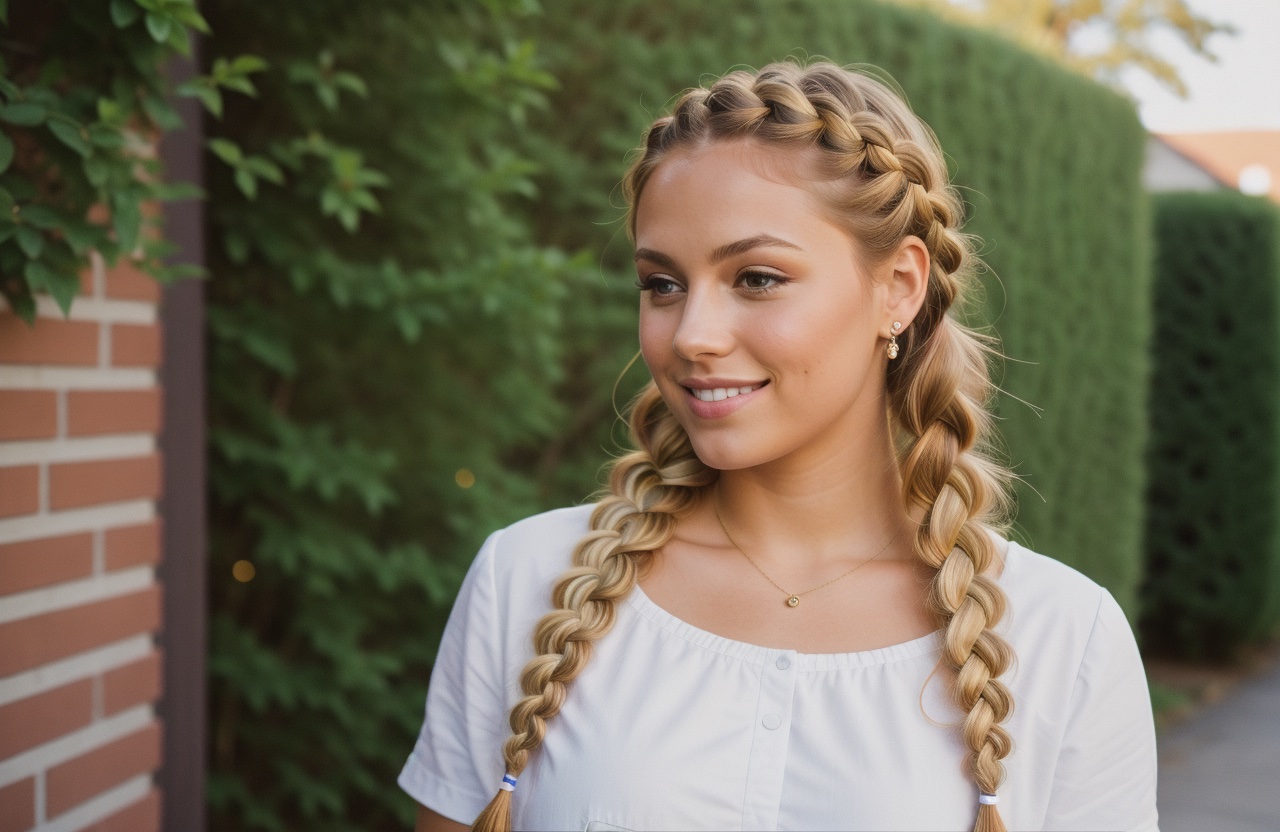
Double Dutch braids have become one of those hairstyles that instantly transform your look from ordinary to extraordinary. These inverted braids sit on top of your head rather than underneath, creating a raised, three-dimensional effect that catches attention wherever you go. Unlike traditional braids that can look flat against your scalp, this technique adds volume and texture that works beautifully for everything from gym sessions to formal events.
The beauty of this braiding style lies in its versatility and practicality. You can wear them tight and sleek for athletic activities, loose and romantic for date nights, or somewhere in between for casual everyday wear. Women with various hair types and lengths can master this technique, though having hair at least shoulder-length makes the process easier. The style keeps hair secure throughout the day while looking polished and intentional, making it perfect for busy women who want to look put-together without spending hours on their hair.
In the following sections, you’ll discover everything from the basic techniques to advanced styling tips that will help you create professional-looking double Dutch braids at home. Whether you’re completely new to braiding or looking to refine your skills, this guide breaks down each step clearly and offers solutions to common challenges. Let’s start with understanding exactly what makes this braiding technique special and why it might become your new favorite hairstyle.
- What Are Double Dutch Braids and Why Choose This Style?
- Essential Tools and Hair Preparation for Perfect Braids
- Step-by-Step Technique for Creating Double Dutch Braids
- Styling Variations and Creative Twists
- Maintaining Your Braids and Troubleshooting Common Issues
- Your Journey to Braiding Mastery
- Frequently Asked Questions
What Are Double Dutch Braids and Why Choose This Style?
Double Dutch braids offer a sophisticated take on traditional braiding that creates eye-catching dimension and structure. The technique involves weaving three sections of hair under rather than over each other, which pushes the braid up from the scalp instead of letting it lie flat. When you create two of these braids running parallel down your head, you achieve a symmetrical, balanced look that frames your face beautifully.
Understanding the Basic Technique
The fundamental difference between Dutch and French braiding comes down to direction. While French braids cross strands over the middle section, Dutch braids pass them underneath. This simple change completely alters the final appearance, making the braid appear to sit on top of your hair rather than blend into it. The raised effect gives your hairstyle more presence and visual interest.
Many women find Dutch braids easier to execute once they understand the motion. Your hands naturally want to pull sections downward, which aligns perfectly with the under-braiding technique. The visibility of the braid as it forms also helps you maintain consistent tension and spot any irregularities quickly.
Benefits That Make This Style Worth Learning
This braiding method offers practical advantages beyond its attractive appearance. The secure hold keeps hair in place during intense workouts, making it a favorite among athletes and fitness enthusiasts. The style also protects hair from environmental damage and reduces daily manipulation, which can help maintain healthy hair over time.
The longevity of properly executed double Dutch braids means you can style your hair once and enjoy the look for several days. With minor touch-ups and proper nighttime care, many women stretch the style for up to three or four days. This time-saving aspect makes it particularly appealing for those with busy schedules.
Double Dutch braids work wonderfully as a protective style for women growing out their hair or recovering from damage. By keeping strands contained and reducing friction, the style minimizes breakage and split ends. The technique also helps distribute natural oils from your scalp throughout your hair length.
Who Can Rock This Look Successfully
While this style works best on medium to long hair, women with shorter lengths can still achieve beautiful results with some modifications. Hair that reaches at least to the shoulders provides enough length to create defined braids that stay secure. Those with bob-length cuts might need to incorporate bobby pins or small elastics to keep shorter pieces in place.
Hair texture plays less of a role than you might expect. Straight hair creates sleek, defined braids, while wavy or curly textures add natural volume and texture to the style. Women with fine hair can benefit from texturizing products to add grip, while those with thick hair might need to work in smaller sections for better control.
Making the Style Work for Different Hair Types
Fine, slippery hair often presents the biggest challenge when creating double Dutch braids. Adding texture through dry shampoo, texturizing spray, or even braiding slightly dirty hair can provide the grip needed for the braids to hold. Some women with very fine hair find that backcombing sections lightly before braiding helps create fuller-looking results.
Thick or coarse hair requires patience and sometimes stronger arms, but the results often look spectacular. The natural volume of thicker hair creates impressive, substantial braids that really stand out. Working with slightly damp hair or using a smoothing product can make the braiding process more manageable for those with very thick locks.
Curly and textured hair brings its own advantages to this style. The natural grip of textured hair helps braids stay in place without sliding, and the volume creates beautifully full braids. Many women with curly hair find that stretching their hair first through blow-drying or braiding while damp helps achieve the length needed for comfortable braiding.
Essential Tools and Hair Preparation for Perfect Braids
Creating flawless double Dutch braids starts long before your fingers begin weaving. The right preparation and tools make the difference between braids that look professionally done and those that fall apart within hours. Taking time to properly prepare your hair and gather quality tools sets you up for success from the start.
Must-Have Tools for Braiding Success
A good set of tools transforms the braiding experience from frustrating to enjoyable. Start with a rattail comb, which becomes invaluable for creating clean, straight parts and separating precise sections of hair. The pointed end helps you achieve professional-looking parts that form the foundation of symmetrical braids.
Hair elastics deserve careful consideration too. Clear or color-matched small elastics work best for securing the ends without drawing attention away from the braids themselves. Keep extras nearby since these small elastics occasionally snap during removal. Many women prefer snag-free versions that won’t pull or damage hair when it’s time to take the braids out.
A handheld mirror or double-sided standing mirror helps you check your progress from multiple angles. Being able to see the back of your head prevents uneven sections or loose pieces from ruining your hard work. Good lighting also matters more than most people realize – natural light or bright LED bulbs help you spot any imperfections as you work.
Preparing Your Hair for Optimal Results
The condition of your hair before braiding significantly impacts both the process and the final result. Most women find that hair that’s been washed 24 to 48 hours earlier provides the ideal texture – clean enough to look fresh but with enough natural texture to grip well during braiding.
Product application can make or break your braiding experience. A lightweight mousse or texturizing spray applied to damp hair and allowed to dry provides grip without stickiness. Focus application on the mid-lengths and ends rather than the roots to avoid a greasy appearance. Some women swear by applying a small amount of hair oil to the very ends to prevent tangling during the braiding process.
Completely detangling your hair before starting prevents frustrating snags mid-braid. Work through your hair in sections with a wide-tooth comb or detangling brush, starting from the ends and working upward. This methodical approach saves time and prevents the frustration of encountering knots while your hands are full maintaining the braid.
Products That Enhance Your Braiding Game
The right products can transform your braiding experience and extend the life of your style. Here are key products to consider:
Texturizing Spray: Adds grip to slippery hair without weighing it down or creating stickiness
Edge Control: Keeps baby hairs and shorter pieces smooth and in place around your hairline
Light-Hold Hairspray: Sets the finished braids without creating crunchiness or visible residue
Dry Shampoo: Refreshes braids on day two or three while adding volume at the roots
Hair Oil: Prevents frizz and adds shine to the finished style without loosening the braids
Common Preparation Mistakes to Avoid
Starting with soaking wet hair ranks among the most frequent errors. Wet hair stretches more than dry hair, leading to braids that loosen significantly as they dry. If you must braid damp hair, ensure it’s only slightly moist and account for some loosening as it dries completely.
Over-producing your hair creates its own set of problems. Too much product makes hair heavy and can leave visible residue on your braids. Start with less than you think you need – you can always add more to specific sections if needed. Focus products on areas that need them most rather than coating all your hair uniformly.
Rushing through the preparation phase often leads to disappointing results. Taking an extra five minutes to properly section, detangle, and prepare your hair pays off in braids that look better and last longer.
Adapting Preparation for Different Hair Textures
Women with naturally oily hair should adjust their preparation accordingly. Using a clarifying shampoo the day before braiding removes excess oil that might make braiding difficult. A volumizing mousse at the roots can also help create the texture needed for braids to hold properly in oilier hair types.
Those with dry or damaged hair need extra attention to moisture balance. While you want some texture for grip, overly dry hair becomes brittle and prone to breakage during braiding. A leave-in conditioner applied to the lengths and ends before braiding provides protection without interfering with the braiding process.
Color-treated or chemically processed hair often has a different texture that can actually work in your favor for braiding. The slightly rougher cuticle of processed hair provides natural grip. However, this hair type needs gentle handling to prevent further damage, so avoid pulling too tightly or using excessive tension.
Step-by-Step Technique for Creating Double Dutch Braids
Mastering the actual braiding technique requires practice, patience, and understanding the rhythm of the movements. Once your hands learn the pattern, muscle memory takes over and the process becomes almost meditative. Breaking down each step helps you build confidence and achieve consistent results.
Starting with the Perfect Part
Creating a clean center part sets the foundation for symmetrical braids. Use the pointed end of your rattail comb to draw a line from your forehead straight back to the nape of your neck. Don’t worry if your natural part falls elsewhere – you can train your hair to accept a center part for the duration of the style.
Check your part from multiple angles before proceeding. Small adjustments now prevent noticeably uneven braids later. Some women find it helpful to secure one side with a clip while working on the other, preventing sections from mixing as they braid.
The width of your sections determines the final look of your braids. For most women, dividing the hair from the center part to just behind each ear creates proportional braids. Adjust this width based on your hair density and personal preference – thicker sections create chunkier braids while thinner sections produce more delicate results.
Beginning the Dutch Braid Motion
Start your first braid by taking a section of hair at your hairline, roughly two inches wide. Divide this into three equal strands, holding them with separate fingers. The key to Dutch braiding lies in crossing the outer strands under the middle strand rather than over it.
Take the right strand and pass it under the middle strand, then do the same with the left strand. This creates your first complete braid sequence. As you continue, add small sections of loose hair to each outer strand before passing it under the middle. The size of these added sections determines how quickly you move down your head and how tight the braid appears against your scalp.
Maintaining consistent tension throughout prevents loose, messy sections from developing. However, avoid pulling so tightly that you cause discomfort or risk traction damage to your hairline. The ideal tension feels secure but comfortable, creating braids that last without causing headaches.
Working Your Way Down
As you progress down your head, keep your hands close to your scalp for the neatest appearance. Letting the braid drift away from your head creates gaps and reduces the raised effect that makes Dutch braids distinctive. Angle your additions slightly backward rather than straight down to follow the natural curve of your head.
The trickiest part often comes around ear level, where the angle of your head changes. Adjust your hand position and the angle at which you’re holding the sections to maintain smooth, even braids. Some women find it helpful to tilt their head slightly forward during this portion.
Once you’ve incorporated all the loose hair from that side of your head, continue braiding the remaining length in a regular three-strand Dutch braid. Keep the same under-pattern going to maintain consistency in appearance. The free-hanging portion of your braid should mirror the tension and tightness of the scalp portion.
Securing and Perfecting Your Braids
When you reach the end of your hair, secure the braid with a small elastic. Leave about an inch of hair below the elastic to prevent the braid from unraveling. Clear elastics work well for a seamless look, or match the elastic to your hair color for the most natural appearance.
After completing both braids, assess them for symmetry and make any necessary adjustments. Gently tug on the edges of each braid section to create a fuller, more voluminous appearance. This “pancaking” technique works best when done gradually from top to bottom, ensuring even fullness throughout.
Small flyaways and baby hairs can be smoothed with a bit of edge control or hairspray applied to a toothbrush or small brush. Work these products in gently to avoid disturbing the braids themselves. Some women prefer leaving a few face-framing pieces loose for a softer, more romantic look.
Troubleshooting as You Braid
If you notice uneven sections developing, pause and redistribute the hair in your hands before continuing. It’s better to fix issues immediately than try to correct them after finishing. Muscle fatigue in your arms might cause you to rush or lose consistency, so take breaks if needed.
Bumps or gaps in the braid usually result from inconsistent tension or adding uneven sections. While perfection isn’t necessary for a beautiful result, significant bumps can be prevented by keeping your additions uniform and maintaining steady tension throughout.
For those struggling with the coordination, practice the hand motions without actually braiding first. Hold three ribbons or even just visualize the movements to build muscle memory. Many women find that once their hands understand the pattern, the actual braiding becomes much easier.
Hair that’s too silky or slippery might slide out of your grip repeatedly. In these cases, a texturizing product becomes essential. Apply it section by section as you work rather than all at once for better control over the amount used.
Styling Variations and Creative Twists
Once you’ve mastered the basic double Dutch braid technique, a world of creative possibilities opens up. Small adjustments to the basic style can completely change your look, taking you from sporty to sophisticated with just a few tweaks. Understanding these variations helps you adapt the style to different occasions and moods.
Playing with Texture and Finish
The difference between sleek and messy Dutch braids lies primarily in preparation and finishing techniques. For a polished look, smooth each section thoroughly before incorporating it into the braid and keep tension consistent throughout. A finishing spray or light pomade smooths any flyaways for that ultra-refined appearance perfect for professional settings or formal events.
Creating an intentionally undone look requires a different approach entirely. Start with textured hair, perhaps using a sea salt spray or texturizing powder. As you braid, allow some pieces to fall naturally rather than capturing every strand. After securing the braids, gently pull at sections to loosen them and use your fingers to roughen up the texture. This relaxed style works beautifully for casual weekends or music festivals.
The middle ground between these extremes offers perhaps the most versatility. Braid neatly but not too tightly, then selectively loosen certain sections for dimension. This balanced approach looks intentional yet effortless, suitable for everything from brunch dates to evening gatherings.
Incorporating Decorative Elements
Accessories can transform basic double Dutch braids into something special. Tiny flowers tucked into the braids create a whimsical, garden-party vibe perfect for spring and summer events. Secure them with bobby pins that match your hair color, placing flowers strategically where they’ll stay secure without weighing down the braids.
Metallic hair rings or cuffs add an edgy, modern touch to the traditional style. Thread these onto your braids at various intervals, or cluster them for more impact. The key lies in choosing accessories that complement rather than overwhelm the braided structure.
Ribbons woven through the braids offer endless color possibilities. Start incorporating the ribbon from the beginning of your braid, treating it as a fourth strand, or weave it through after completion for a different effect. Satin ribbons create an elegant look while leather cords lean more bohemian.
Alternative Parting Patterns
While center parts create classic symmetry, experimenting with different parts yields fresh looks. A deep side part with double Dutch braids creates an asymmetrical style that’s modern and unexpected. One braid will naturally be thicker than the other, adding visual interest.
Zigzag parts inject playfulness into the style. Create the pattern with your rattail comb before beginning to braid, ensuring each zig and zag is deliberate and defined. This variation works particularly well for casual events or when you want to add personality to your look.
Some women create diagonal parts that run from one temple to the opposite side of the nape. This creates braids that wrap around the head at an angle, offering a completely different silhouette from traditional straight-back braids.
Combining with Other Styles
Double Dutch braids don’t have to exist in isolation. Consider these creative combinations:
Half-Up Variation: Braid only the top section of your hair, leaving the bottom half loose for a romantic, flowing look
Bun Finish: Wrap the ends of your braids into a low or high bun for an elegant updo perfect for formal occasions
Ponytail Integration: Gather both braids into a high ponytail for a sporty yet polished style
Side Sweep: Direct both braids to one side and pin them for an asymmetrical formal style
Crown Connection: Connect the two braids at the back of your head to create a crown effect
Adapting for Different Occasions
Your morning workout calls for tight, secure braids that won’t budge during intense movement. Keep them close to the scalp and avoid loose pieces that might stick to sweaty skin. Consider braiding slightly damp hair with a strong-hold gel for maximum staying power during athletic activities.
Professional settings benefit from neat, moderately-sized braids that look polished without being too trendy or distracting. Keep accessories minimal and ensure the overall look appears controlled and deliberate. This demonstrates attention to detail while maintaining workplace appropriateness.
Special events allow for more creativity and drama. Add volume through pancaking, incorporate statement accessories, or combine the braids with curled loose pieces for a red-carpet-worthy style. Don’t be afraid to use temporary hair color spray or glitter for truly special occasions.
Casual daily wear offers the most flexibility. Choose your finish based on your plans and mood. Running errands might call for quick, simple braids while meeting friends for coffee could inspire a more styled approach with intentional texture and perhaps a few decorative bobby pins.
Maintaining Your Braids and Troubleshooting Common Issues
Getting your double Dutch braids to last multiple days while still looking fresh requires specific care techniques. Understanding how to maintain the style and address common problems helps you maximize your styling effort and keep your braids looking intentional rather than tired.
Extending the Life of Your Style
Most women can comfortably wear double Dutch braids for two to four days with proper care. The longevity depends on your hair type, lifestyle, and maintenance routine. The first 24 hours often determine how well the style holds up, so taking preventive measures from the start pays off.
Night care makes the biggest difference in preserving your braids. Wrapping your braids in a silk or satin scarf prevents friction that causes frizzing and loosening. If scarves feel uncomfortable, a satin pillowcase offers similar benefits with less restriction. Some women find that loosely wrapping each braid in a soft scrunchie prevents them from unraveling while sleeping.
Refreshing your braids each morning takes just minutes but makes a substantial difference in appearance. Smooth any frizzy pieces with a small amount of hair oil or serum applied with your fingertips. For stubborn flyaways, spray hairspray onto a toothbrush and gently smooth them down. This targeted approach avoids oversaturating the braids with product.
Dealing with Specific Hair Concerns
Oily roots can develop even with braided styles, particularly for those with naturally oily scalps. Dry shampoo becomes your best friend in this situation. Apply it carefully to the exposed scalp areas between braids, focusing on the roots. Use your fingertips to gently work it in without disturbing the braid structure. This absorbs excess oil while adding volume that can revive flat-looking braids.
Itchy scalp sometimes develops when wearing braids for extended periods. Resist the urge to scratch vigorously, which can loosen your braids and irritate your scalp further. Instead, use a cotton swab dipped in diluted tea tree oil or a scalp-soothing serum to target itchy spots directly. Gentle pressure with your fingertips can also provide relief without damaging the style.
Frizz tends to increase each day you wear the braids, but strategic management keeps it under control. Focus anti-frizz efforts on the most visible areas – around your hairline and the top of the braids. A light mist of hairspray or a tiny amount of smoothing serum can work wonders without weighing down the entire style.
When Problems Arise
Loose sections developing after a day or two don’t necessarily mean starting over. Small clear elastics can secure problematic areas discretely. Place them strategically where the loosening occurs, then gently tug the braid below the elastic to hide it within the braid pattern. This quick fix can extend your style another day or two.
Bumps or uneven sections become more noticeable as the style settles. While you can’t completely fix these without re-braiding, you can minimize their appearance. Gently massage bumpy areas to redistribute the hair slightly, then use a bit of hairspray to set the adjusted section. Strategic placement of accessories can also camouflage problem areas.
If one braid starts falling apart while the other remains intact, you have options beyond starting completely over. Consider re-braiding just the problematic side, using the intact braid as a guide for symmetry. Alternatively, transform the style by undoing both braids partially and creating a half-up braided style that requires less precision.
Knowing When to Remove the Braids
Signs that it’s time to take out your braids include significant loosening, visible product buildup, or scalp discomfort. Most women find that day three or four marks the natural endpoint for the style, though some can stretch it longer with careful maintenance.
Removing double Dutch braids requires patience to avoid unnecessary breakage. Start by carefully cutting the elastic at the bottom with nail scissors, being careful not to cut your actual hair. Gently unravel each braid from bottom to top, using your fingers to detangle as you go.
The wave pattern left after removing braids can be styled as its own look. Many women plan braid removal for when they want effortless waves. A light mist of sea salt spray and some scrunching enhances these natural braid waves for a beachy, textured style that can last another day or two.
Preventing Long-Term Issues
Regular braiding requires attention to scalp and hair health to prevent problems. Varying your part location prevents stress on the same hair follicles repeatedly. If you typically create a center part for your double Dutch braids, occasionally switch to a side part or adjust the exact placement slightly.
Too-tight braiding can lead to traction alopecia, a form of hair loss caused by consistent pulling. Pay attention to any discomfort during or after braiding. Mild tension is normal, but pain, intense pulling sensations, or small bumps along your hairline signal that you’re braiding too tightly.
Give your hair regular breaks between braided styles. After removing braids, spend at least a day or two with your hair loose or in very gentle styles. This recovery period allows your scalp to relax and gives you a chance to thoroughly cleanse and condition your hair before the next braiding session.
Product buildup from frequent braiding necessitates occasional clarifying treatments. Once every few weeks, use a clarifying shampoo to remove accumulated products, followed by a deep conditioning treatment to restore moisture. This maintains healthy hair that braids beautifully and holds styles well.
Your Journey to Braiding Mastery
Double Dutch braids represent more than just another hairstyle option – they offer a practical, versatile solution that adapts to your lifestyle and preferences. From athletic activities to formal events, this braiding technique provides a polished look that stays put while protecting your hair from daily damage. The raised, dimensional appearance of these braids creates visual interest that elevates any outfit, whether you’re wearing workout gear or an evening dress.
The skills you develop while learning this technique extend beyond just creating beautiful braids. You gain better understanding of your hair’s behavior, improved hand coordination, and the confidence that comes from mastering something new. Each time you practice, your muscle memory strengthens and your results improve. Soon, what once seemed complicated becomes second nature, and you’ll find yourself experimenting with variations and developing your own signature touches. The investment of time spent learning pays dividends in quick morning styling sessions and compliments on your always-polished appearance.
Frequently Asked Questions
Q: How long does my hair need to be to create double Dutch braids?
A: Your hair should ideally reach at least shoulder length for comfortable braiding. Shorter hair can work with modifications like using bobby pins or small elastics to secure loose pieces, but chin-length or longer provides the best results.
Q: Why do my Dutch braids keep turning into regular braids halfway through?
A: This happens when you unconsciously switch from passing strands under to passing them over the middle section. Focus on maintaining the under-motion throughout, and practice slowly until the movement becomes automatic.
Q: Can I braid my hair when it’s wet?
A: While possible, wet hair stretches more than dry hair and will loosen significantly as it dries. For best results, braid hair that’s completely dry or only very slightly damp, and expect some loosening if you choose to braid damp hair.
Q: How do I prevent headaches from tight braids?
A: Avoid pulling too tightly, especially around your hairline and temples. The braids should feel secure but comfortable. If you experience pain during braiding, loosen your grip immediately. Taking breaks while braiding also helps prevent tension headaches.
Q: What’s the best way to add volume to thin braids?
A: Gently tug on the edges of each braid section after securing, a technique called pancaking. Start from the bottom and work upward for even fullness. Using volumizing products before braiding and backcombing sections slightly also helps create fuller-looking braids.
Q: How often should I wash my hair if I wear braids regularly?
A: Most women can go 3-4 days between washes when wearing braids. Use dry shampoo to refresh your scalp between washes, and ensure thorough cleansing when you do shampoo to remove any product buildup from styling products.
Q: Why do my braids look uneven even though I part my hair straight?
A: Uneven tension or inconsistent section sizes usually cause asymmetrical braids. Practice maintaining steady pressure throughout and consciously grab equal amounts of hair for each addition. Using a mirror to check your progress helps identify issues early.
Q: Can I exercise with double Dutch braids?
A: Yes, these braids work excellently for exercise. Create them slightly tighter than usual and consider using a strong-hold gel for maximum security during intense workouts. They’ll keep hair off your face and neck while staying put through vigorous movement.