The A-line bob stands as one of the most versatile and flattering haircuts in modern hairstyling. This classic cut features shorter hair at the back that gradually lengthens toward the front, creating a distinctive angled silhouette that frames the face beautifully. Women of all ages find this style particularly appealing because it offers both sophistication and ease of maintenance, making it a go-to choice for those wanting a polished look without excessive styling time.
Mastering the technique to cut this particular style requires understanding its unique geometry and the precision needed to achieve that perfect graduated angle. Unlike traditional bobs that maintain one length throughout, the A-line variation demands careful attention to creating a smooth transition from back to front. The beauty of this haircut lies in its ability to add movement and dimension while maintaining a clean, structured appearance that works well with various hair textures and face shapes.
Throughout the following sections, we’ll walk through everything you need to know about creating this timeless cut, from understanding its fundamental structure to mastering the cutting techniques that professional stylists use. You’ll discover the essential tools required, learn the step-by-step process for achieving that perfect angle, and gain insights into common mistakes to avoid. Whether you’re a budding stylist or someone interested in understanding your haircut better, this comprehensive guide will equip you with the knowledge to achieve a flawlessly executed A-line bob.
Understanding the A-Line Bob Structure
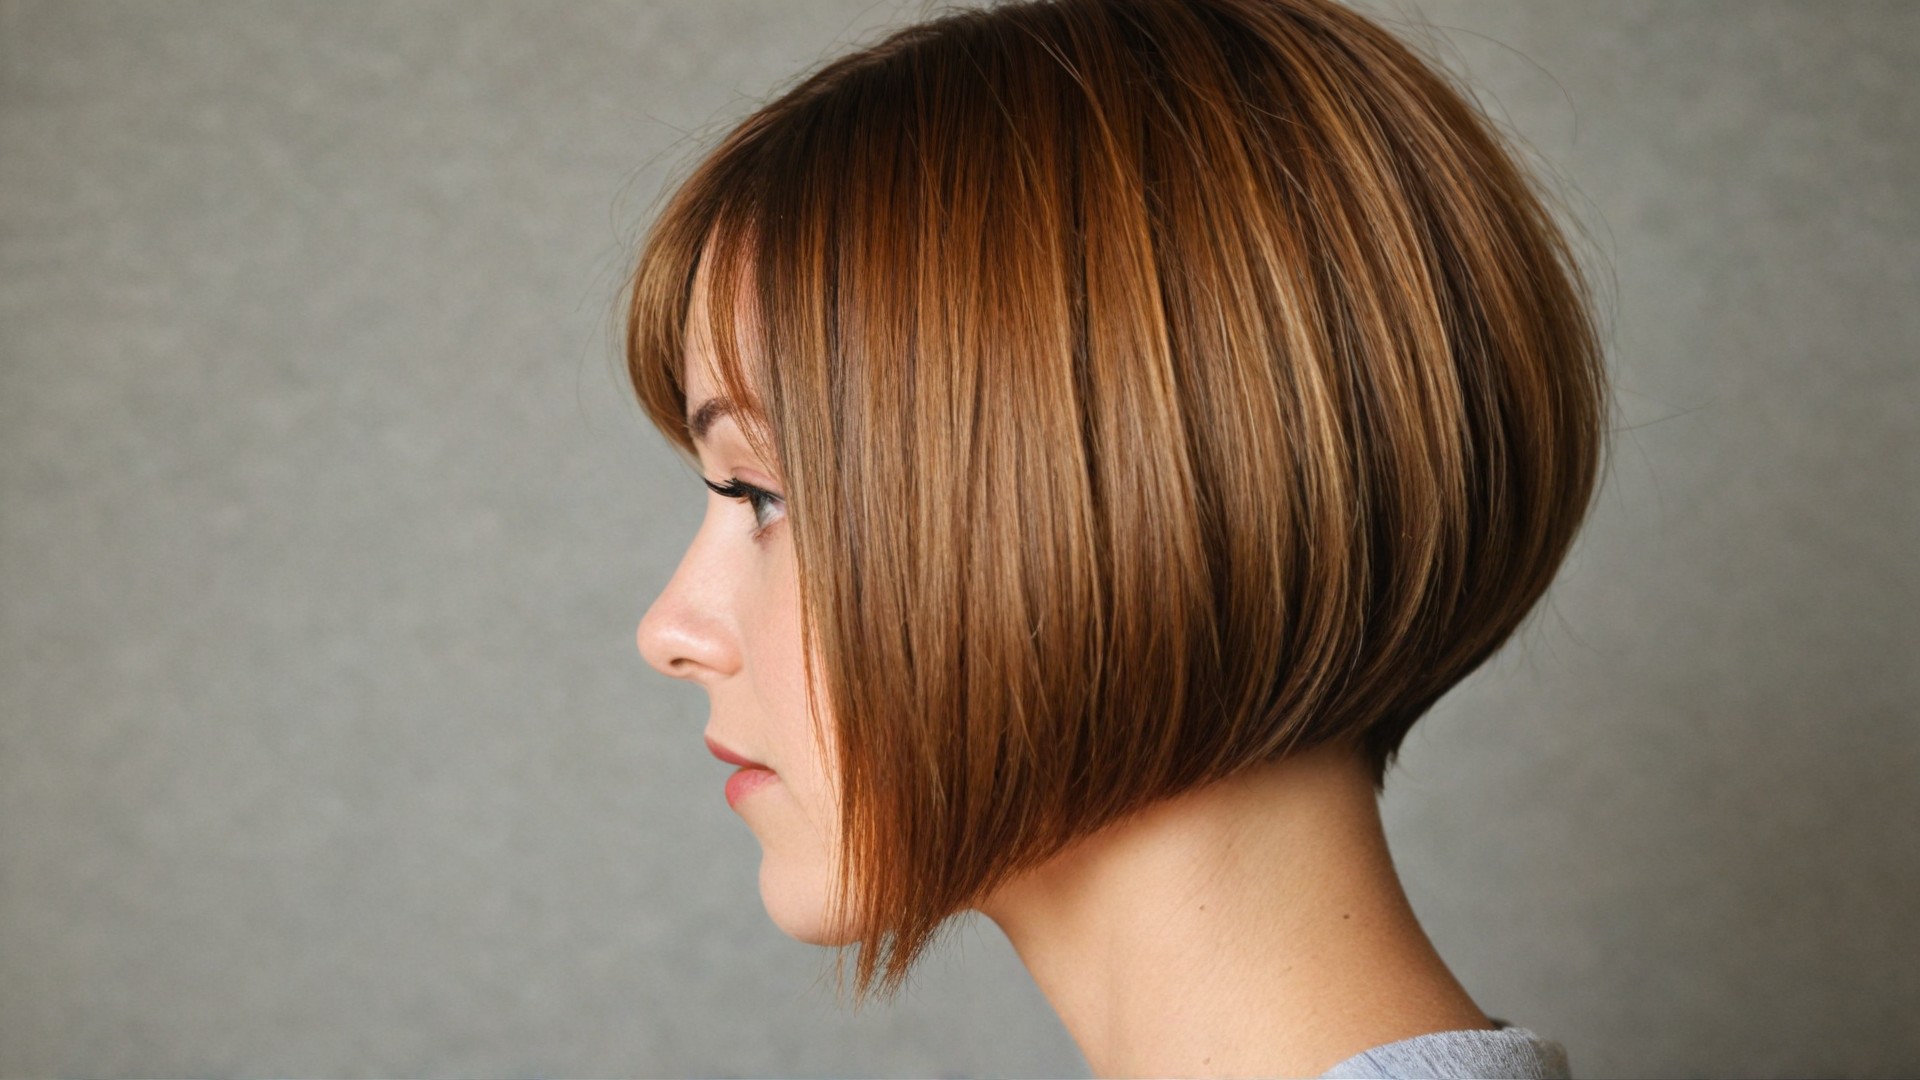
The foundation of any successful A-line bob lies in understanding its distinctive architectural elements. This haircut gets its name from the A-shaped silhouette it creates when viewed from the side, with the hair forming a diagonal line from the nape of the neck to the chin or shoulders. The key characteristic that sets it apart from other bob variations is the dramatic difference in length between the back and front sections, which can range from subtle to quite pronounced depending on personal preference.
What defines an A-line bob haircut?
At its core, an A-line bob features a graduated cut where the hair at the back sits significantly shorter than the front pieces. This graduation creates visual weight that shifts forward, drawing attention to the face while maintaining a sleek profile at the back. The cut typically starts with the shortest point at the nape, anywhere from one to three inches in length, then gradually increases as it moves toward the face. The front sections often reach the jawline or even the collarbone, depending on the desired dramatic effect.
The angle of graduation distinguishes a true A-line bob from other angled cuts. While some bobs feature slight graduation, this style showcases a more pronounced angle that creates a clear diagonal line when the hair falls naturally. This distinct geometry requires precise cutting techniques to maintain the smooth transition between lengths.
How does the angle work in this cut?
The magic of this haircut happens through strategic layering and graduation techniques. Starting from a central point at the back of the head, the hair is cut at increasingly steep angles as you move toward the front sections. This creates what stylists call “weight distribution” – the bulk of the hair’s visual weight sits at the front, creating that characteristic A-line shape.
Think of the angle as a sliding scale. At the back, you might work with a 45-degree angle, which gradually increases to 90 degrees or even slightly forward as you approach the face-framing pieces. This progressive change in cutting angle ensures the hair flows seamlessly from short to long without any harsh lines or disconnection between sections.
The beauty of this angled approach is its versatility. A subtle angle creates a soft, feminine look perfect for professional settings, while a more dramatic angle makes a bold fashion statement. The choice depends entirely on personal style preferences and lifestyle needs.
What face shapes suit this style best?
While the A-line bob offers remarkable versatility, certain face shapes particularly benefit from its unique geometry. Round faces find this cut especially flattering because the forward-angled pieces create vertical lines that elongate the face. The graduation at the back prevents additional width at the cheeks, while the longer front sections draw the eye downward, creating a slimming effect.
Square faces also pair wonderfully with this style. The diagonal lines soften angular jawlines, while the forward weight of the hair creates curves that balance strong facial features. For these face shapes, keeping the front pieces slightly below the jawline helps create the most flattering frame.
Heart-shaped faces benefit from the way this cut adds visual weight at the jaw level, balancing a wider forehead. The key for this face shape is ensuring the longest point hits right at the chin or slightly below, creating harmony between the upper and lower portions of the face. Oval faces, being the most versatile, can wear virtually any variation of this cut successfully.
How to determine the right length for you
Selecting the ideal length for your A-line bob involves considering multiple factors beyond face shape. Your lifestyle plays a crucial role – shorter variations require less daily styling but need more frequent trims to maintain their shape. Longer versions offer more styling versatility but may require more time for daily maintenance.
Consider your hair’s natural texture when determining length. Fine hair often looks fuller with a shorter back section, as this prevents the weight from pulling the hair flat. Thick hair can handle more dramatic angles without looking too heavy, allowing for greater length variation between back and front. Curly or wavy hair requires special consideration, as the natural texture will cause the hair to spring up, making it appear shorter than when cut.
Your personal comfort level with short hair also matters. If you’re transitioning from long hair, starting with a less dramatic angle allows you to adjust gradually. You can always increase the angle at subsequent appointments once you’re comfortable with the shorter length at the back.
Professional obligations might influence your choice as well. Conservative work environments might call for subtler angles, while creative fields often welcome more dramatic variations. The beauty of this cut lies in its adaptability – you can adjust the angle and length to suit any situation while maintaining the essential A-line structure.
Essential Tools and Preparation
Creating a professional-looking A-line bob requires more than just a good pair of scissors. The right tools and proper preparation make the difference between a precision cut and a disappointing result. Understanding which implements to use and how to prepare the hair sets the foundation for success.
What tools do you need for cutting an A-line bob?
Professional haircutting shears stand as the most critical tool in your arsenal. Unlike regular scissors, haircutting shears feature sharper blades designed specifically for slicing through hair without causing damage or split ends. Look for shears between 5.5 and 6.5 inches long, as this size offers the best control for detailed work. The investment in quality shears pays off through cleaner cuts and less hand fatigue during the cutting process.
A fine-tooth cutting comb becomes your guide throughout the process. Choose one with both wide and narrow teeth sections, allowing you to work with different hair densities effectively. The comb should feel comfortable in your hand and move smoothly through hair without snagging. Metal tail combs often provide the precision needed for creating clean sections and checking angles.
Sectioning clips help maintain organization during the cut. You’ll need at least six sturdy clips that grip well without leaving marks in the hair. Butterfly clips or alligator clips work particularly well for holding larger sections, while smaller clips help secure precise subsections during detail work.
How should you prepare the hair before cutting?
Proper preparation begins with a thorough shampoo using a clarifying product to remove any buildup that might affect how the hair lies. Skip heavy conditioners or treatments that could weigh down the hair and obscure its natural fall. A light conditioner on the mid-lengths and ends provides enough slip for combing without affecting the hair’s natural texture.
After washing, towel-dry the hair until it’s damp but not dripping. The moisture level matters significantly – too wet, and you can’t see the hair’s natural movement patterns; too dry, and achieving clean lines becomes difficult. Aim for hair that feels slightly damp to the touch but doesn’t leave water on your hands when squeezed.
Comb through the hair completely, removing all tangles starting from the ends and working upward. This prevents pulling and ensures even tension throughout the cutting process. Pay special attention to the crown area and any natural cowlicks, as these will affect how the finished cut lies.
Should you cut the hair wet or dry?
The debate between wet and dry cutting continues among professionals, but for achieving a precise A-line bob, starting with damp hair offers several advantages. Wet hair shows its true length without the influence of natural texture or styling products. This allows for more accurate angle creation and helps ensure both sides match perfectly.
However, the technique called “cross-checking” works best on dry hair. After completing the initial cut on damp hair, dry and style it as the client normally would. This reveals any inconsistencies or areas needing refinement. The combination approach – wet cutting followed by dry detailing – produces the most professional results.
Consider the hair’s natural texture when deciding on moisture levels:
- Straight hair: Can be cut quite wet with excellent results
- Wavy hair: Best cut when slightly damp to see natural movement
- Curly hair: Benefits from being cut drier to account for spring-back
- Very thick hair: May need to be re-dampened during cutting to maintain control
What sectioning technique works best?
The sectioning pattern for an A-line bob differs from standard haircuts due to the graduated nature of the style. Begin by creating a horizontal part from ear to ear across the back of the head, just above the occipital bone. This establishes your first cutting section and serves as the foundation for the entire cut.
Next, create a center part from the front hairline to the nape. This divides the hair into two equal halves, ensuring symmetry throughout the cutting process. Some stylists prefer working with a slight side part if that’s how the client typically wears their hair, as this creates a more personalized result.
Within these main sections, create smaller subsections about half an inch thick. These manageable pieces allow for precise cutting and help maintain consistent tension. As you work up the head, maintain parallel sections to your original guideline. This systematic approach prevents confusion and ensures every piece of hair gets cut to the proper length.
For the side sections, use diagonal forward partings that follow the intended angle of the cut. These partings should start at the back and angle toward the face, mimicking the A-line shape you’re creating. This sectioning technique naturally guides your scissors to create the graduated effect without forcing unnatural angles.
The crown area requires special attention in sectioning. Create pie-shaped sections radiating from the crown point, as this allows the hair to fall naturally while maintaining the overall shape. Avoid horizontal sections at the crown, as these can create unwanted weight or disconnection in the finished style.
The Step-by-Step Cutting Process

Now comes the moment where preparation transforms into creation. The actual cutting process requires steady hands, keen eyes, and methodical progression through each section. Following a systematic approach ensures consistency and helps achieve that perfectly graduated A-line shape.
How do you establish the baseline?
Creating the baseline forms the foundation of your entire cut. Start at the center back, taking a horizontal section about half an inch thick from your initial parting. Comb this section straight down and determine your shortest length – this becomes your primary guide. Cut straight across at the desired length, typically somewhere between the hairline and the shoulders depending on the client’s preference.
The key to a strong baseline lies in maintaining consistent tension and keeping the hair perpendicular to the floor. Any deviation in angle at this stage will compound throughout the cut. Work slowly and deliberately, checking multiple times that both sides of this initial section are perfectly even. This first cut determines everything that follows.
After establishing the center baseline, work outward toward each ear, maintaining the same length. Use a combination of point cutting and slide cutting techniques to create a soft edge rather than a harsh line. This creates movement and prevents the bob from looking too severe or helmet-like at the back.
What’s the proper angle for graduation?
Determining the correct graduation angle requires visualizing the finished shape before making any cuts. The angle typically ranges from 30 to 45 degrees for a classic A-line bob, though more dramatic styles might use steeper angles. The key is maintaining consistency throughout the cut while gradually increasing the angle as you move forward.
To create the graduation, elevate each new section slightly higher than the previous one. If your baseline was cut at zero elevation (straight down), your next section might be held at a 15-degree angle, the following at 30 degrees, and so on. This progressive elevation creates the stacked effect at the back while maintaining length through the sides.
Use your fingers as a guide, creating a diagonal line from the shortest point at the back to your intended length at the front. This visual guide helps maintain the proper angle as you work through each section. Remember that the angle compounds – small changes in elevation create dramatic differences in the final shape.
How do you create the A-line shape?
The transformation from a standard bob to an A-line masterpiece happens through strategic sectioning and cutting angles. After establishing your graduated back sections, shift focus to the sides. Take diagonal forward sections, starting from behind the ear and angling toward the face. These sections should follow the intended line of the cut.
Connect each new section to the previously cut guide, but allow for increased length as you move forward. The trick lies in over-directing the hair slightly back while cutting. This technique ensures the hair falls forward into the correct A-line position when released. Without this over-direction, the sides may appear disconnected from the back.
As you approach the front sections, the length difference becomes more pronounced. The hair framing the face might be several inches longer than your starting point at the nape. Maintain smooth transitions by taking smaller sections and checking frequently. The goal is a seamless flow from short to long without any visible steps or harsh lines.
What techniques ensure symmetry?
Achieving perfect symmetry in an A-line bob requires constant vigilance and multiple checking methods. Cross-checking serves as your primary tool for ensuring both sides match. Pull sections from each side forward and compare lengths directly in front of the face. Any discrepancies become immediately obvious using this technique.
Here are essential symmetry checks to perform throughout the cutting process:
- Length comparison: Pull corresponding sections from each side to the center
- Visual balance: Step back frequently to assess the overall shape
- Reference points: Use facial features like ears and jawline as guides
- Tension matching: Ensure equal tension when cutting each side
- Angle consistency: Check that graduation angles match on both sides
Another effective technique involves using a handheld mirror to show different angles while cutting. This allows you to see how the hair falls naturally and make adjustments before moving to the next section. Taking photos from multiple angles also helps identify any asymmetry that might not be obvious from one viewpoint.
How do you check and refine the cut?
The refinement stage separates good cuts from great ones. After completing the basic shape, dry the hair completely and style it as intended. This reveals the true line of the cut and highlights any areas needing attention. Look for weight distribution, checking that the A-line shape appears balanced and intentional rather than accidental.
Begin refinement by addressing any heavy areas. Use point cutting or slithering techniques to remove bulk without affecting the overall length. Pay particular attention to the transition zones where different sections meet. These areas often need subtle blending to create that seamless flow characteristic of a well-executed A-line bob.
The perimeter requires special attention during refinement. While the initial cut created the basic shape, the finishing touches perfect the line. Use minimal tension and cut with the scissors slightly open, creating a softer edge that moves naturally. This technique prevents the severe, blunt look that can make a bob appear dated or harsh.
Check the cut in motion by having the client shake their head gently. The hair should fall back into the intended shape without revealing any uneven sections. If certain pieces stick out or don’t blend properly, address them individually rather than recutting entire sections. Sometimes a few strategic snips can perfect the overall shape without major modifications.
Finally, style the hair using the client’s typical methods and products. This final check ensures the cut works with their daily routine and reveals any last adjustments needed. The goal is a cut that looks professionally done whether styled elaborately or simply air-dried.
Professional Tips and Common Mistakes

Years of experience in creating A-line bobs reveal patterns of common errors and professional secrets that make the difference between an adequate cut and an exceptional one. Understanding these insights helps avoid frustrating mistakes while incorporating techniques that elevate your work.
What are the most common cutting errors?
The most frequent mistake involves cutting the initial guide too short at the nape. Once established, you cannot add length back, and a too-short baseline forces the entire cut higher than intended. Always start conservatively – you can remove more length, but you cannot replace it. Beginning slightly longer than the final desired length provides room for adjustments and refinements.
Another prevalent error occurs when stylists fail to maintain consistent sectioning throughout the cut. Irregular sections create uneven weight distribution, resulting in a lopsided or chunky appearance. Each section should mirror the thickness and angle of previous ones. Using clips to pre-section the entire head before beginning helps maintain this consistency.
Over-graduation represents another common pitfall. In enthusiasm to create a dramatic A-line, some stylists create too steep an angle at the back, resulting in a disconnected appearance between the back and sides. The graduation should flow naturally, creating a smooth transition rather than an obvious shelf or line of demarcation.
Poor body position while cutting also leads to problems. Standing directly behind the client often causes unintentional asymmetry, as you naturally favor your dominant side. Instead, position yourself at an angle, moving around the client to maintain proper perspective. This movement ensures equal attention to both sides and helps identify any developing imbalances.
How can you fix uneven sections?
Discovering unevenness mid-cut requires calm assessment rather than panic. First, identify whether the issue stems from incorrect length or improper graduation. Length discrepancies usually appear as one side hanging lower than the other, while graduation problems manifest as different angles or weight distribution between sides.
For length issues, avoid the temptation to immediately cut the longer side to match. Instead, analyze why the discrepancy occurred. Often, uneven sectioning or inconsistent tension caused the problem. Re-section both sides identically and check your guide carefully before making corrections. Sometimes, simply adjusting tension equalizes apparent length differences.
Graduation inconsistencies require a different approach. Return to your baseline and work systematically through each elevation level, comparing sides at every stage. Use your comb to create identical angles on both sides, checking that your body position and hand placement remain consistent. Small adjustments at each level compound into significant corrections by the time you reach the front sections.
When fixing mistakes, work incrementally. Making dramatic corrections often creates new problems. Instead, remove small amounts while constantly comparing both sides. This methodical approach might take longer but produces superior results compared to hasty fixes that potentially worsen the situation.
What texturizing techniques work best?
Texturizing transforms a technically correct A-line bob into a modern, wearable style. The goal involves removing bulk while maintaining the structural integrity of the cut. Different techniques suit different hair types and desired outcomes.
Point cutting works exceptionally well for creating soft, piece-y texture along the perimeter. Hold your scissors vertically and make small, precise cuts into the ends. This technique removes minimal length while creating movement and preventing the blunt, heavy look that can age a bob. Work systematically around the entire perimeter, paying special attention to the front sections where movement is most noticeable.
For internal texture, sliding or slithering techniques prove invaluable. These methods remove weight from within the cut without affecting the perimeter line. Position your scissors at an angle and gently slide them along small sections of hair, removing bulk while creating subtle layers. This technique works particularly well in the crown area where natural volume is desired.
Here’s when to apply specific texturizing methods:
- Dense hair: Aggressive thinning throughout to remove bulk
- Fine hair: Minimal texturizing, focus on the ends only
- Curly texture: Careful point cutting to prevent frizz
- Straight hair: Combination of techniques for movement
- Thick hair: Channel cutting to create internal movement
How do you customize for different hair types?
Fine hair requires special consideration when creating an A-line bob. The graduation at the back should be more subtle to maintain the illusion of thickness. Avoid over-texturizing, as this can make already fine hair appear thinner. Instead, focus on creating clean lines and using the natural fall of the hair to create movement. Consider leaving the perimeter slightly thicker to give the appearance of fuller hair.
Thick hair presents opposite challenges. The abundant density can create an overly triangular shape if not properly managed. Start by removing bulk from the interior sections before establishing your perimeter. This prevents the dreaded “pyramid” effect where the hair bells out rather than maintaining the sleek A-line silhouette. Deeper graduation angles work well with thick hair, as the natural weight helps maintain the shape.
Curly and wavy textures demand a completely different approach. The natural spring in the hair means cutting it longer than the desired finished length. Work with the hair in its natural state rather than fighting against it. For wavy hair, enhance the natural movement by cutting with the wave pattern rather than against it. Curly hair benefits from being cut dry or nearly dry to accurately judge where each curl will settle.
Color-treated or chemically processed hair often has different density throughout. The ends might be more porous and damaged, requiring gentle handling and minimal texturizing. Use sharper shears to prevent further damage and consider wet cutting to better control the damaged portions. The goal remains creating a beautiful shape while maintaining the hair’s integrity.
Each hair type benefits from slightly different finishing products and styling techniques. Fine hair needs lightweight volumizers, thick hair requires smoothing products, and textured hair often needs moisture-rich styling creams. Understanding these needs helps create a cut that not only looks great in the salon but remains manageable for daily styling.
Styling and Maintenance
A perfectly cut A-line bob only reaches its full potential with proper styling and maintenance. The techniques used after the cut determine whether the style looks professionally fresh every day or quickly loses its shape and impact.
How do you style an A-line bob after cutting?
Fresh from the cutting chair, the styling process sets the standard for how the client will recreate the look at home. Begin with a lightweight styling product distributed evenly through damp hair. The product choice depends on the desired finish – smoothing cream for sleek looks, mousse for volume, or texturizing spray for piece-y definition.
The blow-drying technique makes a significant difference in the final appearance. Use a round brush to create subtle bend at the ends, directing the hair forward to enhance the A-line shape. Start at the nape, working in sections that mirror those used during cutting. This methodical approach ensures even drying and prevents frizz or flyaways.
For the signature smooth finish, angle the blow dryer downward along the hair shaft. This technique seals the cuticle and creates shine while reinforcing the forward movement of the cut. The concentrator nozzle attachment helps direct airflow precisely, preventing the hair from becoming overly voluminous or losing its sleek silhouette.
What products work best for this cut?
Product selection can enhance or diminish the impact of an A-line bob. The graduated structure requires products that provide hold without stiffness, allowing the hair to move naturally while maintaining its shape. Lightweight formulations prevent the shorter back sections from becoming flat while avoiding weighing down the longer front pieces.
For daily styling, a volumizing mousse applied to the roots provides lift without creating bulk through the lengths. This proves especially important at the crown, where a flat appearance can make the entire cut look lifeless. Work the product through with fingers, lifting the roots slightly to create natural volume that lasts throughout the day.
Heat protection spray becomes essential for those who style daily with hot tools. The angled nature of this cut means the ends are particularly visible, making damage or dryness immediately apparent. Apply protection spray before any heat styling, concentrating on the mid-lengths and ends where damage typically occurs.
Finishing products add the final polish. A light-hold hairspray maintains the shape without creating helmet hair. For added shine and smoothness, a small amount of serum or oil applied to the very ends creates a healthy appearance. The key lies in using minimal product – too much quickly overwhelms the cut’s clean lines.
How often should you trim an A-line bob?
The structured nature of an A-line bob means regular maintenance is essential for preserving its shape. Unlike longer styles that can grow out gracefully, this cut requires trimming every 4-6 weeks to maintain the precise angles and graduation. The short back section grows out most noticeably, quickly losing the stacked effect that defines the style.
Signs that a trim is needed include the back section touching the collar, loss of the distinctive angle between back and front, or the overall shape appearing heavy and shapeless. Some clients prefer booking standing appointments every four weeks to maintain the cut at its optimal length and shape.
Between professional trims, the style’s longevity depends on proper home care. Regular conditioning treatments keep the hair healthy and manageable, making styling easier and helping the cut maintain its shape. Avoid heavy treatments that might weigh down the hair and obscure the cut’s lines.
What daily care keeps the shape intact?
Maintaining an A-line bob’s polished appearance requires establishing a consistent daily routine. Night care proves particularly important – the way you protect the style while sleeping affects how it looks in the morning. Using a silk or satin pillowcase reduces friction that can create frizz or disturb the hair’s smooth surface.
Morning refresh techniques can revive the style without complete restyling. A quick blast of cool air from the blow dryer, directed downward, often suffices to smooth any sleep-disturbed sections. For more stubborn areas, lightly mist with water and redirect with a brush and blow dryer. This targeted approach saves time while maintaining the cut’s intended shape.
Between washes, dry shampoo helps maintain volume at the roots without adding product buildup that might weigh down the style. Apply it before bed rather than in the morning – this allows the product to absorb oils overnight, resulting in fresher-looking hair with more volume when you wake.
The way you handle the hair throughout the day also impacts its appearance. Avoid constantly tucking the front sections behind your ears, as this can create unwanted bends or kinks in the hair. If you must secure the hair, use smooth clips positioned carefully to avoid creating dents in the sleek surface.
How can you refresh the cut between salon visits?
While nothing replaces professional maintenance, certain techniques can extend the life of your A-line bob between appointments. Learning to trim your own bangs or face-framing pieces helps maintain the front view of the cut, though the back should always be left to professionals.
Simple styling changes can also refresh the look. Alternating between sleek straight styles and subtle waves creates variety while working with the cut’s structure. Using hot tools to create a slight bend at the ends can temporarily disguise grown-out sections by redirecting the hair’s movement.
Strategic use of accessories offers another refresh option. Decorative clips or pins placed asymmetrically can create visual interest while disguising any areas where the cut has lost its precision. Choose accessories that complement rather than compete with the cut’s clean lines.
DIY treatments between salon visits keep the hair healthy and manageable. Weekly deep conditioning masks maintain shine and smoothness, making the cut appear fresher longer. Clarifying treatments every two weeks remove product buildup that might weigh down the style or make it appear dull and lifeless.
When the cut inevitably grows beyond its ideal shape, temporary styling adjustments can buy time until your next appointment. Creating more volume at the crown compensates for length at the back, while smoothing the front sections extra sleek can maintain the illusion of the proper angle. These tricks work temporarily but shouldn’t replace regular professional maintenance.
Mastering Your A-Line Bob
Creating and maintaining the perfect A-line bob combines technical precision with artistic vision. This sophisticated cut rewards attention to detail with a versatile, flattering style that transitions seamlessly from professional settings to casual occasions. The graduated silhouette offers endless possibilities for personalization while maintaining its distinctive architectural appeal.
Success with this cut stems from understanding its fundamental structure and respecting the precision required to execute it properly. Whether you’re crafting this style as a professional or working with your stylist to achieve your ideal look, the principles remain constant: careful sectioning, consistent angles, and regular maintenance create the polished result that makes this classic cut eternally modern. The investment in learning proper techniques and maintaining the style pays dividends in confidence and compliments every time you step out with your perfectly angled bob.
Frequently Asked Questions
Q: How long does it take to cut an A-line bob?
A: A professional A-line bob typically takes 45-60 minutes to cut properly. This includes consultation, shampooing, the actual cutting process, and basic styling. More dramatic angles or very thick hair might require additional time.
Q: Can I cut an A-line bob on myself?
A: While technically possible, cutting your own A-line bob presents significant challenges. The back sections require angles impossible to achieve on yourself, and creating symmetry without proper sightlines proves extremely difficult. Professional cutting ensures the best results.
Q: What’s the difference between an A-line bob and an inverted bob?
A: Both feature shorter back sections and longer fronts, but an A-line bob maintains a more gradual angle with weight distributed evenly. An inverted bob typically has more dramatic stacking at the back with a steeper angle of graduation.
Q: Will an A-line bob work with naturally curly hair?
A: Yes, A-line bobs work beautifully with curly hair when cut properly. The key involves cutting the hair dry or nearly dry to account for shrinkage and working with the natural curl pattern rather than against it.
Q: How much does an A-line bob typically cost?
A: Pricing varies significantly by location and salon level, typically ranging from $45-150. The precision required for this cut often places it at a slightly higher price point than basic one-length cuts.
Q: Can I straighten my A-line bob every day without damaging it?
A: Daily heat styling is possible with proper protection. Always use heat protectant spray, keep tools at moderate temperatures, and incorporate weekly deep conditioning treatments to maintain hair health.
Q: What face shape should avoid an A-line bob?
A: While A-line bobs flatter most face shapes, those with very long faces might find the downward angle elongates their features further. However, adjusting the angle and length can make this cut work for any face shape.
Q: How do I know if my A-line bob is cut correctly?
A: A properly cut A-line bob shows smooth graduation from back to front without visible lines or disconnection. The hair should fall naturally into place when dry, maintain its shape throughout the day, and look balanced from all angles.