
Key Takeaways
- Espresso brown is a rich, deep brown shade with cool undertones that differs from other browns through its coffee-inspired depth and how it shifts in various lighting conditions.
- Match the color to your skin tone – espresso brown works especially well with cool and neutral undertones, while warm skin tones should consider the color carefully and may need adjustments.
- Home coloring requires proper preparation and technique – choose the right dye for your starting hair color, follow pre-color prep steps, and maintain careful processing times for best results.
- Professional methods offer more dimension and customization – salons can create depth through techniques like balayage, glossing treatments, and color correction when needed.
- Maintain your color with strategic care – use color-safe products, adjust washing frequency, protect from heat styling, and schedule regular touch-ups to prevent fading and brassiness.
- Consult with a colorist for personalized advice – discuss your natural hair color, desired outcome, and maintenance commitment to ensure espresso brown is the right choice for you.
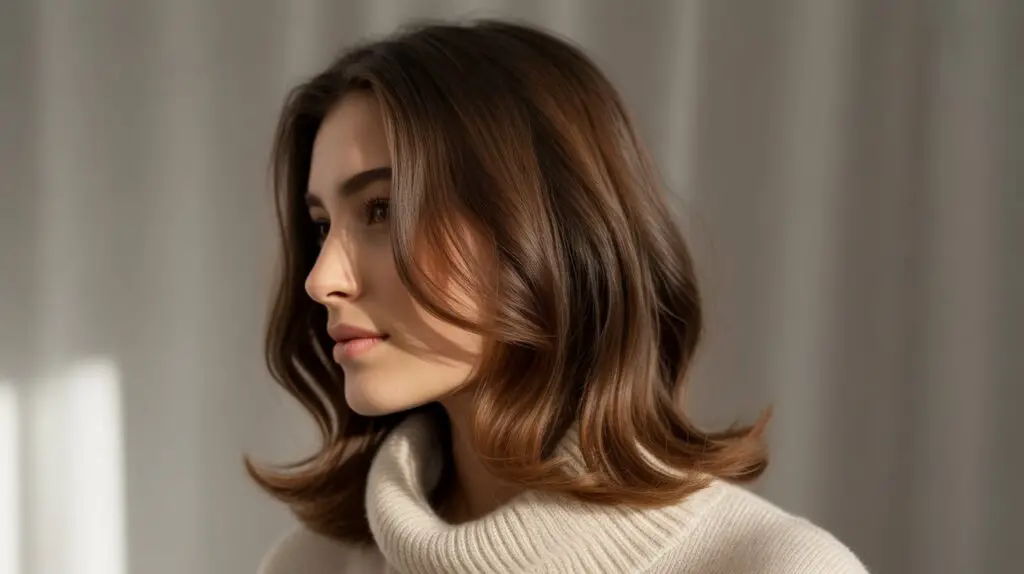
Espresso brown hair has become one of the most requested colors in salons this year, and for good reason. This rich, coffee-inspired shade strikes the perfect balance between dark and light, offering depth without the maintenance demands of lighter colors. The color works like a chameleon, appearing almost black in some lights while revealing warm chocolate undertones in the sun.
Women searching for a sophisticated yet approachable hair color find their answer in this particular shade. Unlike flat, one-dimensional browns that can look harsh or boring, espresso brown creates natural-looking dimension that flatters virtually every complexion. The color also transitions beautifully from summer to winter, making it a year-round option that won’t require seasonal adjustments.
We’ll cover here everything needed to achieve and maintain this gorgeous color. From understanding what makes it different from other brown shades to choosing between at-home and salon applications, plus essential maintenance tips to keep your color looking fresh for weeks. Ready to transform your hair into the perfect cup of espresso? Let’s get started.
What Makes Espresso Brown Hair So Special
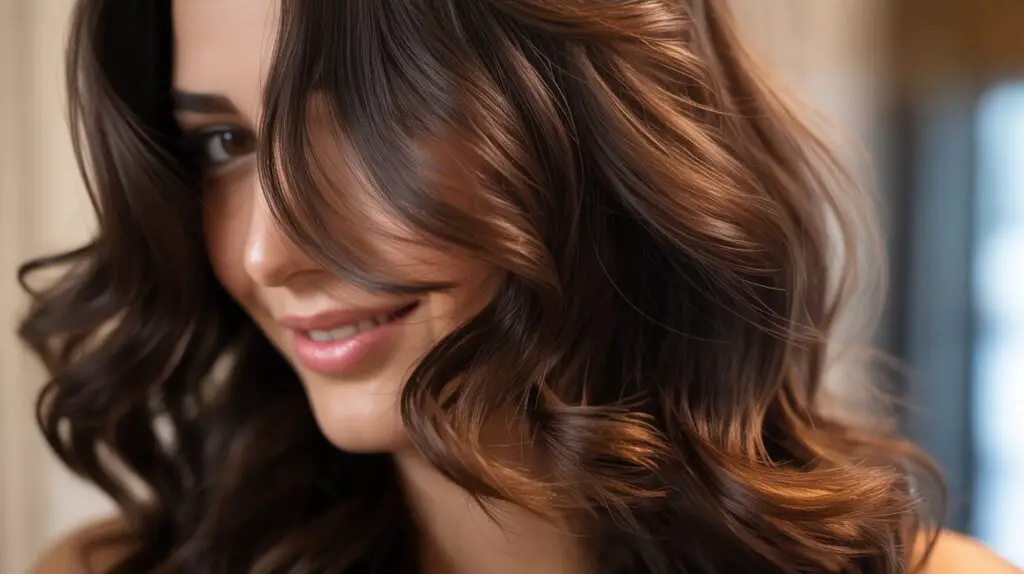
Espresso brown sits at that sweet spot between dark chocolate and medium brown, creating a color that’s neither too light nor too dark. Think of your favorite coffee shop’s espresso shot – that deep, rich brown with subtle hints of caramel when the light hits it just right. This color typically falls between levels 3 and 4 on the hair color chart, though variations exist depending on your starting point and desired intensity.
The exact shade breakdown
Understanding the components of espresso brown helps you communicate effectively with colorists or choose the right box dye. The base consists of a level 3-4 brown, usually with neutral to warm undertones. Red and gold pigments get carefully balanced to prevent the color from looking flat or ashy. Some formulations include tiny amounts of violet to neutralize any unwanted orange tones that might develop over time.
The magic happens in the ratio of these pigments. Too much red creates mahogany, while excessive gold shifts toward caramel. Professional colorists often mix two or three different shades to achieve the perfect espresso tone for each client’s hair texture and natural color.
Difference from other browns
Many people confuse espresso with other brown shades, but distinct differences exist between each variation. Chocolate brown typically runs lighter and warmer, sitting closer to level 5 on the color chart. Mocha brown incorporates more obvious warm tones, sometimes appearing reddish in certain lighting. Meanwhile, coffee brown tends toward cooler undertones with less dimension than espresso.
Espresso brown’s uniqueness comes from its ability to look almost black indoors while revealing rich brown tones outdoors. This duality gives hair movement and life that other dark colors can’t match. The shade also reflects light differently than standard dark browns, creating subtle shine without appearing overly glossy or artificial.
The undertones that matter
The undertone selection in your espresso formula determines whether your hair looks natural or off-putting against your skin. Neutral undertones work for most people, combining equal parts warm and cool pigments. These balanced formulas prevent the color from clashing with your complexion regardless of lighting conditions.
Warm undertones add golden or reddish hints to the base color. These work particularly well for women with olive or golden skin tones, creating harmony between hair and complexion. The warmth also helps the color appear softer and more approachable than cooler alternatives.
Cool undertones incorporate ash or violet pigments to counteract brassiness. Women with pink or fair skin often prefer these formulations, as they prevent the hair from appearing too warm or orange-toned. However, going too cool can result in a flat, lifeless appearance that ages some complexions.
How lighting affects the color
Natural sunlight reveals the true complexity of espresso brown hair. Direct sun exposure brings out hidden warm tones, making the color appear lighter and more dimensional than it does indoors. Golden hour light particularly flatters this shade, creating an almost halo effect around the hair.
Indoor lighting tells a different story. Fluorescent office lights tend to flatten the color, making it appear darker and less dimensional. Warm incandescent bulbs enhance any golden undertones present in the formula. LED lights vary widely in their effect, with cooler temperatures making the hair look darker and warmer ones bringing out chocolate notes. Understanding these variations helps set realistic expectations for how your hair will look in different environments.
Maintenance expectations
Before committing to espresso brown, consider the upkeep involved. The good news? This shade requires less maintenance than lighter colors or fashion shades. Root growth blends more naturally with the darker base, extending time between touch-ups to 6-8 weeks for most women.
Color fading happens gradually with this shade rather than dramatically. The hair typically lightens by half a level over 4-6 weeks, maintaining an attractive appearance throughout the fade process:
Weeks 1-2: Color appears richest and most dimensional
Weeks 3-4: Slight softening occurs but shade remains true
Weeks 5-6: Noticeable lightening, especially at ends
Weeks 7-8: Time for a refresh or gloss treatment
The relatively low maintenance makes espresso brown ideal for busy women or those new to coloring their hair. You won’t need weekly toning treatments or constant touch-ups like with blonde or pastel shades.
Is Espresso Brown Right for Your Skin Tone?
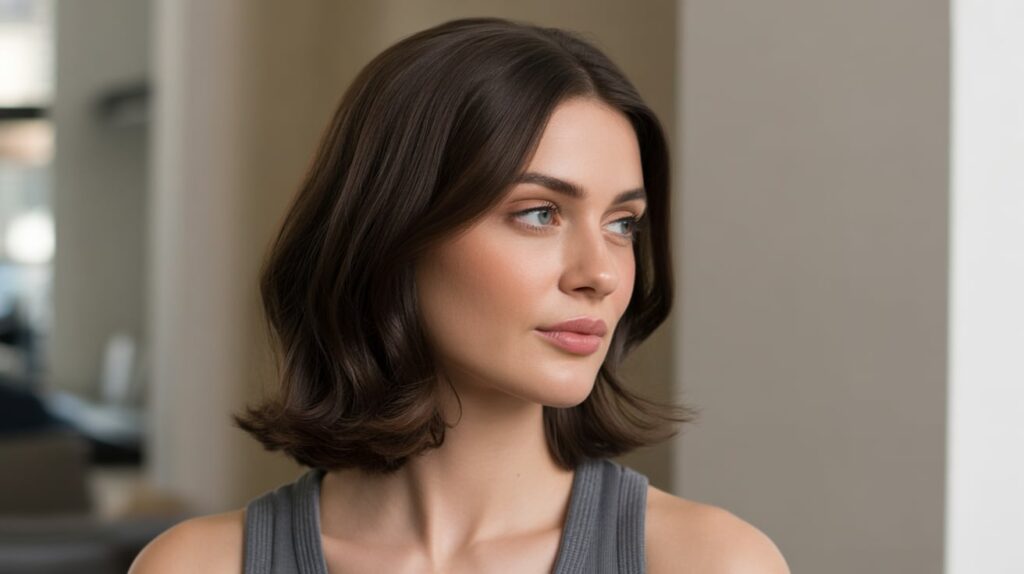
Determining whether espresso brown complements your complexion requires more than just liking how it looks in photos. Your skin’s undertones, natural hair color, and even eye color all play roles in how well this shade will work for you. The versatility of this particular color means most women can wear some variation of it successfully, though certain combinations create especially stunning results.
Cool skin tones and espresso brown
Women with cool undertones often worry that warm-based hair colors will clash with their complexion. Pink, red, or blue undertones in the skin typically indicate a cool complexion. If silver jewelry looks better on you than gold, or your veins appear blue rather than green, you likely fall into this category.
Espresso brown actually works beautifully for cool-toned women when formulated correctly. The key lies in choosing a version with cooler undertones – think espresso with a hint of ash rather than caramel. This prevents the hair from looking brassy or orange against your skin. The depth of the color also creates contrast that makes fair, cool-toned skin appear porcelain-like and luminous.
Adding subtle ash tones to your espresso formula neutralizes any warmth that might compete with your complexion. Your colorist can customize the mixture to include violet or blue-based browns that harmonize with your skin’s natural coolness. The result? Hair that looks expensive and intentional rather than mismatched.
Warm skin tones considerations
Golden, peachy, or yellow undertones characterize warm skin tones. If you tan easily, look better in gold jewelry, or see green-tinted veins, you probably have warm undertones. These complexions practically glow when paired with the right version of espresso brown.
For warm-toned women, espresso brown with golden or caramel undertones creates a harmonious, sun-kissed effect. The warmth in both hair and skin work together rather than competing. This combination often makes skin appear healthier and more radiant, particularly in natural light. The richness of the shade prevents it from washing out warmer complexions the way some lighter browns might.
Your colorist might suggest adding subtle copper reflects or golden ribbons through the espresso base. These small touches enhance the warmth without taking away from the sophisticated depth that makes this color so appealing. Think espresso with a splash of cream rather than black coffee.
Neutral undertones advantages
Lucky women with neutral undertones can pull off virtually any variation of espresso brown. Neither distinctly warm nor cool, neutral skin has balanced undertones that adapt to different hair colors easily. If you look equally good in silver and gold jewelry, you probably have neutral undertones.
This flexibility means you can choose your espresso shade based on personal preference rather than strict color theory rules. Want to warm up your look for summer? Go for a golden-tinged version. Prefer something more dramatic for fall? Choose a cooler, deeper espresso. Your skin won’t fight against either option.
Neutral undertones also mean you can play with dimension more freely. Combining warm and cool tones within the same espresso base creates multi-dimensional color that changes appearance in different lights – something that might look unnatural on strongly warm or cool complexions.
Eye color pairings
Your eye color influences how espresso brown hair frames your face. Brown eyes paired with this hair shade create a monochromatic look that feels cohesive and polished. The similar tones make brown eyes appear larger and more prominent, especially when the hair includes subtle warm highlights that echo golden flecks in the iris.
Blue eyes pop dramatically against the dark backdrop of espresso hair. The contrast makes even pale blue eyes appear more vibrant and noticeable. Cool-toned versions of the shade work particularly well with blue eyes, creating an almost Snow White effect that feels both classic and modern.
Green eyes benefit from espresso brown’s versatility. The color brings out both the blue and yellow components typically found in green eyes, making them appear more complex and interesting. Warm undertones in the hair emphasize any golden rings around the pupil, while cooler tones highlight blue-green aspects of the iris. Hazel eyes experience similar benefits, with the dark hair making their color-changing properties more apparent.
Natural hair color starting points
Your starting hair color determines how easily you can achieve espresso brown and what processes you’ll need. Natural brunettes have the easiest transition, often requiring just a single process to deepen or enrich their existing color. The hair already contains the necessary warm pigments that create depth in espresso shades.
Naturally black hair might need lightening to achieve true espresso brown rather than simply tinted black. This process requires careful handling to prevent damage while lifting the hair enough to accept the brown tones. The result often looks more natural than keeping pure black hair, softening harsh features and adding movement.
Blonde or light brown hair needs significant pigment deposit to reach espresso depths. The process typically involves filling the hair with warm tones first, then applying the final color:
Pre-pigmentation: Adds missing warm tones to prevent ash or green results
Color application: Deposits the espresso shade over prepared hair
Gloss treatment: Seals in color and adds shine
Toning if needed: Adjusts any unwanted undertones
Previously colored hair, especially if it’s been bleached or highlighted, requires special consideration. Your colorist needs to assess the hair’s condition and existing pigments before proceeding. Sometimes a color correction session comes before achieving your desired espresso shade.
How to Achieve Espresso Brown Hair at Home
Coloring your hair at home can save money and time, but achieving salon-quality espresso brown requires careful preparation and technique. The process isn’t particularly difficult, but skipping steps or rushing through application often leads to uneven color or unexpected results.
Choosing the right dye
Box dyes labeled “espresso brown” vary significantly between brands, so reading reviews and checking example photos helps narrow down options. Look for permanent or demi-permanent formulas rather than temporary colors that won’t provide the rich depth this shade requires. Permanent color lasts longest but involves more commitment, while demi-permanent options fade gradually over 6-8 weeks.
Quality matters when selecting at-home color. Drugstore brands have improved considerably, with many offering conditioning formulas that minimize damage. However, professional-grade colors available at beauty supply stores often provide more predictable results and better gray coverage. The extra cost typically equals better color payoff and longevity.
Consider your hair’s current condition and color when selecting a formula. Virgin hair accepts color differently than previously processed hair. If your hair has been bleached, highlighted, or colored recently, choose a formula designed for color-treated hair. These gentler formulas deposit pigment without additional lightening that could cause damage or unpredictable results.
Pre-color preparation steps
Preparation begins 48 hours before coloring with an allergy test. Apply a small amount of mixed color behind your ear and wait the full two days. Seems excessive? Allergic reactions to hair dye can be severe, making this step non-negotiable for first-time users of any brand.
The day before coloring, clarify your hair to remove product buildup that might prevent even color absorption. Use a clarifying shampoo or make your own by mixing regular shampoo with a tablespoon of baking soda. Skip conditioner after clarifying – you want your hair’s cuticles open and ready to accept color.
On coloring day, work with dry, unwashed hair. Natural oils protect your scalp from irritation while helping color process evenly. Section your hair into four quadrants using clips, making application more manageable. Protect your hairline, ears, and neck with petroleum jelly to prevent skin staining. Having all supplies ready prevents scrambling mid-process: gloves, applicator bottle or bowl and brush, timer, old towel, and wide-tooth comb.
Application techniques
Start application at your roots if you’re covering gray or want uniform color. For a more natural look with dimension, begin mid-shaft and work toward ends, applying to roots last. This technique prevents hot roots – that unnaturally bright band of color near your scalp that screams “home dye job.”
Work in thin sections no wider than half an inch, ensuring complete saturation. Espresso brown’s darkness means missed spots become glaringly obvious once hair dries. Use your applicator bottle’s nozzle or a tinting brush to paint color onto each section systematically. Don’t just squeeze color on top and hope it penetrates – work it through with gloved fingers or a wide-tooth comb.
Pay special attention to resistant areas like temples and hairline where gray often concentrates. These sections might need extra product or longer processing time. The hair at your nape processes faster due to body heat, so some colorists recommend applying there last to prevent over-processing.
Back sections challenge even experienced home colorists. Use two mirrors or enlist help for hard-to-reach areas. Alternatively, use the applicator bottle to create horizontal parts across the back of your head, applying color along each part line then combing through to distribute.
Processing time considerations
Processing time varies based on your hair’s starting color, texture, and desired results. The package instructions provide general guidelines, but your hair might need adjustments. Fine hair typically processes faster than coarse hair. Gray hair often needs the full recommended time or even slightly longer.
Room temperature affects processing speed. Warm environments accelerate chemical reactions, while cold rooms slow them down. If your bathroom feels chilly, consider using a processing cap to trap body heat. However, avoid using heat from a blow dryer unless specifically instructed, as this can lead to uneven results or damage.
Check your color’s progress five minutes before the recommended time ends:
Too light: Continue processing up to 5-10 minutes extra
Perfect: Rinse immediately
Too dark: Rinse right away (though espresso brown rarely goes too dark)
Uneven: Apply more product to lighter areas only
Never exceed maximum processing time listed on your product. Leaving color on longer won’t make it darker, but it will damage your hair unnecessarily.
Post-color care immediately after
Rinsing technique matters more than most people realize. Use lukewarm water – hot water opens cuticles and releases fresh color, while cold water might not remove all chemical residue. Rinse until water runs completely clear, which takes longer than you’d expect with dark colors like espresso brown. Any remaining dye will stain pillowcases and towels later.
After rinsing, apply the conditioner included with your color kit. These conditioners are specifically formulated to seal cuticles and lock in fresh color. Leave it on for the full recommended time, usually 2-3 minutes. This step isn’t optional – skipping it leaves hair vulnerable to rapid fading and damage.
Wait at least 48 hours before shampooing your newly colored hair. This allows color molecules to fully oxidize and anchor within the hair shaft. When you do shampoo, use a sulfate-free formula designed for color-treated hair. The wrong shampoo can strip your beautiful new espresso shade within a few washes.
Style gently for the first week. Your hair’s more porous after coloring, making it prone to heat damage. If you must use hot tools, apply a heat protectant first and use lower temperatures than usual. Deep condition weekly to maintain your hair’s health and color vibrancy.
Professional Salon Methods for Perfect Espresso Brown
Walking into a salon for espresso brown hair color opens up possibilities that box dye simply can’t match. Professional colorists use techniques and products that create dimension, ensure even coverage, and customize the shade to flatter your specific features. Understanding these methods helps you communicate effectively with your stylist and know what to expect during your appointment.
Single process coloring
Single process coloring remains the most straightforward salon method for achieving espresso brown. Your colorist mixes a custom formula based on your hair’s current level, underlying pigments, and desired outcome. This isn’t guesswork – they use their knowledge of color theory and professional-grade products to create your perfect shade.
The process starts with a thorough consultation where your colorist examines your hair’s condition, discusses your lifestyle and maintenance preferences, and possibly performs a strand test. They’ll ask about previous chemical treatments, as this history affects how your hair accepts new color. Honesty about box dyes or other salon visits prevents unexpected reactions or results.
Professional application differs from at-home methods in precision and speed. Your colorist sections your hair meticulously, ensuring every strand receives adequate product. They know exactly where to apply color first based on your hair’s porosity patterns and natural hot spots. The whole process typically takes 45-90 minutes, including processing time.
What really sets professional single process apart? The ability to adjust mid-service. If your colorist notices certain sections processing faster or slower, they can modify timing or add product accordingly. They also have access to different developer strengths and additives that customize the formula specifically for your hair’s needs.
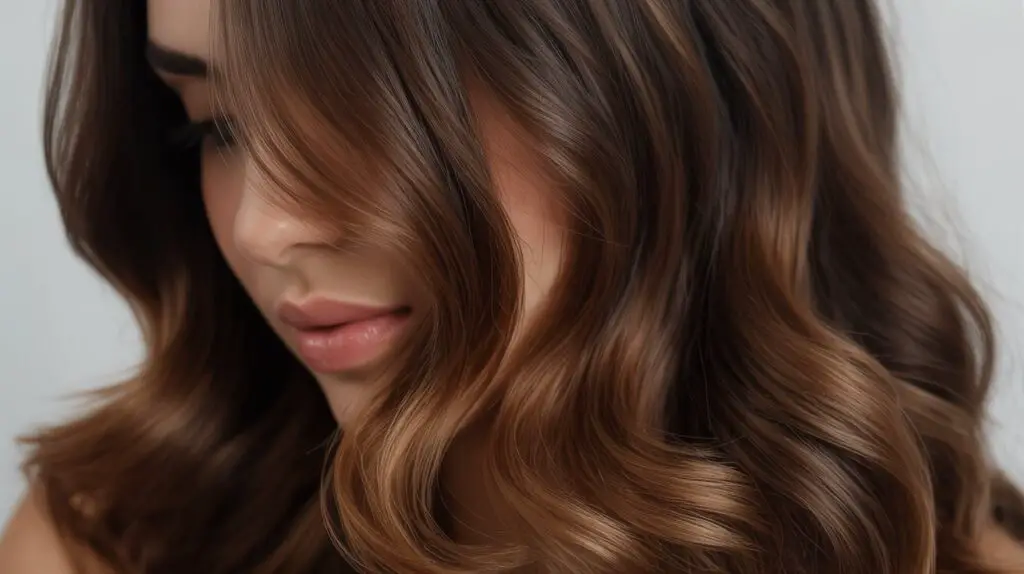
Balayage techniques for dimension
Balayage creates the lived-in, dimensional look that makes espresso brown hair appear natural and expensive. Rather than applying color uniformly, your stylist hand-paints highlights and lowlights throughout your hair. For espresso brown, this might mean adding caramel ribbons or deeper chocolate shadows that create movement and depth.
The technique starts with your colorist sectioning your hair based on your natural growth patterns and face shape. They paint color onto select pieces, focusing on areas where sun would naturally lighten your hair. The result looks effortless, like you’ve spent summers at the beach rather than hours in a salon chair.
Processing happens in open air rather than with foils, allowing the colorist to monitor development and creating softer transitions between colors. Some sections might process for different lengths of time, adding to the natural-looking variation. The entire process takes 2-3 hours but results in color that grows out beautifully without harsh lines.
Glossing treatments
Glossing treatments transform good espresso brown into spectacular espresso brown. These semi-permanent treatments deposit shine and tone without lifting or dramatically changing your base color. Think of them as Instagram filters for your hair – enhancing what’s already there while correcting any unwanted tones.
Professional glosses use different technology than at-home versions, penetrating more effectively while lasting longer. Your colorist can customize the gloss to add warmth, coolness, or neutral tones to your existing espresso shade. The treatment typically processes for just 20 minutes but makes a remarkable difference in how your color reflects light.
Many salons recommend glossing every 4-6 weeks between color appointments. This maintains vibrancy and shine while extending the life of your base color. Some colorists apply gloss immediately after coloring as a finishing step, sealing in the fresh color and adding mirror-like shine that lasts for weeks.
Color correction scenarios
Not every path to espresso brown is straightforward. Previous color treatments, box dye disasters, or damaged hair might require color correction before achieving your desired shade. Professional colorists have techniques and products to fix almost any color situation, though patience and realistic expectations are essential.
Common correction scenarios include removing old black box dye, evening out patchy home highlights, or transitioning from bleached hair to espresso brown. Each situation requires different approaches:
Box dye removal: Special color removers lift artificial pigment without bleaching
Uneven color: Selective application evens out darker and lighter areas
Brass correction: Purple or blue-based formulas neutralize unwanted warm tones
Filling blonde hair: Red and gold tones get added before brown application
Gray blending: Specific techniques ensure resistant grays accept color
Color correction often happens over multiple appointments to maintain hair health. Your colorist might recommend protein treatments between sessions or suggest a slightly lighter initial goal that transitions to true espresso brown once your hair recovers.
What to ask your colorist
Arriving prepared with questions ensures you and your colorist share the same vision. Start by showing inspiration photos, but understand that the exact shade might need adjusting for your skin tone and natural hair color. Ask how they’ll modify the formula to flatter your specific features.
Discuss maintenance honestly. Ask how often you’ll need touch-ups, what at-home care they recommend, and realistic expectations for how the color will fade. Understanding the true cost – both time and money – prevents disappointment later. Request product recommendations specifically for maintaining espresso brown, as different shades require different care strategies.
Technical questions help you understand the process and make informed decisions. Ask about developer strength, whether they recommend permanent or demi-permanent color, and if they suggest any pre-treatments for optimal results. Inquire about the salon’s policy on adjustments if the color isn’t quite right after processing.
Don’t hesitate to ask about your colorist’s experience with espresso brown specifically. Some stylists specialize in brunettes and understand the nuances of creating dimensional dark colors. Others might be blonde specialists who can achieve the color but won’t create the same sophisticated result as someone who works with brunettes regularly.
Finally, get specific about timing and pricing. Complex color services sometimes require scheduling extra time or booking multiple appointments. Knowing the full investment upfront prevents sticker shock and allows you to budget appropriately for maintaining your gorgeous new espresso brown hair.
Maintaining Your Espresso Brown Color
Once you’ve achieved that perfect espresso brown shade, keeping it looking fresh becomes your new priority. The rich depth of this color can fade into muddy brown or develop unwanted red tones without proper care. Smart maintenance strategies extend the time between salon visits while keeping your hair healthy and vibrant.
Washing frequency recommendations
The less you wash espresso brown hair, the longer it maintains its richness. Water alone causes color molecules to escape from the hair shaft, and each shampoo session accelerates this process. Most women with this shade find washing every 3-4 days optimal, though your specific routine depends on scalp oil production and lifestyle factors.
Between washes, dry shampoo becomes your best friend. Apply it before bed to absorb oils overnight, waking up with refreshed-looking hair. Focus application on roots only, as dry shampoo can dull the shine that makes espresso brown so attractive. Dark-tinted formulas prevent white residue that’s especially noticeable against this deep shade.
When you do wash, technique matters as much as frequency. Concentrate shampoo only on your scalp and roots where oil accumulates. Let suds run through lengths and ends during rinsing rather than scrubbing the entire hair shaft. This gentle approach removes necessary dirt and oil without stripping color from more porous mid-lengths and ends where fading happens fastest.
Water temperature significantly impacts color retention. Hot showers feel amazing but open hair cuticles, releasing color molecules with every rinse. Lukewarm water cleanses effectively while keeping cuticles relatively closed. End with a cool rinse to seal cuticles completely, locking in color and adding shine.
Color-safe product selection
Sulfate-free shampoos are non-negotiable for maintaining espresso brown. Sulfates effectively remove dirt and oil but also strip color molecules from your hair. Look for formulas specifically designed for color-treated brunette hair, as these often contain brown pigments that deposit with each wash, refreshing your shade between salon visits.
Conditioners for color-treated hair do more than just detangle. Quality formulas contain ingredients that help seal color molecules inside the hair shaft while providing necessary moisture. Apply conditioner from mid-length to ends, avoiding roots that can become greasy. Leave it on for at least two minutes – longer if your hair feels particularly dry.
Weekly deep conditioning treatments prevent the dryness that makes colored hair look dull and feel brittle. Alternate between protein treatments that strengthen and moisture masks that hydrate:
Protein treatments: Rebuild damaged hair structure, making it better at holding color
Moisture masks: Restore hydration lost during coloring, improving shine and manageability
Color-depositing masks: Refresh espresso tones while conditioning
Bond-building treatments: Repair chemical damage from coloring processes
Purple shampoo isn’t just for blondes. If your espresso brown develops unwanted warm or orange tones, a purple or blue-toned shampoo used once weekly can neutralize brassiness. Don’t overuse these products though – too much can leave brown hair looking ashy or gray.
Heat styling adjustments
Heat styling poses a major threat to espresso brown color longevity. High temperatures open cuticles and accelerate color fade, particularly at the ends where hair is most porous. Reducing heat styling frequency immediately improves color retention, but complete elimination isn’t realistic for most women.
Lower temperature settings achieve similar results without excessive damage. Most hair types can be styled effectively at 300-350°F rather than the 400°F+ many tools reach. Fine hair needs even less heat. The extra time required for styling at lower temperatures pays off in better color retention and overall hair health.
Heat protectant products become mandatory before any thermal styling. These create a barrier between your hair and styling tools while often providing additional benefits like UV protection or color-locking technology. Apply protectant to damp hair before blow-drying and again to dry hair before using flat irons or curling tools.
Alternative styling methods reduce reliance on heat tools. Overnight braids create waves without damage. Velcro rollers add volume using just blow dryer heat rather than direct iron contact. Air drying whenever possible gives hair a break from constant heat exposure. When you do use heat, make it count with styles that last multiple days.
Touch-up scheduling
Root touch-ups for espresso brown typically need scheduling every 6-8 weeks, though individual growth rates vary. Some women see noticeable regrowth at 4 weeks, while others can stretch to 10 weeks. Gray coverage needs determine frequency more than simple growth, as silver strands become visible against the dark base sooner than natural colored roots.
Between full color appointments, root touch-up products help extend your salon visits. Temporary root concealers in spray, powder, or stick form camouflage growth for special events or particularly busy periods. These wash out with shampooing, making them perfect for buying an extra week or two between appointments.
Professional glossing treatments at the halfway point between color services refresh your shade without the commitment or cost of full color. These 20-30 minute treatments add shine, correct any unwanted tones, and deposit enough pigment to revive fading color. Many salons offer gloss treatments as affordable maintenance options.
Preventing fade and brassiness
Sun exposure causes significant fading and color shifting in espresso brown hair. UV rays break down color molecules while lifting the hair’s natural underlying warmth. Wearing hats provides the best protection, but UV-protectant hair products offer defense when coverage isn’t practical. Look for leave-in treatments with SPF specifically formulated for hair.
Swimming requires special precautions to preserve your color. Chlorine strips color rapidly while turning brown hair greenish. Before swimming, wet your hair with clean water and apply a leave-in conditioner to create a barrier. Consider wearing a swim cap for extended pool time. Always rinse immediately after swimming and use a clarifying treatment weekly if you swim regularly.
Hard water minerals build up on hair, dulling espresso brown’s natural shine and sometimes creating an orange cast. Installing a shower filter removes many problematic minerals. Weekly clarifying treatments or apple cider vinegar rinses remove existing buildup. If you live in a hard water area, these preventive measures are essential for maintaining true color.
Product buildup affects color appearance even with proper washing. Styling products accumulate over time, creating a film that makes espresso brown look flat and lifeless. Monthly clarifying treatments remove this buildup, but follow immediately with deep conditioning since clarifying can be drying. Your color will look refreshed and more dimensional after removing product residue.
Environmental factors like pollution and cigarette smoke also affect color. These deposit particles on hair that dull shine and alter color perception. Regular gentle cleansing and protective products that shield hair from environmental damage help maintain your espresso brown’s vibrancy between salon visits. City dwellers especially benefit from anti-pollution hair products that create protective barriers against airborne particles.
Achieving that Perfect Espresso Brown Shade
Achieving that perfect espresso brown shade transforms more than just your appearance – it simplifies your beauty routine while delivering sophistication that works from boardroom to weekend brunch. This versatile color adapts to your lifestyle, whether you’re maintaining it with quick glosses every few weeks or stretching salon visits to every other month. The depth and dimension of properly executed espresso brown creates an expensive, polished look that lighter shades often struggle to achieve without constant upkeep.
Your path to espresso brown success starts with honest evaluation of your commitment level and choosing between professional or at-home application based on your skills and budget. Whatever route you take, proper maintenance using the techniques and products outlined here will keep your color looking fresh far longer than basic care alone. Those weekly deep conditioning treatments and strategic heat styling adjustments might seem tedious initially, but they quickly become second nature as you see how beautifully your color holds up over time.
Frequently Asked Questions
Q: Will espresso brown hair make me look older?
A: Not if chosen and applied correctly. Espresso brown with the right undertones for your skin actually creates a youthful, polished appearance. Single-tone black can age some people, but espresso brown’s dimensional quality adds movement and life that flatters mature faces while giving younger women sophisticated polish.
Q: Can I achieve espresso brown if I have naturally red hair?
A: Yes, natural redheads can achieve espresso brown, though the process requires neutralizing your hair’s red undertones first. Your colorist will likely use ash-based formulas or green-toned correctors to counteract the red before applying the brown. The process might take multiple sessions for the best results.
Q: How much does professional espresso brown color typically cost?
A: Single process espresso brown at salons ranges from $75-$200 depending on location, salon tier, and hair length. Adding techniques like balayage increases costs to $150-$400. Root touch-ups typically cost 60-70% of the initial service price.
Q: What’s the difference between espresso brown and dark chocolate brown?
A: Espresso brown is darker and cooler than dark chocolate brown. On the level system, espresso sits at 3-4 while dark chocolate is typically 4-5. Dark chocolate also contains more obvious warm undertones, while espresso appears almost black in some lighting.
Q: Can I go from black box dye to espresso brown?
A: Moving from black box dye to espresso brown usually requires professional color correction. Box dye black is notoriously difficult to lift, often requiring multiple sessions with color removers before achieving true espresso brown. Attempting this at home often results in uneven, brassy results.
Q: How do I know if my espresso brown is turning brassy?
A: Brassiness in espresso brown appears as unwanted orange or red tones, especially visible in bright light or sun. The color might look warmer than when freshly done, particularly at the ends. If your cool-toned espresso starts looking warm, brassiness has developed.
Q: Should I use purple shampoo on espresso brown hair?
A: Purple shampoo can benefit espresso brown hair that develops warm, brassy tones. Use it once weekly at most, as overuse can create an ashy or grayish cast. Blue-based toning shampoos work better for orange tones specifically.
Q: Will espresso brown cover my gray hair completely?
A: Espresso brown provides excellent gray coverage when applied properly. Permanent color gives the best coverage, though stubborn grays might need pre-softening or longer processing time. Demi-permanent formulas blend grays rather than completely covering them.
Q: Can I swim with espresso brown hair?
A: Swimming won’t ruin espresso brown hair if you take precautions. Wet hair with clean water first, apply leave-in conditioner as a barrier, and rinse immediately after swimming. Use a clarifying treatment weekly if you swim regularly, followed by deep conditioning.