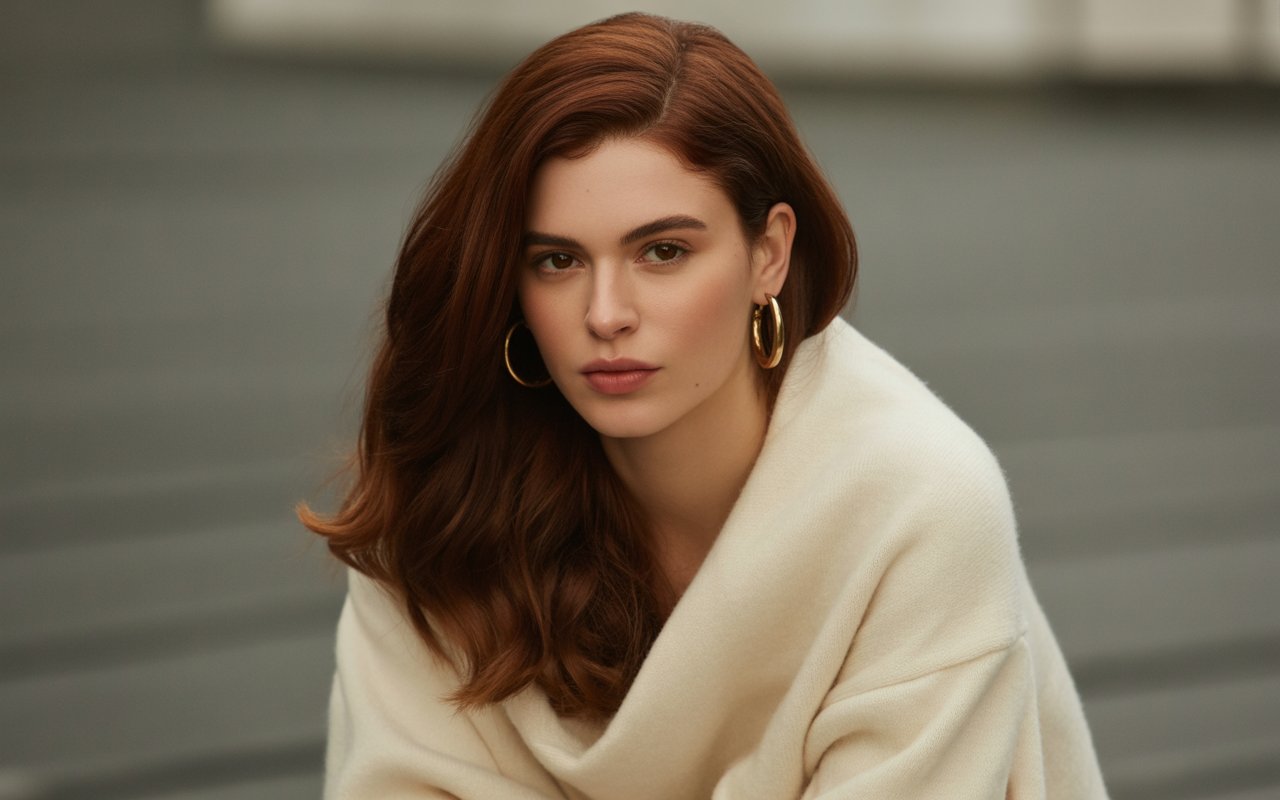
Mahogany hair color has become one of the most requested shades at salons, and for good reason. This rich, multidimensional color combines deep brown bases with subtle red undertones, creating a sophisticated look that flatters various skin tones. The warmth and depth of this particular shade make it an excellent choice for women looking to add vibrancy to their appearance without committing to bold, unnatural colors.
Getting professional results at home might seem challenging, but with the right approach and techniques, you can achieve that glossy, dimensional mahogany color without the salon price tag. The key lies in understanding the process, using quality products, and following proven application methods. Many women have successfully transformed their hair using home coloring kits, saving both time and money while getting exactly the shade they want.
This guide will walk you through everything from selecting the perfect mahogany shade for your complexion to maintaining that gorgeous color for weeks after application. You’ll discover professional techniques that colorists use, learn about the best products available for home use, and understand how to avoid common mistakes that can lead to uneven or brassy results. Let’s get started on your journey to beautiful mahogany hair.
Understanding Mahogany Hair Color and Your Starting Point
Mahogany sits beautifully between brown and auburn on the color spectrum, offering a sophisticated alternative to standard browns or vibrant reds. This versatile shade contains varying levels of red pigments mixed with chocolate brown bases, creating depth and dimension that catches light beautifully. The exact tone can range from deeper, wine-inspired versions to lighter copper-infused variations, giving you plenty of options to find your perfect match.
What exactly is mahogany hair color?
True mahogany takes its name from the rich reddish-brown wood, and hair color manufacturers have interpreted this shade in various ways. Most versions feature a brown base with red or burgundy undertones that become visible in different lighting. Some formulations lean more toward the red spectrum, while others maintain stronger brown dominance. The beauty of this color lies in its complexity – it’s never flat or one-dimensional, which explains why it photographs so beautifully and looks expensive even when done at home.
How to assess your current hair condition
Before selecting your mahogany shade, you need to honestly evaluate your hair’s current state. Run your fingers through your strands – do they feel rough, smooth, or somewhere in between? Hair that’s been previously colored, especially if it’s been lightened, will absorb color differently than virgin hair.
Check for damage by gently stretching a wet strand. If it breaks easily or doesn’t return to its original length, your hair needs strengthening treatments before coloring. Previous chemical processes, including relaxers or perms, affect how your hair will take the new color. Document your current shade with photos in natural light, as this will help you track your progress and choose the right developer strength.
Split ends and excessive dryness should be addressed before coloring. A trim removes damaged portions that might absorb color unevenly, while deep conditioning treatments in the weeks before coloring help your hair accept and hold the new shade better.
Determining if mahogany suits your skin tone
This versatile shade works wonderfully across different complexions, but certain undertones complement specific skin tones better than others. Women with warm undertones in their skin often find that mahogany with copper hints brings out golden tones in their complexion. Cool-toned skin pairs beautifully with mahogany shades containing more burgundy or plum undertones.
To identify your undertones, look at the veins on your wrist in natural light. Green-tinted veins typically indicate warm undertones, while blue or purple veins suggest cool undertones. If you can’t clearly determine the color, you likely have neutral undertones and can wear any mahogany variation successfully.
Consider your natural eye color too. Brown eyes pop against warmer mahogany shades, while green or hazel eyes look striking with cooler, more burgundy-based versions. Blue eyes create beautiful contrast with any mahogany tone, though warmer shades tend to make them appear even brighter.
The difference between mahogany and similar shades
Understanding how mahogany differs from similar colors helps you choose the right box at the store. Auburn contains more orange undertones and appears brighter in sunlight, while mahogany maintains its brown base even in bright conditions. Chestnut brown lacks the red dimension that makes mahogany special, appearing flatter and less multi-tonal.
Burgundy hair color contains more purple-red tones compared to mahogany’s brown-red balance. While both can look similar in certain lighting, burgundy tends to fade to pink tones, whereas mahogany fades to warmer copper-browns. Cinnamon, another commonly confused shade, contains more golden-orange tones and less of the deep brown base that defines true mahogany.
Essential Tools and Products You’ll Need
Professional results require professional preparation, starting with assembling the right supplies before you begin. Having everything ready prevents mid-process scrambling and ensures smooth application from start to finish.
Choosing the right mahogany hair dye
The dye selection process determines your entire outcome, so invest time in researching brands and reading reviews from women with similar starting colors. Permanent dyes provide the longest-lasting results, typically maintaining vibrancy for 6-8 weeks. Demi-permanent options work well if you’re testing the shade or want less commitment, lasting 4-6 weeks with gradual fading.
Box dyes from established brands often include everything needed for home application. Look for formulations specifically labeled as mahogany, deep mahogany, or mahogany brown. Some excellent options include:
- Brands with conditioning agents that minimize damage during processing
- Formulas enriched with oils for shine and moisture
- Products with anti-brass technology to maintain true mahogany tones
- Kits including post-color treatments for extended vibrancy
Pay attention to the volume of developer included. If your hair is longer than shoulder-length or particularly thick, purchase two boxes to ensure complete coverage. Running out mid-application leads to uneven results that are difficult to correct.
Professional tools for home application
While you don’t need salon-grade equipment, certain tools make the difference between amateur and professional-looking results. A tinting brush allows precise application, especially around hairlines and roots. These brushes, available at beauty supply stores for under $5, give you better control than bottle applicators.
Sectioning clips keep hair organized during application, preventing missed spots or overlap that causes uneven color. Four to six clips usually suffice, though having extras helps with thick hair. Choose clips that won’t leave indentations in your hair during processing.
A mixing bowl specifically for hair color provides better consistency than shaking bottles. Glass or plastic bowls work well – avoid metal, which can react with chemical formulas. Some women prefer bottles with applicator tips for root touch-ups, but bowls give superior control for full-head application.
Protective products and accessories
Protecting your skin, clothing, and bathroom surfaces saves cleanup time and prevents staining. Petroleum jelly or a specialized barrier cream applied along your hairline, ears, and neck creates an invisible shield against dye stains. This simple step prevents the telltale signs of home coloring that give away your DIY secret.
Old towels, shirts, and a cape or cutting cape protect clothing during application and processing. Dark colors hide stains better, and designated hair-coloring clothes eliminate worry about ruining favorite outfits. Some women cut open garbage bags as makeshift capes – practical and disposable.
Quality gloves protect your hands while maintaining dexterity for precise application. If the included gloves feel too bulky, purchase nitrile gloves from a pharmacy. These thinner alternatives provide better grip and control while still protecting your skin from staining.
Pre-coloring preparation products
The week before coloring, pamper your hair with treatments that optimize color absorption and longevity. Clarifying shampoo removes product buildup that might prevent even color penetration. Use this 2-3 days before coloring, not immediately before, as you want some natural oils present during the process.
Protein treatments strengthen hair structure, helping strands withstand chemical processing. Apply these 3-5 days before coloring, giving your hair time to recover from the treatment while maintaining the strengthening benefits. Deep conditioning masks add moisture that helps hair accept color more evenly.
Consider these preparation steps:
Two weeks before: Begin weekly deep conditioning treatments
One week before: Trim any split ends that might absorb color differently
Three days before: Use clarifying shampoo to remove buildup
Day before: Apply a light natural oil treatment if hair feels dry
Preparing Your Hair for the Color Process
Proper preparation sets the foundation for gorgeous results. The steps you take in the 48 hours before applying color significantly impact how well your hair accepts and holds the mahogany shade.
When to wash your hair before coloring
The old advice about coloring dirty hair has merit, but there’s a sweet spot for optimal results. Washing your hair 24-48 hours before coloring provides the ideal balance. Natural oils produced during this time protect your scalp from irritation while still allowing proper color penetration.
Hair washed immediately before coloring often feels too slippery for even application, causing dye to slide rather than absorb. Conversely, hair that hasn’t been washed in several days might have too much oil buildup, creating a barrier against color molecules. Find your personal sweet spot based on how quickly your scalp produces oil.
Skip conditioner during your pre-color wash if your hair isn’t particularly dry. Conditioner can create a coating that prevents optimal color absorption, especially at the ends where porosity is typically higher. If you must condition, focus only on the last few inches of length, avoiding the areas where you’ll apply color first.
How to perform a strand test
Never skip this crucial step, regardless of how confident you feel about your color choice. Strand testing reveals exactly how your unique hair will respond to the formula, potentially saving you from disappointing or damaging results.
Select a section from underneath your hair, near the nape of your neck. This hidden area won’t show if the test doesn’t go as planned. Mix a small amount of color according to package directions – you only need about a tablespoon of mixture for testing. Apply to a section about 1⁄4 inch wide and process for the recommended time.
After rinsing and drying your test strand, evaluate the color in different lighting. Natural daylight gives the truest representation, but also check under indoor lighting where you spend most of your time. If the color appears too dark, you might need a lighter shade or shorter processing time. Too light or lacking red tones might mean selecting a deeper mahogany or extending processing time slightly.
Protecting your skin and surroundings
Transform your bathroom into a temporary salon space that’s both functional and protected. Cover countertops with old towels or plastic sheets, as mahogany’s red undertones stain porous surfaces quickly. Remove or cover any fabric items like bathmats or decorative towels that might get splattered during application or rinsing.
Apply barrier cream generously but carefully. Focus on your hairline, making sure to cover about 1⁄2 inch of skin all around your hair. Don’t forget often-missed spots behind your ears and along the back of your neck. Some women apply cream to their entire ear, as these areas commonly get stained during application.
Prepare your cleanup supplies in advance. Keep damp cloths nearby for immediately wiping any drips or splatters. Having cotton balls soaked in rubbing alcohol or makeup remover helps quickly address any skin staining that occurs despite precautions. The faster you address stains, the easier they are to remove.
Setting up your workspace properly
Organization prevents frantic searching mid-application when time matters. Arrange all supplies on your counter in order of use. Place your mixed color, brush, and clips within easy reach. Position mirrors to see the back of your head – a hand mirror works, though some women prefer setting up multiple mirrors for hands-free viewing.
Good lighting makes the difference between even and patchy application. If your bathroom lighting is dim, bring in additional lamps. Natural light from a window helps, but ensure you have adequate artificial lighting for when natural light fades. Many women find that bright, cool-toned LED bulbs show color most accurately during application.
Create sections in your hair before starting. Divide hair into four quadrants – part down the middle from forehead to nape, then from ear to ear across the crown. Clip each section separately. This methodical approach ensures systematic coverage without missing spots or over-processing areas you’ve already covered.
Set multiple timers on your phone. One for mixing time if your color requires development before application, another for processing time once application is complete. Label each timer so you don’t confuse them during the process. Having backup timers prevents over-processing if one fails to sound.
The Step-by-Step Coloring Process
Now comes the exciting part – actually applying your mahogany color. Following a systematic approach ensures even coverage and professional results.
Mixing your color correctly
Read the instructions twice before beginning, as different brands have varying ratios and mixing requirements. Room temperature components mix more easily than cold ones, so let your products sit out for 30 minutes before starting. Pour the developer into your mixing bowl first, then add the colorant. This order prevents colorant from sticking to the bowl’s bottom.
Mix thoroughly but gently to avoid creating air bubbles that can cause uneven application. Use a color brush or plastic spoon to fold the mixture together rather than whipping it. The consistency should be creamy but not too thick – similar to pancake batter. If it seems too thick, you may have incorrect proportions; too thin might indicate over-mixing or wrong developer volume.
Some mahogany shades require a two-step process or mixing multiple tones. If your kit includes a red booster or mahogany intensifier, add it according to directions. These additives enhance the red undertones that give this shade its distinctive warmth. Mix only what you’ll use immediately, as color begins oxidizing once combined with developer.
Application techniques for even coverage
Start with the sections that need the most processing – typically the roots if you’re touching up, or the mid-lengths if this is your first application. The heat from your scalp accelerates processing at the roots, so saving them for last prevents an unwanted hot root effect where roots appear lighter or more orange than lengths.
Work in thin subsections no wider than 1⁄2 inch for thorough saturation. Apply color from roots to ends on each subsection, using your brush to ensure every strand is coated. The brushing motion should be smooth and deliberate – painting rather than slapping on the color. Take your time; rushed application shows in the final result.
For virgin hair applications, apply to lengths first, leaving about an inch gap at the roots. Process for half the recommended time, then apply to roots for the remaining time. This technique prevents the dreaded hot root effect while ensuring even color from root to tip.
Back sections often get neglected, leading to patchy results you’ll notice later. Use your mirror setup to check coverage, or better yet, enlist a friend to help with hard-to-reach areas. Many women find that working systematically from the nape upward ensures complete coverage of these tricky sections.
Timing your process for best results
Processing time varies based on your starting color, hair texture, and desired result. Set your timer only after completing application – the clock starts when the last section is covered, not when you begin applying. Most mahogany shades process for 25-35 minutes, though resistant gray hair might need up to 45 minutes.
Check your color development at the minimum processing time by wiping a small section clean with a damp cloth. The color appears darker when wet, so account for this when evaluating. If you need more development, continue processing in 5-minute increments, checking regularly to avoid over-processing.
Temperature affects processing speed significantly. Warm environments accelerate color development, while cold rooms slow it down. If your bathroom is chilly, consider using a plastic processing cap to trap heat. Some women sit near a heater or use a blow dryer on low heat for a few minutes to speed processing, though this requires careful monitoring.
Never exceed maximum processing time, even if the color hasn’t reached your desired depth. Over-processing damages hair structure and can actually cause color to appear duller. If you need deeper color, plan for a second application in two weeks rather than risking damage with extended processing.
What to watch for during processing
Monitor for any unusual reactions during processing. Slight tingling is normal, but burning, severe itching, or excessive heat indicates a problem. If you experience these symptoms, rinse immediately. Your health takes priority over hair color.
Watch for uneven development, particularly if you have multiple textures or previous color. Resistant sections might appear lighter during processing but often catch up during the final minutes. However, if certain areas seem to be grabbing too much color, you can wipe them with a damp cloth to slow processing.
Color typically develops from light to dark during processing. Don’t panic if your hair looks orange or too bright midway through – the final minutes of processing deepen and refine the tone. This is especially true with mahogany shades, where red tones appear first, followed by the brown base that balances the final color.
Some interesting changes to watch for:
Initial application: Color appears dark and wet against your hair
5-10 minutes: Beginning to see color change, might look brassy
15-20 minutes: Red tones becoming prominent
25-30 minutes: Brown base developing, color deepening
Final minutes: Mahogany dimension emerging
Aftercare and Maintenance for Long-Lasting Color
Your gorgeous new mahogany color needs proper care to maintain its vibrancy and dimension. The first few weeks after coloring are crucial for color longevity.
The first 48 hours after coloring
These critical hours determine how well your color sets and how long it lasts. Wait at least 48 hours before shampooing, allowing color molecules to fully oxidize and lock into your hair shaft. This waiting period might feel uncomfortable, but it extends your color’s life by weeks.
When you do wash, use cool or lukewarm water. Hot water opens hair cuticles, allowing color molecules to escape. That satisfying hot shower might feel good, but it’s washing your beautiful mahogany down the drain. Train yourself to rinse with the coolest water you can tolerate – your color will thank you.
Avoid chlorinated pools, hot tubs, and ocean water during the first week. These elements strip color aggressively, particularly affecting red tones in mahogany formulations. If you must swim, wet your hair with clean water first and apply a leave-in conditioner to create a barrier against damaging elements.
Heat styling should be minimal during the first week while your hair recovers from chemical processing. If you must use hot tools, apply heat protectant and use lower temperatures than usual. Your hair’s structure is temporarily more fragile, and excessive heat can cause both damage and premature color fading.
Products that preserve mahogany tones
Color-safe shampoo isn’t just marketing – these formulations really do extend color life. Look for sulfate-free options that cleanse without stripping. Shampoos specifically designed for red or auburn tones help maintain mahogany’s warm undertones. Apply shampoo only to roots and scalp, letting suds rinse through lengths rather than scrubbing all over.
Purple shampoo, typically associated with blonde hair, can actually benefit mahogany colors that lean cool-toned. Use it once weekly if your color starts showing brassy orange tones. However, warm-toned mahogany shades should avoid purple shampoo, as it can dull the beautiful copper reflects you want to preserve.
Deep conditioning treatments become even more important with colored hair. Weekly masks restore moisture and help seal cuticles, locking in color. Look for treatments with ingredients like keratin, argan oil, or color-protecting complexes. Apply from mid-length to ends, avoiding roots that don’t need heavy conditioning.
Weekly maintenance routines
Establish a routine that balances cleansing with color protection. Washing every 2-3 days, or even less frequently if your scalp allows, significantly extends color life. On non-wash days, dry shampoo absorbs oils without water exposure that fades color.
Color-depositing masks designed for red or mahogany tones refresh your shade between colorings. These treatments add temporary pigment while conditioning, perfect for weeks 3-4 when color typically starts looking dull. Use these instead of regular conditioner once weekly for noticeable vibrancy boost.
A glossing treatment every two weeks adds incredible shine while sealing cuticles. You can purchase professional glosses or make DIY versions with apple cider vinegar rinses. The acidic pH smooths cuticles, making color appear more vibrant and dimensional. Mix one tablespoon vinegar with one cup cool water for a final rinse after conditioning.
Your weekly routine might look like this:
Sunday: Deep conditioning treatment
Tuesday: Regular wash with color-safe products
Thursday: Co-wash or dry shampoo only
Friday: Regular wash with cool water rinse
Saturday: Color-depositing mask if needed
When to schedule touch-ups
Root growth becomes noticeable at different rates depending on your natural color and growth speed. Most women see obvious regrowth around week 3-4, though darker natural hair might show earlier. Plan root touch-ups every 4-6 weeks to maintain seamless color.
All-over color refresh typically happens every 8-10 weeks, though this varies based on your maintenance routine and hair’s porosity. If you’ve been diligent with color-safe products and cool water rinses, you might stretch to 12 weeks. Signs you need full refresh include significant fading, loss of dimension, or ends appearing lighter than roots.
Professional colorists recommend alternating between root touch-ups and full applications. This approach minimizes damage to previously colored lengths while maintaining consistent color. Apply color only to roots for two applications, then do a full refresh on the third application. This cycle keeps hair healthy while maintaining beautiful color.
Your Beautiful Mahogany Transformation
Creating salon-quality mahogany hair at home is absolutely achievable when you understand the process and use proper techniques. From selecting the perfect shade for your skin tone to maintaining that gorgeous color for weeks, each step builds toward stunning results. The money saved by coloring at home can go toward quality maintenance products that keep your hair looking professionally done.
The rich dimension and warmth of mahogany hair color offers sophistication that works from office to evening events. With your new knowledge of application techniques, timing, and maintenance, you’re equipped to achieve and maintain this beautiful shade with confidence. Your hair will radiate health and vibrancy, proving that professional results don’t always require professional prices.
Frequently Asked Questions
Q: Can I achieve mahogany hair color if I have naturally black hair?
A: Yes, but you might need to pre-lighten slightly for vibrant results. Many mahogany formulas work on black hair, creating subtle red reflects in sunlight. For more noticeable color, consider using a high-lift mahogany shade or consulting the brand’s customer service for recommendations.
Q: How long does mahogany hair color typically last?
A: With proper care, permanent mahogany color lasts 6-8 weeks before needing a refresh. The red tones tend to fade first, leaving behind warm brown. Using color-safe products and cool water extends vibrancy significantly.
Q: Will mahogany hair color cover my gray hair completely?
A: Most permanent mahogany dyes provide 100% gray coverage. For resistant grays, extend processing time by 5-10 minutes or choose formulas specifically designed for gray coverage. Stubborn grays might need pre-softening with 20-volume developer before color application.
Q: What’s the difference between mahogany and auburn hair color?
A: Mahogany contains more brown with subtle red undertones, while auburn features prominent orange-red tones with less brown base. Mahogany appears more natural and office-appropriate, whereas auburn makes a bolder statement.
Q: Can I go from mahogany to blonde hair later?
A: Transitioning from mahogany to blonde requires professional help in most cases. The red pigments in mahogany are difficult to lift and often result in orange tones. Plan for multiple sessions and consider gradual lightening through highlights first.
Q: How do I fix mahogany hair that turned out too red?
A: Apply a demi-permanent brown shade one level darker than your current color. This adds brown pigment to balance excessive red. Alternatively, use green-based toners to neutralize red, though this requires careful application to avoid muddy results.
Q: What should I do if my mahogany color looks different at roots versus ends?
A: This usually indicates different porosity levels. Use a protein filler before your next application to even out porosity. For immediate fixes, apply a color-depositing mask to lighter areas only, leaving on for 5-10 minutes.
Q: Is mahogany hair color high-maintenance?
A: Compared to fashion colors, mahogany is relatively low-maintenance. The brown base means roots blend better than with lighter colors. Following basic color care rules maintains vibrancy without excessive effort or expense.