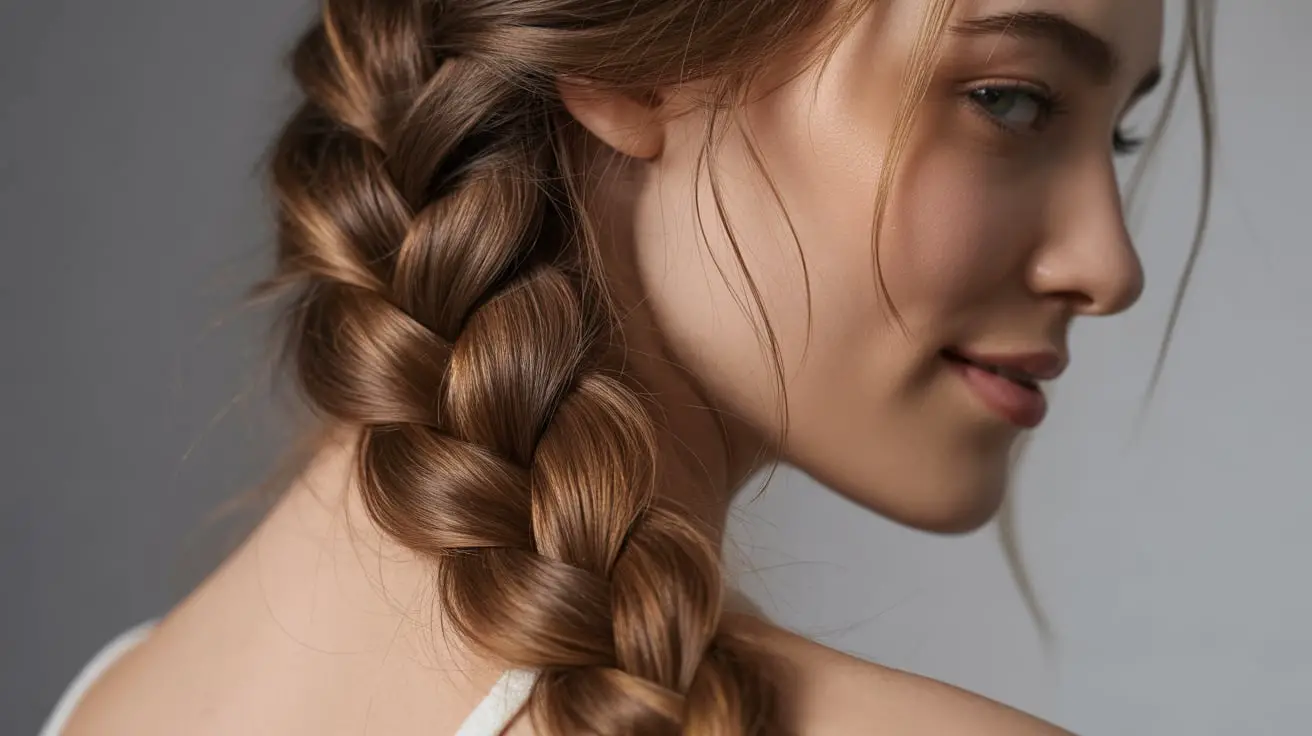
French braiding stands as one of those timeless hairstyling techniques that transforms ordinary hair into something special. This classic braid weaves strands together in a pattern that sits close to the scalp, creating a sophisticated look that works for everything from casual weekends to formal events. Women have passed down this braiding method through generations, and it continues to be a go-to style for its versatility and practicality.
The beauty of French braiding lies in its ability to keep hair neat and controlled while looking effortlessly elegant. Unlike a regular three-strand braid that starts at the nape of the neck, this technique begins at the crown and gradually incorporates hair as you work your way down. Once you master the basic movements, you’ll find yourself creating beautiful braids in minutes, whether you’re styling your own hair or helping a friend.
Learning to create the perfect French braid might seem challenging at first, but with the right guidance and practice, anyone can master this skill. In the following sections, we’ll walk through everything from preparing your hair properly to mastering the braiding technique itself, plus troubleshooting common problems and discovering creative variations. Keep reading to transform yourself into a French braiding expert.
What You Need Before Starting Your French Braid

Getting ready to French braid starts with gathering the right tools and understanding what your hair needs. Having everything prepared beforehand makes the braiding process smoother and helps you achieve professional-looking results. The right preparation can mean the difference between a braid that falls apart in an hour and one that stays perfect all day long.
Hair preparation essentials
Your hair’s condition plays a crucial role in how well it holds a braid. Clean hair provides the best foundation, but hair that’s too freshly washed can be slippery and difficult to work with. Many stylists recommend braiding hair that’s one or two days past washing, as the natural oils help strands grip each other better. If you must braid freshly washed hair, adding some texturizing product will give you the grip you need.
The texture of your hair also matters significantly. Fine hair might need volumizing products to create fuller-looking braids, while thick hair benefits from smoothing serums to control flyaways. Curly or wavy hair often braids beautifully without much preparation, as the natural texture provides excellent grip. Straight hair typically needs the most help with texture sprays or dry shampoo to prevent slipping.
Tools required
A good set of tools makes French braiding much easier. Start with a quality brush or wide-tooth comb to remove tangles completely. Rat-tail combs help create clean sections, especially if you want a precise part. Hair elastics that match your hair color will secure the braid invisibly, and bobby pins help tuck away any rebellious strands.
Keep a spray bottle filled with water nearby to dampen sections that become too dry or staticky during braiding. Some women find that lightly misting their hair throughout the process helps maintain control. A hand mirror lets you check your progress from different angles, particularly helpful when braiding your own hair.
Hair texture considerations
Different hair textures require different approaches to achieve the perfect French braid. If you have fine hair, consider using a volumizing mousse or root lift spray before starting. These products add body without weighing down your strands. Apply them to damp hair and blow-dry with your head upside down for maximum volume.
Medium to thick hair often benefits from a light smoothing cream or anti-frizz serum. Apply these products sparingly, focusing on the mid-lengths and ends rather than the roots. Too much product near the scalp can make your braid look greasy or cause it to slip. For very thick hair, you might want to section off the top layer temporarily while you work on the underlayers.
Length requirements
While French braids work best on medium to long hair, you can create beautiful braids with surprisingly short lengths. Hair that reaches at least to your shoulders gives you enough length to work with comfortably. Shorter hair requires more frequent incorporation of new sections and tighter grip to prevent pieces from escaping.
If your hair has layers, don’t worry – layered hair can create gorgeous, textured French braids. The shorter pieces might poke out slightly, giving your braid a soft, romantic look. You can also use a bit of hairspray or gel to help shorter layers stay in place. Some women actually prefer the dimensional look that layers bring to their braids.
Products to use
The right products make all the difference in achieving a long-lasting French braid. Here are the key products to consider:
Texturizing Spray: Adds grip to slippery hair and helps the braid hold its shape
Dry Shampoo: Absorbs oil and adds volume, perfect for fine or freshly washed hair
Light Hold Hairspray: Sets the braid without making it crunchy or stiff
Smoothing Serum: Controls frizz and flyaways for a polished finish
Hair Wax or Pomade: Helps tame baby hairs and short pieces around the hairline
Remember to apply products with a light hand. You can always add more if needed, but removing excess product means starting over. Focus application on the areas where you need it most – usually the crown for volume, mid-lengths for texture, and ends for control. With your tools and products ready, you’re set to begin creating your perfect French braid.
Preparing Your Hair for the Perfect French Braid

Proper preparation sets the foundation for a French braid that looks polished and stays secure throughout the day. Taking time to prepare your hair correctly prevents frustration during the braiding process and ensures better results. Many women skip this crucial step, then wonder why their braids look messy or fall apart quickly.
Washing and drying techniques
The way you wash and dry your hair impacts how well it braids. When washing, focus shampoo primarily on your scalp and roots, letting the suds rinse through the lengths naturally. This prevents over-stripping the hair shaft of natural oils that help with braiding grip. Use conditioner mainly on the mid-lengths and ends, avoiding the roots to prevent your hair from becoming too slippery.
For drying, the method you choose affects your hair’s texture. Air-drying preserves natural texture and creates good grip for braiding. If you need to blow-dry, use a medium heat setting and dry your hair until it’s about 80% dry, then let it finish air-drying. This technique prevents excessive smoothness that makes braiding difficult.
Some women find that braiding slightly damp hair works better than completely dry hair. The moisture helps control static and makes the hair more pliable. If you choose this method, make sure your hair is only barely damp – wet hair stretches and can lead to breakage or a braid that loosens as it dries.
Detangling properly
Thorough detangling is absolutely essential before attempting any braid. Start from the ends of your hair and work your way up to the roots, using a wide-tooth comb or detangling brush. This bottom-up approach prevents pushing tangles together and creating worse knots. Take your time with this step – rushing through detangling leads to bumpy, uneven braids.
For particularly stubborn tangles, apply a small amount of leave-in conditioner or detangling spray to the knotted area. Work through it gently with your fingers first, then follow with your comb. Never force a comb through a tangle, as this can cause breakage and create frizzy pieces that stick out of your finished braid.
Pay special attention to the hair at the nape of your neck, which tends to tangle more easily due to friction from clothing and movement. This area often gets overlooked but can cause major problems when you reach the end of your braid. Section your hair and check each part thoroughly for hidden tangles.
Adding texture and grip
Creating the right texture transforms slippery, uncooperative hair into the perfect braiding canvas. Texturizing products work by roughening the hair cuticle slightly, giving strands something to hold onto. Apply these products before you begin braiding, focusing on the lengths rather than the scalp.
Dry shampoo serves double duty by absorbing excess oil and adding grit to your hair. Spray it along your part and throughout the lengths, then massage it in with your fingertips. This creates volume at the roots and gives your entire head of hair better grip. Don’t use too much, though – white residue can show through your braid.
For extra staying power, try the “pancake and pull” prep method. Gently tug small sections of hair in different directions to rough up the cuticle naturally. This technique works especially well on very smooth or straight hair that typically won’t hold styles.
Sectioning strategies
Smart sectioning makes the actual braiding process much smoother. Decide where you want your braid to sit – centered, to one side, or perhaps two braids – and create your initial part accordingly. Use the pointed end of a rat-tail comb for precision, especially if you want a perfectly straight part.
When creating your starting section at the crown, make it neither too large nor too small. A section about 2-3 inches wide works well for most hair types. If you take too much hair initially, your braid will be bulky at the top. Too little, and you won’t have enough to establish the braid pattern properly.
Consider pre-sectioning the hair you’ll incorporate as you braid. Some women find it helpful to create horizontal sections with clips, releasing each one as they progress down the head. This method ensures even incorporation and prevents accidentally grabbing too much or too little hair as you work.
Common preparation mistakes
Several preparation errors can sabotage your French braid before you even begin braiding. Using too much product is a frequent mistake – your hair becomes heavy and greasy rather than textured. Start with less product than you think you need and add more only if necessary.
Another common error is attempting to braid hair that’s too damaged or has too many split ends. These damaged pieces won’t lie smoothly and create a frizzy, unkempt appearance. If your ends are very damaged, consider getting a trim before attempting intricate braiding styles.
Ignoring your hair’s natural growth patterns can also cause problems. Most people have cowlicks or areas where hair grows in different directions. Work with these patterns rather than against them by adjusting your braid placement or using a bit of gel to redirect stubborn pieces. Understanding your hair’s unique characteristics helps you adapt the technique for best results.
Step-by-Step French Braiding Technique

Now comes the moment to put everything together and create your French braid. This technique might feel awkward at first, especially if you’re braiding your own hair, but muscle memory develops quickly with practice. The key lies in maintaining consistent tension and rhythm throughout the entire process.
Starting position and grip
Position yourself comfortably before beginning – you’ll be holding your arms up for several minutes. If braiding your own hair, stand in front of a mirror with good lighting. Some women prefer sitting with their elbows resting on a table for support. Find what works for your body to avoid fatigue halfway through.
Begin by taking a section of hair from the crown of your head, roughly following your part line if you have one. This initial section should be about the width of your thumb and include hair from your hairline back about 2-3 inches. Divide this section into three equal strands, holding them between your fingers with comfortable spacing.
Your grip matters more than you might think. Hold the strands firmly but not so tight that your hands cramp. Many beginners make the mistake of death-gripping the hair, which leads to tired hands and an overly tight braid that can cause headaches. Practice finding the sweet spot between secure and relaxed.
The three-strand foundation
The French braid builds on the basic three-strand braiding pattern, so understanding this foundation is crucial. Hold the right strand in your right hand, the left strand in your left hand, and let the middle strand rest between them. The basic pattern involves crossing the outer strands over the middle strand alternately.
Start by crossing the right strand over the middle strand – now the right strand becomes the new middle. Then cross the left strand over this new middle strand. This creates the first crossover of your braid. At this point, you haven’t added any additional hair yet, just established the braiding pattern.
Practice this basic movement a few times before adding the French element. Your fingers need to learn how to swap strands smoothly while maintaining tension. The motion should feel fluid, with your hands working in rhythm. If you’re struggling with coordination, practice with ribbon or yarn first to build muscle memory without dealing with loose hairs.
Adding hair sections correctly
The defining characteristic of a French braid is the gradual incorporation of hair as you work down the head. After your initial crossover, you’ll add hair to each outer strand before crossing it over the middle. This creates the signature woven-into-the-scalp appearance.
When you’re ready to cross the right strand over, first gather a small section of loose hair from the right side of your head. Add this to your existing right strand, then cross the combined section over the middle. The size of each added section determines how your braid looks – smaller additions create a more intricate appearance, while larger sections produce a chunkier braid.
Repeat the process on the left side: gather loose hair from the left side of your head, add it to the left strand, then cross over the middle. Keep your additions consistent in size for an even-looking braid. Use your pinky fingers to separate and gather new sections while your other fingers maintain the braid.
Maintaining even tension
Consistent tension throughout your braid prevents loose spots and ensures a polished finish. Each strand should be pulled with equal firmness – not so tight that it pulls your scalp, but firm enough to keep the braid structure intact. This balance becomes intuitive with practice.
As you work down your head, the angle of pull changes. At the crown, you’re pulling slightly upward and back. By the time you reach the nape, you’re pulling downward. Adjust your arm position to maintain comfortable tension without straining. Some women find it helpful to tilt their head forward slightly as they work on the lower sections.
Check your tension frequently by gently running your hand over the completed portion. Areas that feel loose can be tightened by gently pulling the surrounding sections. Don’t wait until you’ve finished the entire braid to adjust – it’s much easier to fix tension issues as you go.
Finishing the braid
As you near the nape of your neck, you’ll run out of loose hair to incorporate. At this point, continue braiding the three strands in a regular braid down the remaining length of your hair. Keep the same tension you maintained throughout the French portion for a cohesive look.
Some finishing techniques to consider:
Classic Ending: Braid all the way to the ends and secure with an elastic
Messy Bun: Stop braiding midway and twist the remainder into a bun
Ponytail Finish: Secure the braid at the nape and leave the rest loose
Fishtail Transition: Switch to a fishtail pattern for the free-hanging portion
Wrapped Ending: Take a small strand of hair and wrap it around the elastic to hide it
Once you’ve secured your braid, gently tug at the edges to create a fuller, more relaxed look if desired. This technique, called pancaking, works best when done gradually from top to bottom. Pull small sections rather than large chunks for the most natural appearance. Set everything with a light mist of hairspray, focusing on any flyaways or baby hairs around your face.
Common French Braid Mistakes and How to Fix Them
Even experienced braiders encounter challenges with French braids from time to time. Understanding common problems and their solutions helps you troubleshoot on the spot rather than starting over from scratch. Most issues can be fixed without completely undoing your work.
Uneven sections
Uneven strand sizes create a lopsided braid that looks amateur rather than polished. This problem usually starts at the very beginning when dividing the initial section, but it can also develop as you add hair throughout the braiding process. One side appears thicker or more prominent than the other, throwing off the entire braid’s symmetry.
To prevent uneven sections, use your fingers as measuring guides. Each section should be roughly the width of one or two fingers, depending on your desired braid thickness. When adding hair, pinch equal amounts between your thumb and forefinger before incorporating them. This tactile measurement helps maintain consistency even when you can’t see what you’re doing.
If you notice unevenness partway through, you can still make adjustments. Gently pull more hair into the smaller sections on your next few additions to balance things out. The braid might have a slightly irregular pattern for an inch or two, but this usually isn’t noticeable in the finished style. For severe unevenness, it’s better to undo a few crosses and fix the problem properly.
Loose spots and bumps
Bumps and loose areas make your French braid look messy and unprofessional. These typically occur when tension isn’t maintained consistently or when sections of hair aren’t fully incorporated into the braid. Sometimes bumps form when shorter layers stick out or when hair gets caught at odd angles during the braiding process.
Preventing bumps requires smooth, controlled movements and careful attention to each strand. Before crossing sections over, run your fingers down their length to smooth out any irregularities. Make sure each piece of added hair gets fully integrated into its strand rather than just sitting on top. This complete incorporation prevents loose pieces from creating bumps later.
When you encounter a bump that’s already formed, try these fixes: First, gently massage the bumpy area with your fingertips to redistribute the hair. If that doesn’t work, use a bobby pin to tuck the offending piece under the braid. For persistent bumps, you might need to slightly loosen the surrounding braid sections to allow the bump to settle naturally.
Hair slipping out
Nothing frustrates braiders more than carefully placed sections that slip out moments later. This happens most often with silky, straight hair or hair that’s been recently conditioned. Short layers around the face and nape area are particularly prone to escaping.
Combat slipping by improving your hair’s grip before you start braiding. Apply texturizing spray or dry shampoo liberally, focusing on naturally smooth areas. Some women find that lightly backcombing sections before incorporating them helps them stay put. This creates a slight tangle that acts as an anchor within the braid.
For pieces that continually escape despite preparation, strategic product application saves the day. Keep a small amount of hair wax or strong-hold gel on your fingertips while braiding. When you encounter a rebellious piece, smooth a tiny amount of product onto it before incorporating it into the braid. This targeted approach prevents your entire head from becoming product-heavy.
Tension problems
Inconsistent tension creates a braid that’s tight in some spots and loose in others. This often happens when braiders get tired and unconsciously relax their grip, or when switching between different parts of the head requires awkward arm positions. The result looks unprofessional and tends to loosen throughout the day.
Maintaining proper tension requires awareness and occasional breaks. If your arms start to tire, pause for a moment rather than pushing through with weakened grip. Shake out your hands, roll your shoulders, then resume with renewed focus. Some women find counting their crosses helps maintain rhythm and consistent pull.
Physical positioning significantly impacts your ability to maintain tension. For the upper portion of the braid, keep your elbows lifted and away from your body. As you work lower, drop your elbows and bring your hands closer to your neck. This natural progression prevents arm fatigue and helps you maintain steady tension throughout.
Fixing mistakes mid-braid
Discovering a mistake halfway through your French braid doesn’t mean starting over completely. Most errors can be corrected by undoing just a few crosses, fixing the problem, then continuing. The key is catching mistakes early before they affect too much of your braid.
To undo part of a braid without losing everything, hold the last correct cross firmly with one hand. With your other hand, gently work backwards, releasing one cross at a time. Keep the freed sections separated and organized so you can easily restart. This controlled undoing prevents tangles and saves time.
Sometimes a quick fix works better than undoing. Consider these solutions:
Small Gap: Pull surrounding sections tighter to close it
Twisted Section: Gently untwist while maintaining the braid structure
Wrong Strand Crossed: Continue normally – it rarely shows in the finished braid
Missing Hair: Add it to the next incorporation on that side
Extra Hair Grabbed: Tuck it under or incorporate it fully on the next cross
The more you practice French braiding, the better you become at preventing and quickly fixing mistakes. Don’t let perfectionism stop you from completing a braid – small imperfections often add character and rarely get noticed by anyone but yourself.
Styling Variations and Finishing Touches
Once you’ve mastered the basic French braid, endless possibilities open up for creative variations and styling options. These modifications let you adapt the classic technique for different occasions, face shapes, and personal preferences. Small changes in placement, direction, or finishing can completely transform the look.
Side French braids
A side French braid offers a romantic, asymmetrical alternative to the traditional centered style. This variation works beautifully for both casual and formal occasions, framing your face differently and showing off earrings or neck details. The technique remains the same, but the positioning creates an entirely different effect.
Start your side braid by creating a deep side part, then beginning the braid near your temple on the heavier side of the part. Angle the braid diagonally across your head, following your hairline down toward the opposite shoulder. This path requires you to adjust your hand positions more frequently than a straight-back braid, but the results are worth the extra effort.
The challenge with side braids lies in maintaining security since gravity pulls the braid away from your head. Use slightly firmer tension than you would for a centered braid, and consider applying a bit of gel to your hairline for extra hold. Bobby pins placed strategically behind your ear help anchor the braid’s path.
You can also create a side French braid that wraps around your head like a crown. Start at one temple, braid along your hairline across the forehead, then continue around to the opposite ear. This version works particularly well for keeping hair off your face during activities or hot weather.
Double French braids
Two French braids create a sporty, youthful look that’s perfect for active days or when you want extra security for your style. This variation distributes the weight of your hair evenly and tends to stay neater longer than a single braid. The symmetry of double braids also suits many face shapes beautifully.
Creating even double braids requires careful sectioning from the start. Part your hair straight down the middle from forehead to nape, securing one side with a clip while you work on the other. This prevents accidentally incorporating hair from the wrong side. Use a rat-tail comb for precision if you want perfectly straight parts.
Begin each braid at the same height on your head for a balanced look. Some women prefer starting right at the hairline for a sleek appearance, while others begin an inch or two back for a softer effect. Maintain consistent spacing from your center part as you braid – getting too close or too far from the part creates an uneven appearance.
The finishing options for double braids are particularly versatile. Leave them hanging separately, join them into one braid at the nape, wrap them into buns, or pin them across your head for a milkmaid braid effect. Each finishing style creates a completely different look from the same basic technique.
Securing methods
How you secure your French braid affects both its longevity and appearance. The right finishing method prevents unraveling while complementing your overall style. Different occasions and hair types call for different securing techniques.
Traditional elastic bands work well for casual styles, but choosing the right type matters. Fabric-covered elastics grip without damaging hair, while clear elastics provide an invisible hold for formal looks. Avoid rubber bands, which can break hair and cause painful pulling when removed. Match the elastic color to your hair for the most seamless appearance.
For a polished finish that hides the elastic, try the wrap-around technique. Reserve a small section of hair before securing the braid, then wrap this piece around the elastic several times. Secure the wrapped piece with a bobby pin tucked underneath the braid. This creates a sophisticated finish perfect for professional settings or special events.
Adding accessories
Accessories transform a simple French braid into a statement hairstyle. The woven structure of the braid provides perfect anchor points for various decorative elements. Choose accessories that complement your outfit and occasion while considering the security of attachment.
Here are effective ways to incorporate different accessories:
Ribbons: Weave through the braid after completion or incorporate during braiding
Flowers: Tuck stems into the braid crosses for a bohemian look
Hair Rings: Thread onto small sections before braiding for metallic accents
Decorative Pins: Place at strategic points for sparkle and additional security
Scarves: Incorporate as a fourth strand or wrap around the finished braid
When adding accessories during the braiding process, treat them as an additional strand or weave them through as you go. This integration method ensures they stay secure throughout wear. For accessories added after braiding, use bobby pins that match your hair color to anchor decorative elements invisibly.
Making it last longer
A French braid that stays beautiful all day (or even multiple days) requires both proper technique and finishing touches. The longevity of your style depends on your hair type, the products used, and how you protect the braid during wear and sleep.
Set your finished braid with a quality hairspray, holding the can about 10 inches away for even coverage. Focus on areas prone to frizzing, like your hairline and the nape of your neck. Don’t oversaturate – too much product makes hair crunchy and can actually cause more flyaways as the product flakes.
For overnight protection, wrap your braid in a silk scarf or use a silk pillowcase. These smooth materials reduce friction that causes frizz and loosening. Some women find that very loosely wrapping the braid into a high bun for sleeping prevents tangling while maintaining the braid pattern.
To refresh a day-old French braid, lightly mist with water mixed with a drop of leave-in conditioner. Smooth any flyaways with a small amount of hair oil or serum on your palms. Re-tighten any loose sections by gently pulling the surrounding areas. With proper care, a well-executed French braid can look presentable for two to three days.
Your French Braid Journey Forward
Mastering the French braid opens up a world of hairstyling possibilities that go far beyond this single technique. The skills you’ve developed – maintaining tension, coordinating hand movements, and incorporating hair smoothly – transfer to countless other braiding styles. From Dutch braids to waterfall braids, your foundation in French braiding makes learning new techniques much easier.
Remember that perfection comes with practice, and every head of hair presents unique challenges and opportunities. Your first attempts might feel clumsy or look uneven, but each braid teaches your fingers something new. Within a few weeks of regular practice, you’ll find yourself French braiding without thinking about each individual movement, perhaps even while watching TV or chatting with friends. The technique that once seemed impossible becomes second nature, and you’ll wonder why it ever seemed so difficult.
Frequently Asked Questions
Q: How long does my hair need to be for a French braid?
A: Your hair should ideally reach at least to your shoulders for a comfortable French braiding experience. Shorter hair can work but requires more frequent incorporation of sections and tighter grip to prevent pieces from escaping.
Q: Why does my French braid always look loose and messy?
A: Loose, messy braids usually result from insufficient hair texture or inconsistent tension. Try adding texturizing spray or dry shampoo before braiding, and focus on maintaining steady, even tension throughout the entire process.
Q: Can I French braid my own hair if I’m a beginner?
A: Yes, you can learn to French braid your own hair, though it requires more practice than braiding someone else’s. Start with a side French braid where you can see better, then progress to back braiding as your muscle memory develops.
Q: How do I prevent my arms from getting tired while braiding?
A: Take breaks when needed, rest your elbows on a table when possible, and practice good posture. Building arm endurance comes with time, and switching between arm positions as you work down the head helps distribute the effort.
Q: Should I braid wet or dry hair?
A: Dry or slightly damp hair works best for French braiding. Completely wet hair stretches and can lead to breakage, plus the braid often loosens significantly as it dries. If braiding damp hair, make sure it’s no more than 20% wet.
Q: How do I keep short layers from sticking out of my braid?
A: Use a small amount of hair gel, wax, or strong-hold hairspray on shorter pieces before incorporating them. You can also bobby pin stubborn pieces after braiding or appreciate the textured, effortless look that layers create.
Q: Why does my French braid give me a headache?
A: Headaches from French braids typically mean you’re braiding too tightly. Focus on firm but comfortable tension, especially at the crown. If you’re prone to headaches, try starting your braid slightly lower on your head rather than right at the hairline.
Q: How often should I practice to get good at French braiding?
A: Practice for 10-15 minutes every other day for the fastest improvement. Daily practice can work too, but give your arms and scalp occasional rest days. Most people feel comfortable with the technique after 2-3 weeks of regular practice.