Creating beautiful braided hairstyles doesn’t require a professional hairstyling degree or years of practice. The rope braid stands out as one of the most elegant yet achievable styles you can master at home. This twisted technique offers a sophisticated alternative to traditional three-strand braids while being surprisingly simple once you understand the basic method.
Many women assume rope braids belong exclusively in salons or on red carpets, but this versatile style works perfectly for everyday wear. From casual weekend errands to polished office looks, rope braids adapt to any occasion. The technique relies on a simple twisting motion rather than complex weaving patterns, making it accessible even if your previous braiding attempts have ended in frustration.
Ready to add this stunning style to your hair repertoire? We’ll walk through everything from understanding the basic technique to creating various rope braid styles that suit different occasions. You’ll discover preparation tips, step-by-step instructions, and maintenance advice that will have you rope braiding like a seasoned stylist in no time.
Understanding the Rope Braid Technique
The rope braid creates its distinctive spiral appearance through a fundamentally different approach than traditional braiding. Instead of weaving three sections together, this technique involves twisting two sections of hair in opposite directions, then wrapping them around each other. The result resembles twisted rope or cord, hence the name.
Basic mechanics of rope braiding
At its core, rope braiding relies on the principle of opposing tension. You twist each section of hair in one direction – typically away from your face – then wrap these twisted sections around each other in the opposite direction. This counter-twisting creates the characteristic spiral pattern and ensures the braid holds its shape throughout the day.
The tighter you twist the individual sections, the more defined your rope braid appears. However, finding the right balance matters. Over-twisting can cause discomfort and make the style difficult to maintain, while under-twisting results in a loose braid that unravels quickly. Most women find success with moderate tension that feels secure without pulling at the scalp.
Difference between rope braids and regular braids
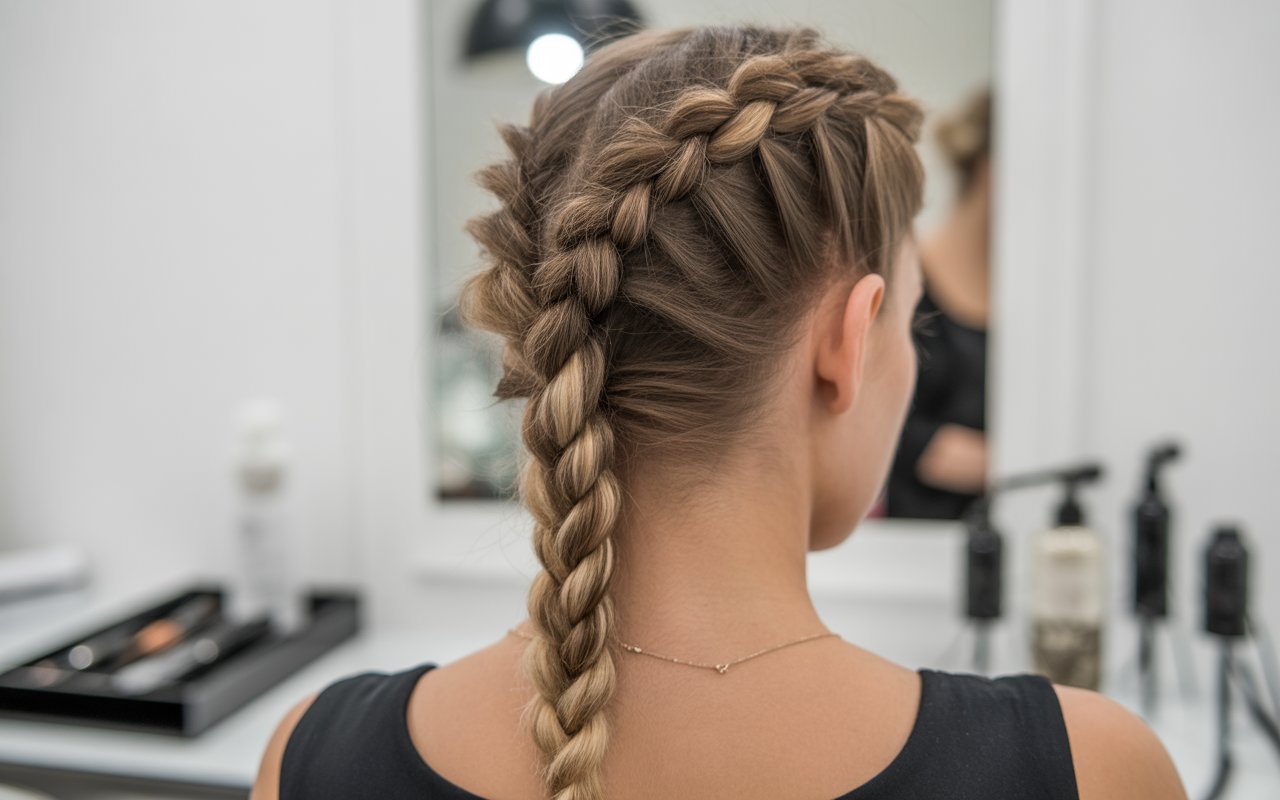
Traditional three-strand braids interweave sections of hair in an over-under pattern. This creates a flat, interlocked appearance that sits close to the head. Rope braids, by contrast, produce a rounded, three-dimensional effect that stands out from the scalp.
The two-section structure of rope braids also makes them faster to complete than many other braiding styles. Without the need to manage a third section or remember complex patterns, you can focus purely on maintaining consistent twists. This simplicity particularly benefits those braiding their own hair, as the technique requires less coordination between hands.
Essential tools and products needed
Success with rope braiding starts with having the right supplies within reach. A rattail comb helps create clean sections and parts, while small clear elastics secure the ends without adding bulk. Hair clips or bobby pins keep sections separated during the braiding process.
Product selection depends on your hair type, but some basics benefit everyone. A lightweight leave-in conditioner or detangling spray prevents snags and makes hair more manageable. Texturizing spray or dry shampoo adds grip to slippery hair that might otherwise slide out of the twist. For finishing touches, a light-hold hairspray maintains the style without creating stiffness.
Consider keeping these items organized in a small basket or drawer near your styling area. Having everything readily available prevents interruptions mid-braid when you realize you need another elastic or clip.
Common mistakes to avoid
Even with its relative simplicity, rope braiding has potential pitfalls. The most frequent error involves twisting both sections in the same direction as you wrap them together. This creates a braid that immediately begins to unravel, as there’s no opposing tension to hold the structure.
Another common issue arises from inconsistent section sizes. Starting with uneven pieces of hair produces a lopsided braid that looks unprofessional. Take time to divide your hair evenly before beginning, using a comb to ensure accuracy rather than estimating by feel.
Many women also struggle with maintaining consistent tension throughout the braid. The style loosens near the top while becoming progressively tighter toward the bottom, creating an unbalanced appearance. Practice helps develop muscle memory for steady pressure, but conscious attention to your grip makes an immediate difference.
Rushing the process leads to frustration and poor results. While rope braids can be completed quickly once you master the technique, initial attempts require patience. Set aside adequate time for practice without the pressure of needing to leave for an event or appointment.
Preparing Your Hair for Rope Braiding
The foundation you create before starting any braid determines its final appearance and longevity. Rope braids particularly benefit from proper preparation, as the twisting motion can emphasize any tangles or uneven texture in your hair. Taking time to prep ensures smoother braiding and more polished results.
Best hair texture for rope braids
While rope braids work on various hair types, certain textures naturally hold the style better than others. Hair with some natural grip – whether from texture, wave pattern, or product application – maintains the twist more effectively than extremely smooth, straight hair. This doesn’t mean those with silky hair can’t achieve beautiful rope braids; they simply need different preparation techniques.
Medium to thick hair density provides ideal conditions for rope braiding. The additional volume helps create fuller, more defined twists that showcase the spiral pattern. Fine hair can still create lovely rope braids but may require extra product for grip and potentially benefit from teasing at the roots for added fullness.
Day-old hair often works better than freshly washed locks. Natural oils provide grip and control without the slipperiness that can occur immediately after shampooing. If you must start with clean hair, adding texture through products becomes especially important.
How to prep different hair types
Straight hair benefits from texturizing products applied before braiding. Work a volumizing mousse through damp hair, then blow-dry with your head upside down to create lift at the roots. Once dry, mist sections with dry shampoo or texture spray as you work. Some women find that creating slight waves with a large-barrel curling iron provides helpful texture without adding obvious curls to the finished braid.
Wavy and curly hair types often need moisture and definition rather than added texture. Apply a curl-enhancing cream or light gel to damp hair, then either air-dry or diffuse until completely dry. The natural pattern provides excellent grip for rope braiding while the product prevents frizz from developing as you manipulate the sections.
For coily or kinky hair textures, stretching the hair first often produces the best results. This might involve blow-drying with tension, doing a braid-out or twist-out the night before, or using other preferred stretching methods. Well-moisturized hair prevents breakage during the twisting process, so don’t skip your regular conditioning routine.
Products that make rope braiding easier
The right styling products transform rope braiding from a struggle into an enjoyable process. Start with a good detangler – whether leave-in conditioner, specialized detangling spray, or light oil – to ensure smooth sections that won’t snag as you twist.
Grip-enhancing products prove invaluable, especially for those with naturally smooth hair. Options include:
Texture Spray: Adds grit and hold without stiffness
Dry Shampoo: Absorbs oils while providing grip
Sea Salt Spray: Creates beachy texture ideal for braiding
Volumizing Powder: Offers targeted grip at roots
Light Pomade: Controls flyaways without weighing hair down
Edge control or gel helps create polished parts and smooth any baby hairs around the hairline. However, avoid heavy products that might make sections difficult to separate or cause the braid to look greasy.
Sectioning hair properly
Clean, precise sections form the backbone of any successful braid. For rope braids, start by deciding where you want the braid positioned – center back, side, or incorporated into a larger style. Use the pointed end of a rattail comb to create your part, working slowly to ensure straightness.
The size of your sections depends on the final look you want to achieve. Larger sections create bold, statement braids, while smaller sections produce more delicate results. Whatever size you choose, consistency matters more than the specific measurement. Use your comb to check that both sections contain roughly equal amounts of hair.
Clip away any hair you’re not immediately using. This prevents accidentally grabbing extra strands as you work and maintains clean lines throughout the braiding process. Butterfly clips or duckbill clips work better than small bobby pins for holding larger sections.
Creating the right foundation
Beyond products and sectioning, several techniques help establish an ideal foundation for rope braiding. If you want a sleek look, smooth each section with a bristle brush before beginning to twist. This removes any remaining tangles and helps hair lie flat against itself as you work.
For added volume at the crown, gently tease the roots before starting your braid. Use a fine-tooth comb to backcomb small sections, then smooth the surface layer to hide the teasing. This creates lift that prevents the braid from lying too flat against your head.
Consider the direction you’ll be braiding as you prep. If creating a side rope braid, direct hair toward that side while drying to train it in the right direction. For braids that travel straight back, ensure your part runs directly down the center of your desired placement.
Temperature matters too. Working in a humid environment can cause hair to frizz or revert to its natural texture mid-braid. If possible, style in a climate-controlled space and have anti-humidity products ready for touch-ups.
Step-by-Step Rope Braiding Tutorial
Now comes the exciting part – actually creating your rope braid. With your hair properly prepped and tools at hand, you’re ready to transform those twisted sections into a beautiful, professional-looking style. The key lies in understanding each step thoroughly before moving to the next.
Starting your rope braid correctly
Position yourself in front of a mirror where you can see the back of your head, either using a hand mirror or a three-way mirror setup. Good visibility prevents uneven sections and helps you spot any issues early in the process. Begin by taking your prepared section of hair and dividing it into two equal parts.
Hold one section in each hand, keeping them separated and taut. Your grip should be firm enough to maintain control but not so tight that it causes hand fatigue. Many women find success holding the sections between their thumb and first two fingers, leaving the other fingers free to assist as needed.
Before you begin twisting, ensure both sections are smooth and free of tangles. Run your fingers through each piece one final time, checking for any snags or uneven areas. This attention to detail at the start saves frustration later when a hidden tangle disrupts your rhythm.
The twisting technique explained
The magic of rope braiding happens through opposing rotations. Start by twisting the right section away from your face – clockwise if you’re looking down at it. Continue twisting until the section feels firm and begins to coil slightly on itself. The amount of twist affects the final appearance, with tighter twists creating more defined braids.
Simultaneously or immediately after, twist the left section in the same direction – also away from your face. Both pieces should now have individual twists running through them. This step transforms loose hair into rope-like sections that will hold their shape when wrapped together.
Here’s where the opposing motion creates the braid: while maintaining those individual twists, wrap the two sections around each other in the opposite direction – toward your face. The right section crosses over the left, then the left (which is now on the right side) crosses back over. This counter-movement locks the twists in place.
As you work down the length of your hair, you’ll need to add more twists to the individual sections before each wrap. Think of it as a continuous process – twist, twist, wrap, repeat. The rhythm becomes natural with practice, and your hands develop muscle memory for the movements.
How to maintain even tension
Consistent tension throughout your rope braid separates amateur attempts from professional-looking results. The challenge lies in maintaining the same pressure from roots to ends while your arms tire and your grip naturally wants to change. Start with moderate tension – tight enough to hold the twist but not so tight that it pulls uncomfortably at your scalp.
Pay attention to how the braid feels in your hands as you work. The twisted sections should maintain their individual spirals without completely unraveling between wraps. If they’re loosening too quickly, increase your initial twist. If your hands cramp from over-twisting, reduce the rotation slightly.
Your grip position affects tension control. Keep your hands relatively close to the working area of the braid rather than holding the very ends of the sections. This provides better control and prevents the twist from traveling too far down the hair shaft before you’re ready to wrap.
Watch for tension changes at natural transition points – where your arms need to reposition, where the hair texture changes, or where you pause to rest. These areas often show slight variations in tightness. Developing awareness of these moments helps you compensate automatically.
Securing the braid properly
The method you use to finish your rope braid impacts both its appearance and longevity. Stop twisting and wrapping when you have about two inches of hair remaining. This leaves enough length to secure properly without creating a stubby end that looks unfinished.
Before reaching for an elastic, give both sections a final firm twist in the same direction you’ve been using. This extra rotation helps the very end of the braid maintain its shape. Hold this twist as you carefully transfer both sections to one hand.
Choose a small, clear elastic that won’t add bulk or distract from your braid. Wrap it around both sections at least three times, ensuring it’s tight enough to hold but not so tight it creates an indentation. Some women prefer to wrap the elastic around just once or twice initially, adjust the braid’s appearance, then complete the securing.
For an ultra-polished finish, take a small piece of hair from the bound section and wrap it around the elastic. Secure this piece with a bobby pin inserted vertically into the braid. This technique, commonly used by stylists, hides the elastic completely and creates a seamless end to your rope braid.
Troubleshooting common issues
Even with careful technique, challenges arise during the rope braiding process. If your braid starts unraveling immediately, you’re likely twisting and wrapping in the same direction. Stop, unravel what you’ve done, and restart with conscious attention to opposing movements.
Bumpy or uneven sections usually indicate inconsistent tension or section size. While you can’t fix this without starting over, make note of where the issue occurred. Next time, pay extra attention to maintaining steady pressure and checking section size at that point in the process.
When pieces of hair pop out or create loops along the braid, the culprit is often insufficient twisting of individual sections. The solution involves twisting each piece more thoroughly before wrapping. You might also need to smooth each section with slightly damp fingers to encourage stray hairs to stay put.
For braids that look beautiful initially but loosen within hours, the issue typically lies in product choice or application. Your hair might need more texturizing product for grip, or you may benefit from a stronger-hold finishing spray. Weather conditions also play a role – humid days require extra holding power to combat moisture-induced frizz and loosening.
If your rope braid appears flat rather than dimensional, you might be pulling the sections too far apart as you wrap them. Keep the sections closer together and focus on the twisting motion rather than stretching the hair horizontally. Adding volume at the roots before braiding also helps create a fuller appearance.
Different Rope Braid Styles and Variations
Once you master the basic rope braid technique, a world of styling possibilities opens up. The versatility of this braiding method allows for countless variations, each offering a unique look suitable for different occasions and preferences. From simple modifications to elaborate updos, rope braids adapt to your creative vision.
Single rope braid styles
The classic single rope braid running down the back remains a timeless choice. Start this style at the crown for a high-positioned braid that elongates the neck, or begin at the nape for a low, romantic look. The placement dramatically changes the overall effect – high braids read youthful and energetic, while low positions feel sophisticated and elegant.
A deep side part transforms the basic rope braid into an asymmetrical statement. Sweep all your hair to one side and create the braid over one shoulder. This positioning works particularly well for showcasing earrings or an interesting neckline. The side placement also makes the braiding process easier since you can see your work without mirrors.
Consider incorporating a rope braid into a half-up style. Section off the top portion of your hair from temple to temple, create a rope braid with this section, and leave the remaining hair loose. This combination provides the polish of an updo while maintaining the movement of flowing hair. Perfect for second-day hair when you want to look put-together without washing and completely restyling.
Double rope braid options
Two rope braids offer double the visual interest and countless arrangement possibilities. The most straightforward approach involves creating matching braids on either side of a center part. These can hang freely for a youthful look reminiscent of schoolgirl styles but elevated through the sophisticated rope technique.
For a more complex appearance, try creating two rope braids that merge into one. Start with sections from either side of your head, braid them individually for several inches, then combine the four twisted pieces into one larger rope braid. This creates an intricate Y-shape that looks far more complicated than the actual technique requires.
Asymmetrical double braids provide modern appeal. Create one rope braid starting at the temple and traveling diagonally across the back of your head. Add a second braid beginning at the opposite ear and meeting the first. The intersection point becomes a focal element – enhance it with a decorative pin or small flower for special occasions.
Side rope braids
Side-swept rope braids offer numerous creative possibilities beyond the basic over-the-shoulder style. Try starting at one temple and following your hairline around to the opposite ear, creating a crown-like effect. This works beautifully for keeping hair off your face while maintaining an elegant appearance.
The waterfall rope braid variation adds romantic movement. Begin a rope braid at one side, but instead of incorporating all hair, allow sections to fall free as you work across your head. The dropped pieces create a cascading effect while the rope element adds textural interest. This style particularly suits wavy or curled hair where the loose sections show movement.
Multiple small rope braids along one side create an edgy, modern look. Part your hair dramatically to one side, then create three or four thin rope braids along the heavier side. Leave them hanging separately or gather them together at the ear level. This asymmetrical approach works well for concerts, festivals, or any event where you want to make a style statement.
Rope braid updos
Transform rope braids into elegant updos suitable for formal events. The simplest version involves creating a standard rope braid, then wrapping it into a bun shape and securing with bobby pins. The twisted texture of the rope braid adds visual interest to what might otherwise be a plain bun.
For a more elaborate updo, create multiple rope braids throughout your hair – perhaps four to six depending on hair thickness. Wrap and pin these individually around your head, creating an intricate pattern. Some braids might coil at the nape, others near the crown, building dimension and texture throughout the style.
The rope braid crown presents another sophisticated option. Starting at one ear, create a rope braid that follows your hairline across the front of your head to the opposite ear. Continue braiding around the back, eventually connecting where you started. Tuck and pin the end invisibly. The remaining hair can be left loose, curled, or gathered into a low bun, with the rope braid serving as a built-in headband.
Combining rope braids with other styles
Rope braids integrate beautifully with other hair techniques. Try creating a rope braid that feeds into a fishtail braid halfway down – the textural contrast between the round rope section and flat fishtail creates visual intrigue. Simply stop the rope technique at your desired transition point and begin fishtailing with the same two sections.
Incorporate rope braids into ponytails for elevated casual styles. After securing your ponytail, take a section of hair from underneath and create a rope braid. Wrap this around the elastic and pin in place. Or create multiple thin rope braids throughout the ponytail itself for added texture and movement.
Space buns get an upgrade with rope braid details. Part hair down the middle and create high ponytails on either side. Before twisting into buns, rope braid each ponytail. The resulting buns show beautiful spiral patterns that elevate this playful style. Leave a few face-framing pieces loose and create mini rope braids with these for extra detail.
The key to successfully combining techniques lies in understanding how different textures and shapes interact. Rope braids provide round, spiral texture that contrasts nicely with smooth hair, traditional flat braids, or curled sections. Use this contrast deliberately to create focal points and visual interest throughout your style.
Making Your Rope Braid Last
Creating a beautiful rope braid represents only half the challenge – maintaining its appearance throughout the day and potentially multiple days requires specific strategies. With proper care, your rope braid can look fresh and defined far longer than you might expect.
How to sleep with rope braids
Nighttime presents the biggest threat to your carefully crafted style. The friction from tossing and turning can loosen twists, create frizz, and generally dishevel your braid. Protection starts with choosing the right pillowcase – silk or satin creates less friction than cotton, allowing your hair to glide rather than catch as you move.
Before bed, check your braid’s security. If any sections feel loose, now’s the time to gently twist them back into place. Avoid the temptation to completely redo the braid, as overworking can cause unnecessary stress on your hair. Instead, focus on reinforcing weak spots with light twisting motions.
A silk or satin scarf provides additional protection. Wrap it around your hairline and braid, ensuring full coverage without uncomfortable tightness. Some women prefer bonnets or buffs that enclose the entire hairstyle. The key lies in finding a method that stays in place throughout the night while feeling comfortable enough for quality sleep.
For longer rope braids, consider loosely coiling the length into a high, loose bun secured with a soft scrunchie. This prevents the braid from getting trapped under your body or tangled in bedding. The elevation also reduces direct pressure on any one section of the braid.
Daily maintenance tips
Morning touch-ups can restore your rope braid to its original glory with minimal effort. Start by gently smoothing any frizz with slightly damp hands – the moisture helps hair lie flat without completely rewetting the style. Avoid using too much water, which can cause the twists to loosen.
A light mist of texture spray or hairspray provides renewed hold without the crunchiness of heavy products. Hold the bottle at least 12 inches away and spray in light layers rather than one heavy application. This technique prevents product buildup that can make hair look dull or feel sticky.
For flyaways around your hairline or along the braid, a small amount of edge control or light pomade works wonders. Apply product to a clean toothbrush or edge brush, then gently smooth problem areas. This targeted approach tames frizz without affecting the overall braid structure.
If sections begin separating or the braid develops gaps, resist pulling or retwisting aggressively. Instead, gently squeeze the affected area while slightly twisting in the original direction. This encourages the sections to nestle back together without creating additional stress or frizz.
When to refresh your rope braid
Most rope braids maintain their appearance for two to four days, depending on your hair type, activity level, and care routine. Fine, straight hair typically requires refreshing sooner than textured or thick hair. Active lifestyles that involve sweating or frequent hair touching also shorten the style’s lifespan.
Watch for these signs that indicate refreshing time:
- Significant loosening at the roots
- Multiple fuzzy or frizzy sections
- Loss of definition in the twist pattern
- Uncomfortable buildup of products or natural oils
- Tangling that resists gentle finger-combing
When refreshing becomes necessary, you have options beyond completely starting over. Sometimes unbraiding just the last few inches and retwisting provides enough improvement. Other times, taking out the entire braid, gently detangling, and rebraiding offers the best results.
Products for longevity
Strategic product use extends the life of your rope braid significantly. Dry shampoo serves double duty – absorbing excess oil at the roots while adding grip that helps maintain the twist. Apply to your scalp before bed on day two or three, then massage in the morning for fresh-feeling hair.
Anti-humidity sprays prove invaluable in moisture-prone climates. These create an invisible barrier that prevents atmospheric moisture from penetrating the hair shaft and causing frizz or loosening. Apply before leaving the house on humid days, focusing on the outer layer of the braid.
Leave-in conditioners with hold properties keep hair moisturized without sacrificing style integrity. Look for lightweight formulas that won’t weigh down your braid or leave residue. Apply sparingly to the length of the braid, avoiding the roots where product buildup occurs fastest.
For special occasions when your rope braid must look perfect all day, consider using a braid spray specifically designed for maintaining braided styles. These products typically combine hold, shine, and anti-frizz properties in formulations that won’t flake or build up with reapplication.
Quick fixes for loosening braids
Despite best efforts, rope braids sometimes loosen at inopportune moments. Knowing quick fixes helps you maintain your style without access to mirrors or full styling tools. The simplest solution involves gently pulling the braid taut from the secured end while holding the base steady. This redistributes tension throughout the length.
For loosening at the crown, try this discrete fix: insert a bobby pin vertically into the braid about an inch from your scalp, catching a small amount of hair from your head along with the braid. This anchors the style without visible pins. Match the bobby pin color to your hair for complete invisibility.
When the twist pattern starts disappearing in certain sections, use your fingers to gently retwist just those areas. Work in the same direction as your original twist, using light pressure to encourage the hair back into formation. This targeted approach takes seconds but can dramatically improve appearance.
Emergency supplies fit easily in a small pouch for on-the-go fixes. Include travel-size texture spray, a few bobby pins, small clear elastics, and a miniature brush or comb. Some women add a silk scrunchie for converting their rope braid into a bun if extensive loosening occurs.
Mastering Your Rope Braid
The path from rope braid novice to confident stylist requires patience and practice, but the versatility of this technique makes the effort worthwhile. Your fingers will develop muscle memory for the twisting motions, and you’ll instinctively know how much tension creates your preferred look. Each attempt builds on the last, refining your technique until creating beautiful rope braids becomes second nature.
The beauty of rope braids lies not just in their elegant appearance but in their adaptability to your lifestyle and preferences. Whether you prefer polished styles for professional settings or relaxed braids for weekend adventures, this technique accommodates your needs. As you experiment with different variations and combinations, you’ll discover signature looks that feel uniquely yours. The rope braid isn’t just another hairstyle – it’s a valuable skill that opens doors to countless creative possibilities in your hair journey.
Frequently Asked Questions
Q: Can I create a rope braid on short hair?
A: Yes, rope braids work on hair as short as chin-length, though the technique might need adjusting. Use smaller sections and secure the end very close to the tips. Adding texture spray helps shorter pieces grip better during twisting.
Q: Why does my rope braid keep unraveling even when I twist in opposite directions?
A: You might not be twisting the individual sections enough before wrapping them together. Try adding more rotations to each section before the wrapping step. Also check that you’re maintaining the twist while wrapping rather than allowing sections to loosen.
Q: What’s the difference between a rope braid and a twist?
A: While both involve two sections of hair, a twist simply wraps pieces around each other. A rope braid requires twisting each section individually first, then wrapping them in the opposite direction, creating a more defined spiral pattern.
Q: How can I make my rope braid look fuller?
A: Several techniques add volume: gently tug at the edges of your completed braid to loosen it slightly, start with lightly teased hair, or use volumizing products before braiding. Creating your rope braid with larger sections also produces a fuller appearance.
Q: Can I rope braid wet hair?
A: While possible, wet rope braids often look different once dried and may not hold their shape well. Damp hair works better than soaking wet, but completely dry hair typically gives the best results for defined, long-lasting rope braids.
Q: How do I prevent my rope braid from hurting my scalp?
A: Scalp pain usually indicates excessive tension. Reduce the tightness of your initial twists and avoid pulling hair too taut at the roots. If pain persists, loosen the braid slightly by gently massaging your scalp and allowing some natural movement at the base.
Q: What’s the best way to remove a rope braid without causing tangles?
A: Start from the bottom and work upward, gently untwisting rather than pulling sections apart. Apply a detangling spray or light oil to your fingers as you work. Take your time and separate sections carefully to prevent knots from forming.
Q: Can I wash my hair with a rope braid in?
A: While possible, washing typically loosens the braid significantly. If you must wash, focus shampoo only on your scalp using gentle pressing motions rather than rubbing. Skip conditioner on the braided portion and expect to need restyling afterward.