The modern layered bob has transformed from a simple classic cut into one of today’s most versatile and sought-after hairstyles. This contemporary version adds movement, texture, and dimension through strategic layering techniques that create a fresh, dynamic look. Unlike the blunt bobs of previous decades, this style offers flexibility in styling while maintaining the sophisticated essence that makes bob haircuts timeless.
Professional hairstylists have refined the layered bob technique to suit various hair textures and face shapes, making it accessible to almost anyone seeking a stylish yet manageable haircut. The beauty of this particular style lies in its ability to add volume where needed, reduce bulk in thick hair, and create the illusion of fullness in finer strands. Whether you prefer a sleek, polished finish or a more textured, lived-in appearance, the modern layered bob adapts to your personal style preferences.
Learning the proper cutting techniques for this haircut requires understanding both the fundamental principles of bob construction and the nuanced approach to creating seamless layers. The following sections will guide you through the essential tools, preparation steps, cutting methodology, common pitfalls to avoid, and maintenance strategies that professional stylists use to achieve this coveted look. Ready to master the art of cutting a modern layered bob? Let’s begin this comprehensive guide.
Understanding the Modern Layered Bob Cut
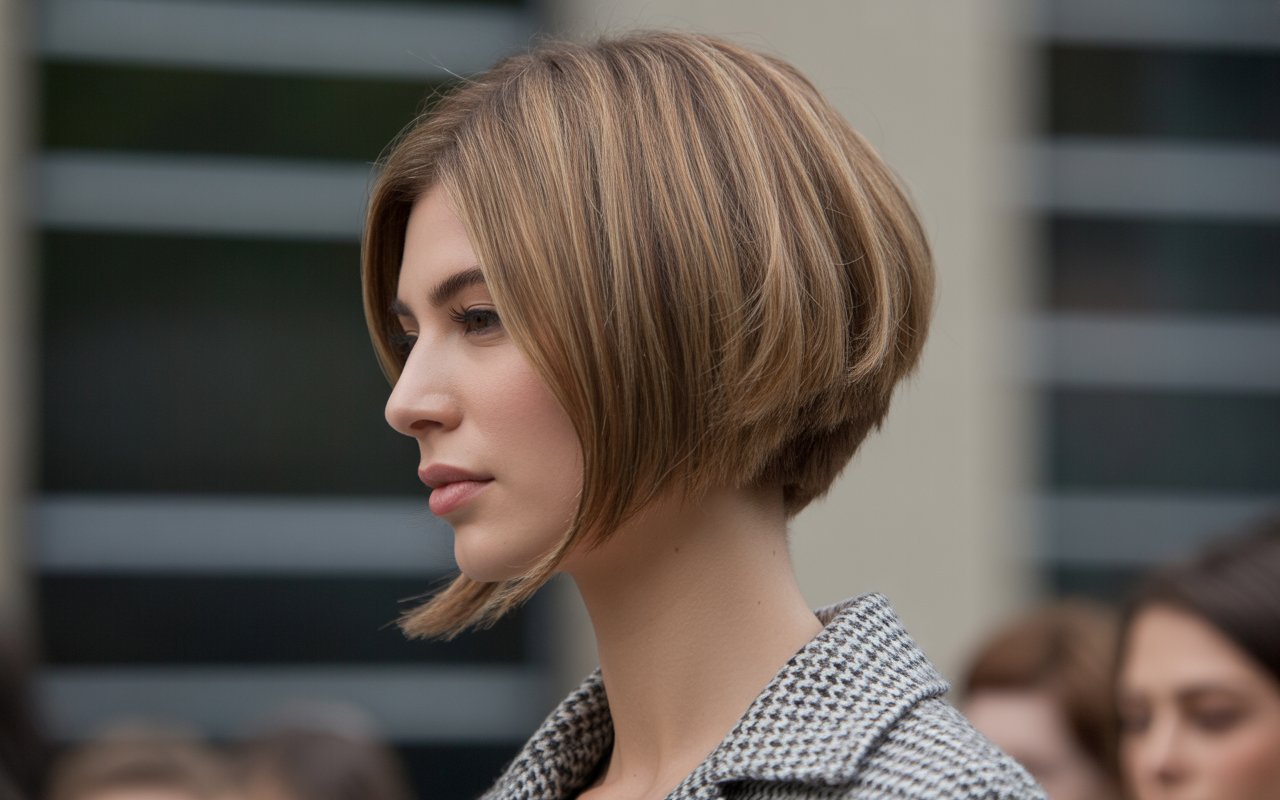
The modern layered bob distinguishes itself through its strategic placement of varying hair lengths that create movement and shape. Unlike traditional one-length bobs, this style incorporates graduated layers that start from the crown and blend seamlessly toward the perimeter. The result is a haircut that moves naturally, frames the face beautifully, and offers multiple styling options.
Today’s version typically falls anywhere from chin-length to just above the shoulders, though the exact length depends on individual preferences and facial features. The layers themselves vary in depth and placement – some stylists create subtle, barely-there layers for a softer effect, while others opt for more dramatic layering that produces significant texture and volume. This adaptability makes the cut suitable for various occasions, from professional settings to casual weekends.
Difference from Traditional Bob Cuts
Traditional bob cuts maintain a uniform length around the entire head, creating a solid, geometric shape that emphasizes precision and structure. The modern layered variation breaks away from this rigid format by introducing dimension through carefully placed layers that soften the overall silhouette. This fundamental difference changes how the hair moves, how it frames the face, and how versatile the styling options become.
The cutting technique itself differs significantly as well. While a traditional bob requires horizontal cutting lines to maintain evenness, the layered version employs various cutting angles to create graduation and movement. Point cutting, slide cutting, and texturizing shears all play roles in achieving the desired effect, techniques rarely used in classic bob construction.
Hair Textures That Work Best
Fine hair benefits tremendously from a layered bob because the layers create an illusion of thickness and body. The strategic removal of weight in certain areas allows the remaining hair to lift and move more freely, preventing the flat, lifeless appearance that can plague those with finer strands. The key lies in avoiding over-layering, which could make thin hair appear even sparser.
Medium to thick hair textures find their perfect match in this haircut as well. The layering technique removes bulk without sacrificing the overall shape, allowing thick hair to fall more gracefully around the face. Coarse or unruly textures become more manageable through proper layer placement, reducing the pyramid effect that can occur with one-length cuts on voluminous hair.
Curly and wavy hair types can absolutely rock a layered bob, though the approach differs slightly. The layers must account for the spring factor in curls, meaning the hair appears shorter when dry than when wet. Stylists often cut curly hair dry or use specialized techniques to ensure the layers enhance rather than disrupt the natural curl pattern.
Face Shapes That Suit This Style
Round faces benefit from layered bobs that add height at the crown and maintain slightly longer lengths near the face. The layers create vertical lines that elongate the face, while strategic texturing around the cheekbones can create more angular definition. Avoiding excessive volume at the widest part of the face helps maintain balance.
Square and rectangular face shapes find harmony with softer, more graduated layers that gentle the jawline. The movement created by layers helps counteract strong angular features, while maintaining some length near the chin area creates a more oval appearance. Side-swept bangs or face-framing pieces can further enhance this effect.
Oval faces enjoy the most flexibility with this haircut, as their balanced proportions work with virtually any variation. Heart-shaped faces benefit from layers that add width at the jaw level, balancing a wider forehead. The versatility of layer placement allows stylists to customize the cut to enhance each individual’s best features while minimizing areas of concern.
Essential Tools and Preparation
Quality haircutting shears form the foundation of any successful layered bob creation. Professional shears ranging from 5.5 to 6.5 inches provide the control and precision necessary for clean lines and accurate layer placement. The sharpness of your shears directly impacts the hair’s health – dull blades can cause split ends and uneven cuts that compromise the final result.
Thinning shears or texturizing scissors serve as secondary tools for creating seamless blends between layers and removing bulk without altering the overall length. These specialized scissors feature teeth on one or both blades, allowing for selective hair removal that creates movement and reduces weight. Choose thinning shears with 25-35 teeth for versatility in various hair textures.
A quality cutting comb with both wide and fine teeth sections enables precise sectioning and tension control during cutting. The fine teeth create clean partings and maintain control over smaller sections, while the wider teeth work through thicker areas without causing tangles or discomfort. Carbon or hard rubber combs resist static and provide better control than plastic alternatives.
Additional tools that enhance precision include:
Sectioning Clips: Hold hair sections securely without leaving marks or creases
Spray Bottle: Maintains optimal moisture levels during cutting
Neck Strip or Cape: Protects clothing and provides professional presentation
Blow Dryer and Round Brush: Essential for checking the cut’s shape when styled
Hand Mirror: Allows viewing of the back sections during cutting
Preparing the Hair for Cutting
Begin with freshly shampooed hair using a clarifying product to remove any styling product buildup that might affect how the hair falls naturally. Skip heavy conditioners or treatments that could weigh down the hair and alter its true texture. The goal is to work with hair in its most natural state to ensure accurate cutting.
Towel dry the hair until it’s damp but not dripping. Excessive water can cause the comb to slip and make it difficult to maintain proper tension during cutting. The ideal dampness level allows the hair to stay in place when combed while still showing its natural growth patterns and cowlicks.
Thoroughly detangle from ends to roots using a wide-tooth comb, removing all knots that could interfere with clean cutting lines. Pay special attention to the nape area and behind the ears where tangles often hide. Any remaining knots will cause uneven tension and result in irregular lengths.
Setting Up Your Workspace
Position your cutting chair at a height that allows you to work comfortably without straining your back or shoulders. Your elbows should remain relatively close to your body during most of the cutting process, with the client’s head at approximately chest level. Proper ergonomics prevent fatigue and maintain cutting accuracy throughout the service.
Arrange all tools within easy reach on a clean, organized station. Having everything accessible prevents interruptions that could affect your concentration or cause you to lose track of your cutting pattern. A cluttered workspace increases the risk of accidents and creates an unprofessional atmosphere.
Ensure adequate lighting from multiple angles to eliminate shadows that could obscure your cutting lines. Natural light provides the most accurate color representation, but bright LED lights work well as alternatives. Position lights to illuminate both sides of the head evenly, with additional lighting for checking the back sections.
Safety Considerations
Always maintain controlled hand positions when working with sharp instruments near the client’s face and neck. Keep your fingers between the scissors and the client’s skin, using them as a barrier to prevent accidental nicks. This protective positioning becomes second nature with practice but requires conscious attention initially.
Store cutting tools safely when not in immediate use. Open scissors left on counters or chairs pose injury risks to both you and your client. Develop the habit of closing shears immediately after each use and placing them in designated holders or on your station.
Check for skin conditions, moles, or sensitive areas on the scalp before beginning. Ask clients about any concerns or areas to avoid. This preliminary assessment prevents injury and demonstrates professional awareness. Mark any areas of concern mentally or communicate with your client throughout the process to ensure their comfort and safety.
Communication remains your best safety tool. Explain what you’re doing, especially when working near the ears or nape. Ask clients to remain still during critical cutting moments and alert them before using any tools that might startle them, such as the blow dryer. This ongoing dialogue creates trust and prevents sudden movements that could result in cutting accidents.
Step-by-Step Cutting Technique

Creating precise sections forms the foundation for a perfectly executed layered bob. Start by parting the hair from ear to ear across the crown, separating the top section from the bottom. This horizontal parting should follow the natural curve of the head, sitting approximately two inches above the occipital bone. Secure the top section with clips, ensuring no stray pieces fall into your working area.
Next, create a vertical center part from the front hairline to the nape, dividing the hair into left and right sides. This central guide ensures symmetry throughout the cutting process. Working with one side at a time prevents confusion and maintains consistency in your layer placement.
The lower sections require further subdivision for optimal control. Create horizontal partings every half-inch to one inch, depending on the hair’s density. Thinner sections provide more precision but take longer to complete, while thicker sections work faster but may sacrifice some accuracy. Finding the right balance depends on your skill level and the desired outcome.
Creating the Base Length
Establishing the perimeter length sets the foundation for your entire haircut. Starting at the nape, comb a horizontal section straight down and cut straight across at the desired length. This initial cut determines where your shortest layers will end, so consider the client’s preferences carefully before making this crucial decision.
Work your way up the back of the head, using your first section as a traveling guide. Each new section should be combed down to meet the previous one, ensuring consistent length throughout the perimeter. Maintain zero elevation and even tension to create a solid baseline that will support your layers.
Moving to the sides, continue the line from the back sections toward the front. The angle here determines whether the bob will be longer in front (A-line), even all around, or shorter in front (inverted). Most modern layered bobs feature a slight A-line that flatters various face shapes. Check both sides frequently to ensure they match perfectly.
The key to a successful base lies in maintaining consistent tension and body position. Stand directly behind each section you’re cutting rather than reaching across the head. This positioning ensures your cutting line remains true and prevents accidental graduation.
Adding Graduated Layers
Begin creating layers by taking vertical sections through the interior of the haircut. Starting at the crown, elevate sections to 45 degrees and cut at an angle that creates graduation. This technique removes weight while maintaining length at the perimeter, producing the movement characteristic of modern layered bobs.
The angle of elevation determines how dramatic your layers appear. Lower elevation creates subtle layers that blend seamlessly, while higher elevation produces more noticeable steps and increased volume. Most clients prefer something in the middle – enough layering to create movement without sacrificing the bob’s classic shape.
Work systematically through each section, using your previous cut as a guide. Pull each new section to the guide and cut parallel to maintain consistency. This traveling guide method ensures smooth transitions between layers and prevents harsh lines or gaps in the haircut.
Pay special attention to the sections around the face:
Temple Area: Lighten these sections carefully to avoid creating holes in the haircut
Crown Region: Add slightly shorter layers here to create lift and volume
Nape Sections: Keep layers longer to maintain the bob’s weight line
Side Sections: Graduate smoothly to connect back and front seamlessly
Texturizing Techniques
Point cutting adds softness and movement to the layers without removing additional length. Hold sections at various angles and make small, diagonal cuts into the ends. This technique works particularly well on the perimeter to soften the baseline and create a more lived-in appearance.
Slide cutting removes weight from mid-lengths while maintaining the overall shape. Open and close the shears while sliding them down the hair shaft at an angle. This creates irregular lengths within each section that move independently, adding texture without creating obvious layers.
Thinning shears strategically remove bulk from specific areas. Focus on the interior sections where hair tends to build up, particularly around the occipital area and behind the ears. Avoid using thinning shears on the perimeter or top layers where they might create frizz or flyaways.
Channel cutting creates deep texture suitable for thicker hair types. Make parallel vertical cuts into horizontal sections, removing narrow channels of hair. This dramatic texturizing technique works best on clients who want significant movement and a more undone finish to their bob.
Finishing Touches
Dry the hair completely to assess the true shape and identify any areas needing refinement. The way hair falls when dry often differs from its wet appearance, particularly with natural waves or cowlicks. Use a round brush to smooth the hair into its intended style while checking for balance and symmetry.
Perfect the perimeter by making minor adjustments where needed. Sometimes small pieces spring up once the hair dries, or slight unevenness becomes apparent. These final touches make the difference between a good haircut and an exceptional one.
Cross-check your layers by pulling sections from different angles. Horizontal checks ensure even length, vertical checks confirm smooth graduation, and diagonal checks reveal any disconnection between sections. This thorough examination identifies issues before the client leaves your chair.
Detail work around the hairline creates a polished finish. Carefully trim any hair that extends beyond your intended shape around the ears and nape. These areas frame the haircut and significantly impact its overall appearance. Use precise, controlled movements to avoid cutting too short in these visible areas.
Common Mistakes to Avoid
Overzealous cutting ranks among the most frequent errors when creating a layered bob. The excitement of transformation can lead to removing excessive length or creating layers that are too short for the desired style. Once hair is cut, there’s no immediate way to restore it, making restraint essential throughout the process.
Starting conservatively allows room for adjustments as you progress. You can always remove more hair, but you cannot add it back. This principle applies especially to the perimeter length – beginning longer than the final goal provides flexibility to perfect the shape without risking an unexpectedly short result.
The temptation to create dramatic layers in a single pass often results in choppy, disconnected sections that lack the seamless flow characteristic of a well-executed layered bob. Instead, build layers gradually through multiple passes, assessing the shape between each round of cutting. This methodical approach produces superior results.
Consider the hair’s elasticity and shrinkage factor, particularly with curly or damaged hair. Wet hair stretches, appearing longer than it will when dry. Textured hair springs up significantly once moisture evaporates. Accounting for these factors prevents shocking surprises when the client sees their finished style.
Uneven Layer Distribution
Inconsistent layer placement creates an unbalanced appearance that disrupts the haircut’s harmony. Some sections appear heavy and bulky while others look thin and wispy. This typically results from losing track of your guide or changing elevation angles midway through the cutting process.
Maintaining systematic patterns throughout the haircut ensures even distribution. Whether you work from back to front or use a different sequence, consistency in your approach prevents gaps or concentrated areas of layering. Document your method mentally or physically to maintain uniformity.
The sides often reveal uneven layering most obviously. One side might have perfect graduation while the other appears choppy or disconnected. This usually stems from different body positions when cutting each side or failing to check both sides simultaneously during the layering process.
Regular visual checks from multiple angles help identify distribution issues before they become permanent. Step back frequently to assess the overall shape rather than focusing solely on individual sections. Sometimes what feels right technically doesn’t translate visually, making these periodic assessments crucial.
Wrong Angle Techniques
Incorrect cutting angles produce layers that don’t blend properly or create unwanted effects like excessive bulk removal or harsh lines. The angle of your shears relative to the hair section determines how the layers will fall and interact with each other.
Vertical cutting when horizontal would be appropriate creates stringy, separated pieces rather than cohesive layers. Conversely, horizontal cutting in areas requiring vertical techniques results in blunt, shelf-like steps that resist blending. Understanding when to apply each technique comes through education and practice.
The elevation angle affects the final result as dramatically as the cutting angle. Pulling hair straight up (90 degrees) when you intended 45-degree elevation creates much shorter layers than planned. These angular errors compound throughout the haircut, potentially ruining the intended shape.
Finger angle also influences the outcome significantly. Holding sections with fingers parallel to the floor creates different results than angled finger positions. Consistency in finger placement ensures predictable, even results throughout the haircut.
Fixing Cutting Errors
Discovering mistakes mid-haircut triggers panic in many stylists, leading to overcorrection that worsens the situation. The key lies in staying calm and assessing the error objectively before attempting repairs. Sometimes what seems like a disaster is actually a minor issue easily resolved with strategic adjustments.
Resist the urge to immediately even out perceived inconsistencies:
Assessment First: Dry the section to see how it truly falls
Minimal Correction: Remove only what’s absolutely necessary
Blend Don’t Match: Sometimes blending covers errors better than trying to match exactly
Strategic Styling: Some issues resolve through styling rather than cutting
Accept Imperfection: Minor variations often go unnoticed by anyone except the stylist
Major errors might require reimagining the haircut entirely. If you’ve cut one section significantly shorter than intended, consider adjusting the overall design to incorporate this length rather than matching everything to the mistake. Creative problem-solving often produces unique, flattering results.
Communication with your client becomes crucial when errors occur. Honest discussion about options and limitations helps manage expectations and maintains trust. Most clients appreciate transparency and collaborative problem-solving over attempts to hide mistakes.
Styling and Maintenance Tips
The versatility of a modern layered bob shines through its various styling possibilities. For a sleek, polished look, apply a heat protectant to damp hair and blow-dry using a round brush. Direct the airflow down the hair shaft while pulling sections taut to minimize frizz and enhance shine. This technique works particularly well for professional settings or formal occasions.
Creating texture and movement requires a different approach. Scrunch a texturizing product through damp hair and either air-dry or use a diffuser attachment. This method enhances natural wave patterns and gives the layers room to express their full potential. The result is an effortless, lived-in appearance perfect for casual days.
The tousled, bedhead look has become increasingly popular with this haircut. Apply a volumizing mousse to the roots and rough-dry the hair while tossing it in various directions. Once about 80% dry, twist small sections around your finger and hit them with heat to create loose, imperfect waves. Finish by running your fingers through to separate the pieces.
For those preferring heat-free methods, overnight techniques provide excellent results. Twist damp sections and secure them in small buns before bed. Upon waking, release the buns and gently separate the waves with your fingers. This method creates natural-looking texture without thermal damage.
Product Recommendations
Lightweight products work best with layered bobs to avoid weighing down the carefully crafted movement. Volumizing mousses applied to the roots provide lift without stickiness or stiffness. Look for alcohol-free formulas that won’t dry out the hair or cause brittleness over time.
Texturizing sprays enhance the natural movement of layers while adding grip for styling. Sea salt sprays create beachy waves, while dry texture sprays offer volume and hold without wetness. Apply these products sparingly – too much can make hair appear dirty or greasy rather than effortlessly styled.
Heat protection remains non-negotiable for those who regularly use hot tools. Spray or serum formulations shield hair from temperatures up to 450 degrees while often providing additional benefits like frizz control or shine enhancement. Apply evenly through damp hair before any heat styling.
Finishing products seal the style and provide lasting hold. Light-hold hairsprays maintain movement while preventing flyaways. For piece-y definition, work a small amount of pomade or wax through the ends. Choose products based on your hair texture – finer hair needs lighter formulations while thicker hair can handle heavier products.
Maintaining the Shape
Regular trims every 6-8 weeks preserve the integrity of your layered bob. As hair grows, the carefully planned proportions shift, causing the style to lose its shape. The layers begin to appear heavy and disconnected, while the perimeter loses its clean line.
Between professional appointments, small maintenance steps keep the style looking fresh. Trim any obviously damaged ends with sharp scissors, cutting individual pieces rather than attempting to reshape sections. This prevents split ends from traveling up the hair shaft and compromising the overall health.
The way you sleep affects how your bob maintains its shape. Silk or satin pillowcases reduce friction that causes tangles and frizz. For those who move significantly during sleep, loosely securing the hair in a high, soft scrunchie prevents it from becoming matted or misshapen.
When to Schedule Trims
Growth patterns influence trim frequency more than arbitrary timelines. Fast-growing hair might need attention every 4-5 weeks, while slower growth allows for longer intervals. Monitor how quickly your style loses its shape rather than adhering to rigid schedules.
Signs your layered bob needs professional attention include:
Perimeter Touching Shoulders: The length has grown beyond the intended bob range
Heavy, Shapeless Layers: Growth has eliminated the graduation between layers
Difficult Styling: The haircut no longer responds to your usual styling routine
Split or Damaged Ends: Visible damage affects the overall appearance
Lost Face Framing: The pieces around your face no longer flatter your features
Seasonal changes might also dictate trim timing. Summer humidity often requires shorter layers to prevent excessive volume, while winter’s dry air might benefit from slightly longer layers that provide more weight and smoothness. Adjust your maintenance schedule according to how your hair responds to environmental factors.
Planning trims around important events ensures your hair looks its best when it matters most. Schedule appointments 3-5 days before special occasions to allow the cut to settle and give you time to practice styling. This buffer also provides opportunity for minor adjustments if needed.
Your Modern Layered Bob
Creating and maintaining a modern layered bob represents both an art and a science, requiring technical precision balanced with creative vision. The techniques covered throughout this guide provide the foundational knowledge needed to achieve this sophisticated yet versatile style. From understanding the initial concept through the cutting process to long-term maintenance, each element contributes to the overall success of this contemporary classic.
The beauty of mastering these techniques lies in the endless customization possibilities they offer. Every individual’s hair presents unique characteristics that influence how the layers fall, how the shape develops, and how the finished style appears. Whether you’re cutting your own hair or working on others, remember that perfection comes through practice, patience, and a willingness to adapt techniques to suit specific needs. Your modern layered bob journey starts with that first confident cut and evolves with each styling session, trim, and creative interpretation along the way.
Frequently Asked Questions
Q: Can I cut a layered bob on wet or dry hair?
A: While both methods work, cutting damp hair provides the most control and precision for creating even layers. Wet hair shows the true length and allows for cleaner cutting lines, though some stylists prefer dry cutting for curly hair to see exactly how the layers will fall naturally.
Q: What’s the ideal length for a modern layered bob?
A: The perfect length typically falls between the chin and shoulders, though this varies based on face shape and personal preference. Most flattering versions hit just below the jawline to mid-neck, providing enough length for versatility while maintaining the classic bob silhouette.
Q: How do I prevent my layered bob from looking triangular?
A: Avoid creating layers that are too short at the crown while leaving excessive weight at the bottom. Proper weight distribution through strategic layering and regular texturizing prevents the pyramid effect, especially important for those with thick or coarse hair.
Q: Will a layered bob work with my natural curls?
A: Absolutely! Curly hair looks fantastic in a layered bob when cut properly. The key involves cutting the hair dry or accounting for shrinkage, using techniques that enhance rather than fight your natural curl pattern, and avoiding excessive thinning that might cause frizz.
Q: How often should I wash my layered bob?
A: Washing frequency depends on your hair type and lifestyle, but most people find 2-3 times per week optimal. This schedule maintains natural oils that keep the layers smooth and manageable while preventing buildup that weighs down the style.
Q: What’s the difference between layers and texture in a bob?
A: Layers involve cutting different lengths throughout the hair to create movement and remove weight, while texturizing refers to techniques that create variation within those layers. Both work together to achieve the dimensional look characteristic of modern bobs.
Q: Can fine hair handle a layered bob without looking too thin?
A: Fine hair actually benefits from strategic layering that creates illusion of fullness. The trick involves minimal layering focused on creating movement rather than removing excessive weight, combined with volumizing products and styling techniques.
Q: How do I grow out a layered bob gracefully?
A: Growing out requires patience and regular trims to maintain shape during transition. Focus on growing the perimeter first while gradually reducing the difference between your shortest and longest layers through strategic trimming every 6-8 weeks.