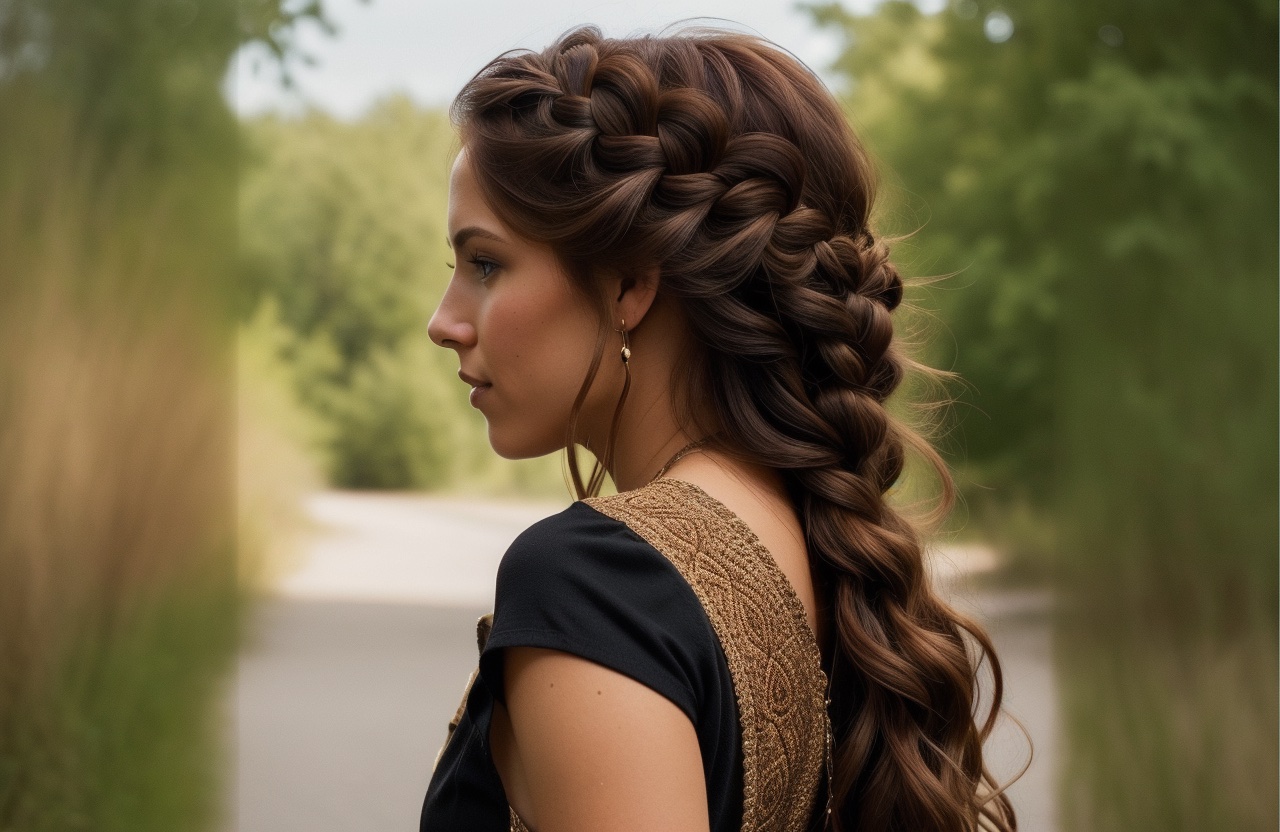
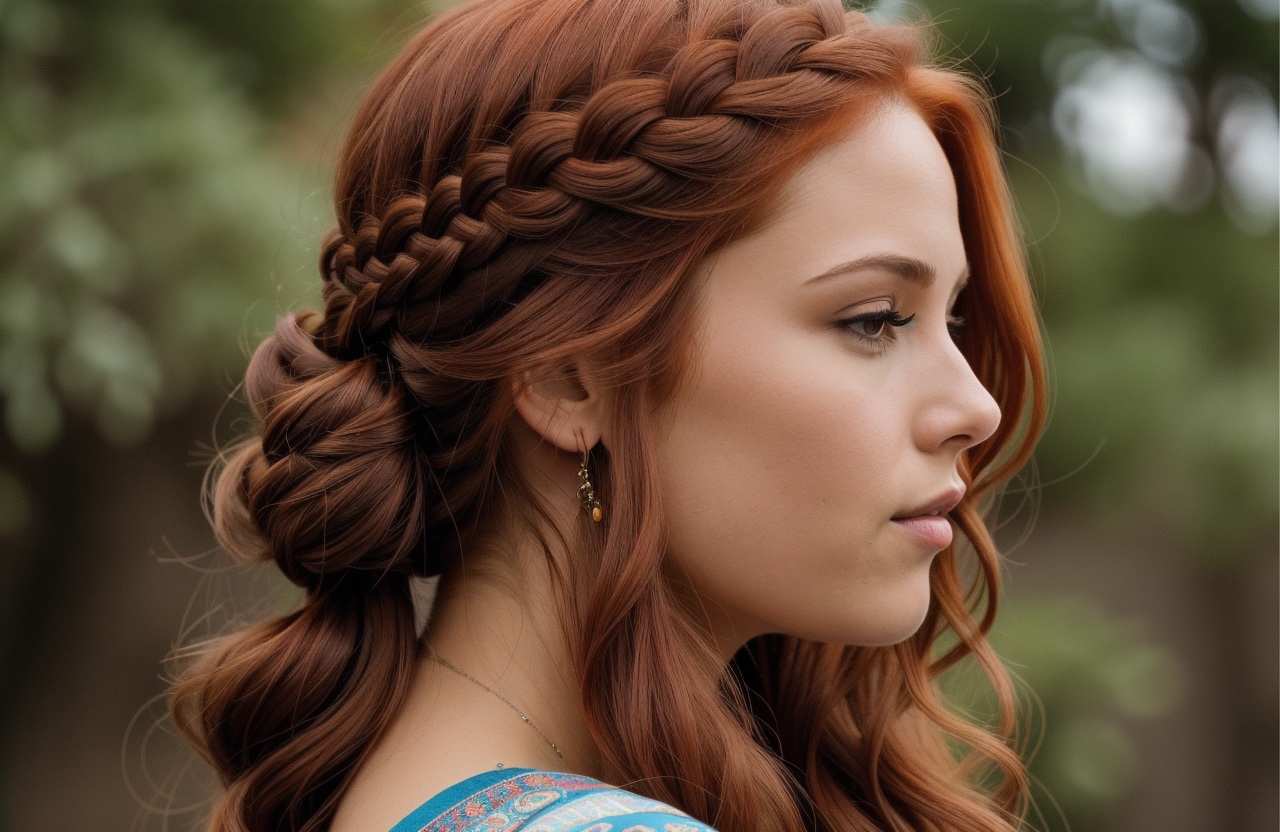
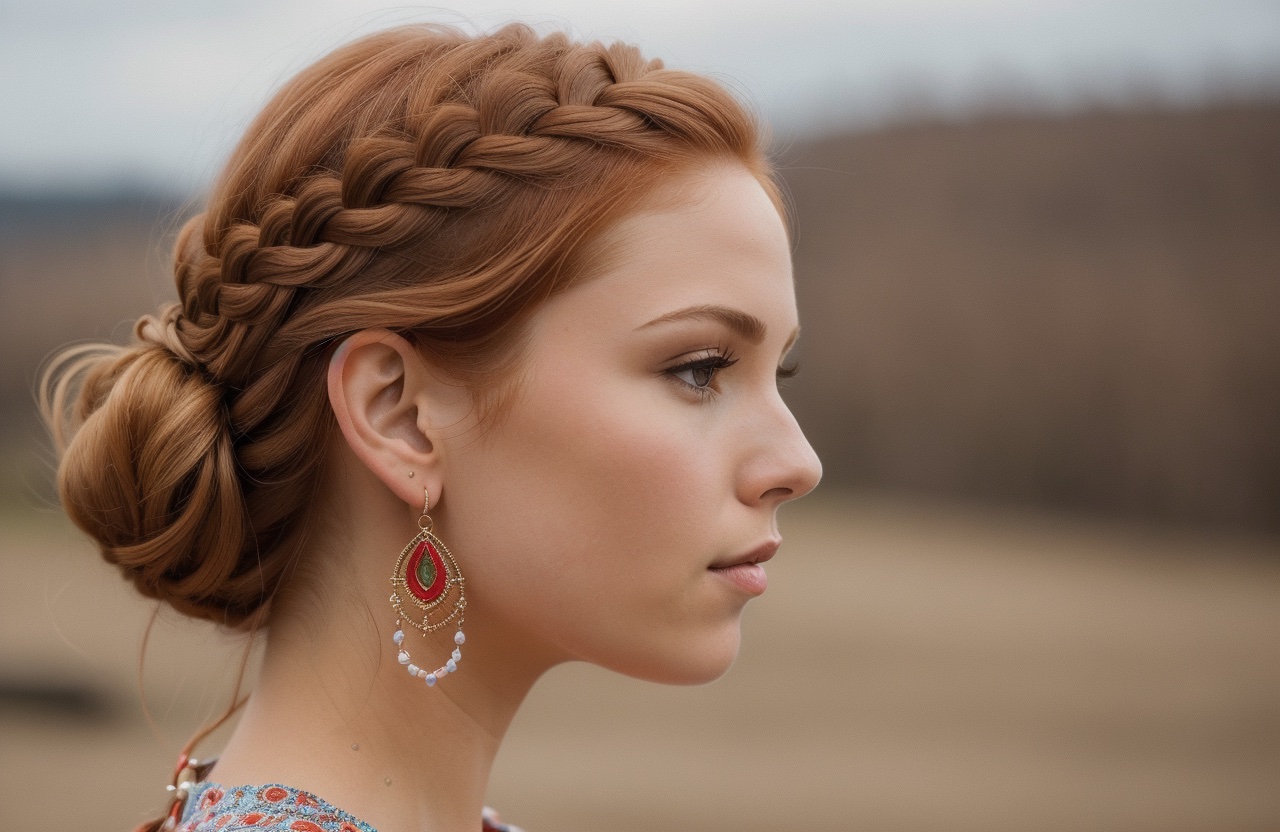
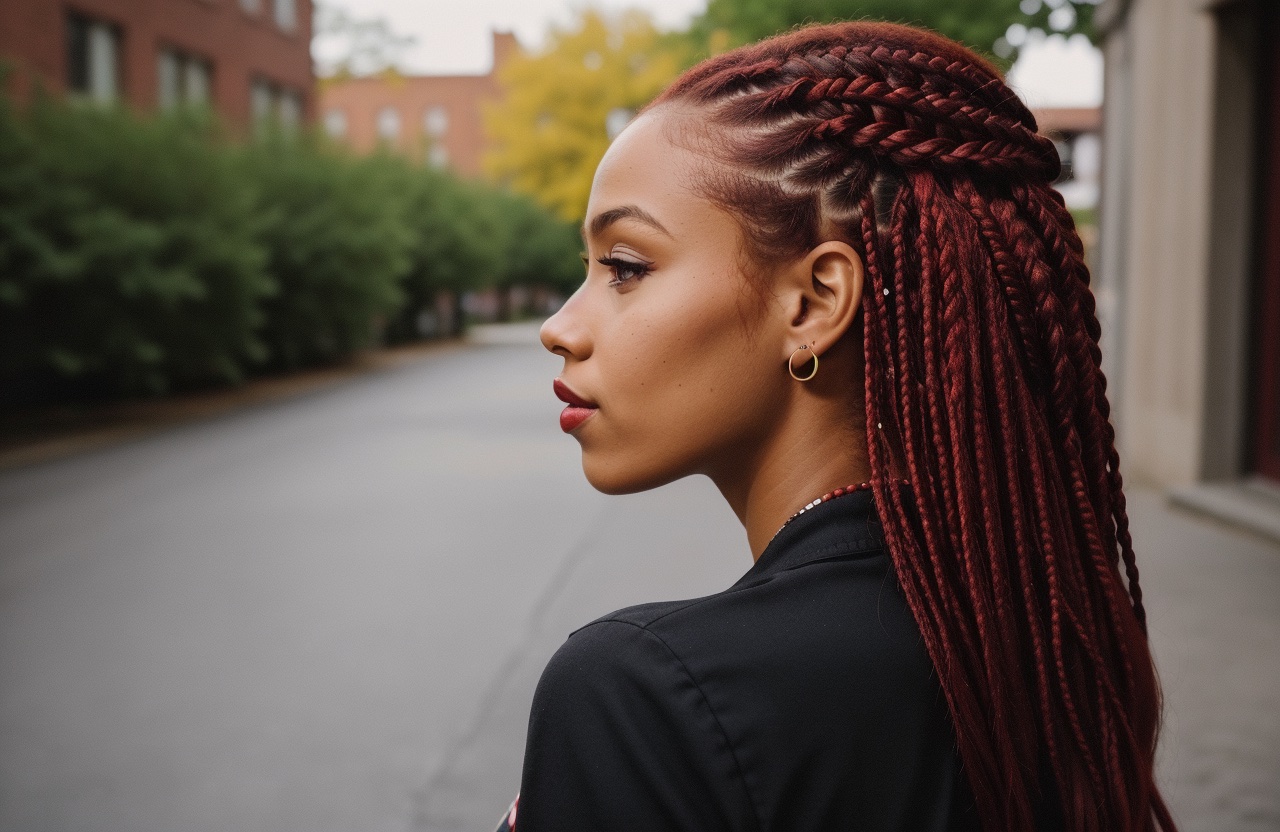
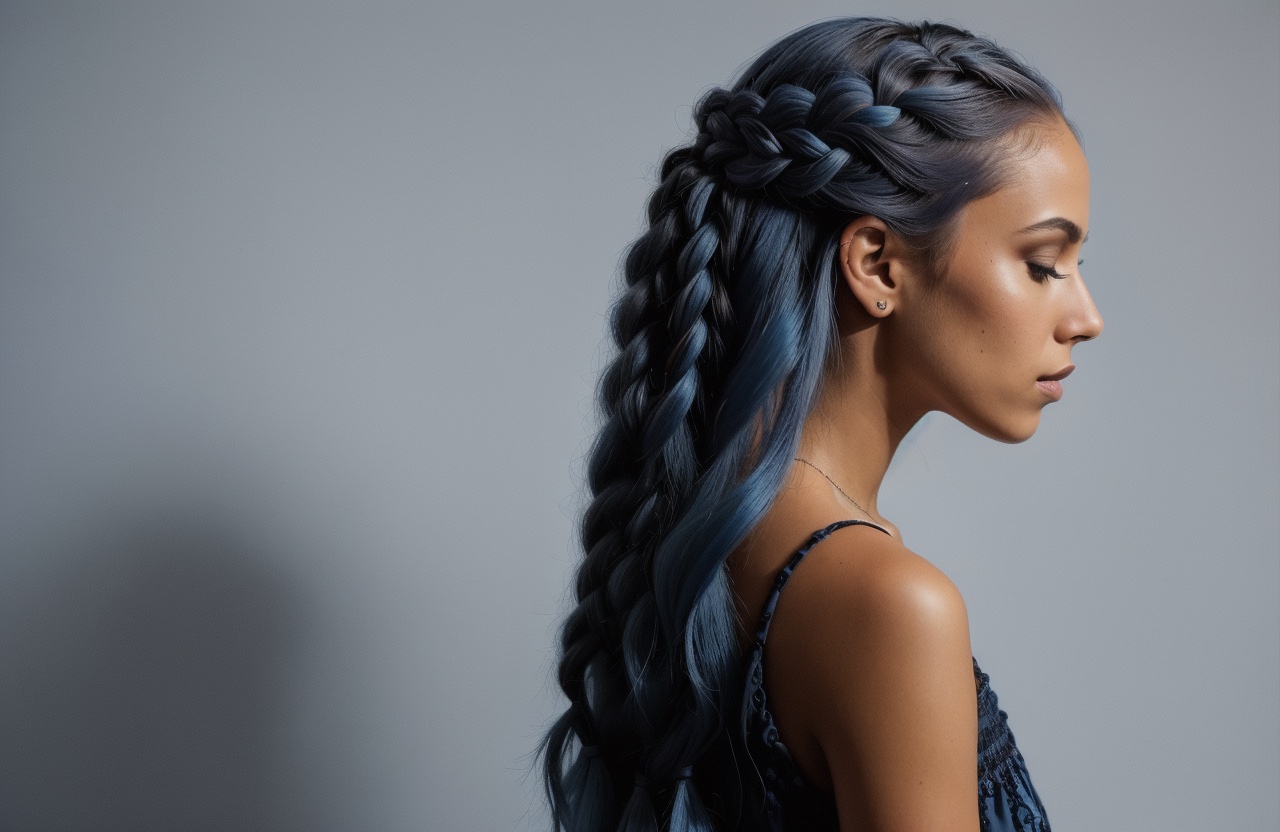
The bohemian braid has become one of those hairstyles that perfectly captures the spirit of relaxed sophistication. Unlike traditional braids that require precision and tight weaving, this style celebrates imperfection with its loose, textured appearance that looks effortlessly beautiful. Women everywhere have discovered that this particular style offers the rare combination of looking put-together while maintaining that carefree, artistic vibe that defines bohemian fashion.
Creating the perfect bohemian braid isn’t about following rigid rules or achieving geometric precision. The beauty lies in understanding how to intentionally craft that undone, romantic texture that makes these braids so captivating. Whether you have pin-straight hair or natural waves, thick locks or fine strands, mastering this technique opens up countless possibilities for expressing your personal style through hair that looks both elegant and approachable.
We’ll walk through everything from understanding what truly defines this braiding style to mastering the techniques that bring it to life. You’ll discover how to prepare your hair for optimal results, learn step-by-step methods for creating various bohemian braid styles, and find out how to adapt them for different occasions. Plus, we’ll share maintenance tips that keep your creation looking fresh all day long. Ready to transform your hair into a work of art that captures that coveted bohemian spirit? Let’s get started.
What Makes a Braid Truly Bohemian
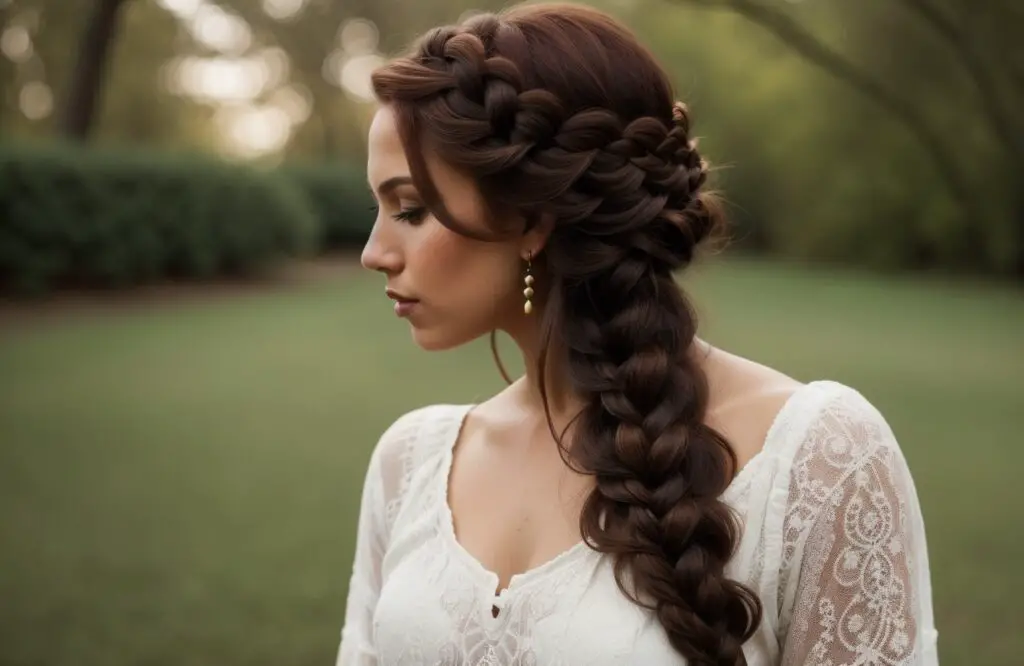
A bohemian braid immediately stands out from other braiding styles through its distinctively loose weave and organic flow. Rather than pulling each section taut, you allow the hair to maintain natural movement and body. The result creates dimension and visual interest that rigid braids simply cannot achieve. This relaxed approach means working with your hair’s natural tendencies rather than fighting against them.
The texture should appear lived-in, as if you’ve spent the day wandering through flower fields or dancing at a music festival. Achieving this requires a delicate balance between control and chaos. You want enough structure to maintain the braid’s shape while allowing individual strands to escape and frame your face naturally.
Essential elements that define the style
Several key components work together to create an authentic bohemian braid. First, volume plays a crucial role – the braid should have substance and fullness rather than lying flat against your head. This often means incorporating teasing or texturizing techniques before you even begin braiding.
The placement also matters significantly. Bohemian braids often sit slightly off-center or incorporate multiple smaller braids woven together. They might start as a regular braid and transition into something more complex, or begin loose from the crown. The overall silhouette should feel organic and spontaneous rather than symmetrical and planned.
Face-framing pieces are another hallmark of the style. Strategic wisps and tendrils soften the overall look and prevent it from appearing too polished. These pieces should look naturally fallen rather than carefully arranged, though achieving this casual appearance often requires thoughtful planning.
Difference between regular braids and bohemian versions
Traditional braids focus on uniformity and neatness. Each section gets divided equally, pulled with consistent tension, and secured tightly to prevent any straying. The goal is often durability and a clean, professional appearance. Think of the braids you might wear to the gym or office – functional and tidy.
Bohemian braids flip this approach entirely. Sections might vary in size, creating an irregular pattern that adds visual interest. The tension changes throughout, sometimes tighter near the scalp and looser toward the ends, or vice versa. Small sections get pulled out intentionally after braiding to create that signature messy texture.
The finishing touches differ dramatically too. While regular braids often end with a simple elastic hidden by wrapped hair, bohemian styles might incorporate ribbons, flowers, or metallic threads woven throughout. The ends might be left loose and wavy rather than secured neatly.
Key characteristics to achieve
Creating an authentic bohemian braid requires attention to specific details that define the style. The braid should have visible texture throughout – this means your hair needs some grip and grit rather than being silky smooth. Products that add texture become your best friends in achieving this look.
The shape should be slightly irregular and organic. Perfect symmetry works against you here. Instead, aim for gentle curves and natural-looking bumps that suggest movement and life. The braid might be fuller in some sections and narrower in others, creating visual rhythm.
Color variation enhances the bohemian effect significantly. Whether through natural highlights, intentional coloring, or temporary additions like clip-in pieces, having multiple tones visible in the braid adds depth and makes the texture more apparent. Even subtle variations in shade can make a dramatic difference in the final appearance.
Finally, the overall impression should be romantic and slightly undone. The style should look like it could have been created in minutes, even though achieving that effortless appearance often requires careful attention and practice.
Preparing Your Hair for the Perfect Bohemian Look
Getting your hair ready sets the foundation for a stunning bohemian braid that holds its shape while maintaining that signature relaxed texture. The preparation phase determines whether your braid will look authentically effortless or simply messy.
Best hair textures and lengths for bohemian braids
Medium to long hair provides the ideal canvas for bohemian braids, typically falling at least past the shoulders. This length gives you enough material to create the loose, flowing effect that defines the style. Shorter hair can work too, but you’ll need to adjust your expectations and possibly incorporate extensions or creative pinning techniques.
Natural texture plays a huge role in achieving the bohemian look. Wavy or slightly curly hair already has the built-in texture that makes these braids appear effortlessly beautiful. The natural bends and curves in textured hair create interesting patterns within the braid itself. Straight-haired women shouldn’t worry though – there are plenty of techniques to add the necessary texture before braiding.
Fine hair benefits from volumizing treatments and strategic teasing to create the fullness bohemian braids require. Thick hair, while naturally voluminous, might need thinning or sectioning strategies to prevent the braid from becoming too bulky. Each hair type brings its own advantages and challenges to creating this style.
Second or third-day hair often works better than freshly washed locks. The natural oils and slightly lived-in texture provide better grip for braiding and help maintain the style throughout the day. If you must start with clean hair, don’t skip the texturizing products.
Products that create the right foundation
The right products make the difference between a bohemian braid that lasts all day and one that falls apart within hours. Start with a volumizing mousse or root lift spray applied to damp hair before blow-drying. This creates lift at the roots that translates into a fuller-looking braid.
Texture spray becomes your secret weapon for achieving that perfectly imperfect finish. Apply it throughout your hair, scrunching as you go to encourage natural movement and grip. Look for formulas that add grit without making hair feel sticky or crunchy. Sea salt sprays work wonderfully for creating beachy texture that complements the bohemian aesthetic.
Dry shampoo serves double duty – absorbing excess oil while adding volume and texture. Even if your hair isn’t oily, a light application of dry shampoo provides the grip needed for the braid to hold its shape. Focus on the roots and mid-lengths, avoiding the ends where you want to maintain softness.
A lightweight holding spray applied before braiding helps maintain the style without creating stiffness. Choose flexible hold formulas that allow movement while providing enough control to keep everything in place.
Pre-styling techniques for added texture
Creating texture before you begin braiding ensures your bohemian braid has that coveted undone quality. If you have straight hair, consider these pre-styling approaches:
Overnight Preparation: Sleeping in loose braids or twists creates natural waves without heat damage.
Heat Styling: Use a large-barrel curling iron to create loose waves, then brush through them gently.
Crimping Sections: Crimp random pieces throughout for varied texture that adds interest.
Twist and Pin: Create small twists all over, secure with bobby pins, then release after an hour.
Teasing plays a crucial role in achieving volume. Work in sections, gently backcombing at the roots to create lift. Focus on the crown area where you want maximum height. The key is building volume gradually rather than creating obvious bumps.
For naturally curly or wavy hair, you might actually need to smooth certain sections slightly while maintaining overall texture. A wide-tooth comb can help distribute natural texture more evenly without completely smoothing it out.
Common preparation mistakes to avoid
Over-conditioning leaves hair too slippery to hold a braid properly. If you’ve recently deep-conditioned, consider using more texturizing products or waiting another day before attempting your bohemian braid. The style needs some friction to maintain its shape.
Starting with hair that’s too clean and smooth makes achieving the bohemian texture nearly impossible. Your braid will look too perfect and polished, missing that essential lived-in quality. If you’ve just washed your hair, load up on texturizing products and consider roughing it up with your hands.
Using too much product creates heaviness that weighs down the braid and prevents that airy, romantic feeling. Build products gradually, starting with less than you think you need. You can always add more, but removing excess product means starting over.
Skipping the volumizing step at the roots results in a flat braid that lacks the fullness bohemian styles require. Even if you have thick hair, creating lift at the crown makes a significant difference in the overall appearance.
Not considering your hair’s natural tendencies leads to frustration. Work with what you have rather than fighting against it. If your hair naturally falls to one side, incorporate that into your braid placement. If certain sections tend to be frizzier, position them where a little extra texture actually enhances the look.
Step-by-Step Braiding Techniques
Start by gathering your hair into a low, loose ponytail position without actually securing it with an elastic. This gives you a sense of where your braid will naturally fall. Bohemian braids typically sit lower on the head than traditional styles, often beginning at the nape of the neck or slightly to one side. Divide your hair into three uneven sections – this irregularity adds to the organic feel of the finished braid.
Begin braiding with very light tension, allowing the sections to overlap loosely rather than pulling them tight. Your hands should move in a relaxed, flowing motion rather than the controlled, precise movements of traditional braiding. As you work down the length of your hair, vary the tension slightly – sometimes a bit tighter, sometimes looser – to create natural-looking variations in the braid’s width.
The rhythm of bohemian braiding differs from standard techniques. Instead of maintaining consistent speed and tension throughout, you’ll speed up and slow down, creating subtle variations that prevent the braid from looking too uniform. Think of it as braiding while dancing – there’s movement and flow rather than mechanical precision.
Don’t worry about catching every single strand as you braid. Small pieces that escape add to the overall texture and movement. In fact, you might intentionally leave out a few face-framing pieces from the very beginning, knowing they’ll soften the final look.
Creating the signature messy texture
Once you’ve completed the basic braid, the real transformation begins. This is where you turn a regular braid into something special. Start at the top of your braid and gently tug at the edges of each section, pulling small pieces outward to create volume and texture. Work your way down systematically, but vary how much you pull each section.
The technique called “pancaking” helps create that full, voluminous appearance. Gently pull the outer edges of each braid section horizontally, flattening and widening them slightly. This makes the braid appear fuller and more substantial while maintaining its structure. Focus on pulling the sections that face outward for maximum visual impact.
Random pieces should be pulled completely free from the braid. These wisps and tendrils are essential for achieving that effortlessly undone appearance. Target areas around your face, the crown, and along the sides of the braid. The key is making it look accidental even though you’re being quite deliberate about placement.
Use your fingers to rough up the surface texture of the braid itself. Gently rub sections between your fingers to create a slightly fuzzy, lived-in appearance. This technique works particularly well if you’ve properly prepped your hair with texturizing products.
Incorporating twists and pulls for volume
Adding twisted elements within your bohemian braid creates visual interest and additional texture. As you braid, occasionally twist one section before crossing it over. This creates a rope-like texture within certain parts of the braid that catches light differently and adds dimension.
The “pull and pin” technique involves pulling sections loose, twisting them slightly, and then pinning them back into the braid at a different point. This creates loops and interesting shapes that make your braid look more complex and artistic. Use bobby pins that match your hair color for a seamless look.
Consider incorporating the “bubble braid” technique in sections. After completing a portion of your braid, gently pull it apart to create a bubble or expanded section, then continue braiding normally. These bubbled sections add unexpected volume and create focal points within the overall style.
For maximum volume at the crown, try the “flip and pull” method. Before you begin braiding, flip your head upside down and braid the first few sections in this position. When you flip back up, you’ll have natural lift at the roots. Then continue pulling and loosening sections as you work down the braid.
Securing without losing the relaxed vibe
The way you finish your bohemian braid can make or break the entire look. Traditional clear elastics often look too neat and obvious for this style. Instead, consider these securing methods that maintain the bohemian aesthetic:
Natural Wrapping: Take a small section of hair from the braid’s end and wrap it around the elastic.
Ribbon Ties: Use soft fabric ribbons or leather cords instead of elastics.
Invisible Securing: Use a small, clear elastic but position it higher up, allowing the ends to remain loose.
Pin Tuck Method: Fold the end under and secure with bobby pins for a finished look.
Leave the very ends of your braid loose and slightly messy. You might even consider unbraiding the last inch or two, allowing the hair to flow naturally. This prevents the style from looking too controlled at the bottom.
If your braid feels too loose and you’re worried about it falling apart, strategically placed bobby pins can add security without being visible. Slide them into the braid at angles, catching the inner sections while leaving the outer appearance unchanged. Match the pins to your hair color and hide them within the braid’s texture.
The final touch involves a light misting of flexible-hold hairspray. Hold the can at least 12 inches away and mist lightly over the entire braid. You want just enough product to maintain the style without creating stiffness or shine that would detract from the natural, bohemian appearance.
Styling Variations for Different Occasions
Your daily bohemian braid should feel effortless enough to create during your morning routine while still looking polished for work or errands. Start with a simple side braid that begins just behind one ear and drapes over the opposite shoulder. This placement feels natural and won’t interfere with daily activities like driving or working at a computer.
For busy mornings, try the “mock bohemian” approach. Create a regular three-strand braid but leave it quite loose from the start. Once secured, spend just thirty seconds pulling at sections and roughing up the texture. This gives you that bohemian feel without the time investment of more elaborate techniques. A quick spritz of texture spray beforehand makes even this simple version look intentionally styled.
The half-up bohemian braid works beautifully for casual days when you want your hair partially down. Gather just the top section of your hair, create a loose braid that extends a few inches, then secure it with a small elastic. Pull the braid apart for volume and allow the rest of your hair to flow freely. This style keeps hair out of your face while maintaining a relaxed appearance.
Consider creating two loose bohemian braids that frame your face for a youthful, playful variation. Keep them intentionally messy and uneven – one might start higher than the other, or be slightly thicker. This asymmetry adds to the casual, carefree vibe perfect for weekend activities or running errands.
Festival and concert-ready styles
Music festivals and concerts call for bohemian braids that can withstand hours of dancing while looking photogenic from every angle. The crown braid remains a favorite for these occasions. Start a loose braid at one ear, following your hairline around to the other side. Instead of keeping it tight against your head, allow it to sit slightly away from your scalp, creating a halo effect.
Multiple braids woven together create the perfect festival statement. Start with three or four thin bohemian braids scattered throughout your hair, then loosely weave them together into one larger braid. The result looks intricate and artistic while maintaining that essential undone quality. Add small flowers, feathers, or metallic threads throughout for extra festival flair.
The waterfall bohemian braid combines flowing hair with braided elements for stunning movement while dancing. This technique involves dropping sections of hair through the braid as you work, creating a cascade effect. Keep the overall tension very loose and pull at the braided sections for extra volume.
Space buns with bohemian braided details have become a festival staple. Create two high buns but braid the sections loosely before wrapping them. Pull pieces free around your face and from the buns themselves. This style stays secure during long events while embodying that free-spirited festival aesthetic.
Bohemian braids for formal events
Formal occasions require bohemian braids that feel elegant while maintaining their relaxed character. The low bohemian chignon starts as a loose braid that you then wrap and pin into a bun at the nape of your neck. Pull strategic pieces free to frame your face and create texture throughout. This sophisticated style works beautifully with both cocktail dresses and formal gowns.
A side-swept bohemian braid draped over one shoulder creates an asymmetrical look perfect for events where you’ll be photographed. Begin the braid high on the opposite side of where it will rest, allowing it to sweep dramatically across your head. Keep the braid very loose and full, pulling sections for volume before securing the end with a decorative clip or wrapped ribbon.
The bohemian crown combines multiple braiding techniques for a truly special occasion look. Create a loose fishtail braid as your base, then incorporate twisted sections and pulled pieces throughout. Position it like a headband across the top of your head, securing with bobby pins hidden within the braid’s texture:
Base Structure: Begin with a deep side part and section off hair from temple to temple.
Braiding Method: Use a combination of standard and fishtail techniques for varied texture.
Volume Building: Pull sections dramatically for an ethereal, romantic appearance.
Secure Points: Pin at both temples and the crown, leaving ends to blend with flowing hair.
Finishing Touches: Add pearl pins or delicate flowers for formal elegance.
For black-tie events, consider a bohemian-inspired updo that incorporates multiple braided elements. Create several loose braids throughout your hair, then pin them in an artistic arrangement at the back of your head. Leave strategic pieces loose for movement and soften the overall silhouette with face-framing wisps.
Seasonal adaptations and accessories
Summer bohemian braids should feel beachy and carefree. Incorporate sea-inspired accessories like shell clips or turquoise beads woven through the braid. Keep the texture extra messy and windswept, as if you’ve just returned from a day at the ocean. Consider leaving the bottom third of your hair unbraided for a mermaid-like effect.
Fall calls for richer textures and warmer tones in your bohemian braids. Weave burgundy ribbons or copper wire through your braid for seasonal color. Create fuller, more substantial braids that complement cozy sweaters and scarves. Adding small artificial autumn leaves or berries makes for stunning seasonal photography.
Winter bohemian braids can incorporate metallic elements for holiday parties or cozy knitted details for everyday wear. Try threading thin tinsel or metallic thread through your braid for subtle sparkle. For casual winter days, create a loose braid that works with winter hats – position it low and to the side so it won’t be crushed.
Spring styles should feel fresh and romantic. Incorporate fresh or silk flowers throughout your braid, focusing on small blooms that won’t overwhelm the hairstyle. Pastel ribbons or delicate chains add to the seasonal feeling. Keep the overall texture lighter and airier than winter versions, suggesting growth and renewal.
Maintaining Your Bohemian Braid Throughout the Day
Finding the right balance of products keeps your bohemian braid intact without sacrificing its intentionally undone appearance. A texturizing powder applied at the roots before braiding provides incredible staying power. Just a small amount worked into the hair near your scalp creates grip that lasts all day. The powder absorbs oils that might otherwise cause the braid to slip while adding volume that prevents flattening.
Setting sprays designed for flexible hold work better than traditional hairsprays for this style. Look for formulas that promise “touchable hold” or “natural movement.” Apply these products in light layers rather than one heavy coating. Hold the bottle at arm’s length and mist over the completed braid, allowing the product to settle gently rather than saturating any one area.
For extra security in humid weather, consider using an anti-humidity serum before braiding. These products create an invisible barrier that prevents moisture from causing frizz or loosening your carefully crafted texture. Apply primarily to the mid-lengths and ends, avoiding the roots where you want to maintain volume.
Hair oils might seem counterintuitive for hold, but a tiny amount applied to the very ends prevents them from looking dry or frizzy as the day progresses. Choose lightweight formulas that won’t weigh down your braid. Argan or jojoba oils work particularly well, adding shine without greasiness.
Touch-up techniques without starting over
Small fixes throughout the day keep your bohemian braid looking fresh without requiring a complete redo. Carry a small texturizing spray in your bag for quick refreshers. A light spritz followed by gentle scrunching revives texture that might have fallen flat.
When sections start escaping more than you’d like, don’t immediately reach for bobby pins. First, try gently twisting the loose piece and threading it back through the braid using your finger. This often holds better than pinning and maintains the organic look. If you must use pins, slide them in at an angle following the direction of the braid.
Flyaways around your face can be tamed without disturbing the overall style. A clean mascara wand or toothbrush sprayed lightly with hairspray works perfectly for smoothing small sections. Brush gently in the direction you want the hair to lay, being careful not to flatten the purposeful messiness.
If the braid starts feeling too loose at certain points, try the “twist and tuck” method. Take the loose section, give it a gentle twist, then tuck it under the adjacent part of the braid. This tightens specific areas without affecting the overall relaxed appearance. You can also gently pull the braid in opposite directions at loose points to create temporary tightness.
Protecting the style while sleeping
Preserving your bohemian braid overnight lets you enjoy the style for multiple days with minimal morning touch-ups. The key lies in preventing friction and maintaining the braid’s shape without adding pressure that could create dents or flat spots.
Switching to a silk or satin pillowcase reduces friction significantly. These smooth fabrics allow your hair to glide rather than catch and pull. If changing pillowcases isn’t an option, a silk scarf wrapped loosely around your braid achieves the same effect. Secure the scarf with a loose knot that won’t leave marks.
The pineapple method adapted for braids works wonderfully. Gently gather your braid on top of your head, securing it very loosely with a soft scrunchie. This keeps the braid from being crushed while you sleep. Position it slightly forward so you’re not lying directly on the gathered section.
For side braids, try sleeping on the opposite side with the braid draped over your pillow. Place a silk scarf under the braid to prevent direct contact with cotton pillowcases. This position preserves the braid’s shape while preventing the weight from pulling at your scalp all night.
Refreshing day-old bohemian braids
Second-day bohemian braids often look better than freshly styled ones. The natural settling overnight creates authentic texture that’s difficult to achieve on purpose. Start your refresh by assessing which areas need attention rather than automatically redoing everything.
Revive flattened sections by gently massaging the scalp underneath with your fingertips. This creates lift at the roots without disturbing the braid itself. Focus on the crown area where volume tends to disappear overnight. A quick blast of cool air from your blow dryer aimed at the roots while lifting sections adds instant volume.
Redefine the texture by lightly misting with water mixed with a small amount of leave-in conditioner. The moisture reactivates any styling products from the day before while the conditioner prevents frizz. Scrunch gently after misting to encourage the texture to spring back.
If certain pulled sections have lost their shape, re-pull them slightly differently than the day before. This creates new texture patterns that look intentional rather than slept-on. Focus on areas that frame your face, as these have the most visual impact.
Sometimes day-old bohemian braids benefit from transitioning into a new style rather than trying to preserve the original. Transform your braid into a bohemian bun by wrapping and pinning it loosely. Or undo the bottom half and leave it as waves while keeping the top portion braided. These adaptations give you a fresh look while working with the texture you’ve already created.
Your Bohemian Braid Journey
Mastering the bohemian braid opens up a world of hairstyling possibilities that perfectly balance elegance with ease. You’ve discovered that this style isn’t about perfection but rather about understanding how to create intentional imperfection that looks effortlessly beautiful. From selecting the right products and preparation techniques to executing various braiding methods and maintaining your style throughout the day, each element contributes to achieving that coveted bohemian aesthetic.
The versatility of bohemian braids means you’ll never run out of ways to express your personal style. Whether you’re heading to the office with a simple side braid, dancing at a festival with elaborate woven styles, or attending a formal event with an elegant braided updo, these techniques adapt to any occasion. The key lies in adjusting the level of refinement while maintaining that signature relaxed texture that makes bohemian braids so appealing. With practice, creating these beautiful styles becomes second nature, allowing you to achieve that perfectly undone look that captures the free-spirited essence of bohemian beauty.
Frequently Asked Questions
Q: How long does my hair need to be to create a bohemian braid?
A: Your hair should ideally reach at least past your shoulders for the best results. However, shorter hair around chin to shoulder length can work with modifications like adding extensions or creating multiple smaller braids instead of one large one.
Q: Can I achieve a bohemian braid with very straight, fine hair?
A: Yes, fine straight hair can absolutely work for bohemian braids. The key is proper preparation with volumizing products, texturizing sprays, and potentially curling your hair first to add grip and texture before braiding.
Q: How do I prevent my bohemian braid from completely falling apart?
A: Use texturizing products before braiding for better grip, strategically place bobby pins within the braid for invisible support, and finish with a flexible-hold hairspray. Also, avoid making the braid too loose initially – you can always loosen it more after securing.
Q: What’s the difference between a fishtail bohemian braid and a regular bohemian braid?
A: A fishtail bohemian braid uses two sections of hair instead of three, creating a more intricate, scale-like pattern. When pulled apart and roughed up, fishtail braids create even more texture and visual interest than regular three-strand bohemian braids.
Q: Should I wash my hair before creating a bohemian braid?
A: Actually, second or third-day hair works better for bohemian braids. The natural oils and texture provide better grip and hold. If you must start with clean hair, load up on texturizing products to create the necessary grit and grip.
Q: Can I sleep in my bohemian braid and still have it look good the next day?
A: Absolutely! Use a silk pillowcase or wrap the braid in a silk scarf, secure it loosely on top of your head while sleeping, and refresh with a bit of texturizing spray in the morning. Day-old bohemian braids often look even better than fresh ones.
Q: What accessories work best with bohemian braids?
A: Natural elements like small flowers, feathers, or wooden beads complement the bohemian aesthetic perfectly. Ribbons, leather cords, metallic threads, and vintage hair clips also work beautifully. Choose accessories that enhance rather than overwhelm the relaxed vibe.
Q: How do I know if I’m pulling the braid apart too much?
A: You’ve pulled too much if the braid’s structure starts disappearing or if you can see through to the elastic. Start conservatively with gentle pulls and gradually increase until you achieve your desired fullness while maintaining the braid’s basic shape.