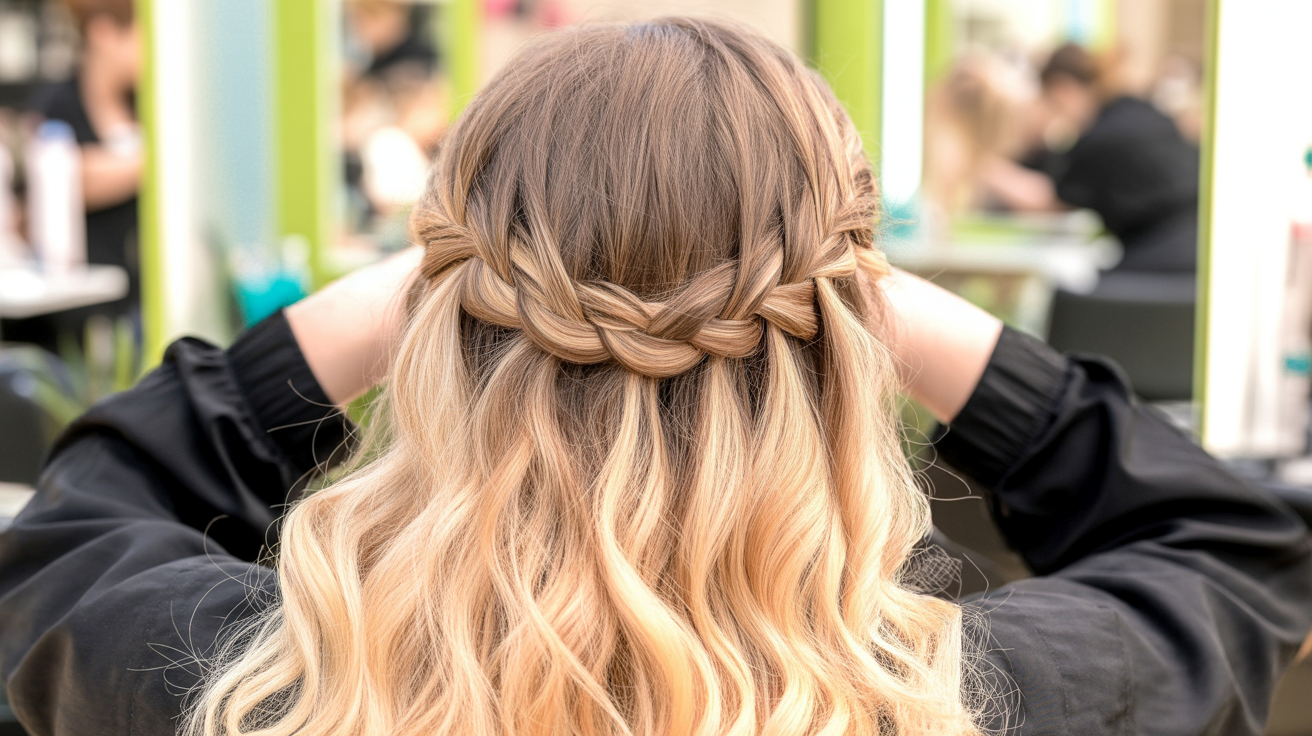
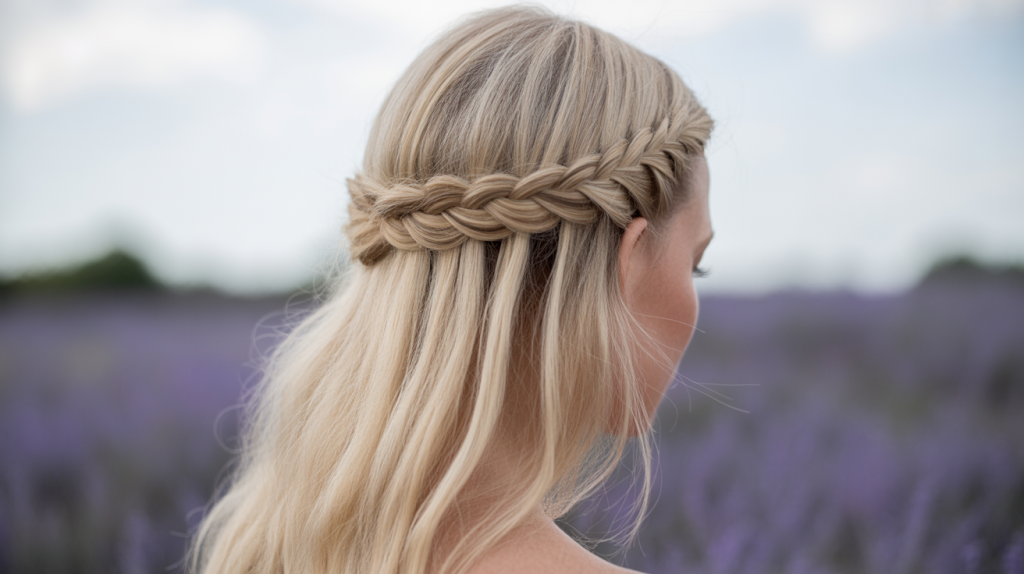
The French braid with waterfall technique creates a stunning cascading effect that looks far more complicated than it actually is. This braiding method combines the structured foundation of a traditional French braid with the romantic flowing elements of dropped hair sections. Unlike regular braids that secure all your hair from root to tip, this technique allows portions of your hair to fall freely while maintaining an intricate woven pattern across your head.
Learning this particular braiding style offers the perfect entry point for women who want to master more advanced hair techniques without feeling overwhelmed. The waterfall method builds directly on basic French braiding skills, making it accessible for beginners while delivering professional-looking results. Most women find they can achieve a beautiful waterfall braid within just a few practice sessions, even if they’ve never attempted complex braiding before.
Let’s break down here every aspect of creating this gorgeous hairstyle step by step. Including the essential preparation techniques, the specific hand movements required, and how to troubleshoot common challenges that beginners face. We’ll also share various styling options and finishing touches that will help you customize this versatile look for any occasion.
Understanding the French Braid Foundation
The foundation of mastering any waterfall braid starts with understanding how traditional French braiding works. This technique forms the backbone of countless hairstyles and serves as your stepping stone to more advanced braiding methods. Once you grasp these fundamental movements, creating that gorgeous cascading effect becomes much more achievable.
Basic French Braid Technique and Hand Positioning
French braiding requires specific hand positioning that might feel awkward at first. Hold your hands close to your scalp with your palms facing downward. Your thumbs should point toward your ears while your fingers grip the hair sections firmly but gently.
Start by sectioning off a triangle of hair at the crown of your head. Divide this section into three equal strands. The key lies in keeping consistent tension as you cross the right strand over the middle, then the left strand over the new middle. Your hands should move in a rhythmic pattern, with one hand always maintaining control while the other picks up new hair.
Practice this crossing motion without adding hair first. Many women find it helpful to practice on a friend or even a mannequin head before attempting it on themselves. The muscle memory develops faster than you might expect.
How the Waterfall Variation Modifies the Traditional French Braid Method
The waterfall technique transforms the standard approach by introducing a dropping mechanism. Instead of continuously adding hair to both sides of your braid, you’ll only add hair to the top section while releasing the bottom section completely.
Think of it as controlled letting go. Each time you would normally cross the bottom strand over the middle in a regular French braid, you drop that strand instead and pick up a fresh section from behind it. This creates the signature flowing effect that gives the style its name.
The timing of when to drop and when to pick up new sections determines the success of your braid. You’ll maintain the same three-strand structure throughout, but one of those strands constantly changes as you progress across your head.
Key Differences Between Regular French Braids and Waterfall Braids
Regular French braids incorporate all your hair into one contained structure. The waterfall method leaves most of your hair flowing freely while creating a woven band across your head. This fundamental difference affects everything from the tools you need to the final styling options.
The tension requirements also differ significantly. Traditional French braids can handle tighter braiding since all hair remains secured. Waterfall braids need gentler handling to prevent the dropped sections from looking messy or uneven.
Another major distinction involves the finishing process. Regular French braids end with a simple elastic at the nape of your neck. Waterfall braids often require bobby pins to secure the final sections and may need additional styling for the loose hair.
Essential Hair Preparation and Texture Requirements
Your hair condition directly impacts how well this technique works. Clean hair often proves too slippery for successful braiding, while overly dirty hair becomes difficult to manipulate smoothly.
Day-old hair provides the ideal texture for most women. The natural oils create just enough grip without making your hair look greasy. If you must start with freshly washed hair, apply a light texturizing spray or dry shampoo to add some grip.
Hair length plays a crucial role in achieving the waterfall effect. You need at least shoulder-length hair for the dropped sections to create that cascading appearance. Shorter hair can work, but the effect becomes less dramatic.
Tools and Products Needed for Successful Braiding
The right tools make this technique significantly easier to master. Here’s what you’ll need for best results:
Clear Elastics: These secure your braid without disrupting the visual flow of the style.
Bobby Pins: Choose pins that match your hair color for seamless blending.
Texturizing Spray: Adds grip to slippery hair and helps maintain the braid structure.
Wide-Tooth Comb: Detangles hair gently without creating static.
Hair Clips: Keep sections separated during the braiding process.
A good mirror setup proves essential for self-braiding. Position yourself between two mirrors or use a handheld mirror to check your progress from different angles. Many women find that practicing in good lighting prevents mistakes that occur in poorly lit spaces.
The products you choose should match your hair type. Fine hair benefits from volumizing sprays, while thick hair might need smoothing serums to prevent frizz during braiding. Avoid heavy products that weigh down your hair and make the waterfall sections look limp.
What Makes the Waterfall Technique Special?
This braiding method stands apart from every other technique because it creates movement within structure. The cascading effect mimics natural hair flow while maintaining the organized beauty of a woven pattern. Most braided styles secure hair completely, but this approach allows freedom and control to coexist.
The Science Behind the Cascading Waterfall Effect
The visual appeal of this technique stems from how light interacts with the varying hair levels. Each dropped section catches light differently than the braided portions, creating depth and dimension that flat hairstyles cannot achieve. The contrast between secured and flowing hair produces an optical illusion of movement even when you’re standing still.
Physics plays a role in how the dropped sections fall. Gravity pulls each released strand downward at slightly different angles, depending on where it was released from the braid. This natural variation prevents the style from looking too uniform or artificial.
Hair’s natural texture contributes to the overall effect. Straight hair creates clean, defined lines in the cascading sections. Wavy hair adds organic curves that soften the structured braid above. Curly hair produces volume and bounce in the released portions while the braided section remains controlled.
How Dropping and Picking Up Hair Sections Creates the Flowing Pattern
The dropping mechanism works by releasing one strand while immediately replacing it with a new section from behind. This constant exchange maintains the three-strand structure while creating the illusion of hair flowing through the braid rather than being trapped within it.
Each drop point becomes a release valve for the style. You control the spacing between drops, which determines how dense or sparse the cascading effect appears. Closer drops create more flowing sections, while wider spacing produces a more structured look with fewer falling strands.
The pickup process requires precision timing. You must gather the new hair section from the exact spot where the previous strand was released. This creates continuity in the flow pattern and prevents gaps or bunching in the overall design.
Why This Braid Works Beautifully on Different Hair Lengths and Textures
Medium-length hair showcases this technique perfectly because the dropped sections have enough length to create visible cascades without overwhelming the braided structure. The falling strands reach your shoulders or collarbone, producing an elegant frame around your face and neck.
Long hair amplifies the dramatic effect. The extended length of each dropped section creates sweeping movements that catch attention from across a room. You can enhance this further by adding waves or curls to the loose portions after completing the braid.
Shorter hair presents different advantages. While the cascading effect appears more condensed, it creates a sophisticated look that works well for professional settings. The controlled release of smaller sections maintains the style’s elegance without appearing overwhelming.
Hair thickness affects the technique’s success in predictable ways. Fine hair benefits from the added visual weight that the cascading sections provide, making your overall style appear fuller and more voluminous. Thick hair gains manageability through this method, as it removes bulk from the top while showcasing your hair’s natural abundance in the flowing sections.
Benefits of Choosing Waterfall Braids Over Other Braided Styles
This technique offers the best of both worlds for women who want styled hair without complete restriction. Traditional braids can feel tight and constraining throughout the day, but this method keeps most of your hair free and comfortable while adding visual interest.
Time investment proves reasonable compared to more complex braided styles. You can complete a basic version in under ten minutes once you master the technique. More elaborate variations might take longer, but they still require less time than intricate updo styles.
Versatility sets this approach apart from other braiding methods. Here are the main styling advantages:
Hair Texture Enhancement: Works with your natural texture instead of fighting against it.
Face Framing: The cascading sections create flattering angles around your face.
Professional Appropriate: Looks polished enough for workplace settings.
Event Ready: Elegant enough for formal occasions with minimal additional styling.
Low Maintenance: Requires fewer touch-ups throughout the day than complex updos.
When and Where to Wear This Versatile Hairstyle
Professional environments welcome this style because it appears polished without being overly formal. The structured braid portion demonstrates attention to detail, while the flowing sections maintain approachability. You can wear it to important meetings, presentations, or networking events with confidence.
Casual settings provide the perfect backdrop for this technique’s relaxed elegance. Weekend brunches, shopping trips, or coffee dates all suit this style well. The effortless appearance fits naturally into laid-back social situations.
Special occasions benefit from this method’s inherent romance. Wedding guests frequently choose this style because it photographs beautifully and complements formal attire without competing with the bride’s hairstyle. Date nights, anniversary dinners, and holiday parties all provide appropriate venues for showcasing this technique.
Seasonal considerations can influence your choice to wear this style. Summer months particularly suit this approach because it keeps hair off your neck while maintaining an elegant appearance. The flowing sections catch breezes naturally, providing some cooling effect during hot weather.
Step-by-Step French Waterfall Braid Tutorial
Breaking down this braiding method into manageable steps removes the intimidation factor that stops many women from attempting it. Each movement builds on the previous one, creating a logical progression that your hands will learn through repetition. The key lies in starting slowly and focusing on one element at a time rather than trying to rush through the entire process.
Proper Hair Sectioning and Starting Position Techniques
Begin by creating a deep side part using the pointed end of a rat-tail comb. The deeper the part, the more dramatic your finished style will appear. Position yourself in front of a well-lit mirror where you can see both the front and sides of your head clearly.
Take a triangular section of hair from the heavier side of your part, starting about two inches back from your hairline. This triangle should be roughly the same width as three of your fingers placed side by side. The section needs enough hair to work with but not so much that it becomes unwieldy.
Divide this triangular section into three equal strands. Hold the right strand in your right hand, the left strand in your left hand, and let the middle strand rest between your fingers. Your grip should be firm enough to maintain control but gentle enough to avoid creating tension that pulls on your scalp.
Position your hands close to your head with your elbows slightly raised. This posture prevents your arms from getting tired quickly and gives you better control over the braiding process. Keep your wrists flexible as you’ll need to rotate them slightly as the braid progresses across your head.
Detailed Breakdown of the Crossing Over Versus Dropping Method
Start with two standard French braid crosses to establish your foundation. Cross the right strand over the middle, then cross the left strand over the new middle. Add a small section of hair from the right side to the right strand, then cross it over the middle again.
Here’s where the technique diverges from traditional braiding. Instead of adding hair to the left strand and crossing it over, you’ll drop the left strand completely. Let it fall naturally and pick up a new section of hair from directly behind where you dropped the previous strand.
This new section becomes your left strand. Cross it over the middle just as you would in a regular French braid. The timing of this exchange creates the waterfall effect – you’re essentially threading new hair through your braid while allowing other sections to cascade freely.
Continue this pattern: add hair to the right strand and cross over, drop the left strand and pick up a replacement from behind it, then cross the new left strand over the middle. Each repetition creates another “waterfall” strand that flows down from your braid.
How to Maintain Consistent Tension While Braiding
Tension control determines whether your finished braid looks polished or messy. Too tight creates an uncomfortable pulling sensation and can cause the dropped strands to stick out awkwardly. Too loose results in a braid that falls apart or looks sloppy.
Aim for a tension level that feels secure but comfortable. The braid should sit against your head without creating any pulling sensation on your scalp. Test this by gently tugging on the braid after every few crosses – it should feel stable but not rigid.
Your grip pressure needs to remain consistent throughout the braiding process. Many women start with the right tension but gradually tighten their grip as they concentrate, leading to an uneven appearance. Check your grip every few crosses and consciously relax your fingers if you notice them clenching.
The dropped strands require special attention for tension management. Don’t pull on them as you release them from the braid. Simply let them fall naturally from your fingers. Pulling or tugging on these sections can disrupt the smooth flow pattern that makes this style so appealing.
Troubleshooting Uneven Sections and Loose Strands
Uneven hair sections create the most common problems with this technique. Each piece you pick up should roughly match the size of the piece you just dropped. This maintains visual balance and prevents some areas from looking fuller than others.
What should you do if you accidentally pick up too much or too little hair? Stop and adjust immediately rather than continuing with uneven sections. Gently release the oversized section and pick up a smaller amount, or add a bit more hair to an undersized section before proceeding.
Loose strands that escape from the braid during the process need immediate attention. Use a small bobby pin to secure any pieces that won’t stay in place, but try to hide the pins within the braid structure so they don’t show in the finished style.
If your braid starts to feel loose as you work, stop and gently tighten the existing crosses before continuing. This prevents the entire style from becoming too relaxed and potentially falling apart later in the day.
Finishing Techniques and Securing Your Waterfall Braid
Stop adding new sections when you reach the area just behind your ear. The exact stopping point depends on your preference – some women prefer to end at the ear, while others continue further back toward the nape of their neck.
Complete the remaining length using a standard three-strand braid with the hair you have left in your hands. This tail section will eventually be hidden, so focus on making it neat rather than perfect. Secure the end with a clear elastic band that blends with your hair color.
Tuck the braided tail under the rest of your hair and secure it with bobby pins placed in an X-pattern for maximum hold. Choose pins that match your hair color exactly so they disappear into the style. Position the pins where they’ll be covered by the loose hair flowing over them.
Mist the entire style lightly with a flexible-hold hairspray to lock everything in place without making your hair feel stiff or crunchy. Focus the spray on the braided portion rather than the flowing strands, which should maintain their natural movement and softness.
Common Beginner Mistakes and How to Avoid Them
Most women make predictable errors when learning this braiding technique, but these mistakes serve as valuable learning opportunities rather than reasons to give up. Understanding what typically goes wrong helps you recognize and correct issues before they compromise your entire style. Each error teaches you something important about tension, timing, or hand positioning that improves your overall braiding skills.
Pulling Too Tightly and Causing Scalp Discomfort
Excessive tension represents the most frequent problem beginners encounter with this technique. The urge to grip tightly stems from wanting to maintain control, but this approach creates pain and makes the style look forced rather than effortless.
Your scalp will tell you immediately if you’re pulling too hard. Any stinging, burning, or aching sensation means you need to loosen your grip right away. The braid should feel secure without causing any discomfort whatsoever.
Tight braiding also affects the final appearance negatively. Overly taut sections create an artificial look that lacks the flowing grace this style is known for. The dropped strands may stick out awkwardly instead of cascading naturally when the tension is too high.
Practice finding the right pressure by braiding loose sections of hair that aren’t attached to your head first. This helps you develop muscle memory for appropriate tension levels without the feedback of scalp discomfort clouding your judgment.
Mixing Up Dropped Strands with Active Braiding Sections
Confusion about which strands to drop and which to keep active derails many attempts at this technique. The constant switching between regular French braid movements and waterfall drops requires mental tracking that becomes easier with practice.
Visual organization helps prevent this mix-up. Keep the dropped strands visually separate from the working sections by gently pushing them away from your hands as you release them. This creates clear boundaries between active and inactive hair.
Some women find it helpful to verbalize the process as they work. Saying “drop left, pick up new left, cross over” helps reinforce the correct sequence until it becomes automatic. This internal dialogue prevents the mental confusion that leads to grabbing the wrong sections.
Creating Uneven Waterfall Sections Throughout the Braid
Inconsistent section sizes create an amateur appearance that draws attention for the wrong reasons. Each dropped piece should roughly match the others in thickness and volume to maintain visual harmony across the entire style.
The size of each pickup section directly affects the final result. Taking too much hair creates thick, chunky cascades that overpower the delicate braided structure above. Taking too little produces sparse, stringy sections that lack impact.
Develop a reference point for consistent sizing. Many women use their pinky finger width as a guide for each section. This provides a reliable measurement that you can check throughout the braiding process.
Speed often contributes to uneven sections. Rushing through the technique leads to grabbing whatever hair is convenient rather than measuring each piece carefully. Slow down your movements until consistency becomes natural, then gradually increase your pace.
Problems with Hand Positioning and Finger Coordination
Poor hand placement creates unnecessary difficulty and often leads to dropped sections or lost control of the braid structure. Your hands need to work in harmony, with each finger having a specific role in maintaining the pattern.
Hold your working strands close to your scalp rather than letting them drift away from your head. This proximity gives you better control and makes it easier to pick up new sections accurately. Extended arms tire quickly and make precise movements harder to execute.
Finger coordination improves with targeted practice. Work on the pickup and drop sequence using just your fingertips rather than your whole hand. This develops the fine motor skills needed for smooth transitions between movements.
Many beginners struggle with which hand should hold which strand at any given moment. Start slowly and consciously think about hand placement for each step. The muscle memory will develop faster if you focus on correct positioning from the beginning rather than trying to fix bad habits later.
Solutions for Slippery or Fine Hair That Won’t Hold the Braid
Hair texture significantly impacts how well this technique works, but solutions exist for every hair type. Slippery hair slides out of your grip and makes maintaining the braid structure challenging throughout the process.
Texture products become essential for women with fine or silky hair. Apply dry shampoo to damp hair before blow-drying, or use a texturizing spray on dry hair before starting the braid. These products create grip without adding visible residue or weight.
Strategic product placement makes a difference in holding power. Focus texture products on the areas where you’ll be picking up new sections rather than coating all your hair. This targeted approach provides grip where you need it most while keeping the cascading sections soft and natural-looking.
Environmental factors also affect hair texture. Humid weather makes hair more slippery, while dry conditions can create static that interferes with smooth braiding. Adjust your product use based on the day’s weather conditions for optimal results.
The timing of your styling session matters for fine hair. Day-old hair often holds braids better than freshly washed hair because natural oils provide some grip. If you must work with clean hair, use a light styling cream before blow-drying to add body and texture.
Consider using smaller sections when working with fine hair. This compensates for the lack of natural grip by giving you more control over each piece. Smaller sections also create a more proportional look on hair that lacks natural volume.
Hair length affects how well fine hair holds this style. Very long fine hair may be too heavy to maintain the braid structure, while shorter fine hair might not have enough length to create dramatic cascading effects. Work with your hair’s natural characteristics rather than fighting against them.
Styling Variations and Finishing Touches
Once you master the basic technique, countless styling possibilities open up to transform this braiding method into completely different looks. The foundation remains the same, but small adjustments in placement, direction, and finishing create dramatically different results. Your creativity becomes the only limit to how you can adapt this versatile style.
Single Side Waterfall Braid Versus Double Waterfall Braids
A single-side approach focuses all the visual interest on one area of your head, creating an asymmetrical look that works beautifully for casual occasions. Start the braid on your preferred side and work it across to the opposite ear, leaving the rest of your hair flowing freely. This method takes less time and requires fewer advanced skills than more complex variations.
Double braids require significantly more coordination but produce a balanced, symmetrical appearance that suits formal events perfectly. Create one braid on each side of your head, starting from your temples and working back toward your ears. The two braids can meet at the back of your head or remain separate, depending on your desired final look.
The double approach demands better ambidextrous skills since you’ll need to braid with your non-dominant hand for one side. Practice the single-side version until it becomes effortless before attempting the more challenging double technique.
Timing considerations differ between these approaches. Single braids can be completed in under ten minutes once you develop proficiency. Double braids typically require fifteen to twenty minutes, making them less practical for rushed morning routines but perfect for special occasions where you have extra preparation time.
Adding Curls and Waves to Enhance the Waterfall Effect
Pre-styling your hair with waves or curls amplifies the romantic appearance of the cascading sections. The texture contrast between the smooth braided portion and the flowing textured sections creates visual depth that catches light beautifully.
Loose waves work better than tight curls for this application. Use a large barrel curling iron or hot rollers to create gentle curves that maintain movement throughout the day. Curl away from your face for the most flattering frame around your features.
Should you curl before or after braiding? Curling first provides better results because you can braid through the textured hair without disrupting the wave pattern. The dropped sections will already have movement and body when they’re released from the braid.
Heat protectant becomes essential when adding curls to this style. Apply the product evenly through damp hair before blow-drying, then use a lighter application on dry hair before curling. This prevents damage while helping the curls hold their shape longer.
Incorporating the Waterfall Braid Into Updos and Half-Up Styles
Half-up styles showcase this braiding technique while keeping most of your hair down and accessible. Create the braid across the crown area, then gather both the braid and some of the loose hair into a ponytail or bun at the back of your head.
The placement of your updo affects the overall balance of the style. Higher placements create a more youthful, casual appearance, while lower positions produce sophisticated looks suitable for professional settings or evening events.
Updo variations require strategic bobby pin placement to maintain security throughout the day. Use pins that match your hair color exactly and place them in crossing patterns for maximum hold. The weight of long hair can pull down inadequately secured updos, so don’t skimp on the hardware.
Using Accessories Like Bobby Pins and Texture Sprays for Hold
Strategic product application can make the difference between a style that lasts all day and one that falls apart within hours. Apply texture spray to slightly damp hair before blow-drying for maximum grip, or mist it lightly on dry hair just before braiding.
Bobby pin selection matters more than most women realize. Choose pins that are slightly smaller than the thickness of your hair sections for the best grip. Pins that are too large won’t hold adequately, while pins that are too small can break your hair.
Color matching for bobby pins requires checking them against your hair in natural light. What looks like a perfect match under artificial lighting often appears obviously different in daylight. Keep multiple shades on hand to accommodate seasonal hair color changes.
Professional styling products offer advantages over drugstore alternatives for this technique. The extra cost often pays off in longer-lasting hold and better hair health over time. Look for products specifically designed for braided styles rather than general-purpose hairsprays.
Creative Ways to Combine Waterfall Braids With Other Techniques
Fishtail combinations create intricate-looking styles that are easier to execute than they appear. Start with your waterfall technique across the crown, then transition the tail section into a fishtail braid for added visual interest.
French braid combinations work by starting with a traditional French braid at the nape of your neck while creating the waterfall section across the crown. The two techniques meet in the middle, creating a style that looks professionally done.
Consider these advanced combination methods for special occasions:
Crown and Cascade: Start with a crown braid around your hairline, then transition into the waterfall technique for the remaining sections.
Twisted Waterfall: Replace the traditional three-strand braid with rope twists while maintaining the dropping mechanism.
Side Swept Elegance: Begin the braid at one ear and sweep it across to the opposite shoulder for dramatic asymmetry.
Double Layer Effect: Create a waterfall braid, then add a second layer underneath using the same technique.
Braided headband combinations use the waterfall technique to create a band across your forehead area while leaving the crown and back sections free for other styling options. This approach works particularly well for women with shorter hair who want to achieve the waterfall look without requiring significant length.
Practice each combination separately before attempting to merge techniques. The muscle memory for each individual method needs to be solid before you can successfully coordinate multiple braiding styles within a single hairstyle.
Master This Elegant Technique and Transform Your Hair Game
Learning the French braid with waterfall technique opens up a world of styling possibilities that will serve you well for years to come. This method bridges the gap between simple everyday hairstyles and complex formal looks, giving you the confidence to tackle any occasion with grace. The cascading effect creates an illusion of effortless beauty while demonstrating your attention to detail and styling skills.
Your journey from beginner to proficient doesn’t happen overnight, but each practice session builds the muscle memory and coordination needed for flawless execution. The versatility of this technique means you’ll never run out of ways to adapt it for different moods, events, or seasons. Whether you choose the romantic simplicity of a single-side braid or the sophisticated balance of double braids, you now have the knowledge and tools to create stunning hairstyles that reflect your personal style and enhance your natural beauty.
Frequently Asked Questions
Q: How long does it take to learn the French braid with waterfall technique?
A: Most women can create a basic waterfall braid within a few practice sessions. Complete mastery typically takes 2-3 weeks of regular practice, with each attempt becoming smoother and faster.
Q: What’s the main difference between a regular French braid and a waterfall braid?
A: In a waterfall braid, you drop the bottom strand and pick up a new section from behind it, creating cascading hair. Regular French braids keep all three strands throughout the entire braid.
Q: Can I do this technique on short hair?
A: You need at least shoulder-length hair for the waterfall effect to be visible. Shorter hair can work but produces a less dramatic cascading appearance.
Q: Why does my braid keep falling apart?
A: This usually happens from using too little tension or working with hair that’s too clean and slippery. Try using dry shampoo or texturizing spray before braiding for better grip.
Q: Should I curl my hair before or after braiding?
A: Curl your hair before braiding. This creates texture that helps the braid hold better and gives the dropped sections beautiful movement when they’re released.
Q: How do I prevent my scalp from hurting while braiding?
A: Keep your grip firm but gentle. Any stinging or aching means you’re pulling too tightly. The braid should feel secure without causing any discomfort.
Q: What’s the easiest way to hide bobby pins in this style?
A: Choose bobby pins that exactly match your hair color and place them in X-patterns where they’ll be covered by loose hair. Position them strategically within the braid structure rather than on top.
Q: Can I sleep in a waterfall braid?
A: While possible, it’s not recommended for the health of your hair. The braid may become messy overnight, and sleeping in any tight hairstyle can cause breakage and scalp irritation.
Q: How do I make the waterfall sections look even?
A: Use your pinky finger width as a guide for each section you pick up. Take your time and consciously measure each piece rather than rushing through the process.