
French braids have graced brides’ heads for generations, standing as one of hairstyling’s most enduring choices. This classic technique never goes out of style because it brings together elegance and practicality in perfect harmony. The gentle weaving pattern creates a polished look that photographs beautifully and stays secure throughout your entire celebration.
The beauty of this braided style lies in its remarkable adaptability. Whether you’re planning a rustic barn wedding, an elegant cathedral ceremony, or a beachside celebration, this hairstyle works wonderfully with any theme. It pairs seamlessly with flowing bohemian gowns, structured ballgowns, or sleek modern dresses. The technique flatters every face shape and works beautifully with straight, wavy, curly, or textured hair types.
Let’s show you here how to master this timeless bridal look and the reasons why this particular braiding technique remains a top choice for modern brides. You’ll learn how to choose the perfect variation for your wedding style and learn professional styling tips that will make your special day hairstyle absolutely stunning.
- What Makes French Braids Perfect for Wedding Hair
- The protective nature of braids for all-day wear and humidity resistance
- The timeless quality that ensures your wedding photos will never look outdated
- How French braids create sophisticated, chic, and graceful looks ideal for formal weddings
- The versatility to work with headpieces, veils, and other bridal accessories
- The comfort factor – keeping hair secure without causing pain or discomfort
- Classic French Braid Techniques for Brides
- Essential preparation tips: smoothing hair and creating the right texture
- Step-by-step guide to creating the perfect French braid foundation
- The difference between French and Dutch braiding techniques for weddings
- Professional techniques for achieving volume through pancaking
- How to secure your French braid for long-lasting wedding day wear
- Stunning French Braid Wedding Styles
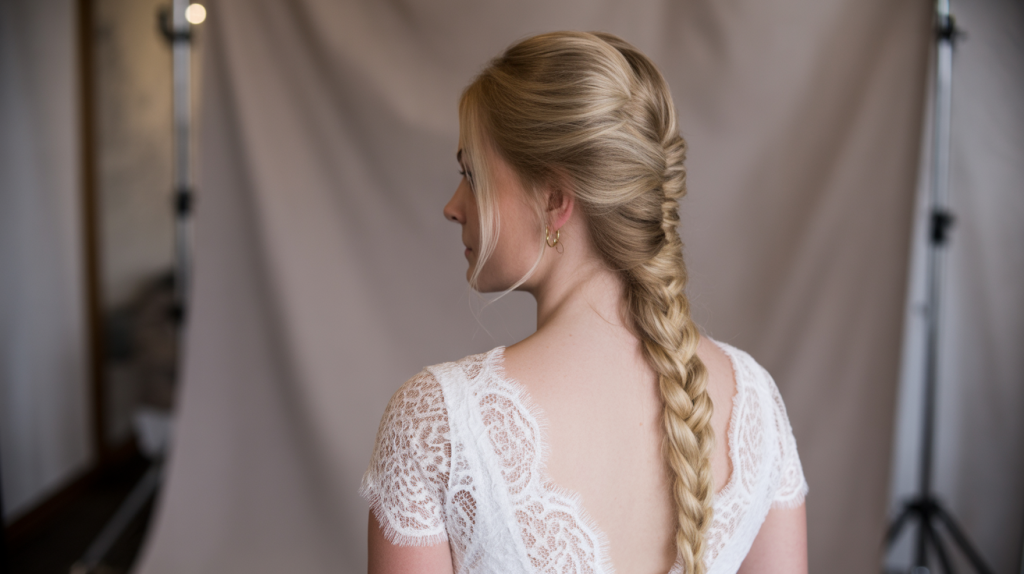
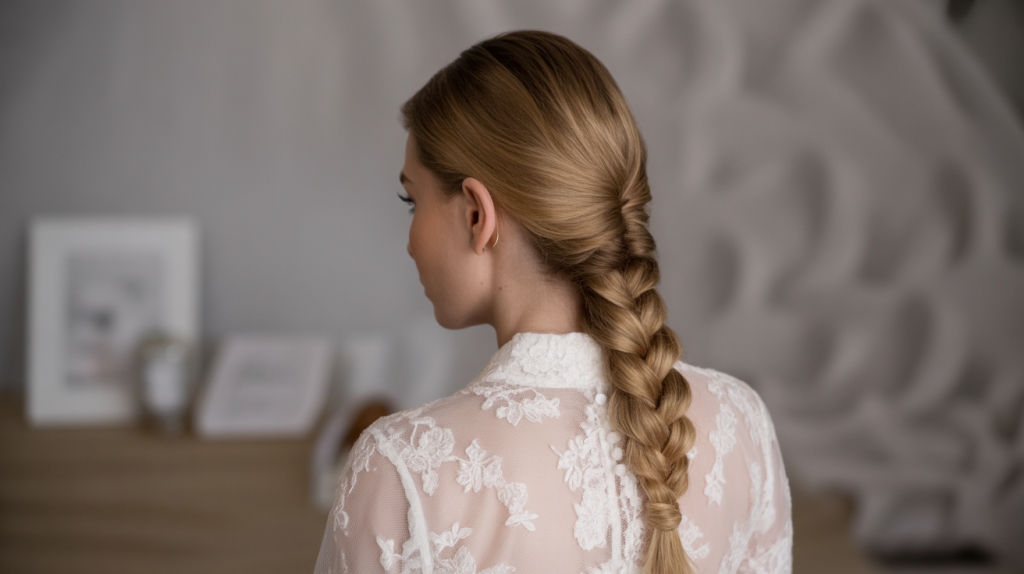
- Single French braid cascading elegantly down the back for classic brides
- Crown French braids that create a regal, fairytale appearance
- Half-up French braid styles that offer the best of both worlds
- French braided updos and chignons for formal wedding ceremonies
- Side-swept French braids for romantic, bohemian wedding themes
- How to Choose the Right French Braid Style for Your Wedding
- Selecting French braid styles based on your wedding dress neckline and silhouette
- Matching French braid techniques to your hair length and texture
- Considering your wedding venue and theme when choosing your French braid style
- Working with your hairstylist to create a style that mirrors your wedding aesthetic
- Timeline considerations for achieving your perfect French braid on wedding day
- Styling Tips and Finishing Touches for French Braid Weddings
- Creating texture and waves before braiding for added dimension
- Adding fresh or silk flowers to your French braid for natural beauty
- Using hair jewelry, pearls, and metallic accessories with French braids
- Incorporating silk ribbons and diamanté crystals for romantic touches
- Professional finishing techniques with bobby pins and hairspray for lasting hold
- Your Perfect Bridal Look Awaits
- Frequently Asked Questions
What Makes French Braids Perfect for Wedding Hair
Planning your wedding hairstyle means choosing something that will look beautiful from morning until night. You need a style that handles stress, weather, and countless photos while keeping you comfortable. This classic braiding technique delivers on all these requirements, making it an ideal choice for your special day.
The protective nature of braids for all-day wear and humidity resistance
Your wedding day can last 12 hours or more. You’ll move from getting ready to ceremony to reception, potentially facing heat, wind, or unexpected weather changes. This weaving technique creates a secure foundation that holds your hair in place regardless of external conditions.
Humidity affects most hairstyles, causing frizz and loosening curls. The interlocked pattern of this braided style actually benefits from slight moisture in the air. Instead of falling flat or puffing up, the woven strands maintain their shape and texture. Beach weddings, summer ceremonies, and outdoor receptions become much less stressful for your hair.
The protective aspect extends beyond weather resistance. Dancing, hugging guests, and moving throughout your celebration won’t disturb a properly executed braid. You can focus on enjoying your day rather than checking mirrors or touching up your hairstyle.
The timeless quality that ensures your wedding photos will never look outdated
Trends change rapidly in the beauty world. What looks modern today might appear dated in your anniversary photos years from now. This particular braiding method has remained popular across decades precisely because it transcends temporary fashion.
Why does this style age so well? The technique itself dates back centuries, appearing in artwork and photographs from different eras. The clean lines and structured appearance create an elegant foundation that complements any wedding dress style or decade. Your grandmother might have worn a similar hairstyle, and your future daughter could choose the same technique.
How French braids create sophisticated, chic, and graceful looks ideal for formal weddings
Formal ceremonies demand polished, refined styling. The structured nature of this braiding technique automatically elevates your overall appearance. The neat, controlled pattern reads as intentional and carefully planned – exactly what formal occasions require.
The sophistication comes from the technique’s architectural quality. Each section builds upon the previous one, creating visual interest through repetition and pattern. This geometric element adds depth and dimension that photographs beautifully under professional lighting.
For black-tie weddings, cathedral ceremonies, or elegant ballroom receptions, this hairstyle matches the formality of your setting. It pairs seamlessly with structured wedding gowns, statement jewelry, and dramatic makeup looks.
The versatility to work with headpieces, veils, and other bridal accessories
Wedding accessories require careful consideration during hairstyle planning. Many elaborate updos limit where you can place a veil or headpiece. This braided approach offers multiple attachment points and works with various accessory styles.
Veils attach beautifully at different points along the braid – at the crown for cathedral length veils, or lower for shorter styles. The woven texture provides secure grip points that won’t slip during your ceremony. Hair combs, pins, and decorative elements integrate naturally into the braided pattern.
Consider these accessory options that work perfectly with this technique:
Fresh Flowers: Tuck small blooms between the woven sections for garden party elegance.
Pearl Pins: Add scattered pearl accents along the length for vintage glamour.
Ribbon Weaving: Thread silk ribbon through the braid for color coordination.
Crystal Hair Vine: Drape delicate crystal strands alongside the braided pattern.
Headband Placement: Position decorative headbands above or below the starting point.
The comfort factor – keeping hair secure without causing pain or discomfort
Your wedding day includes hours of wearing your chosen hairstyle. Tight updos can cause headaches, while loose styles require constant adjustment. This braiding method distributes weight evenly across your scalp, reducing pressure points that cause discomfort.
The technique doesn’t require excessive pulling or tension to stay secure. Proper execution relies on the interlocking pattern rather than tight elastic bands or numerous bobby pins. This means less stress on your hair follicles and scalp throughout the day.
Hair length affects comfort differently with various styles, but braiding works well regardless of your hair’s natural length. Short hair can be extended with matching pieces, while long hair gets manageable structure. The weight distribution prevents the pulling sensation that long, loose hair can create during extended wear.
Professional stylists often recommend this approach for brides who plan to keep their hair styled for extended periods. The technique ages gracefully throughout the day, often looking better after a few hours of settling than immediately after styling.
Classic French Braid Techniques for Brides
Mastering the art of bridal braiding requires understanding fundamental techniques that transform ordinary hair into stunning wedding styles. These time-tested methods form the backbone of countless elegant looks that have graced ceremonies for generations. Learning these core skills opens doors to countless styling possibilities for your special day.
Essential preparation tips: smoothing hair and creating the right texture
Your hair’s condition before braiding determines the final result’s polish and longevity. Clean hair often proves too slippery for braiding, while dirty hair lacks the body needed for structure. Day-old hair provides the ideal balance of cleanliness and grip.
Start by washing your hair the evening before your wedding or trial. Apply a lightweight conditioning treatment to mid-lengths and ends, avoiding the scalp area. This creates manageable texture without excess oils that cause slipping.
Heat protection becomes crucial during preparation. Apply a thermal spray throughout your hair before using any styling tools. Blow-dry your hair smooth using a paddle brush, working in sections from roots to ends. The goal is creating a sleek base that eliminates tangles and provides even texture.
Does your hair type affect preparation methods? Absolutely. Fine hair benefits from volumizing mousse applied to damp strands before drying. Thick hair responds well to smoothing cream that tames frizz without weighing down the strands. Curly hair should be blown straight with a round brush for easier braiding, while naturally straight hair might need texturizing spray for better grip.
Step-by-step guide to creating the perfect French braid foundation
Begin by sectioning your hair properly. Use a tail comb to create a triangular section at your hairline, starting from your temples and meeting at the crown. This initial section determines your braid’s width and positioning.
Divide this triangular section into three equal parts. Hold the right section in your right hand, the left section in your left hand, and let the middle section rest between your fingers. This positioning allows for smooth movement throughout the braiding process.
Cross the right section over the middle, then cross the left section over the new middle. You’ve completed one basic braid stitch. Now comes the signature move that creates the woven appearance.
Add hair to the right section by picking up a small amount from the hairline. Cross this enlarged section over the middle. Repeat on the left side, adding hair from the opposite hairline and crossing over the center. Continue this pattern down your head.
The difference between French and Dutch braiding techniques for weddings
Understanding these two techniques gives you styling versatility for different wedding looks. The hand movements remain identical, but the crossing direction creates completely different visual effects.
Traditional braiding crosses sections over the center piece. This creates a braid that sits on top of your hair, appearing raised and prominent. The pattern shows clearly and creates a classic, refined appearance perfect for formal ceremonies.
Dutch braiding crosses sections under the center piece instead. This technique creates an inverted effect where the braid appears embedded into your hair. The three-dimensional quality adds drama and works beautifully with bohemian or rustic wedding themes.
Which technique should you choose? Consider your dress style and wedding formality. Structured gowns pair beautifully with traditional methods, while flowing designs complement the dimensional quality of Dutch techniques.
Professional techniques for achieving volume through pancaking
Pancaking transforms a tight, narrow braid into a full, romantic style. This technique involves gently pulling apart the woven sections to create width and texture. Professional stylists use this method to customize braid thickness for different hair types and desired looks.
Wait until you’ve completed your entire braid before starting this process. Beginning from the top, use your thumb and forefinger to gently tug at the outer edges of each woven section. Work systematically down the length, maintaining consistent pressure.
Pull evenly on both sides of each section to maintain symmetry. The goal is creating gradual expansion rather than dramatic distortion. Fine hair requires gentle pressure, while thick hair can handle more aggressive manipulation.
Timing matters significantly with this technique. Pancaking immediately after braiding works best because the hair hasn’t set into position yet. Once you’ve achieved your desired fullness, mist lightly with hairspray to lock the shape.
How to secure your French braid for long-lasting wedding day wear
Proper securing prevents loosening during your celebration. The traditional method involves gathering remaining hair at the nape and finishing with a regular three-strand braid. Secure this tail with a clear elastic band that disappears into your hair color.
Bobby pins provide additional security at key stress points. Insert pins at the base where braiding transitions to loose hair. Angle pins upward into the braid’s foundation for maximum hold. Use pins that match your hair color exactly to maintain the style’s clean appearance.
Professional stylists recommend the following securing methods for extended wear:
Strategic Pin Placement: Insert bobby pins every two inches along the braid’s length, angling them into the scalp.
Elastic Reinforcement: Use small clear elastics at quarter points along long braids to prevent stretching.
Hairspray Application: Mist each section as you braid rather than only at the end for stronger hold.
Texture Spray Foundation: Apply before braiding to increase grip between hair strands.
Pin Camouflage: Choose bobby pins one shade darker than your hair color for better blending.
The final step involves checking your work from multiple angles. Use a hand mirror to examine the back and sides, adjusting any loose sections or visible pins. A properly executed braid should feel secure without causing discomfort or tension headaches during extended wear.
Stunning French Braid Wedding Styles
Wedding hairstyles set the tone for your entire bridal look, and braided options offer countless possibilities for creating the perfect style. These versatile techniques adapt beautifully to different wedding themes, dress styles, and personal preferences. Your chosen approach will complement your facial features while providing the elegance and security needed for your celebration.
Single French braid cascading elegantly down the back for classic brides
The timeless appeal of one continuous braid creates sophisticated elegance that never goes out of style. This approach works particularly well for women who want their hair styled yet still want to show its length and natural beauty. The technique involves starting at the crown and working systematically down to create a seamless flow.
Position yourself comfortably with good lighting before beginning. Section your hair from temple to temple, creating the foundational triangle that determines your braid’s width. Keep this initial section relatively narrow for a refined appearance that won’t overwhelm delicate facial features.
What makes this style particularly stunning for weddings? The uninterrupted line creates visual height and elongates your silhouette. This effect pairs beautifully with strapless gowns, off-shoulder designs, or any dress that showcases your back and shoulders.
The finishing technique determines whether your braid appears casual or formal. Secure the end with a clear elastic, then wrap a small section of hair around the band to hide it completely. This polished detail elevates the entire look from everyday styling to bridal elegance.
Crown French braids that create a regal, fairytale appearance
Circling your head with intricate braiding creates an ethereal, princess-like quality that transforms any bride into royalty. This technique requires more advanced skills but delivers breathtaking results that photograph beautifully from every angle.
Start by parting your hair down the center or slightly off-center, depending on your preference. Begin braiding at one ear, adding hair as you work around your hairline. The key lies in maintaining consistent tension while following your head’s natural curve.
Half-up French braid styles that offer the best of both worlds
Combining the security of braided sections with the romance of flowing hair creates versatile options for modern brides. This approach satisfies women who want structured styling while maintaining the softness of loose waves or curls.
Begin by sectioning the top portion of your hair from ear to ear. This creates clear boundaries between the braided and loose sections. Work your chosen braiding technique through this upper section, then secure it at the crown with bobby pins that match your hair color.
The remaining hair can be styled in loose waves, tight curls, or left naturally straight depending on your preference. This flexibility allows you to customize the look based on your dress style and wedding theme. Beach weddings benefit from relaxed waves, while ballroom receptions pair beautifully with polished curls.
Consider these styling variations that work beautifully with this approach:
Waterfall Effect: Allow some strands to cascade naturally through the braided section for romantic movement.
Twisted Accents: Add small twists to frame your face before joining the main braided section.
Textured Volume: Tease the crown section gently before braiding to create additional height and fullness.
Asymmetrical Placement: Position the braided section slightly off-center for modern sophistication.
Floral Integration: Weave small flowers or greenery through the braided portion for garden party elegance.
French braided updos and chignons for formal wedding ceremonies
Cathedral ceremonies and black-tie receptions call for polished, sophisticated styling that commands respect and attention. These elevated techniques combine braiding with classic updo construction to create stunning formal looks.
The foundation begins with creating multiple braided sections that will form your updo’s structure. Start with two or three separate braids positioned strategically around your head. These don’t need to be perfectly uniform – slight variations add visual interest and prevent the style from appearing too rigid.
Wrap these braided sections into elegant coils at the nape of your neck. Secure each coil with bobby pins inserted at angles that distribute weight evenly. The goal is creating a substantial base that feels secure without causing discomfort during extended wear.
Does hair length affect updo construction? Absolutely. Longer hair creates fuller, more dramatic updos but requires additional securing techniques. Shorter hair benefits from texturizing products that increase grip and volume, making the finished style appear more substantial.
Side-swept French braids for romantic, bohemian wedding themes
Asymmetrical styling creates relaxed elegance perfect for outdoor ceremonies, rustic venues, and free-spirited celebrations. This approach moves away from centered, symmetrical braiding toward organic, flowing designs that feel effortless yet intentional.
Begin by creating a deep side part that falls naturally with your hair’s growth pattern. Start your braiding technique on the heavier side, working diagonally across your head rather than straight back. This creates visual movement that enhances the romantic quality.
The finishing options vary significantly with this style. You can secure the braid low on your shoulder for a relaxed appearance, or pin it behind one ear for subtle sophistication. Some brides prefer to let the braid transition into loose waves that cascade over one shoulder.
Bohemian themes benefit from deliberately imperfect finishing. Gently pull apart some sections to create controlled messiness that appears naturally windswept. This technique works particularly well for beach weddings or garden ceremonies where structured perfection feels out of place.
Accessories play a crucial role in completing these romantic looks. Fresh flowers, delicate hair vines, or vintage-inspired pins enhance the organic quality without overwhelming the braided foundation. Choose elements that complement your bouquet and overall wedding aesthetic for cohesive styling throughout your celebration.
How to Choose the Right French Braid Style for Your Wedding
Selecting the perfect braided hairstyle involves balancing multiple factors that affect your overall bridal appearance. Your dress design, hair characteristics, venue setting, and personal style preferences all play crucial roles in determining which approach will look most stunning on your special day. Making the right choice creates harmony between all elements of your bridal look.
Selecting French braid styles based on your wedding dress neckline and silhouette
Your gown’s design directly influences which braided styles will complement rather than compete with your dress. Strapless and off-shoulder gowns showcase your neck and shoulders beautifully, making them perfect partners for elaborate back-focused braiding. These dress styles benefit from single cascading braids or intricate crown designs that draw attention to your upper body.
High necklines require different considerations altogether. Halter tops, mock necks, and high-back designs leave limited space for hair styling at the neckline. Side-swept options or half-up styles work better with these silhouettes, keeping hair away from ornate dress details while maintaining visual balance.
A-line and ballgown silhouettes create dramatic, formal impressions that pair beautifully with structured updos. The voluminous skirt proportions call for equally substantial hair arrangements. Princess-style dresses with full skirts particularly benefit from crown braiding or elaborate chignons that match the gown’s grandeur.
Sleek, fitted designs like mermaid or trumpet styles emphasize your natural curves. These streamlined silhouettes work best with equally polished hair arrangements. Single, well-defined braids or smooth updos complement the dress’s clean lines without adding visual bulk that might overwhelm the design.
Matching French braid techniques to your hair length and texture
Short hair presents specific challenges and opportunities for braided styling. Chin-length cuts require creative approaches like side-swept accent braids or crown details that add interest without requiring significant length. Professional extensions can create fuller braiding options, but they need expert application to appear natural.
Medium-length hair offers the most versatility for wedding braiding. This length provides enough material for substantial styling while remaining manageable during the creation process. Half-up approaches work particularly well, allowing you to showcase both braided sections and loose hair movement.
Long hair creates stunning possibilities but requires careful consideration of weight distribution and securing methods. Extended braids can cause neck strain during long celebrations, making updos or partially contained styles more comfortable options. The additional length also means more time for styling and higher product requirements.
Hair texture significantly affects braiding success and appearance. Fine hair benefits from volumizing products and pancaking techniques that create fuller-looking results. Thick hair provides natural volume but may require sectioning into smaller portions for easier manipulation and more refined finished appearance.
Considering your wedding venue and theme when choosing your French braid style
Outdoor venues present weather considerations that influence style selection. Beach ceremonies call for secure styling that withstands wind and humidity. Tightly woven braids or contained updos perform better than loose, flowing styles in these conditions. Garden weddings benefit from romantic, organic-looking approaches that complement natural surroundings.
Indoor venues offer more control over environmental factors, allowing for delicate styling choices that might not survive outdoor conditions. Ballrooms and churches suit formal, polished arrangements that match the setting’s elegance. Historic venues often inspire vintage-influenced styling that honors the location’s character.
Wedding themes guide aesthetic decisions beyond venue considerations. Bohemian celebrations call for relaxed, intentionally imperfect styling that appears effortlessly romantic. Rustic themes pair beautifully with textured, organic-looking braids enhanced with natural elements. Modern minimalist weddings benefit from clean, geometric braiding patterns that echo contemporary design principles.
Traditional ceremonies often feature classic styling approaches that honor time-tested elegance. These celebrations typically favor refined, symmetrical arrangements that photograph beautifully and maintain polished appearances throughout extended festivities.
Working with your hairstylist to create a style that mirrors your wedding aesthetic
Communication with your stylist begins during initial consultations, long before your wedding day. Bring inspiration photos, fabric swatches from your dress, and detailed descriptions of your venue and theme. This information helps your stylist understand your vision and suggest appropriate modifications for your specific hair type and face shape.
Professional trials allow you to test different approaches and make adjustments before your wedding. Schedule these appointments well in advance, preferably during the same time of day as your wedding ceremony. This timing helps you understand how the style will look and feel during your actual celebration timeframe.
Discuss maintenance requirements and touch-up possibilities during long celebrations. Some braided styles require periodic adjustments, while others maintain their appearance throughout extended events. Understanding these differences helps you choose approaches that match your celebration’s duration and intensity level.
Consider these collaboration strategies that produce the best results:
Inspiration Sharing: Collect multiple reference images showing different angles and lighting conditions.
Dress Coordination: Schedule hair trials after dress fittings to test style compatibility.
Accessory Integration: Bring veils, headpieces, and jewelry to trial appointments for complete testing.
Timeline Planning: Discuss realistic styling timeframes and backup options for schedule changes.
Product Discussion: Review hold requirements and weather resistance needs for your specific venue.
Timeline considerations for achieving your perfect French braid on wedding day
Complex braided styles require significantly more time than simple arrangements. Single braids typically need 30-45 minutes for completion, while elaborate updos can require 90 minutes or more. Factor these timeframes into your getting-ready schedule, allowing buffer time for any adjustments or touch-ups needed.
Hair preparation affects styling duration considerably. Clean, properly conditioned hair braids more easily than neglected or over-processed strands. Schedule professional treatments well in advance of your wedding, allowing time for your hair to settle into its optimal condition.
Morning-of logistics require careful coordination between hair and makeup timing. Many stylists prefer completing hair first, as it provides a stable foundation that won’t be disturbed during makeup application. However, some intricate styles benefit from makeup completion first, preventing smudging or disruption during detailed hair work.
Backup planning protects against unexpected complications on your wedding day. Discuss simplified alternatives with your stylist that can be implemented quickly if time becomes limited. Having these contingency options prepared reduces stress and maintains confidence in your final appearance regardless of circumstances.
Styling Tips and Finishing Touches for French Braid Weddings
Perfect braided wedding hairstyles require attention to details that elevate your look from simple to extraordinary. The finishing elements you choose transform basic techniques into stunning bridal styles that complement your dress, venue, and personal aesthetic. These refinements make the difference between amateur attempts and professional results that photograph beautifully throughout your celebration.
Creating texture and waves before braiding for added dimension
Pre-styling your hair adds depth and visual interest that makes braided arrangements appear fuller and more romantic. Smooth, straight hair often creates flat, one-dimensional results that lack the richness needed for special occasions. Building texture beforehand gives you a foundation that enhances every braided section.
Start with damp hair and apply volumizing mousse from roots to ends. Divide your hair into sections and twist each portion tightly, then blow-dry using a diffuser attachment. This technique creates natural-looking waves without the harsh lines that traditional curling methods produce.
Heat styling offers more controlled texture creation. Use a large barrel curling iron on medium heat, wrapping sections away from your face. Allow each curl to cool completely in your palm before releasing it. This cooling process sets the wave pattern and increases longevity throughout your wedding day.
What if your hair refuses to hold texture? Fine hair benefits from texturizing spray applied before and after wave creation. Thick hair responds well to sea salt spray that enhances natural movement without weighing down your strands. The key lies in using products that add grip without creating stiffness.
Adding fresh or silk flowers to your French braid for natural beauty
Floral accents transform structured braiding into organic, garden-inspired artistry. Fresh flowers provide authentic beauty and fragrance, while silk alternatives offer durability and color consistency that survives long celebrations. Your choice depends on your venue, season, and personal preferences.
Fresh flower selection requires coordination with your florist to match your bouquet and wedding palette. Delicate blooms like baby’s breath, small roses, or jasmine work beautifully tucked between braided sections. Sturdy varieties like orchids or succulents provide dramatic accents that won’t wilt during extended wear.
Silk flowers eliminate concerns about wilting, staining, or seasonal availability. High-quality artificial blooms appear remarkably realistic in photographs and maintain perfect appearance throughout your entire celebration. Choose flowers with flexible stems that bend easily around braided curves.
Attachment methods determine how securely your floral elements stay in place. Bobby pins work well for lightweight flowers, while heavier blooms need small floral wire twisted around hair sections. Your stylist can strategically place flowers during the braiding process, weaving them into the structure for maximum security.
Using hair jewelry, pearls, and metallic accessories with French braids
Decorative accessories add glamour and sophistication that matches your wedding’s formality level. Metallic elements catch light beautifully in photographs, while pearls provide classic elegance that never appears dated. These additions should complement rather than compete with your dress and other jewelry choices.
Hair vines offer flexible styling options that adapt to different braided configurations. These delicate wire pieces feature beads, crystals, or pearls connected along adjustable lengths. Weave them through your braided sections or drape them alongside for ethereal movement.
Incorporating silk ribbons and diamanté crystals for romantic touches
Ribbon weaving creates soft, feminine accents that add color coordination and textural contrast to structured braiding. Silk ribbons provide luxurious feel and appearance while maintaining flexibility for complex weaving patterns. Choose widths that complement your braid’s scale – narrow ribbons for delicate work, wider versions for bold statements.
Threading techniques vary depending on your desired effect. Weave ribbons through individual braided sections for integrated appearance, or wrap them around the entire braid’s exterior for defined contrast. Secure ribbon ends with small stitches or bobby pins hidden within the hair structure.
Diamanté crystals and rhinestones provide sparkle that photographs beautifully under professional lighting. Individual crystals can be applied with temporary hair adhesive at strategic points along your braided pattern. Clustered arrangements create more dramatic focal points that draw attention to specific areas.
Consider these application strategies for maximum impact:
Gradient Placement: Start with dense crystal application at the crown, tapering to sparse accents at the ends.
Geometric Patterns: Create regular spacing between crystals for modern, structured appearance.
Random Scattering: Apply crystals irregularly for organic, starlight-inspired effects.
Color Coordination: Match crystal colors to your dress embellishments or jewelry for cohesive styling.
Size Variation: Combine different crystal sizes for dynamic visual texture and depth.
Professional finishing techniques with bobby pins and hairspray for lasting hold
Securing your braided style requires strategic pin placement that provides maximum hold while remaining invisible in photographs. Professional stylists use specific techniques that distribute weight evenly and prevent loosening during extended wear. These methods separate amateur attempts from polished, long-lasting results.
Bobby pin selection affects both security and appearance. Choose pins one shade darker than your hair color for better camouflage. Matte finishes prevent light reflection that makes pins visible in photographs. Stock multiple sizes – small pins for delicate work, larger versions for substantial securing needs.
Insertion angles determine holding power significantly. Pins inserted perpendicular to your scalp provide minimal grip, while angled placement creates friction that increases security. Cross pins in X patterns at stress points where braids join or change direction.
Hairspray application requires layered approach for optimal results. Mist lightly during braiding process to add grip between sections. Apply heavier coverage after completion, focusing on areas prone to loosening. Choose formulas that dry quickly without leaving sticky residue that attracts lint or debris.
Temperature and humidity affect product performance throughout your celebration. Outdoor venues require stronger hold formulas that resist moisture and wind. Indoor celebrations allow lighter products that maintain natural movement while providing adequate security. Test your chosen products during trial appointments to confirm performance under similar conditions to your wedding day environment.
Your Perfect Bridal Look Awaits
These timeless braiding techniques offer endless possibilities for creating the wedding hairstyle of your dreams. Whether you choose elegant simplicity or elaborate decorative elements, the foundation remains the same – skilled technique combined with thoughtful finishing touches. Your braided style becomes more than just a hairstyle; it transforms into a reflection of your personality and wedding vision that will look stunning in photographs for years to come.
The beauty of this classic approach lies in its adaptability to any bride’s needs and preferences. From intimate garden ceremonies to grand ballroom celebrations, these versatile techniques complement every wedding style while providing the security and comfort you need for your special day. Trust in these proven methods, work closely with your stylist, and prepare to feel absolutely radiant as you walk down the aisle with confidence and grace.
Frequently Asked Questions
Q: How long do French braids last on wedding day?
A: Properly executed French braids can last 12-15 hours with minimal touch-ups when secured correctly with bobby pins and hairspray.
Q: Should I use fresh or silk flowers in my wedding braid?
A: Fresh flowers provide authentic beauty and fragrance but may wilt during long celebrations. Silk flowers offer durability and consistent appearance throughout your entire wedding day.
Q: What hair length works best for French braid wedding styles?
A: Medium-length hair offers the most versatility, but all lengths work with proper techniques. Short hair benefits from extensions, while long hair may need strategic securing for comfort.
Q: How do I choose between French and Dutch braiding techniques?
A: French braids create raised, prominent patterns perfect for formal weddings. Dutch braids appear embedded in your hair with three-dimensional effects ideal for bohemian themes.
Q: When should I create texture in my hair before braiding?
A: Add waves or texture before braiding to create fuller, more dimensional results. Smooth, straight hair often appears flat and one-dimensional in braided styles.
Q: How many bobby pins do I need for a secure French braid?
A: Plan for 15-20 bobby pins for basic styles, up to 40 for elaborate updos. Choose pins one shade darker than your hair color for better camouflage.
Q: Can I sleep in my French braid the night before my wedding?
A: Avoid sleeping in your wedding braid as it may loosen or create dents. Instead, sleep in loose braids to add texture, then style fresh on your wedding morning.
Q: What’s the best way to attach a veil to a French braided hairstyle?
A: French braids provide multiple secure attachment points. Your stylist can position the veil at the crown for cathedral lengths or lower for shorter styles, using the braided structure for grip.
Q: How do I prevent my French braid from looking too tight or severe?
A: Use the pancaking technique to gently pull apart braided sections for fuller appearance. This creates romantic softness while maintaining the style’s security and structure.