French braids offer a practical and charming solution for parents seeking hairstyles that can withstand the energy of childhood. These intricate-looking braids keep hair secure throughout playground adventures, art projects, and naptime, while adding a touch of sophistication to any little one’s appearance. The versatility of French braids makes them suitable for everything from casual school days to special family gatherings.
Many parents feel intimidated by the seemingly complex weaving pattern of French braids, assuming they require professional hairstyling skills. The truth is far more encouraging – with basic techniques and patient practice, anyone can master these protective styles. Children’s hair, often finer and more manageable than adult hair, actually lends itself beautifully to French braiding, making the learning process smoother than you might expect.
In the following sections, we’ll explore various French braid techniques specifically adapted for young children, from simple single braids to creative variations that will delight your little ones. You’ll discover practical tips for working with wiggly kids, learn which tools make the process easier, and find inspiration for styles that suit different hair types and lengths. Let’s transform your morning hair routine into an enjoyable bonding experience that leaves your child feeling confident and ready for their day.
- What Are French Braids and Why Kids Love Them
- Essential Tools and Preparation for Braiding Kids' Hair
- Simple French Braid Styles Perfect for Children
- Tips for Success When French Braiding Children's Hair
- Creative Variations and Fun Additions
- Final Thoughts on French Braiding Young Hair
- Frequently Asked Questions
What Are French Braids and Why Kids Love Them
French braids start at the crown of the head and gradually incorporate sections of hair as they progress downward, creating a woven pattern that lies flat against the scalp. This technique differs from traditional three-strand braids, which begin with all the hair gathered at once. The result is a secure, comfortable style that distributes tension evenly across the scalp, preventing the pulling sensation that often bothers sensitive young heads.
Understanding the basic French braid structure
The foundation of a French braid involves three sections of hair that interweave while continuously adding small portions from the sides. Think of it as building a braid piece by piece, rather than creating one all at once. This gradual incorporation creates the characteristic raised pattern that sits snugly against the head. Starting with smaller sections makes the process more manageable, especially when working with fine children’s hair.
How French braids differ from regular braids
Regular braids hang freely from a single gathering point, while French braids integrate into the scalp itself. This integration provides superior hold and prevents the style from sliding out during active play. The technique also eliminates the need for multiple hair ties along the length of the hair, reducing potential damage and discomfort. For children who dislike having their hair pulled back tightly, French braids offer a gentler alternative that still keeps strands away from their face.
Why this style works well for active children
The close-to-head construction of French braids makes them nearly indestructible during typical childhood activities. Whether your child enjoys climbing, running, or rolling around during playtime, these braids stay intact without constant readjustment. The style also works wonderfully under helmets for bike riding or sports activities, preventing uncomfortable bunching or pulling that loose hair might cause.
Swimming becomes more enjoyable when hair stays controlled, and French braids excel in this area. Water activities won’t unravel a well-done French braid, making pool days and beach trips more relaxed for both parents and children. The braid also dries more quickly than loose wet hair, reducing the risk of tangles and discomfort after water play.
The comfort factor for little ones
Children often complain about hairstyles that feel too tight or cause headaches, but properly executed French braids avoid these issues. The even distribution of hair weight prevents strain on any single area of the scalp. This balanced approach means kids can wear their braids all day without discomfort, making them ideal for long school days or extended family events.
The smooth surface of French braids also eliminates irritation during naptime or nighttime sleep. Unlike ponytails or buns that create pressure points when lying down, French braids allow children to rest their heads comfortably in any position. Many parents find that leaving loose French braids in overnight actually helps prevent morning tangles.
Age-appropriate variations
French braiding techniques adapt easily to different developmental stages and hair lengths. For toddlers with shorter hair, partial French braids that incorporate just the front sections work beautifully. These mini versions keep hair out of eyes while requiring less sitting time – perfect for wiggly little ones who haven’t yet developed patience for longer styling sessions.
Preschoolers often enjoy the process of choosing how many braids they want or where to position them. This age group typically has enough hair length for full French braids but might still need entertainment during the braiding process. School-age children can often sit still longer, allowing for more elaborate styles or tighter, longer-lasting braids that withstand full days of activity.
Essential Tools and Preparation for Braiding Kids’ Hair

Success with French braiding begins long before your fingers touch your child’s hair. Having the right tools within reach and properly preparing both the hair and your little one makes the entire process smoother and more enjoyable. A well-organized braiding station prevents frustration and reduces the time your child needs to sit still.
Must-have hair accessories for children
A good spray bottle filled with water becomes your most valuable tool for managing children’s hair. Light misting helps control flyaways without soaking the hair, making sections easier to separate and manage. Choose a bottle with a fine mist setting to avoid over-wetting, which can make braiding slippery and difficult.
Small, snag-free elastics designed specifically for children’s hair prevent breakage and discomfort. Look for options without metal clasps, as these can catch and pull delicate strands. Clear or color-matched elastics blend seamlessly with hair color, while bright, fun colors can add personality to the finished style. Keep plenty on hand, as they tend to disappear mysteriously in households with children.
A wide-tooth comb works better than brushes for detangling young hair without causing pain. Start from the ends and work your way up to the roots, holding the hair above where you’re combing to minimize pulling on the scalp. For particularly tangled areas, a detangling spray formulated for children can work wonders. Some parents find that sectioning clips help separate hair into manageable portions, though nimble fingers can often work without them.
Preparing young hair for braiding
The ideal starting point is clean, slightly damp hair that’s been thoroughly detangled. Washing hair the night before often works well, as overnight drying leaves hair in perfect condition for morning braiding. If starting with completely dry hair, that light misting mentioned earlier helps tremendously with control and sectioning.
Some children’s hair benefits from a small amount of leave-in conditioner or light styling cream to reduce frizz and add manageability. Avoid heavy products that might make the hair slippery or leave residue on your hands during braiding. The goal is hair that feels smooth but not slick, allowing your fingers to grip sections effectively.
Making the experience enjoyable for kids
Transform braiding time into a special ritual rather than a chore. Set up a comfortable spot with good lighting where your child can see themselves in a mirror if they wish. Some children enjoy watching the process, while others prefer distraction through their favorite show, audiobook, or conversation about their day.
Creating positive associations with hair styling starts with respecting your child’s comfort level. Take breaks if needed, and never force the issue if they’re having a particularly sensitive day. Many parents find success with special “braiding only” activities:
- Tablet Time: Reserved exclusively for hair styling sessions
- Story Podcasts: Engaging audio content that doesn’t require visual attention
- Special Snacks: Small treats that don’t create messy fingers
- Counting Games: Making math practice part of the braiding process
- Song Singing: Favorite tunes that mark the beginning and end of styling time
Dealing with tangles and sensitive scalps
Children’s scalps vary greatly in sensitivity, and what feels fine to one child might be uncomfortable for another. Always start gently and increase firmness only as needed for the braid to hold. If your child has a particularly sensitive scalp, try braiding slightly looser and securing with an extra elastic midway down if necessary.
For persistent tangles, resist the urge to pull through them forcefully. Instead, isolate the tangled section and work it free with your fingers or a wide-tooth comb while supporting the hair above to prevent scalp pulling. Sometimes dividing a large tangle into smaller sections makes it more manageable. Patience during this phase pays off in a more comfortable experience overall and a child more willing to sit for future braiding sessions.
Simple French Braid Styles Perfect for Children
Starting with basic French braid styles builds confidence for both you and your child. These fundamental techniques form the foundation for more creative variations later, while providing immediately wearable results that will delight your little one. Each style offers different benefits, allowing you to choose based on your child’s hair type, length, and daily activities.
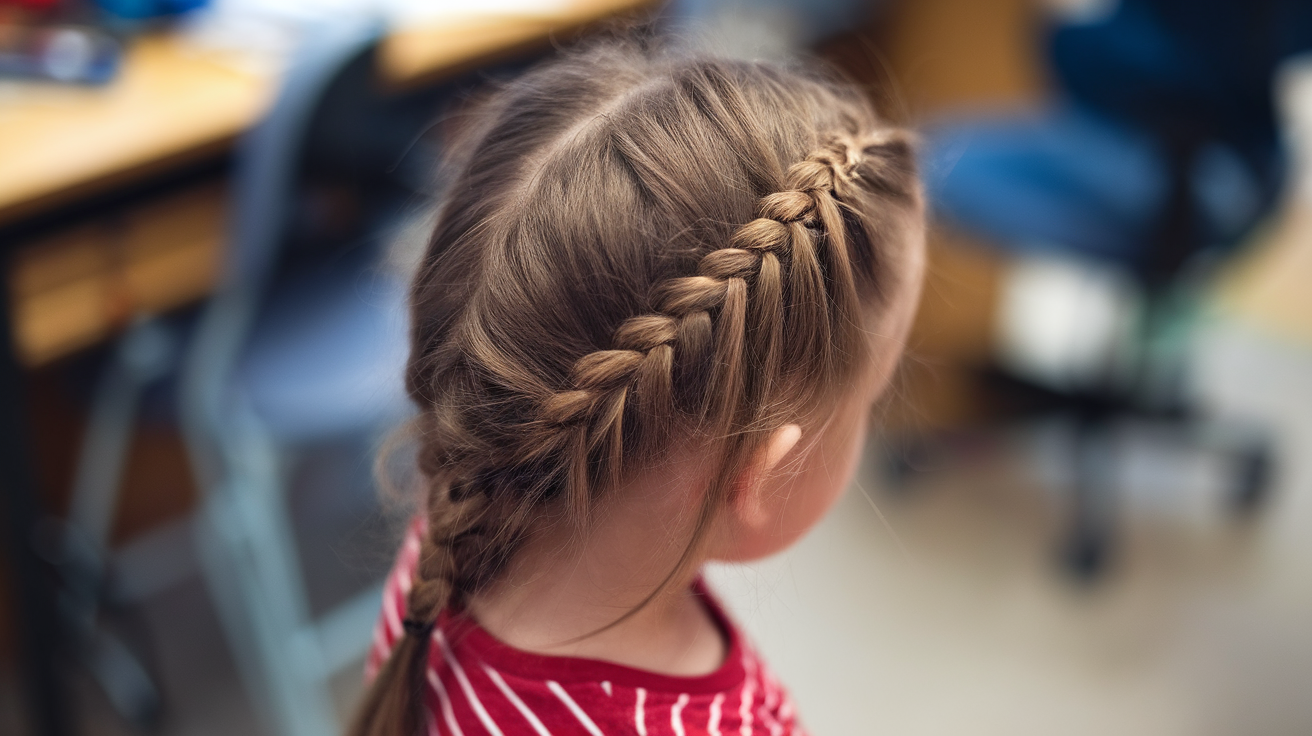
Classic single French braid down the back
The traditional center French braid remains popular for good reason – it’s secure, timeless, and suits nearly every occasion. Beginning at the crown, divide a section of hair into three equal parts. Cross the right section over the middle, then the left section over the new middle, just like a regular braid. The French element comes from adding small sections of loose hair to each outer section before crossing it over.
Keep sections small and even for the smoothest result. Your hands should move in a steady rhythm: add hair to the right section, cross over middle, add hair to the left section, cross over middle. This repetitive motion becomes second nature with practice. Continue this pattern down the head, following the natural curve of the skull.
As you progress, the braid naturally incorporates all the surrounding hair. Once you’ve gathered all loose hair (usually at the nape of the neck), continue with a regular three-strand braid to the ends. Secure with an elastic, leaving a small tail if your child prefers, or braiding completely to the tips for maximum neatness.
This style typically lasts all day without touch-ups, making it perfect for school or daycare. The centered position also means it works well under hats or hoods without creating uncomfortable bumps.
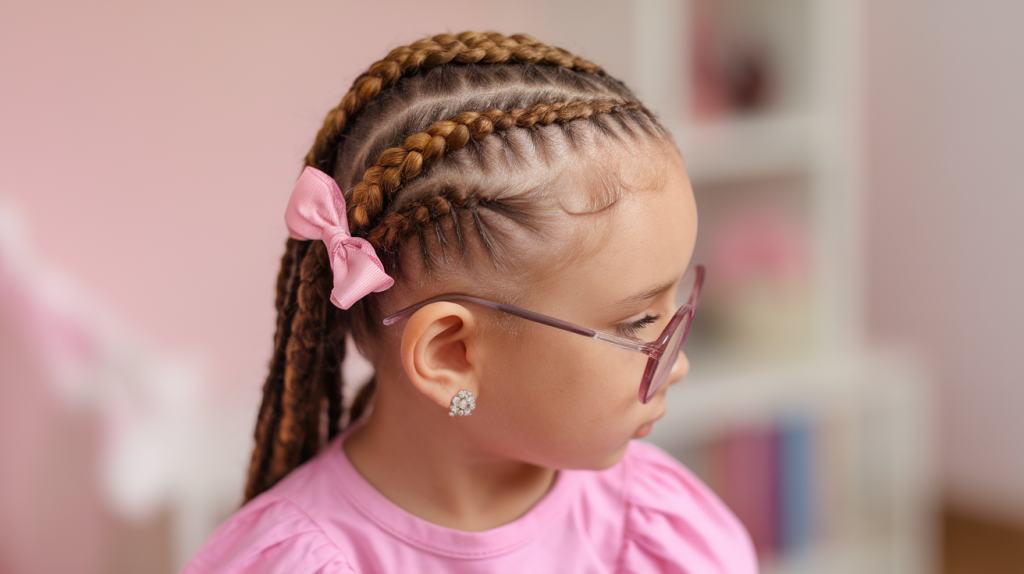
Double French braids for extra security
Two French braids offer superior staying power for extremely active children. Part the hair down the center from forehead to nape, securing one side with a temporary clip or elastic while working on the other. This division doesn’t need to be perfectly straight – a slight zigzag can actually look charming and is more forgiving of mistakes.
Start each braid higher on the side of the head rather than directly on top. This positioning creates a more comfortable fit and prevents the braids from pulling toward the center throughout the day. The technique remains the same as a single braid, but working with half the hair makes each braid quicker to complete.
Double braids distribute weight more evenly across the scalp, reducing any potential discomfort from having all the hair pulled to one point. They also offer creative opportunities – try braiding one slightly higher than the other for an asymmetrical look, or experiment with different braid tightness for varied texture.
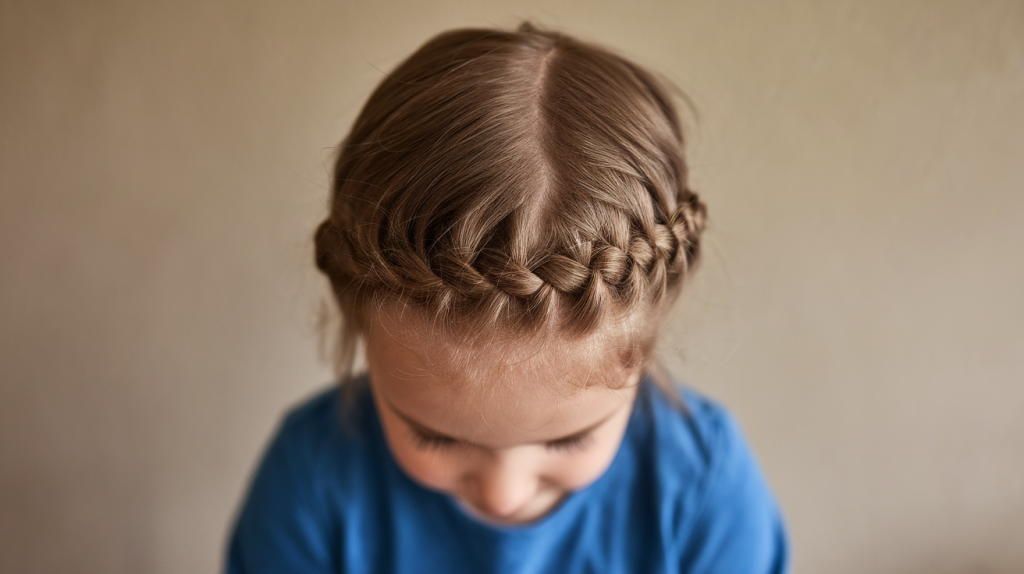
Side French braids for a playful look
Beginning a French braid from one side of the head and curving it around creates a crown-like effect that children adore. Start above one ear with a solid section divided into three parts. As you braid, angle your hands to guide the braid across the head rather than straight down. This requires slightly more coordination but produces stunning results.
The key lies in consistent tension and smooth curves. Add hair only from the front initially, creating a defined edge along the hairline. As you round the crown, begin incorporating hair from both sides. You can end this style various ways: continue the braid down one shoulder, wrap it into a bun, or pin it across like a headband.
This style works particularly well for special occasions or when your child wants something “fancy” for school. The asymmetrical design frames the face beautifully and keeps every strand secure despite its decorative appearance.
Mini French braids for shorter hair
Children with chin-length or shorter hair can still enjoy French braids through strategic mini versions. Focus on the front sections where hair tends to be longest and most bothersome in eyes. Create small French braids starting at the hairline and extending back just a few inches before securing with tiny elastics.
These abbreviated braids can stand alone as accent pieces or connect to other styling elements. Try creating two or three mini braids along the hairline, leaving the back hair loose. Or braid small sections on either side of a part, pinning them back to create a half-up style that works with limited length.
The beauty of mini braids lies in their versatility and quick execution. They take only minutes to create but add significant style impact. As your child’s hair grows, these same techniques expand into fuller styles, making them excellent practice for both of you.
Partial French braids for beginners
Not ready for full French braids? Partial versions offer excellent stepping stones. Start with French braiding only the top section of hair, transitioning to a regular braid once you’ve passed the crown. This approach reduces the time your child needs to sit still while still achieving the French braid look.
Another beginner-friendly option involves French braiding just the bangs or front sections, pulling them back and securing with a clip or elastic. The remaining hair stays loose, but face-framing pieces remain controlled. This technique works wonderfully for growing out bangs or managing different lengths within a haircut.
Partial braids also solve the common problem of arm fatigue that new braiders experience. By limiting the French braiding portion to the easiest-to-reach areas, you can create polished looks without straining. As your skills and stamina improve, gradually extend the French braided sections until you’re comfortable creating full styles.
Tips for Success When French Braiding Children’s Hair

Mastering the technical aspects of French braiding is only half the equation when working with young children. Understanding how to manage the behavioral and practical challenges makes the difference between a pleasant morning routine and a daily struggle. These strategies help create positive experiences that benefit both parent and child.
The journey from braiding novice to confident stylist happens gradually. Each small success builds upon the last, creating a foundation of skills that eventually become second nature. Your child’s cooperation often improves alongside your technical abilities, as they learn to trust the process and enjoy the results.
Keeping kids still during braiding
Movement is natural for children, and expecting statue-like stillness sets everyone up for frustration. Instead, work with their energy by building in acceptable movements. Teach your child the difference between small wiggles (okay) and big head turns (need to pause). Creating a special signal or word that means “I need a break” gives them control within the process.
Position matters tremendously for both comfort and cooperation. Having your child sit on a low stool while you stand allows better angle access without straining your back. Some families find success with the child sitting on the floor while the parent sits on a couch behind them. Experiment with different setups to find what works for your specific heights and preferences.
Strategic breaks prevent meltdowns before they start. After completing one section or every few minutes, pause to let your child stretch, look in the mirror, or simply move around briefly. These micro-breaks actually speed up the overall process by maintaining cooperation throughout.
Quick techniques for busy mornings
Preparation the night before transforms hectic mornings into manageable routines. Spray damp hair with leave-in conditioner before bed, then create loose braids for sleeping. In the morning, these braids release to reveal tangle-free waves perfect for French braiding. This advance work cuts morning styling time nearly in half.
Develop muscle memory through practice during relaxed times rather than rushed mornings. Weekend afternoons or quiet evenings provide ideal practice opportunities without time pressure. The more automatic your movements become, the faster you’ll complete styles when speed matters.
For ultra-busy days, master one go-to style that you can execute quickly and reliably. Often, this becomes a simple single French braid or double braids. Knowing you have a fallback option reduces stress and ensures your child always leaves home with neat hair.
Consider these time-saving approaches:
- Section First: Divide hair into rough sections before starting to braid
- Skip Perfection: Small bumps or loose pieces won’t affect the overall hold
- Use Spray Bottle: Lightly mist sections as you go rather than wetting all hair first
- Elastic Ready: Keep elastics on your wrist or in easy reach
- Practice Path: Always braid in the same direction to build speed
Making braids last through playtime
The longevity of a French braid depends more on technique than on product use. Consistent tension throughout creates braids that withstand vigorous activity. This doesn’t mean pulling painfully tight – rather, maintaining even, firm pressure as you work prevents loose spots that unravel later.
Securing the braid properly makes an enormous difference in staying power. Wrap the elastic multiple times until it feels genuinely secure, not just barely holding. For extra insurance during particularly active days, add a second elastic an inch or two below the first. This backup prevents total unraveling if the primary elastic breaks or slides off.
Weather considerations affect braid longevity too. Humid days might require a light misting of hairspray (child-friendly formula) or anti-humidity spray. Very dry conditions benefit from a tiny amount of hair oil or serum on the finished braid to prevent static and flyaways. Cold weather often means hats, so ensure braids lie flat enough to fit comfortably underneath without creating pressure points.
Troubleshooting common challenges
Uneven sections create lopsided braids that pull uncomfortably. If you notice this happening mid-braid, pause and gently redistribute hair between sections before continuing. Better to fix early than complete an entire uncomfortable style. With practice, your fingers learn to gauge equal amounts without conscious thought.
Bumps and lumps frustrate many beginning braiders. Usually, these result from not pulling sections smooth before incorporating them. Run your fingers through each new section like a comb before adding it to the braid. Also, maintain upward angle tension – pulling slightly up and back rather than straight down creates smoother results against the scalp.
Short layers that won’t stay in braids need creative solutions. A tiny amount of hair gel or light-hold mousse on just these pieces helps them stick to neighboring sections. Alternatively, leave very short pieces out entirely and pin them separately after completing the main braid. Sometimes working with hair’s natural tendencies produces better results than fighting against them.
Building your child’s confidence
Children who feel ownership over their hairstyles cooperate more readily during creation. Let them choose between options you’re comfortable executing: “Would you like one braid or two today?” or “Should we add your blue elastics or the sparkly ones?” These small choices give agency without overwhelming anyone.
Mirror time after completion lets children admire the finished product and builds positive associations. Take photos occasionally to create a “hairstyle album” they can browse for inspiration. Some children enjoy naming their different styles or creating stories about princesses, athletes, or adventurers who wear similar braids.
Praise both the process and the result. Comments like “You sat so still while I did the tricky part!” or “Your braid looks strong enough for all your playground games!” reinforce cooperative behavior and build excitement for future styling sessions. Over time, many children begin requesting their favorite braided styles, turning what might have been a chore into a cherished routine.
Creative Variations and Fun Additions
Once you’ve mastered basic French braiding techniques, a world of creative possibilities opens up. Children particularly love personalized touches that make their hairstyles unique. These variations require no additional technical skills – just imagination and perhaps a few extra accessories. The joy on your child’s face when wearing a special creation makes the minimal extra effort worthwhile.
Adding colorful ribbons and accessories
Weaving ribbons through French braids creates stunning visual effects with minimal effort. Choose ribbons slightly longer than your child’s hair and secure one end with the starting elastic. As you braid, treat the ribbon as a fourth strand, wrapping it around one section consistently. The ribbon spirals through the finished braid, adding color and movement that delights young eyes.
Hair-safe accessories transform ordinary braids into extraordinary styles. Tiny flower clips placed along the braid’s edge create a garden effect. Small butterfly pins scattered throughout suggest whimsical flight. For special occasions, metallic thread woven through adds subtle sparkle without the mess of glitter products.
Consider seasonal themes your child might enjoy. Autumn braids might feature tiny silk leaves tucked into the weave. Winter styles could incorporate snowflake clips or silver ribbons. Spring calls for pastel colors and flower accents, while summer braids might showcase bright tropical themes. This seasonal rotation keeps hairstyling fresh and exciting throughout the year.
Combining French braids with other styles
French braids pair beautifully with various other techniques to create hybrid styles. A French braid crown flowing into loose curls combines structure with softness. Start French braiding along the hairline, then transition to regular hair down the back, curling the loose portion with a wide-barrel iron or foam rollers for heat-free waves.
The half-up French braid offers an excellent compromise for children who want both styled and loose hair. French braid sections from each temple, meeting at the crown and securing them together. The remaining hair flows freely while face-framing pieces stay controlled. This style works particularly well for children with very long or thick hair that might feel heavy in a full braid.
Incorporating small buns or twists adds dimension to basic French braids. Try French braiding to the crown, then twisting the remaining length into a ballerina bun. Or create multiple mini French braids that feed into gathered ponytails at various points. These combinations teach children that hairstyling involves creativity, not just following rigid patterns.
Special occasion French braid ideas
Formal events call for elevated French braid styles that still suit young children. The Dutch flower braid creates a stunning focal point: French braid normally but leave small loops of hair protruding at regular intervals. After securing the braid, gently pull these loops to form petal shapes, creating the illusion of flowers growing along the braid.
For particularly special occasions, consider incorporating costume elements directly into the braiding:
- Princess Styles: Pearl strands woven throughout for royal elegance
- Sports Events: Team color ribbons showing school spirit
- Holidays: Themed accessories matching the celebration
- Performances: Extra-secure styles with decorative elements that won’t shift during movement
- Photos: Asymmetrical or face-framing braids that photograph beautifully
Birthday parties might feature the birthday child’s age in mini braids along one side. Holiday gatherings could showcase braids shaped into hearts for Valentine’s Day or arranged to hold shamrock clips for St. Patrick’s Day. These thoughtful touches make children feel special and celebrated.
Seasonal French braid inspirations
Each season brings opportunities for themed French braid creativity. Summer styles might stay off the neck entirely, with French braids wrapping into high buns perfect for pool days. Incorporate bright elastic colors reminiscent of beach balls and sunshine. These practical warm-weather styles keep children cool while looking polished.
Fall French braids can mirror nature’s changing colors. Try creating loose, slightly messy French braids that mimic the casual feeling of autumn. Weave in burgundy or golden ribbons, or tuck preserved small leaves (sealed in clear nail polish for durability) into completed braids. The earthy, harvesty feeling suits back-to-school time perfectly.
Winter calls for sleek, smooth French braids that fit comfortably under hats and hoods. Consider styles that start lower on the head to avoid hat interference. Silver or white ribbons create a snowy effect, while deep jewel-toned accessories bring richness to dreary days. These practical considerations ensure children stay styled despite weather requirements.
Spring French braids can be lighter and more whimsical. Create loose braids with tendrils framing the face, suggesting the fresh, soft feeling of new growth. Pastel accessories and flower clips complete the seasonal look. These romantic styles work beautifully for spring photos and Easter celebrations.
Making braiding a bonding experience
Transform braiding sessions into cherished connection time between parent and child. Share stories from your own childhood while your fingers work. Ask about their dreams, friends, or favorite school subjects. This focused one-on-one time often reveals thoughts and feelings children might not share during busier moments.
Teach older children to braid friendship bracelets or doll hair while you work on their French braids. This parallel activity keeps hands busy and creates a sense of shared creative time. Some children enjoy learning to French braid on practice dolls or even attempting sections of their own hair, building skills for future independence.
Create traditions around braiding time that your child will remember fondly. Perhaps Sunday mornings mean elaborate braids and pancakes, or Friday afternoons bring experimental styles for the weekend. Maybe each successful braiding session earns a sticker on a chart, with rewards for cooperation milestones. These rituals weave positive memories that last far beyond childhood, creating associations between hairstyling and parental love that your child will carry forward into their own parenting journey someday.
Final Thoughts on French Braiding Young Hair
French braiding your child’s hair opens doors to creativity, practicality, and precious bonding moments that extend far beyond mere hairstyling. The techniques you’ve learned here provide a foundation for countless variations, each one an opportunity to make your little one feel special and cared for. As your skills develop and your child grows, these braiding sessions become treasured rituals that strengthen your connection while solving the practical challenge of managing active children’s hair.
The journey from fumbling with sections to confidently creating intricate styles mirrors many aspects of parenting – what seems impossible at first gradually becomes second nature through patience and practice. Your willing student transforms too, from a wiggly toddler who barely tolerates hair brushing to a child who eagerly requests their favorite braided style. These small victories in the daily routine of family life create a tapestry of memories that both of you will cherish, long after the last braid has been unraveled and your child styles their own hair independently.
Frequently Asked Questions
Q: At what age can I start French braiding my child’s hair?
A: You can begin creating simple French braids once your child has hair that’s at least 3-4 inches long, typically around age 2-3. However, the ability to sit still matters more than age – some patient toddlers handle braiding well, while some older children need more practice with sitting time.
Q: How can I French braid very fine or slippery hair that won’t hold?
A: Fine hair benefits from texturizing before braiding. Try braiding slightly damp hair or applying a small amount of mousse or dry shampoo for grip. Smaller sections and tighter (though not painful) tension help fine hair stay put. Using smaller, grippier elastics designed for fine hair also makes a significant difference.
Q: My child’s hair is too short for full French braids. What can I do?
A: Focus on partial French braids using just the longer sections, usually around the crown or bangs area. Create multiple mini French braids along the hairline, or try French braiding just the top section while leaving underneath layers loose. These abbreviated styles still provide the benefits of controlled hair without requiring overall length.
Q: How long should a French braid last on a child?
A: A well-executed French braid typically lasts a full day of normal activity. For very active children or overnight wear, expect some loosening and flyaways. Many parents find that braids can last 2-3 days with minor touch-ups, though daily rebraiding prevents tangles and maintains scalp health.
Q: What’s the best way to remove French braids without causing tangles?
A: Start by carefully removing the elastic and gently loosening the bottom portion of the braid. Work your way up gradually, using your fingers to separate sections rather than pulling the braid apart. A light mist of detangling spray helps. Never rush this process – patient unbraiding prevents painful tangles and hair damage.
Q: Can French braiding damage my child’s hair?
A: When done correctly with appropriate tension, French braiding actually protects hair from damage by preventing tangles and reducing manipulation throughout the day. Avoid braiding too tightly, vary the position of braids to prevent stress on the same areas, and give hair regular breaks from braiding to maintain optimal health.
Q: How do I handle a child who cries or complains during braiding?
A: First, assess if you’re pulling too hard or if there are tangles causing pain. Take breaks, offer distractions, and consider shorter braiding sessions until they build tolerance. Sometimes switching positions, times of day, or adding special rewards helps. Never force braiding on a distressed child – building positive associations matters more than perfect hair.
Q: Should I braid my child’s hair wet or dry?
A: Slightly damp hair often works best for French braiding – it’s easier to control than dry hair but less fragile than soaking wet strands. If braiding wet hair, be extra gentle as wet hair breaks more easily. Completely dry hair can be misted lightly with water for better manageability. Avoid braiding soaking wet hair that will be left in braids for extended periods, as this can lead to scalp issues.