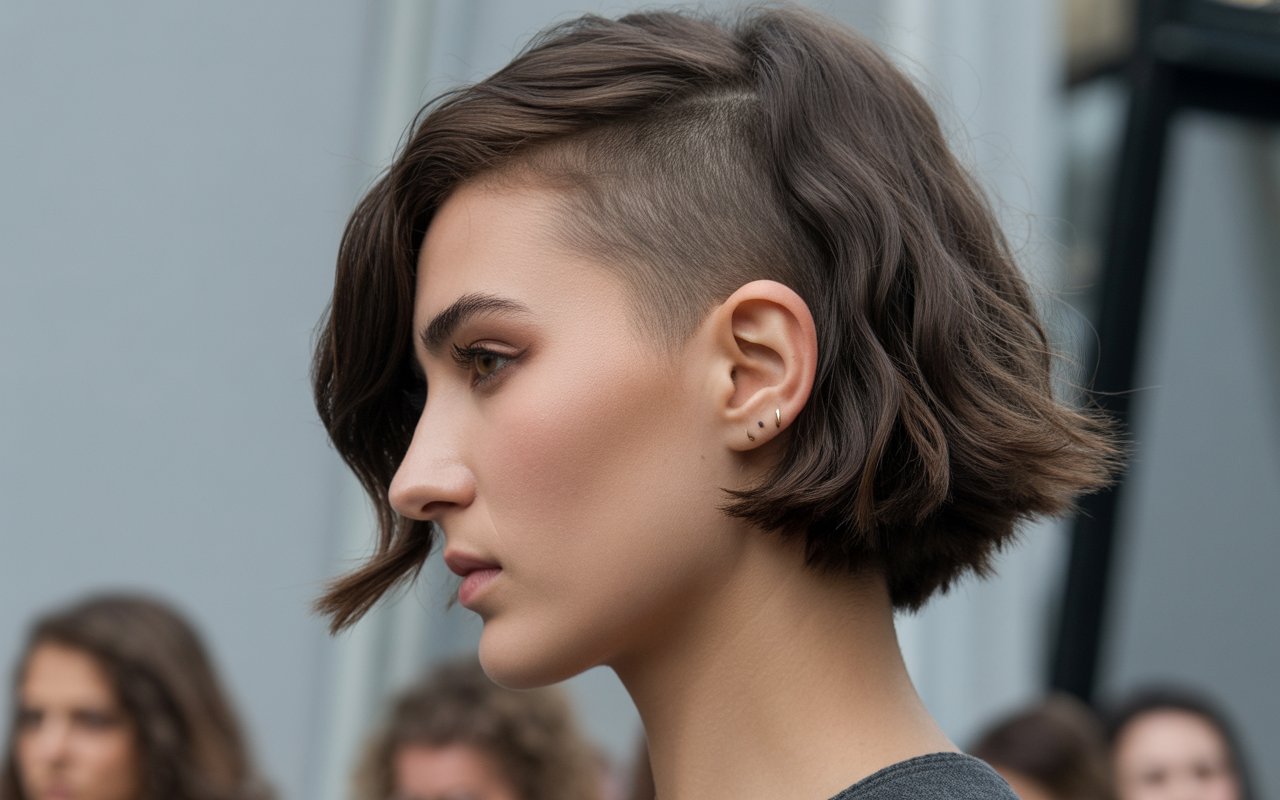
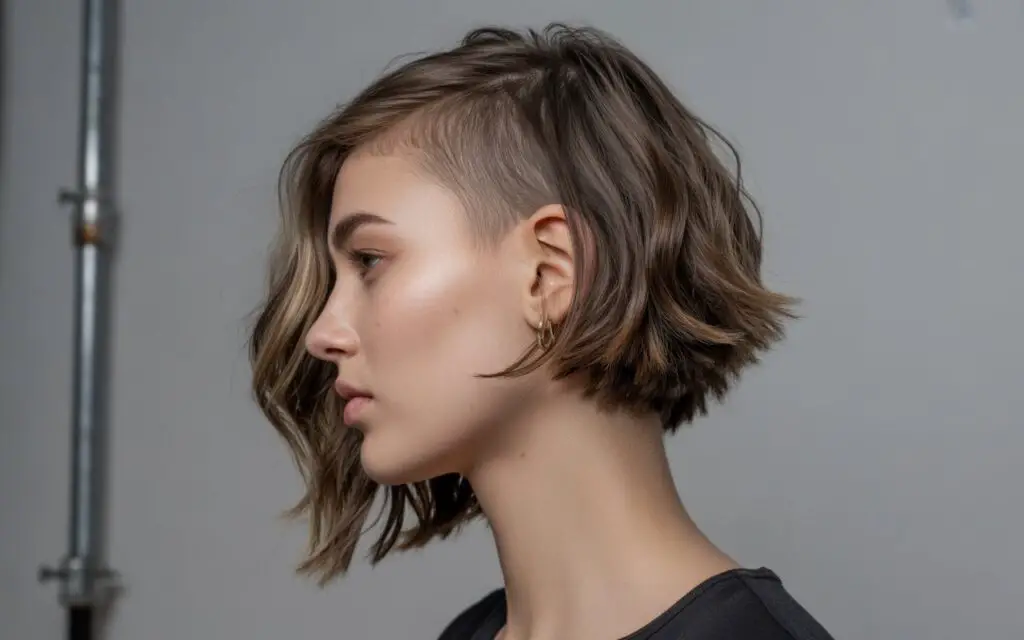
The shaggy bob with undercut combines two of hairstyling’s most dynamic elements into one striking look. This hairstyle pairs the lived-in texture of a shaggy bob with the sharp precision of an undercut, creating a style that’s both edgy and effortlessly cool. Women who choose this cut often find themselves with a versatile canvas that can go from professional to playful with just a few styling tweaks.
Getting the styling right makes all the difference between looking intentionally tousled and accidentally messy. The undercut adds an extra dimension that requires specific techniques to highlight the contrast between the shorter and longer sections. Your styling approach will depend on your hair’s natural texture, the length of your layers, and how dramatic your undercut is.
We’ll walk through everything you need to know about bringing out the best in this contemporary cut. From preparing your hair properly to mastering texture techniques and finishing touches, you’ll discover how to make this style work for your daily routine. Let’s uncover the secrets to achieving that perfect balance of structure and movement.
What Makes a Shaggy Bob with Undercut Special?
The combination of choppy layers and a precise undercut creates visual interest that traditional bobs simply can’t match. This dual-texture approach gives you the freedom to play with contrasts – soft versus sharp, messy versus clean, volume versus sleekness. The undercut removes bulk from underneath while the shaggy layers on top maintain movement and body.
The contrast between textured layers and clean undercut
Your styling approach should emphasize the deliberate difference between these two elements. The upper layers need texture and movement, while the undercut area stays smooth and defined. This juxtaposition is what gives the style its modern edge. You can achieve this by using different products on each section – texturizing spray for the top layers and a light pomade for the undercut area.
The beauty lies in how these opposing textures complement each other. The clean lines of the undercut make the shaggy texture appear more intentional rather than unkempt. Meanwhile, the soft layers prevent the undercut from looking too severe or masculine.
How the undercut changes the traditional shaggy bob
Without the weight of hair underneath, the top layers move differently than they would in a standard bob. They tend to spring up more, creating natural volume without requiring excessive teasing or product. This built-in lift means less morning styling time for busy women.
The undercut also affects how heat tools work on your hair. With less density to work through, your flat iron or curling wand can create texture more efficiently. Sections dry faster when blow-drying, and products distribute more evenly through the remaining hair.
Which hair types work best with this combination
While this cut adapts to various hair types, certain textures shine with minimal effort. Naturally wavy hair requires the least manipulation – often just some scrunching with product creates the perfect shaggy texture. Straight hair benefits from the undercut’s volume-boosting properties but needs more help creating texture through styling techniques.
Fine hair gains substantial body from this combination since removing weight underneath allows the top layers to lift naturally. Thick hair becomes more manageable with the bulk reduction, though you might need stronger-hold products to maintain the style throughout the day.
Women with curly hair find this cut particularly liberating. The undercut eliminates the triangle shape that can happen with shorter curly styles, while the layers encourage curl formation in attractive patterns.
Maintenance differences from regular bobs
The styling routine changes significantly compared to a traditional bob. You’re working with less hair overall, which speeds up your morning routine. However, the undercut portion needs regular touch-ups to maintain its crisp appearance – typically every 3-4 weeks.
Product application becomes more strategic. The exposed scalp area of the undercut might need different care than the longer sections, especially if you color your hair. Some women use this as an opportunity to experiment with designs or different colors in the undercut area, adding another dimension to their styling options.
How Do You Prepare Your Hair for Styling?
Starting with the right foundation determines whether your style lasts all day or falls flat by noon. Preparation goes beyond just washing – it’s about creating the optimal canvas for your styling products and tools to work effectively.
Starting with clean, properly conditioned hair
The washing process sets everything in motion. Choose a shampoo that won’t weigh down your layers but still cleanses thoroughly. Clarifying shampoos work well once a week to remove product buildup that can make hair look limp. For regular washes, a volumizing or texturizing shampoo adds grip to your strands.
Conditioning needs vary between the longer layers and the undercut area. Apply conditioner mainly to the mid-lengths and ends of your longer sections, avoiding the roots where you want lift. The shorter undercut area needs minimal conditioning – just enough to keep it soft without making it slippery.
Your water temperature matters more than you might think. Finish with a cool rinse to seal the hair cuticle, which helps your style hold better and adds shine. This simple step makes a noticeable difference in how your hair responds to styling.
Choosing the right products for your hair texture
Product selection can make or break your styling success. Start with a lightweight leave-in treatment that won’t weigh down your layers. Look for formulas that add grip and texture rather than smoothing – you want some roughness for the shaggy effect to work.
For the foundation, consider these product categories based on your needs:
Volume Mousse: Adds body without stiffness, perfect for fine hair
Texture Spray: Creates grit and separation for that piece-y look
Heat Protectant: Essential if using hot tools, choose one that doesn’t flatten
Root Lift Spray: Targets the crown area for extra height
The undercut section might benefit from a different product altogether. A light gel or cream can define this area without making it look greasy or flat against your head.
Tools you’ll need for successful styling
Your tool selection directly impacts your ability to create the signature messy-yet-controlled look. A good blow dryer with a concentrator nozzle gives you precision when directing the airflow. This control prevents the layers from becoming too fluffy or undefined.
Round brushes in different sizes create varied textures – smaller barrels for tighter bends, larger ones for gentle waves. However, many women find that finger-styling during blow-drying creates the most natural-looking texture. Your hands can scrunch, twist, and direct the hair in ways brushes cannot.
For heat styling, consider tools that enhance texture rather than smooth it. A curling wand creates more natural-looking bends than a traditional curling iron with a clamp. A mini flat iron works perfectly for adding flicks and bends to individual pieces. Some women swear by crimping plates near the roots for invisible volume.
Don’t overlook the importance of a good wide-tooth comb for initial detangling and sectioning clips for controlling your hair while working through different areas.
Pre-styling treatments that make a difference
Before reaching for any heat tools or styling products, certain prep steps enhance your results. A volumizing treatment applied to damp roots and left for a few minutes creates lasting lift. These treatments often contain ingredients that swell the hair shaft slightly, giving each strand more body.
Applying a texturizing primer throughout your lengths helps products adhere better and provides a foundation for building texture. Think of it like using primer before makeup – it creates a better surface for everything that follows. These primers often contain sea salt or sugar-based ingredients that add natural grit.
For women dealing with frizz or excessive dryness, a small amount of hair oil applied to the very ends prevents that straw-like appearance that can happen with textured styles. The key is using minimal product – just enough to condition without eliminating the desired roughness.
Some stylists recommend “rough drying” your hair to about 80% dry before applying any styling products. This technique involves using just your blow dryer without any brushes, tousling your hair with your fingers as you dry. This creates natural volume and texture that you can then enhance with products.
What Are the Best Techniques for Creating Texture?
Mastering texture creation transforms a basic bob into that coveted lived-in style. The techniques you choose depend on your hair’s natural tendencies and how much time you want to spend styling.
Working with your natural hair texture
Rather than fighting against your hair’s natural patterns, successful styling works with what you have. Wavy hair responds beautifully to scrunching techniques – simply squeeze sections upward while the hair is damp, encouraging the wave pattern to form. This method requires minimal heat and gives authentic-looking results.
Straight hair needs more encouragement to hold texture. Twist small sections while damp, then blow dry with a diffuser or let them air dry. Once dry, gently pull apart the twists for natural-looking waves. This technique creates more lasting texture than using hot tools alone.
The direction you dry your hair influences the final texture. Flipping your head upside down while drying creates volume at the roots. Directing pieces away from your face opens up your features. Alternating the direction of different sections prevents the style from looking too uniform or helmet-like.
Consider your hair’s memory from previous styles too. If you typically wear your hair straight, it might resist holding waves initially. Consistent styling in your new textured direction gradually trains your hair to fall into these patterns more easily.
Using heat tools effectively
When heat styling becomes necessary, the approach differs from traditional smooth styles. Instead of running your iron straight through sections, create bends and curves. Wrap pieces around a curling wand in alternating directions – some toward your face, others away. This variation prevents the curls from clumping together into one mass.
The flat iron twist technique works exceptionally well for this cut. Take small sections, twist them, then run your flat iron down the twisted hair. This creates an irregular wave pattern that looks effortless. Varying the tightness of your twists produces different textures throughout your style.
Temperature settings matter significantly. Medium heat usually suffices for creating texture – you’re not trying to achieve pin-straight or perfectly formed curls. Lower temperatures also mean less damage over time, keeping your layers healthy and bouncy.
Scrunching and twisting methods
These hands-on techniques create the most natural-looking texture without depending entirely on hot tools. The basic scrunch involves squeezing sections of damp hair upward with product on your palms. But variations on this technique yield different results.
The twist and release method involves taking sections, twisting them tightly while damp, securing with a clip, then releasing once dry. The hair maintains a spiral pattern that you can separate for volume. This works particularly well on the longer top layers.
Rope twisting creates a different texture altogether:
Step One: Section damp hair into 1-inch pieces
Step Two: Apply texturizing product to each section
Step Three: Twist each section into a tight rope
Step Four: Allow to dry completely before unraveling
The accordion scrunch adds extra texture by pushing hair up toward the scalp in a zigzag motion rather than straight up. This creates more bends and irregularities in the hair pattern.
Some women find success with the “plop” method – wrapping damp hair in a microfiber towel or t-shirt for 10-20 minutes. This encourages natural texture formation without manipulation or heat.
Product application for maximum texture
How you apply products matters as much as which products you choose. The prayer hands method – rubbing product between your palms then smoothing over sections – distributes evenly but might flatten texture. Instead, try the rake and shake technique: rake product through with your fingers, then shake sections to encourage separation.
Layering products creates dimension. Start with a volumizing mousse at the roots, add a texturizing cream through the mid-lengths, then finish with a texture spray on dry hair. Each layer serves a different purpose without overwhelming your hair.
The undercut area needs its own approach. A tiny amount of pomade or wax warmed between your fingers can be pressed into this section for definition. Avoid getting these heavier products on your longer layers where they would weigh down the texture.
Cocktailing products – mixing two or more together before application – can create custom formulas perfect for your hair. A popular combination mixes sea salt spray with a lightweight cream for texture without dryness. Experiment with ratios to find your ideal blend.
Don’t forget about dry texturizing products. Texture powder or dry shampoo applied at the roots after styling adds grit and volume that lasts. These products work especially well for second-day styling when your hair needs refreshing without washing.
How Can You Style the Undercut Area?
The undercut portion deserves as much attention as your longer layers. This section can be a subtle accent or a bold statement, depending on your styling choices.
Creating contrast with the longer layers
The key to a successful look lies in emphasizing the difference between your two lengths. While the top layers have movement and texture, the undercut should appear sleek and controlled. This doesn’t mean plastering it flat against your head – subtle styling makes a significant impact.
Using a small amount of grooming cream, you can direct the hair growth pattern in the undercut area. Some women prefer pushing it forward for a modern look, while others sweep it back for a cleaner appearance. The direction you choose affects the overall silhouette of your style.
Color can enhance this contrast dramatically. Even if you maintain your natural color on top, the undercut area offers a playground for experimentation. Darker shades create depth, while lighter tones make the undercut more prominent. Some women add subtle highlights or lowlights for dimension without committing to a bold color change.
Using products to define the undercut
Product choice for the undercut differs from what works on your longer sections. You want control without shine or stiffness. Matte pomades work excellently, providing hold while maintaining a natural finish. These products prevent the shorter hairs from sticking up throughout the day.
Application technique prevents product buildup that can make the undercut look greasy. Warm a pea-sized amount between your fingers until it’s barely visible, then press it into the hair rather than rubbing. This method distributes product evenly without excess.
For special occasions or when you want extra definition, a finishing cream applied with a fine-tooth comb creates precise lines. Comb in the direction of hair growth for the smoothest appearance. This technique works particularly well if you have designs or patterns shaved into your undercut.
Weather affects the undercut differently than longer hair. Humidity can cause shorter hairs to curl or frizz. A humidity-blocking spray applied lightly to this area maintains your style regardless of weather conditions. These sprays often have the added benefit of UV protection for the exposed scalp.
The undercut might need midday touch-ups, especially if you’re active. Carrying a small container of product for quick fixes keeps you looking polished. A travel-sized grooming stick offers convenient application without getting product on your fingers.
Styling options for grown-out undercuts
As your undercut grows, styling options expand but require different techniques. The awkward growth phase – typically around weeks 4-6 – challenges many women. During this time, the hair is too long to lie flat but too short to blend with upper layers.
This intermediate length responds well to texturizing products that add grip. A small amount of clay or fiber paste worked through the growing section creates intentional-looking texture that complements your shaggy layers. The goal isn’t to hide the growth but to make it appear purposeful.
Accessories become valuable tools during growth phases. Decorative bobby pins or small clips can secure rebellious sections while adding visual interest. Headbands push longer growth back, creating a different silhouette. These solutions buy you time between salon visits.
Some women discover they prefer the slightly grown-out look to a fresh undercut. The softer edge creates a less dramatic contrast that suits certain face shapes better. This “shadow undercut” still reduces bulk but appears less severe.
Maintaining the clean lines
Between salon appointments, small maintenance steps keep your undercut looking fresh. Cleaning up the neckline with tweezers removes stray hairs that blur the edges. This five-minute task extends the clean appearance by a week or more.
If you’re comfortable with clippers, touching up the perimeter yourself maintains crispness. Use guards to avoid cutting too short, and work in good lighting with multiple mirrors. The back area challenges even experienced home stylists, so consider enlisting help for hard-to-reach spots.
Regular exfoliation of the undercut area prevents ingrown hairs and removes product buildup that dulls the appearance. A gentle scalp scrub once weekly keeps the skin healthy and the hair growing properly. This attention to scalp health becomes more important with the exposed skin of an undercut.
The way you sleep affects your undercut’s appearance. Silk or satin pillowcases reduce friction that can cause the shorter hairs to stick up. Some women find that wearing a silk scarf or bonnet to bed preserves their style better than any morning touch-up could achieve.
For important events when you need your undercut looking its absolute best, scheduling a quick cleanup at your salon makes a noticeable difference. Even if your longer layers don’t need attention, a fresh undercut sharpens your entire look. Many salons offer discounted touch-up services between full appointments.
Which Finishing Touches Complete the Look?
The final steps in your styling routine determine whether your look stays fresh all day or gradually falls apart. These finishing techniques separate amateur attempts from professional-looking results.
Adding volume at the crown
Crown volume prevents the style from looking flat or lifeless, especially important with the reduced bulk from your undercut. The technique starts at the root level – literally. Lifting small sections at the crown and applying a volumizing dust or texture powder directly to the roots creates invisible support.
Teasing remains an effective method when done correctly. Instead of aggressive backcombing that damages hair, use a gentle lifting motion with a tail comb. Lift sections straight up, then push down gently at the mid-shaft. This creates cushioning without visible ratting. Smooth the top layer over the teased sections for a polished finish.
Creating piece-y separation
That perfectly imperfect separation defines the shaggy bob aesthetic. After your initial styling, use your fingers to pull apart sections, creating distinct pieces rather than a unified mass. Working with dry hair gives you more control over the final look.
A texturizing paste or fiber cream warmed between your fingers helps define individual pieces. Twist small sections between your fingers, then gently pull them apart. This technique creates the lived-in texture that makes this style so appealing. Focus on the pieces around your face and the crown for maximum impact.
The pinch and pull method works wonders for creating separation:
Pinch: Take a small section between your thumb and forefinger
Twist: Rotate the section while sliding your fingers down
Pull: Gently separate the twisted section into smaller pieces
Set: Mist lightly with texture spray to hold
Some sections benefit from being left more connected, while others look better highly separated. This variation creates visual interest and prevents the style from looking too uniform or overdone.
Setting the style for longevity
Once you’ve achieved your desired look, setting it properly ensures it lasts beyond the first hour. Traditional hairspray often creates stiffness that contradicts the soft, moveable nature of this style. Instead, opt for flexible hold formulas that maintain movement.
The application distance matters significantly. Holding spray too close creates wet spots that weigh down sections. The ideal distance is 10-12 inches from your hair, allowing the product to disperse evenly as a fine mist. Work in sections, lifting and spraying underneath for invisible hold.
A working spray applied throughout the styling process often holds better than a finishing spray applied only at the end. These buildable formulas allow you to add hold gradually without creating a helmet effect. You can continue adjusting and perfecting your style even after applying product.
For extra security in humid weather or during active days, a humidity shield spray creates an invisible barrier against moisture. These products prevent frizz and drooping without adding weight or visible residue. Apply as your very last step, focusing on areas prone to losing their shape.
Quick refresh techniques for second-day hair
Second-day styling often looks better than freshly washed hair for this particular cut. The natural oils and settled texture create authentic-looking grit that’s difficult to replicate with products alone. However, strategic refreshing keeps everything looking intentional rather than slept-on.
Start by assessing which areas need attention. The crown typically loses volume overnight, while the undercut might need smoothing. Rather than attempting to restyle everything, target specific areas for touch-ups.
Dry shampoo serves multiple purposes in second-day styling. Beyond absorbing oil, it adds texture and grip that helps recreate volume. Apply to roots, let it sit for a minute, then massage in with your fingertips. This technique lifts hair away from the scalp while distributing the product.
For pieces that have lost their shape, try the steam refresh method. Lightly mist sections with water, then twist or scrunch them back into shape. The moisture reactivates styling products already in your hair. A few passes with a blow dryer on low heat sets the refreshed texture.
The undercut area might need a different approach for day-two styling. A damp cloth wiped over this section removes any product buildup or oils, then a tiny amount of fresh product restores the clean appearance. This takes less than a minute but makes a significant difference in your overall look.
Sometimes second-day hair needs a completely different approach. If your texture has fallen flat, try adding braids or twists to some sections while leaving others loose. This creates an intentionally undone look that works perfectly with the casual nature of a shaggy bob. A decorative clip or pin can also redirect attention while securing any uncooperative sections.
Mastering Your Signature Style
Your shaggy bob with undercut offers endless possibilities for personal expression. The combination of textured layers and a clean undercut creates a style that adapts to your mood, schedule, and occasion. Whether you prefer a polished professional look for work or a messier weekend vibe, the techniques you’ve learned provide the foundation for achieving either aesthetic.
The beauty of this cut lies in its versatility and reduced styling time compared to longer hairstyles. Once you understand your hair’s unique characteristics and find the right product combination, daily styling becomes intuitive rather than laborious. Many women discover that their best hair days happen when they work with their natural texture rather than against it, using the undercut’s structure to their advantage while letting the shaggy layers do what they do best – move, catch light, and frame the face beautifully.
Frequently Asked Questions
Q: How often should I trim my shaggy bob with undercut to maintain the style?
A: The longer layers typically need trimming every 6-8 weeks to maintain the shaggy texture and prevent them from looking straggly. The undercut requires more frequent maintenance, usually every 3-4 weeks, to keep the lines clean and the length manageable.
Q: Can I style a shaggy bob with undercut without using heat tools?
A: Absolutely! Air-drying with the right products often creates the best texture. Apply a texturizing mousse or sea salt spray to damp hair, scrunch sections upward, and let your hair dry naturally. Twist some pieces while damp for extra wave definition.
Q: What’s the best way to grow out an undercut if I change my mind?
A: Growing out an undercut takes patience and strategic styling. During the awkward phase, use headbands, bobby pins, or scarves to control the growing section. Gradually blend the lengths by asking your stylist to keep the top layers longer while the undercut catches up.
Q: Will a shaggy bob with undercut work for professional settings?
A: Yes, this style can absolutely look professional. Style it sleeker with less texture for work by using a smoothing cream and blow-drying with a round brush. Save the messier, more textured styling for casual occasions.
Q: How do I prevent my undercut from looking greasy or flat?
A: Use minimal product on the undercut area – less is definitely more. Choose matte-finish products over shiny ones, and apply by pressing product into the hair rather than rubbing. Regular shampooing of this area prevents oil buildup.
Q: What face shapes suit a shaggy bob with undercut best?
A: This versatile cut flatters most face shapes. Round faces benefit from the volume on top, square faces soften with the textured layers, oval faces can wear it any way they like, and heart-shaped faces look great with side-swept layers.
Q: Can thick hair handle a shaggy bob with undercut?
A: Thick hair actually works wonderfully with this style. The undercut removes bulk where you don’t need it, while the shaggy layers on top maintain movement. Your stylist can adjust the amount of hair removed in the undercut based on your hair’s density.
Q: How do I sleep without ruining my styled shaggy bob?
A: Use a silk or satin pillowcase to reduce friction. For extra protection, loosely wrap your hair in a silk scarf or wear a satin bonnet. In the morning, refresh with a light mist of water and scrunch to reactivate the texture.