Dutch braids bring a romantic sophistication to wedding hairstyles that few other techniques can match. This inverted braiding method creates raised, textured patterns that catch light beautifully in photographs while keeping hair perfectly controlled throughout your celebration. Brides increasingly choose this versatile style for its ability to work with various hair lengths and textures, transforming everything from bohemian garden ceremonies to formal ballroom receptions.
The beauty of Dutch braiding lies in its adaptability to personal style preferences. Whether you envision a single dramatic braid cascading down your back, multiple small braids creating an intricate crown, or side-swept variations that frame your face, this technique offers endless possibilities. The raised texture adds dimension that flat styles simply cannot achieve, creating visual interest that complements both minimalist gowns and elaborate beaded dresses.
Planning your wedding hairstyle requires careful consideration of multiple factors beyond just aesthetic appeal. Your chosen Dutch braid style needs to withstand hours of dancing, hugging, and celebration while maintaining its polished appearance from ceremony through reception. In the following sections, we’ll explore everything from selecting the perfect variation for your face shape to incorporating meaningful accessories, preparing your hair for optimal results, and professional techniques that guarantee your braids stay flawless throughout your special day.
- What Makes Dutch Braids Perfect for Weddings
- Choosing the Right Dutch Braid Style for Your Face Shape
- How to Incorporate Flowers and Accessories
- Preparing Your Hair for Dutch Braid Wedding Styles
- Professional Tips for Long-Lasting Dutch Braids
- Final Thoughts on Your Dutch Braid Journey
- Frequently Asked Questions
What Makes Dutch Braids Perfect for Weddings
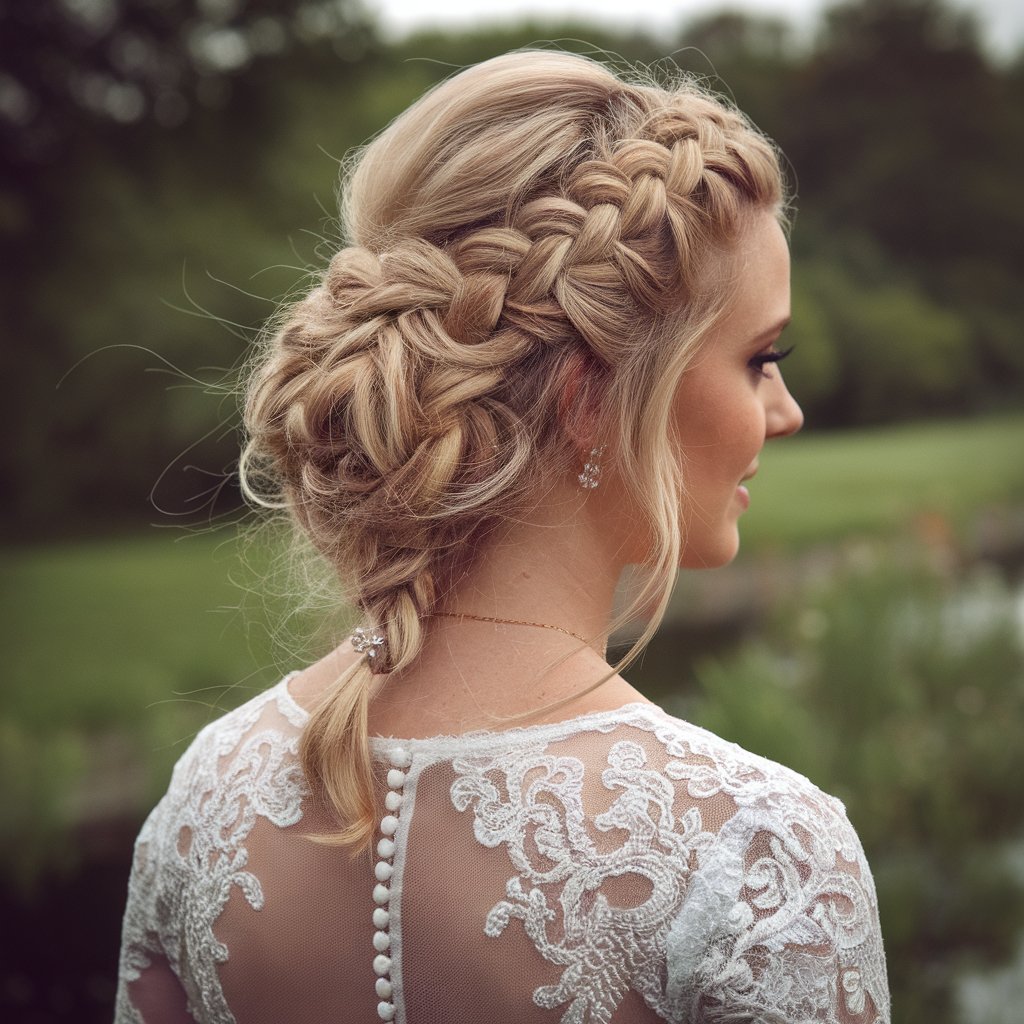
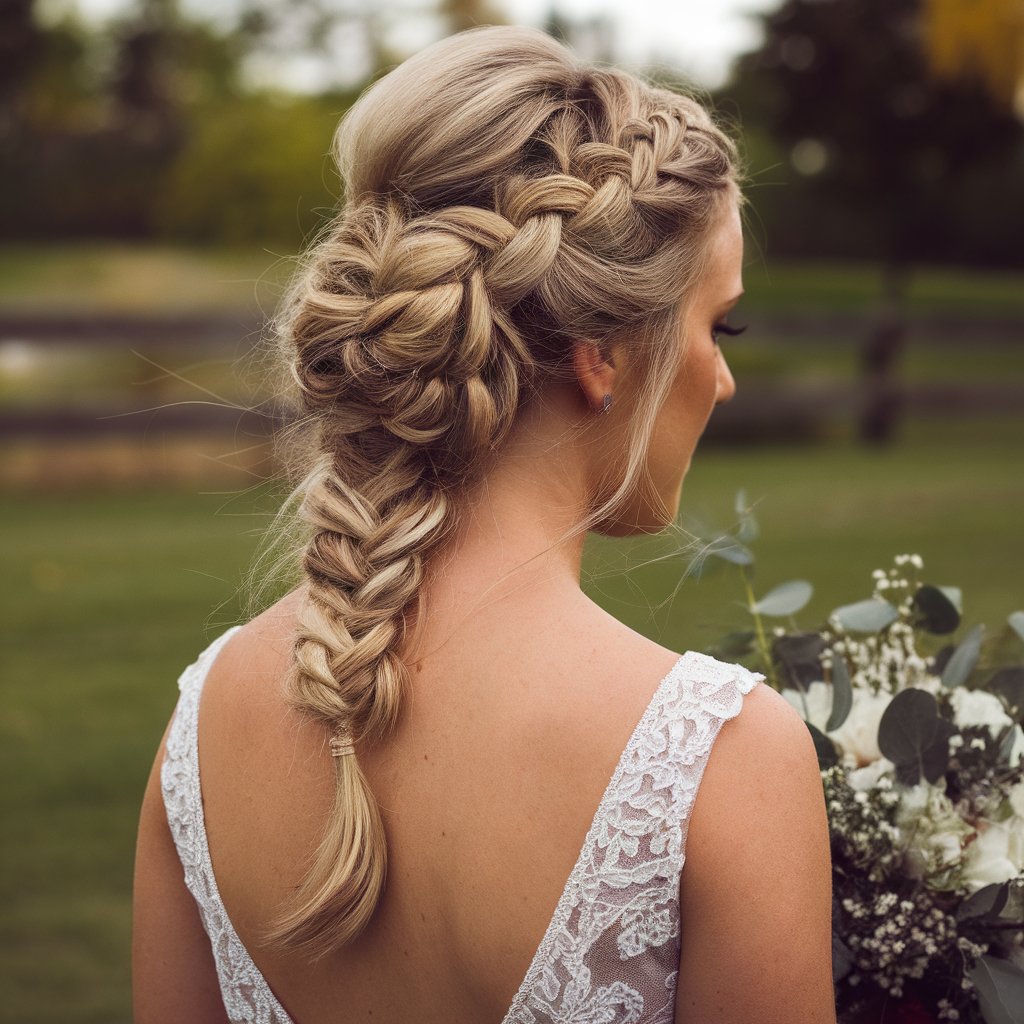
Dutch braids offer a structured elegance that sets them apart from other wedding hairstyle options. The inverted braiding technique creates a three-dimensional effect by weaving strands under rather than over, resulting in a raised pattern that sits proudly on the head. This distinctive appearance adds sophistication without requiring elaborate styling tools or excessive product, making it an ideal choice for brides who want refined beauty with practical staying power.
The structured elegance of inverted braiding
The architectural quality of Dutch braiding creates visual interest that works harmoniously with wedding attire. Each section of hair becomes part of a larger design, building texture and movement that catches light from every angle. This technique naturally creates volume at the crown, elongating the neck and highlighting facial features in a flattering way. The precision required for Dutch braiding results in a polished finish that looks intentional and refined, qualities every bride desires for her wedding day appearance.
Unlike loose curls or straight styles that can fall flat, the woven structure maintains its shape through temperature changes and humidity. The interlocking pattern distributes weight evenly along the scalp, preventing uncomfortable pulling or tension headaches that sometimes accompany elaborate updos. This comfort factor becomes especially important during long wedding days that stretch from early morning preparations through late-night celebrations.
How Dutch braids photograph beautifully
Professional wedding photographers consistently praise Dutch braided styles for their photogenic qualities. The raised texture creates natural shadows and highlights that add depth to images, preventing hair from appearing flat or lifeless in photos. From dramatic black-and-white portraits to sun-drenched outdoor shots, this braiding technique maintains its definition and appeal across various lighting conditions.
The three-dimensional nature of Dutch braids means they photograph well from multiple angles. Profile shots showcase the raised pattern running along the scalp, while front-facing images highlight the face-framing qualities of side-swept variations. Back views reveal intricate weaving patterns that add visual interest to shots of the dress train or during first dance moments. This versatility ensures beautiful hair in candid moments as well as posed portraits.
Lasting power through long celebration days
Wedding days typically span twelve to fourteen hours, from early morning preparations through late-night dancing. Dutch braids excel at maintaining their structure throughout these marathon celebrations. The tight weaving technique locks each strand in place, resisting the loosening that affects many other styles. This reliability means fewer bathroom touch-ups and more time enjoying your celebration.
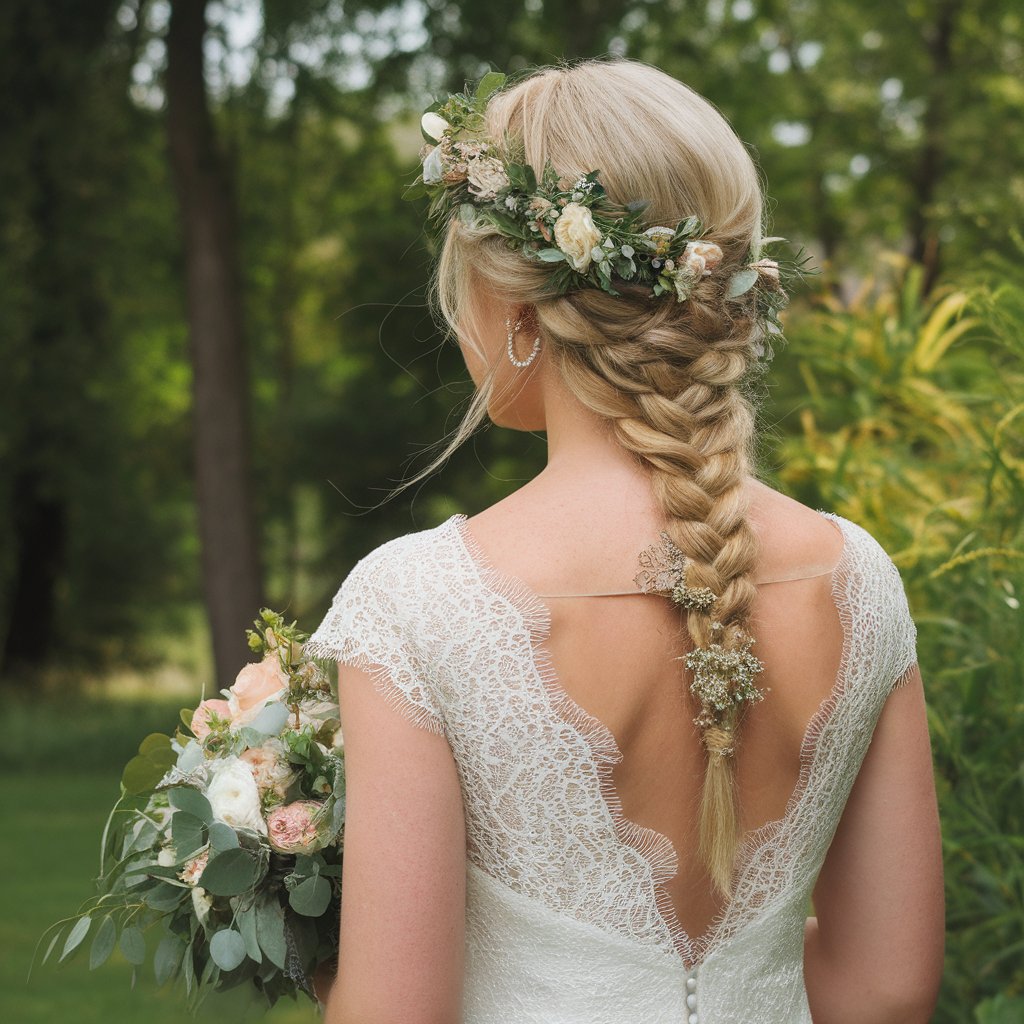
The secure foundation of Dutch braiding also provides excellent anchor points for veils, tiaras, and other hair accessories. Heavy cathedral veils that might slip from smooth styles stay firmly in place when attached to Dutch braids. This stability extends to flower crowns and decorative pins, which can be woven directly into the braid structure without requiring excessive bobby pins or clips.
Versatility for different wedding themes
Dutch braiding adapts seamlessly to various wedding aesthetics, from rustic barn celebrations to elegant ballroom affairs. A loose, slightly undone Dutch braid adorned with baby’s breath suits bohemian outdoor ceremonies perfectly. Meanwhile, a sleek, tight Dutch braid crown paired with pearl pins complements formal church weddings beautifully.
Beach weddings benefit from Dutch braids’ ability to control hair in windy conditions while maintaining a relaxed appearance. Mountain or destination weddings appreciate the style’s low-maintenance nature – once properly set, Dutch braids require minimal attention regardless of weather conditions. Garden party receptions find the perfect match in Dutch braids interwoven with fresh flowers that echo bouquet selections.
Cultural wedding traditions also find expression through Dutch braiding variations. The technique can incorporate traditional hair ornaments, colored ribbons representing heritage, or specific patterns that hold cultural significance. This adaptability allows brides to honor family traditions while maintaining contemporary style.
Choosing the Right Dutch Braid Style for Your Face Shape
Understanding how different Dutch braid placements complement various face shapes helps you select the most flattering option for your wedding day. The positioning, tightness, and direction of your braids can enhance your best features while creating balanced proportions. Professional stylists consider these factors when designing custom looks, but knowing these principles helps you communicate your preferences effectively during consultations.
Oval faces and their Dutch braid options
Oval face shapes enjoy the most flexibility with Dutch braid styles, as their balanced proportions work well with virtually any variation. A classic center-parted Dutch braid crown creates regal elegance without overwhelming delicate features. This symmetrical approach draws attention to the eyes and cheekbones while maintaining harmony with the natural face shape.
Side-swept Dutch braids that begin at one temple and curve around to the opposite ear create romantic asymmetry. This style adds movement and softness, particularly beautiful when paired with loose tendrils framing the face. The diagonal line of the braid creates visual interest without disrupting the oval face’s natural balance.
For a more dramatic look, multiple thin Dutch braids can run parallel from the hairline toward the crown, eventually gathering into an elaborate bun or cascading style. This approach adds texture and detail while maintaining proportion. The key with oval faces lies in choosing styles based on personal preference rather than corrective needs.
Round faces with strategic braid placement
Round faces benefit from Dutch braid styles that add height and vertical lines. A high Dutch braid crown that sits above the natural hairline creates the illusion of length, drawing the eye upward. This placement strategy works particularly well when the remaining hair flows down rather than being pulled back horizontally.
Diagonal Dutch braids that start at one side and sweep across to the opposite shoulder create flattering angles. This asymmetrical approach breaks up the circular shape while adding dynamic movement:
Crown Height: Position braids to add volume at the crown rather than the sides
Loose Tension: Keep side sections slightly looser to avoid emphasizing width
Vertical Elements: Incorporate downward-flowing elements like a Dutch braid transitioning to a regular braid
Face-Framing Pieces: Leave strategic strands loose to create vertical lines near the face
Starting Dutch braids slightly back from the hairline, rather than right at the forehead, prevents adding width at the widest part of the face. This subtle adjustment makes a significant difference in the overall effect.
Square faces softened by Dutch braiding
Square face shapes benefit from Dutch braid styles that soften angular features. Curved Dutch braids that follow the natural roundness of the head create gentle lines that contrast with the face’s stronger angles. Starting braids at a slight diagonal rather than straight back adds movement that prevents emphasizing the jawline’s squareness.
A Dutch braid halo that encircles the entire head creates soft curves while drawing attention upward toward the eyes. This style works particularly well when small sections are gently pulled loose after braiding, creating a slightly undone texture that adds romantic softness. The key lies in avoiding severe, straight-back styles that might emphasize angular features.
Incorporating waves or curls into the non-braided portions adds additional softness. Dutch braids that transition into loose, flowing hair at the nape create beautiful contrast between structured and free-flowing elements. This combination provides the control needed for a wedding while maintaining feminine softness.
Heart-shaped faces and crown Dutch braids
Heart-shaped faces, characterized by wider foreheads and narrower chins, find balance through strategic Dutch braid placement. Low-positioned Dutch braids that begin at or below ear level add width to the lower face, creating more balanced proportions. These styles draw attention away from the forehead while adding fullness where needed.
A Dutch braid crown that sits low on the head, almost like a headband positioned at the widest part of the forehead, helps minimize upper face width. This placement creates horizontal lines that balance proportions beautifully. Adding volume through the crown and allowing hair to flow freely below the braids creates ideal balance.
Side-parted Dutch braids work wonderfully for heart-shaped faces, especially when they begin tighter at the part and gradually loosen as they move down. This graduated tension creates a gentle A-line silhouette that complements the face’s natural tapering.
Long faces balanced with horizontal braids
Long face shapes benefit from Dutch braid styles that add width rather than height. Horizontal Dutch braids that run across the head from ear to ear create the illusion of width while avoiding additional length. Multiple parallel braids running sideways can create particularly striking effects.
A low, loose Dutch braid crown positioned at or below the natural hairline adds width without height. This placement strategy works especially well when combined with side-swept bangs or face-framing layers that break up vertical lines. The braiding should maintain consistent tension to avoid creating lift at the crown.
Asymmetrical Dutch braids that travel diagonally across the head before curving around one ear add interest while maintaining horizontal emphasis. These styles can incorporate small braided sections combined with loose, voluminous waves for added width. The overall goal remains creating fullness at the sides rather than the top.
How to Incorporate Flowers and Accessories
Adorning Dutch braids with carefully chosen accessories transforms a beautiful hairstyle into a breathtaking bridal masterpiece. The raised structure of Dutch braids provides perfect anchor points for various decorative elements, from delicate fresh flowers to sparkling vintage pieces. Understanding placement techniques and selection principles helps create cohesive looks that enhance rather than overwhelm your wedding style.
Fresh flowers woven through Dutch braids
Fresh flowers bring natural beauty and romance to Dutch braided styles, creating an organic connection between your hairstyle and bouquet. Small, sturdy blooms work best for weaving directly into braids – think spray roses, wax flowers, or baby’s breath. These varieties withstand handling and maintain their appearance throughout the day without wilting or dropping petals.
The technique for incorporating fresh flowers requires planning during the braiding process. As you create each section, tuck small blooms or greenery sprigs into the weave, securing stems within the braid structure itself. This method creates a seamless integration where flowers appear to grow naturally from the braid rather than sitting on top as an afterthought.
Flower placement should follow the natural curve and flow of your Dutch braids. Clustering blooms at specific points – such as where a braid curves around the ear or where multiple braids meet – creates focal points that draw the eye. Alternatively, evenly spacing tiny flowers throughout the length creates a delicate, fairy-tale effect perfect for garden or bohemian weddings.
Consider the longevity of your chosen blooms when planning your floral hair design. Hardy varieties like succulents, eucalyptus, and dried elements maintain their appearance regardless of temperature or humidity. If selecting more delicate flowers, your florist can wire and seal stems to extend their freshness throughout your celebration.
Pearl pins and crystal accents placement
Strategic placement of pearl pins and crystal accents adds elegance and sparkle to Dutch braided styles. These classic accessories work particularly well with formal wedding themes, catching light beautifully in both natural and indoor settings. The key lies in creating patterns that complement rather than compete with the braid’s natural texture.
Pearl pins inserted at regular intervals along a Dutch braid create a sophisticated dotted line effect. Position them at the peaks of the raised braid sections for maximum visibility, angling each pin to follow the braid’s direction. Varying pearl sizes – larger at focal points, smaller throughout – adds visual interest while maintaining elegance.
Crystal hairpins and decorative bobby pins can be clustered at specific points or scattered throughout for subtle shimmer:
Temple Clusters: Group 3-5 crystal pins where braids begin for face-framing sparkle
Crown Accent: Place larger crystal pieces where braids meet at the crown
Cascading Pattern: Graduate from larger to smaller pieces following the braid’s path
Intersection Points: Add single statement pieces where multiple braids cross
The metal tone of your accessories should coordinate with your jewelry and dress details. Silver-toned pieces complement cool-toned gowns and platinum jewelry, while gold or rose gold accents warm up ivory dresses and vintage-inspired looks.
Ribbon weaving techniques for color
Ribbons woven through Dutch braids add color, texture, and personal meaning to your wedding hairstyle. Satin, silk, or velvet ribbons in your wedding colors create cohesion with your overall design scheme. The ribbon width should proportionally match your braid size – narrow ribbons for delicate braids, wider options for statement styles.
Begin ribbon integration at the start of your Dutch braid, treating it as a fourth strand that weaves alongside your hair sections. This technique creates a spiral effect where the ribbon appears and disappears throughout the braid length. Alternatively, you can wrap ribbon around completed braids, securing it at intervals with hidden bobby pins.
Consider ribbons with special significance – perhaps lace from your mother’s wedding dress or ribbon in your cultural heritage colors. These meaningful additions create emotional connections that make your hairstyle even more special. Vintage ribbons from antique shops add unique character to bohemian or rustic wedding themes.
Vintage brooches as focal points
Antique or vintage brooches make stunning focal points when incorporated into Dutch braided styles. These statement pieces work best at strategic locations where they won’t interfere with comfort – typically where braids gather at the back or side of the head. A single spectacular brooch often creates more impact than multiple smaller pieces.
Secure brooches by first creating a stable base with bobby pins crossed in an X pattern where you plan to place the piece. Thread the brooch pin through this bobby pin foundation rather than directly through the braid, protecting both your hair and the accessory. This method also makes removal easier at the reception if desired.
Family heirloom brooches add sentimental value while serving as your “something old” or “something borrowed.” These pieces often feature intricate designs and quality craftsmanship that photograph beautifully. Position them where they’ll be visible in profile shots and back-view photos for maximum impact.
Delicate chains and hair vines
Hair vines and delicate chains draped across or woven through Dutch braids create ethereal, goddess-like effects. These flexible accessories follow the natural curves of your braided style while adding movement and dimension. Choose pieces that complement your dress neckline and overall aesthetic – simple chains for minimalist gowns, elaborate crystal vines for ornate dresses.
Attachment points matter when working with chains and vines. Secure them at multiple locations along the Dutch braid to prevent shifting or sagging. Small, clear elastic bands wrapped around braid sections provide invisible anchor points for delicate chains. Hair vines with built-in wire bases can be shaped to follow your braid’s path, tucking ends securely into the weave.
The draping pattern you choose affects the overall look dramatically. Loose, swooping chains create romantic movement, while taut positioning adds structure and formality. Test different arrangements during your hair trial to find the perfect balance between security and visual appeal.
Preparing Your Hair for Dutch Braid Wedding Styles
Proper hair preparation in the weeks and days leading up to your wedding ensures your Dutch braids look their absolute best. The condition, texture, and cleanliness of your hair directly impact how well braids hold and how polished they appear. Creating an effective preparation timeline helps you achieve optimal results without last-minute stress or complications.
Pre-wedding hair care timeline
Beginning a dedicated hair care routine at least three months before your wedding allows time for noticeable improvements in hair health and texture. Focus on deep conditioning treatments weekly to strengthen strands and improve manageability. Protein treatments every two weeks help reinforce hair structure, particularly important for hair that will undergo extensive styling.
Six weeks before the wedding, schedule your final color appointment if you’re planning any changes. This timing allows for adjustments if needed while ensuring your color looks fresh for the big day. Avoid dramatic chemical treatments closer to the wedding, as these can affect hair texture and how well it holds braids.
Two weeks before, begin using a clarifying shampoo once weekly to remove product buildup. Clean hair provides better grip for Dutch braids, preventing slippage that can occur with product-heavy strands. However, avoid over-clarifying, which can make hair too slippery to braid effectively.
The week of your wedding, minimize heat styling and heavy products. Focus on gentle care that maintains your hair’s natural texture and health. Schedule your final trim four to five days before the wedding to eliminate split ends while allowing hair to settle into its natural state.
Texture preparation the night before
The evening before your wedding, wash your hair with a volumizing shampoo to create ideal texture for Dutch braiding. Skip heavy conditioners that might make hair too soft and slippery. Instead, apply a lightweight leave-in treatment focusing on mid-lengths and ends while avoiding roots.
Creating subtle texture helps Dutch braids grip better and last longer:
Braiding Damp Hair: Create loose braids throughout damp hair, sleeping with them overnight for natural waves
Texture Spray: Apply texturizing spray to towel-dried hair before air drying
Volumizing Mousse: Work mousse through roots for lift without weight
Dry Shampoo: Apply before bed to absorb oils and add grip by morning
If your hair tends toward oiliness, apply dry shampoo to roots before bed. This overnight absorption period prevents the powdery appearance that sometimes occurs with morning application. For extremely fine or slippery hair, consider using a salt spray for additional texture and grip.
Morning-of washing and drying techniques
Some hair types benefit from morning-of washing, particularly if your scalp produces excess oil overnight. If washing the morning of your wedding, use lukewarm water and gentle shampoo, focusing on the scalp rather than lengths. This approach removes oils without over-stripping hair of necessary texture.
Drying techniques significantly impact how well hair braids. Rough-dry hair to about 80% dry using medium heat and your fingers rather than a brush. This method maintains natural texture while preventing frizz. Direct airflow from roots to ends, following the hair’s natural growth pattern.
For the final 20% of drying, switch to cool air while gently scrunching sections. This technique locks in texture and adds volume without creating frizz or static. Avoid brushing completely dry hair before braiding, as this can create too much smoothness and static electricity.
Apply a lightweight working spray or texture mist to completely dry hair just before braiding begins. These products provide grip and control without the heaviness of traditional styling products. Focus application on sections that will be braided, avoiding areas that will remain loose.
Products that enhance braid longevity
Selecting the right products makes the difference between Dutch braids that last all day and styles that loosen within hours. Start with a volumizing mousse or root lift spray applied to damp hair before drying. These products create structure at the base that supports the weight of elaborate braided styles.
Texture powder or dry texture spray applied section by section during braiding provides incredible grip. Dust powder directly onto sections before incorporating them into the braid. This technique proves especially helpful for fine or freshly washed hair that might otherwise slip.
Setting products deserve special attention for wedding-day braids. A flexible-hold hairspray applied in light layers throughout the braiding process provides security without stiffness. Avoid heavy applications that might create a helmet-like effect or visible product buildup in photos.
Bobby pins and elastics specifically designed for your hair color and texture prevent visible mechanics in your finished style. Stock multiple sizes – smaller for securing delicate details, larger for anchoring substantial sections. Coat elastics with dry shampoo for extra grip if working with particularly silky hair.
Working with extensions for fuller braids
Extensions can transform thin or short hair into the full, lengthy braids many brides envision. Professional-quality clip-in extensions offer temporary volume without the commitment of permanent extensions. Choose pieces that match your hair color exactly, or have them custom-colored to blend seamlessly.
Integration technique matters when incorporating extensions into Dutch braids. Section natural hair first, then strategically place wefts where they’ll add the most impact. For Dutch braids, position extensions slightly below where the braid will begin, allowing natural hair to cover attachment points.
Synthetic extensions require different handling than human hair pieces. They typically hold braided styles better due to their texture but can appear obviously artificial if not properly integrated. Blend synthetic pieces by applying the same texturizing products to both natural and synthetic hair sections.
Practice with extensions before your wedding day to perfect placement and blending techniques. Your hair trial should include working with the exact extensions you’ll use for the wedding. This preparation ensures your stylist knows exactly how many pieces you need and where to position them for optimal results.
Professional Tips for Long-Lasting Dutch Braids
Professional stylists use specific techniques to ensure Dutch braids maintain their structure and beauty throughout wedding celebrations. These insider secrets go beyond basic braiding skills, focusing on the foundational elements that separate amateur attempts from salon-quality results. Understanding these professional approaches helps you communicate effectively with your stylist and maintain your look throughout the day.
Setting techniques that prevent loosening
The foundation of long-lasting Dutch braids begins with proper sectioning and tension control. Professional stylists maintain consistent, firm tension throughout the braiding process – not so tight that it causes discomfort, but firm enough to create structure. This balanced approach prevents the gradual loosening that occurs when sections are braided too loosely from the start.
Working with slightly damp hair or adding setting lotion to each section before braiding creates memory in the hair structure. As the hair dries completely within the braid formation, it maintains that shape more effectively than braiding completely dry hair. This technique proves particularly effective for hair that typically doesn’t hold styles well.
The direction you pull each section during braiding affects longevity. Pulling sections slightly upward while braiding creates lift at the roots that prevents sagging as the day progresses. This upward tension also helps the signature raised effect of Dutch braids appear more pronounced and maintain its three-dimensional quality.
Cross-checking your work by gently tugging the completed braid ensures even tension throughout. Any sections that feel loose should be carefully tightened before moving forward. This quality control step takes extra time but prevents disappointing loosening hours into your celebration.
Strategic pinning for security
Bobby pin placement can make or break your Dutch braid’s staying power. Professional stylists use a specific insertion technique where pins enter the braid at one angle, catch a small section of hair beneath, then push back through at the opposite angle. This X-pattern creates a secure lock that won’t slip.
The type of bobby pins matters as much as placement. New pins with intact coating grip better than old, stretched pins that have lost their tension. Pins that match your exact hair color become invisible in photos, while textured or crimped pins provide extra grip for challenging sections.
Strategic pinning locations include these critical points:
Braid Origins: Secure the very beginning of each Dutch braid with crossed pins
Direction Changes: Add pins wherever braids curve or change direction
Junction Points: Reinforce where multiple braids meet or combine
End Points: Lock braid ends before incorporating into buns or other elements
Weight-Bearing Sections: Support areas holding accessories or veil attachments
Creating a hidden support structure with pins before adding visible decorative elements ensures everything stays secure. This underlying framework bears the weight of accessories without relying on the braids alone for support.
Touch-up strategies for reception
Planning for minor touch-ups between ceremony and reception keeps your Dutch braids looking fresh throughout the celebration. Designate a trusted bridesmaid or family member to help with quick fixes, providing them with a small emergency kit containing your styling products and tools.
Small amounts of texture spray or dry shampoo can refresh braids that have lost their grip after hours of wear. Apply product to fingertips rather than spraying directly on styled hair, then gently press into any sections that appear loose. This targeted approach prevents oversaturating areas that still look perfect.
If small pieces escape from your Dutch braids during enthusiastic dancing, don’t attempt to re-braid entire sections. Instead, twist escaped pieces and pin them back following the original braid pattern. These quick fixes blend seamlessly while taking only moments in the bathroom mirror.
Consider planning a slight style change between ceremony and reception. Perhaps removing a formal veil reveals beautiful braided details, or adding festive accessories transforms your look for party time. These intentional transitions disguise any minor loosening while creating distinct looks for different parts of your celebration.
Weather-proofing your Dutch braid style
Weather conditions significantly impact how well Dutch braids maintain their structure. High humidity requires extra anti-frizz protection, while dry conditions might need additional moisture to prevent static. Understanding these challenges helps you prepare appropriate countermeasures.
For humid conditions, apply anti-humidity spray in thin layers throughout the styling process rather than one heavy application at the end. This layering technique creates a protective barrier without weighing down the hair or creating visible product buildup. Silicone-based serums applied sparingly to the surface of completed braids add shine while repelling moisture.
Wind presents unique challenges for outdoor ceremonies. Extra securing pins at strategic points prevent lifting and tangling. Consider incorporating a beautiful wrap or shawl that can protect your hairstyle during particularly breezy moments without compromising your overall look.
Cold weather can cause static that makes small hairs stand up around Dutch braids. A light misting of static guard spray or running a dryer sheet gently over the hair surface (without disturbing the braids) eliminates this issue. Keep these items in your emergency kit for quick fixes if needed.
Emergency kit essentials for brides
A well-stocked emergency hair kit ensures you’re prepared for any situation on your wedding day. This kit should travel with your maid of honor or remain accessible at both ceremony and reception venues. Include products you’ve tested during hair trials to avoid unexpected reactions.
Your emergency kit should contain bobby pins in multiple sizes and your exact hair color, clear elastics for invisible fixes, and any specific texture or holding products your stylist used. Travel-sized versions prevent bulk while providing everything needed for touch-ups. Include the exact shades of any colored accessories in case replacements are needed.
Tools for your kit include a tail comb for adjusting small sections, tweezers for placing tiny accessories, and small scissors for trimming any unexpected flyaways. A hand mirror helps you check back sections, while good lighting from a small LED compact ensures you can see clearly for precise fixes.
Document your hairstyle with photos from multiple angles during your hair trial. These reference images help anyone assisting with touch-ups understand the intended look. Include close-up shots of specific details like accessory placement or braid patterns for accurate recreation if needed.
Final Thoughts on Your Dutch Braid Journey
Dutch braids offer timeless elegance and practical reliability that make them an exceptional choice for wedding hairstyles. From their photogenic qualities to their incredible staying power, these raised braids provide everything a bride needs to look and feel magnificent throughout her celebration. The versatility of this technique means every bride can find a variation that perfectly expresses her personal style while complementing her dress, venue, and overall wedding aesthetic.
The key to achieving your dream Dutch braid wedding style lies in preparation, communication with your stylist, and choosing variations that suit your face shape and hair type. Whether you opt for a single statement braid, an intricate crown, or multiple braids adorned with meaningful accessories, this classic technique will ensure you look stunning from your walk down the aisle through your last dance. Your wedding hairstyle becomes part of your story, captured forever in photographs and memories, making the thoughtful selection of Dutch braids a choice you’ll appreciate for years to come.
Frequently Asked Questions
Q: How far in advance should I schedule my Dutch braid hair trial?
A: Schedule your hair trial approximately 6-8 weeks before your wedding. This timing allows for adjustments if needed while keeping the style fresh in your stylist’s mind.
Q: Can Dutch braids work with thin or fine hair?
A: Yes, thin hair can absolutely support Dutch braids. Using volumizing products, texture spray, and potentially adding clip-in extensions creates the fullness needed for beautiful braided styles.
Q: How long does it typically take to create Dutch braid wedding styles?
A: Most Dutch braid wedding styles require 45-90 minutes depending on complexity. Intricate designs with multiple braids or extensive accessories might take up to two hours.
Q: Will Dutch braids give me a headache during my wedding?
A: Properly executed Dutch braids shouldn’t cause headaches. Professional stylists know how to maintain secure hold without excessive tension. Communicate immediately if you feel discomfort during styling.
Q: Should I wash my hair the morning of my wedding for Dutch braids?
A: Day-old hair typically braids better than freshly washed hair. Wash your hair the night before unless you have very oily hair that requires morning washing.
Q: Can I combine Dutch braids with other hairstyle elements?
A: Absolutely! Dutch braids pair beautifully with loose curls, sleek buns, or flowing waves. Many brides incorporate Dutch braids as accent elements within larger hairstyle designs.
Q: How do Dutch braids hold up during outdoor summer weddings?
A: Dutch braids excel in outdoor conditions because the woven structure resists wind and maintains shape despite humidity. Using anti-humidity products provides extra protection.
Q: What’s the difference between Dutch braids and French braids for weddings?
A: Dutch braids create a raised, more pronounced effect by braiding under rather than over. This three-dimensional quality photographs better and provides stronger anchor points for accessories than flatter French braids.