
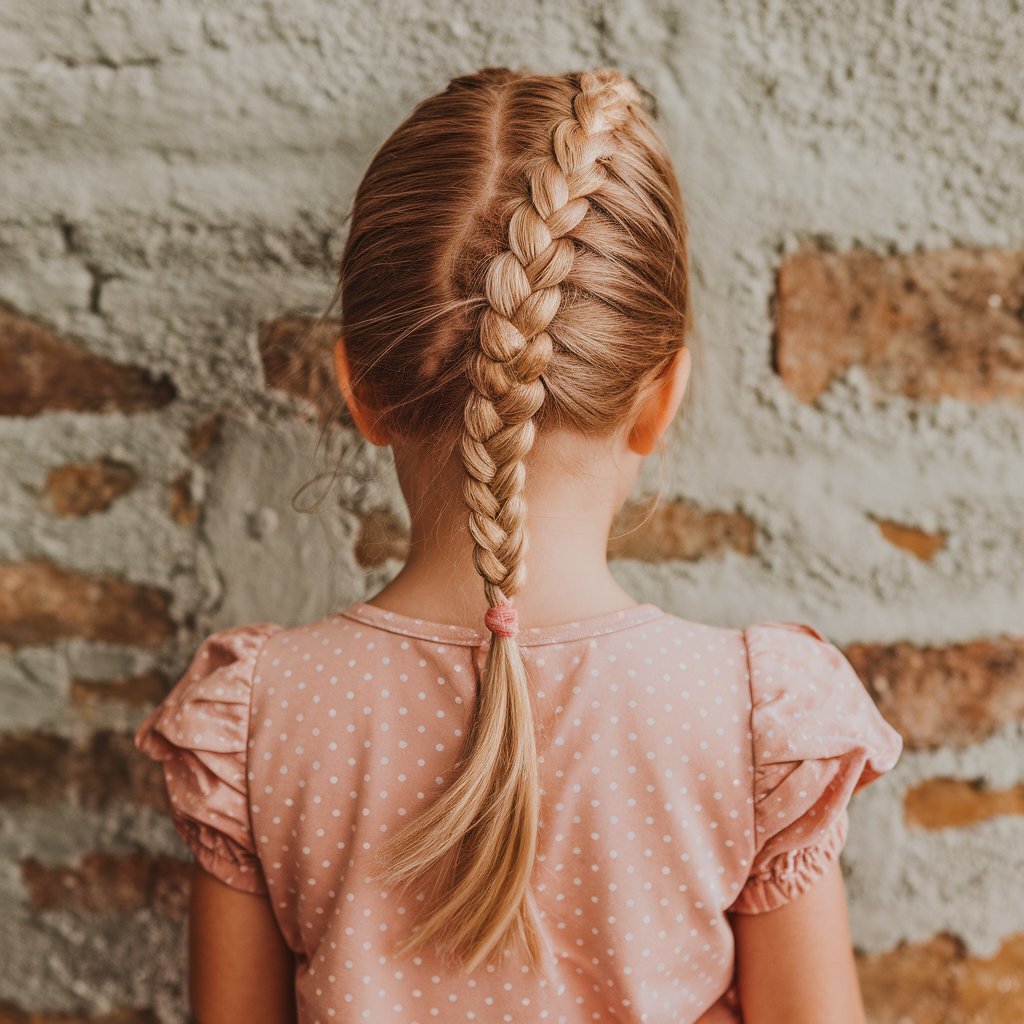
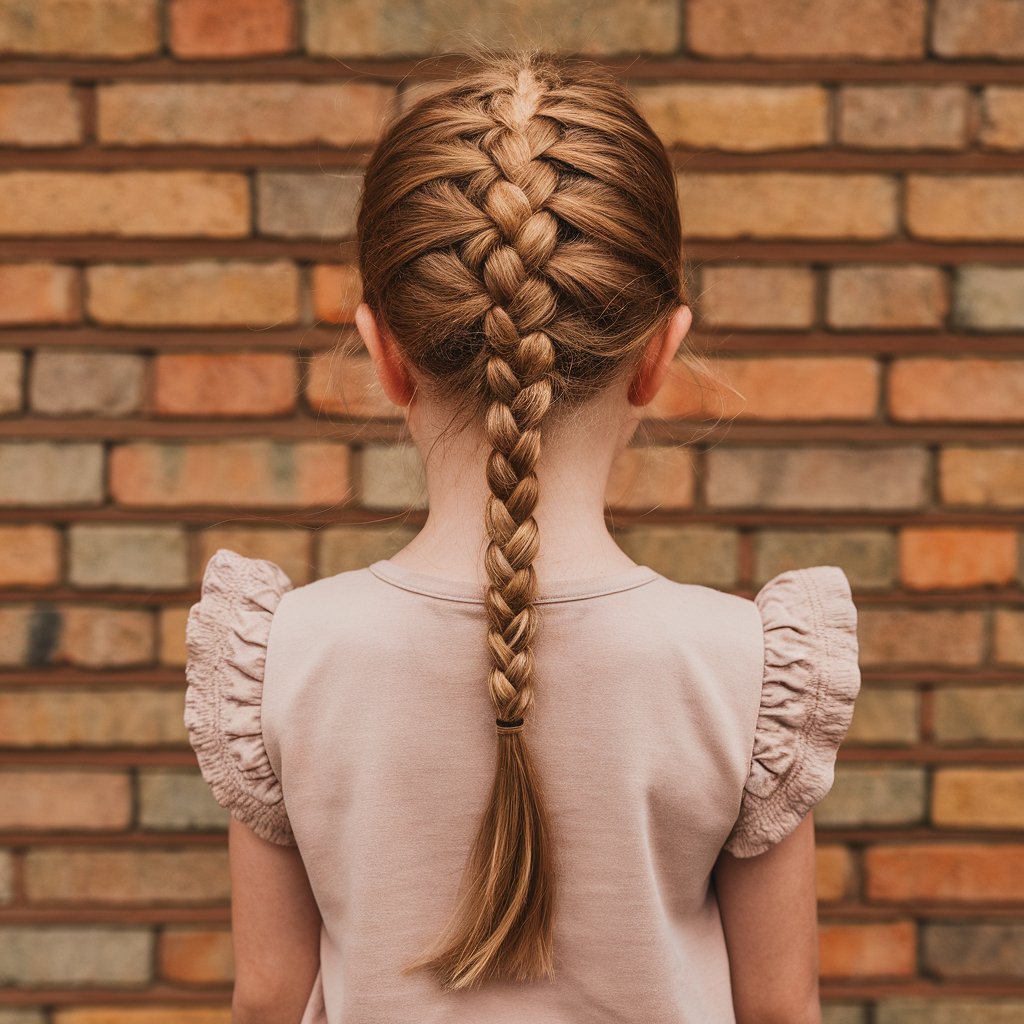
Dutch braids have become a go-to hairstyle for parents looking to keep their children’s hair neat and stylish throughout busy days. Unlike regular braids that sit on top of the hair, these inverted plaits create a raised, textured look that stays secure through playground adventures, sports practice, and even afternoon naps. The technique involves weaving strands under rather than over, creating a braid that appears to pop out from the head.
Parents often struggle with hairstyles that look great in the morning but fall apart by lunchtime. Children’s active lifestyles demand hairstyles that can withstand constant movement, weather changes, and the occasional hat or helmet. Dutch braids solve these challenges while still looking polished enough for school photos, birthday parties, or family gatherings. The style works beautifully on various hair textures and lengths, making it accessible for most children aged three and up.
Throughout the following sections, we’ll walk through everything you need to know about creating these practical yet adorable hairstyles. From selecting the right tools to mastering different variations, you’ll discover techniques that work for rushed mornings and special occasions alike. Whether your child has fine, straight hair or thick, curly locks, these methods will help you create braids that last from sunrise to bedtime. Let’s transform those morning hair battles into quick, enjoyable bonding moments with styles your kids will actually want to wear.
What Makes Dutch Braids Perfect for Active Kids
Dutch braids offer something that few other hairstyles can match for children – they actually get better looking as the day progresses. While ponytails loosen and buns fall apart, these sturdy plaits maintain their shape through jungle gym sessions and art class mishaps. The inverted braiding technique locks hair securely at the scalp, distributing tension evenly to prevent headaches that tight hairstyles often cause.
Durability and Staying Power
The unique structure of Dutch braids creates exceptional hold without requiring excessive amounts of hair products. Each section weaves beneath the others, creating a firm foundation that resists the typical wear and tear of childhood activities. This construction method means fewer morning touch-ups and less frustration for both parents and kids.
Swimming lessons, soccer practice, and playground adventures pose no threat to well-executed Dutch braids. The style naturally tightens as children move, actually improving its appearance throughout active play. Many parents report their children’s Dutch braids lasting two to three days with minimal maintenance, though daily rebraiding is recommended for hygiene.
Comfort for All-Day Wear
Unlike tight ponytails that can cause tension headaches, properly executed Dutch braids distribute weight evenly across the scalp. Children often forget they’re wearing them, which eliminates the constant hair-touching and adjustment that disrupts classroom focus. The braids lie flat enough to accommodate nap time at preschool without creating uncomfortable bumps against pillows or car seats.
Teachers frequently praise this hairstyle for keeping hair completely out of children’s faces during learning activities. Young students can lean over desks, participate in floor activities, and engage in hands-on science experiments without hair interference. This practical benefit extends to meal times, where loose hair often ends up decorated with lunch remnants.
Versatility for Different Occasions
A single Dutch braid down the back works perfectly for casual school days, while double braids create a more playful look for weekend activities. The style easily transforms with simple additions – colorful elastics for spirit week, ribbons for holidays, or flower clips for special events. This adaptability means mastering one basic technique opens doors to countless variations.
The hairstyle transitions seamlessly from athletic activities to formal occasions. A Dutch braid crown suits everything from gymnastics class to flower girl duties, requiring only minor adjustments in execution. Parents appreciate having one reliable technique that works for soccer games on Saturday morning and grandma’s birthday dinner that evening.
Age-Appropriate Styling Options
Toddlers benefit from looser, shorter Dutch braids that accommodate their fine, delicate hair without causing discomfort. These modified versions still provide the practical benefits while being gentle on developing hair follicles. As children grow, the braids can become more intricate, teaching them about personal grooming and style choices.
Preteens particularly appreciate Dutch braids because they look mature and trendy without requiring heat styling or chemical treatments. The style grows with children, evolving from simple straight-back braids in kindergarten to elaborate patterns and combinations by middle school. This progression allows kids to develop their personal style while maintaining age-appropriate looks.
Essential Tools and Preparation for Kids’ Hair
Creating successful Dutch braids starts long before your fingers touch your child’s hair. Having the right supplies within reach and properly preparing the hair makes the difference between a smooth five-minute styling session and a tearful twenty-minute struggle. The investment in proper tools pays off quickly through saved time and reduced morning stress.
Must-Have Braiding Tools
Your braiding kit should include a spray bottle filled with water, a wide-tooth comb, a fine-tooth comb or rat-tail comb for creating clean parts, and plenty of small elastic bands. Avoid rubber bands that can damage hair – instead, choose fabric-covered elastics or silicone bands designed specifically for children’s hair. Keep these items in a designated basket or drawer where little hands won’t scatter them.
A lightweight leave-in conditioner or detangling spray proves invaluable, especially for children with textured or easily tangled hair. Some parents find that a small amount of hair gel or light-hold mousse helps control flyaways without creating stiffness. For special occasions, decorative elements like ribbons, small clips, or colorful beads add personality without compromising the braid’s structure.
Consider purchasing a tall stool that puts your child at comfortable braiding height. This simple addition prevents back strain during styling and allows your child to see themselves in the mirror, making them feel more involved in the process. Good lighting also matters – position your styling station near a window or invest in a well-lit vanity area.
Prepping Children’s Hair for Braiding
Start with clean, slightly damp hair for the best results. Completely wet hair stretches and may result in loose braids once dry, while bone-dry hair can be difficult to manage and may cause static. Lightly misting dry hair with water creates the ideal texture for braiding. For children with very curly or textured hair, working with hair that’s about 80% dry often yields better results.
Thoroughly detangle from ends to roots before attempting any braiding. This step prevents painful pulling during the braiding process and ensures smooth, even sections. Work through knots gently with a wide-tooth comb, using detangling spray as needed. Taking extra time here saves tears and frustration later.
Creating the Right Environment
Transform braiding time into an enjoyable routine rather than a dreaded chore. Set up a comfortable space with your child’s favorite show playing or an audiobook running. Some parents use this time for conversations about the upcoming day or to practice spelling words, turning hair time into quality bonding time.
Keep your child’s hands busy with a small toy, tablet, or coloring book. Fidgety fingers often lead to head movement, making precise braiding difficult. Having a special activity reserved just for hair-styling time creates positive associations with the process.
Morning routines run smoother when braiding happens before breakfast. Sticky fingers and syrup accidents won’t ruin your hard work, and you’ll avoid the rush that comes with trying to style hair with just minutes before the school bus arrives. This scheduling also allows time for any necessary adjustments or fixes.
Managing Fidgety Children During Styling
Children who struggle to sit still benefit from clear expectations about braiding time. Use a visual timer so they can see how much longer they need to remain seated. Most Dutch braids can be completed in under ten minutes once you’ve mastered the technique, which feels manageable even for active youngsters.
Practice runs during calm weekend moments help children understand what to expect. Let them braid a doll’s hair or practice on yarn while you work on their hair. This parallel activity keeps them engaged while teaching them about the process. Many children become more cooperative when they understand what you’re doing and why each step matters.
For particularly sensitive scalps, test different tension levels to find what feels comfortable. Some children prefer firmer braids that won’t move, while others need looser styles to avoid discomfort. Listen to your child’s feedback and adjust accordingly – a slightly less perfect braid worn happily beats a flawless style that causes tears.
Step-by-Step Dutch Braiding Techniques for Children
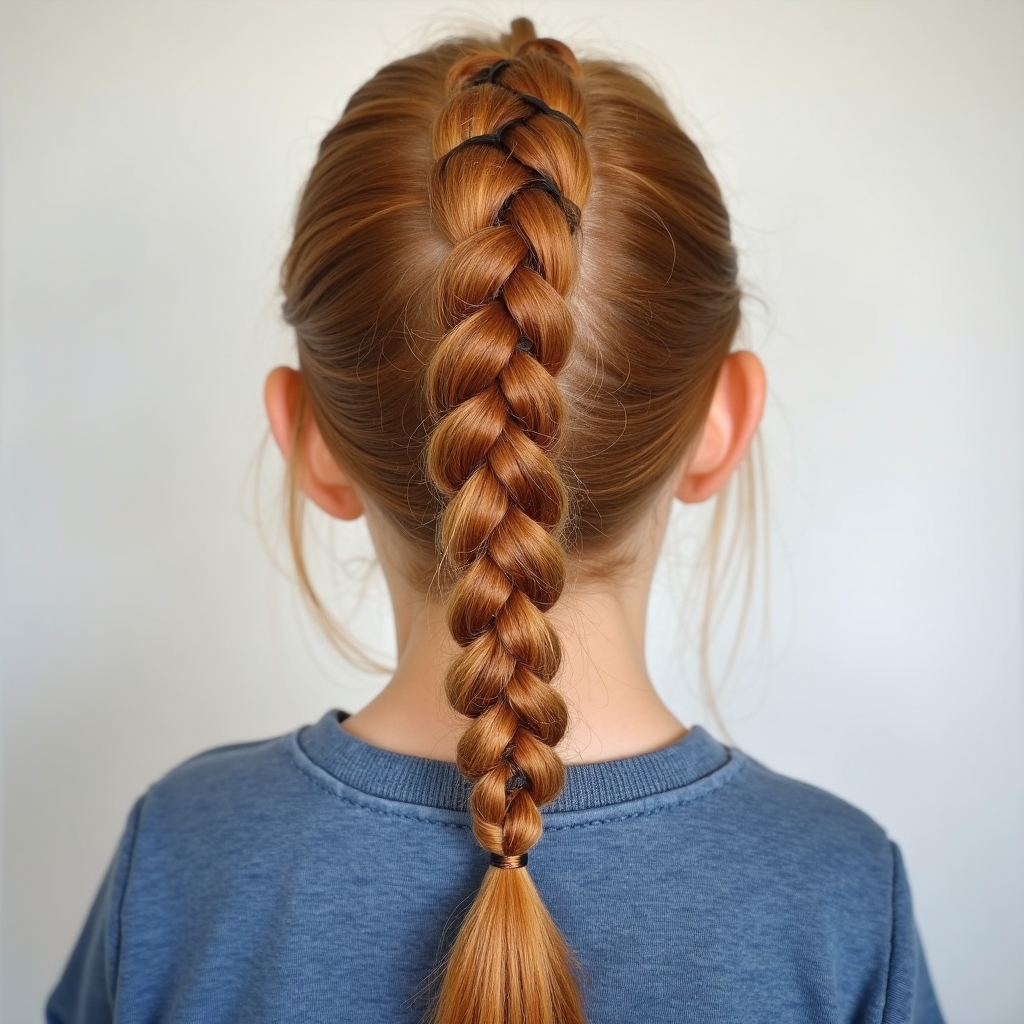
Mastering the Dutch braid technique requires understanding the fundamental difference from traditional braiding. Where regular braids cross strands over each other, Dutch braids pass them underneath, creating that signature raised appearance. This simple change in direction produces dramatically different results, though the hand movements remain nearly identical once you adjust your muscle memory.
Basic Dutch Braid Method
Begin by sectioning off a triangular portion of hair at the crown, dividing it into three equal strands. Hold the right strand in your right hand, the left in your left hand, and let the middle section rest between your fingers. Cross the right strand under the middle strand, then cross the left strand under the new middle strand. This establishes your braid’s foundation.
Now comes the Dutch braid magic – adding hair as you go. Before crossing each outer strand under the middle, gather a small section of loose hair and add it to that strand. Pick up hair only from the area directly beside where you’re braiding to maintain straight, clean lines. The amount of hair you add with each cross determines how tight the braid sits against the scalp.
Continue this pattern – adding hair, crossing under, switching hands – until you’ve incorporated all loose hair into the braid. Once you reach the nape of the neck with no more hair to add, finish with a regular three-strand braid to the ends. Secure with an elastic band, gently tugging at the edges of the braid to create fullness if desired.
Your grip matters more than you might think. Keep your hands close to the scalp for better control, but avoid pulling so tightly that you cause discomfort. Think of your fingers as gentle guides rather than tight clamps. The braid should feel secure but not painful.
Common Mistakes to Avoid
Taking sections that are too large or uneven creates a lopsided appearance that worsens as the day progresses. Use your finger or a comb to ensure each added section matches the others in size. Consistent sectioning produces professional-looking results that hold their shape better.
Many beginners accidentally switch between over and under techniques mid-braid, creating a confused hybrid style. Stay focused on always passing strands underneath to maintain the Dutch braid’s characteristic look:
Strand Position: Always pass outer strands under the middle strand
Hand Movement: Keep wrists relaxed to prevent fatigue
Section Size: Maintain uniform thickness throughout
Tension Control: Apply consistent pressure from root to tip
Hair Addition: Incorporate new hair smoothly without creating bumps
Rushing through the process leads to loose, messy braids that won’t last through morning recess. Take your time, especially when learning. Speed comes naturally with practice, but accuracy should always be your primary goal. Most parents find they can complete a basic Dutch braid in three to five minutes after a few weeks of regular practice.
Adapting Technique for Different Hair Types
Fine, straight hair requires different handling than thick, curly locks. For thin hair, use smaller sections and consider adding texture with dry shampoo or texturizing spray before braiding. This gives the hair more grip and prevents the braid from sliding out. Don’t pull too tightly, as fine hair breaks easily under tension.
Curly and textured hair often braids best when slightly stretched. Use a wide-tooth comb to gently elongate curls while braiding, or consider braiding on blown-out hair for longer-lasting results. These hair types typically hold braids exceptionally well once properly secured, often looking better on day two than day one.
Very short hair challenges even experienced braiders. Focus on keeping sections very small and maintaining consistent tension. You might only achieve a Dutch braid along the hairline or crown, finishing with small pigtails or leaving the bottom loose. Bobby pins can secure rebellious short pieces that won’t stay in the braid.
Speed Tips for Morning Routines
Prepare the night before by ensuring hair is detangled and placing all tools within arm’s reach. Some parents partially braid hair before bed, securing it loosely, then tightening and finishing in the morning. This works particularly well for children who wake up grumpy or rushed.
Master one simple Dutch braid variation before attempting complex styles. A single braid down the back or two side braids will serve you well for months. Once these become second nature, typically taking under five minutes each, you can explore more elaborate options for special occasions.
Set realistic expectations for daily styling versus weekend efforts. A slightly imperfect braid that gets your child to school on time beats abandoning the attempt altogether. Save intricate designs for leisurely mornings when neither of you feels pressured. Children pick up on stress, making them less cooperative during rushed styling sessions.
Creative Dutch Braid Variations Kids Will Love

Once you’ve mastered the basic Dutch braid, a world of creative possibilities opens up. Children love having choices in their hairstyles, and these variations provide options for different moods, occasions, and outfit coordination. Each style builds on the fundamental technique you’ve already learned, requiring only minor adjustments to create completely different looks.
Double Dutch Braids
Two Dutch braids, often called boxer braids when worn tight to the scalp, rank among the most requested styles in elementary schools. Part the hair straight down the middle from forehead to nape, securing one side with a clip while you work on the other. This symmetrical style suits athletic activities perfectly while maintaining enough sophistication for picture day.
The key to even double braids lies in that initial center part. Use the tail of a rat-tail comb to create a perfectly straight line, following the natural curve of your child’s head. Some parents find that starting from the nape and working forward produces straighter results than the reverse approach. Don’t worry if the part isn’t completely perfect – small imperfections disappear once the braids are complete.
For a playful twist, try creating zigzag parts instead of straight lines. This adds visual interest without requiring additional braiding skills. Simply angle your comb back and forth as you create the part, then braid as usual. Kids particularly love this variation because it feels special and different from their classmates’ styles.
Side Dutch Braids
A single Dutch braid swept to one side creates an elegant look that works for formal events and casual days alike. Start the braid above one ear, angling across the head to finish over the opposite shoulder. This asymmetrical style flatters round faces and adds interest to simple outfits.
The technique remains identical to a standard Dutch braid, but the positioning requires some practice. Support your arms on a table or counter to prevent fatigue, as you’ll be working at an angle. Children often prefer this style because they can see the braid throughout the day, making them feel more connected to their appearance.
Dutch Braid Pigtails
Combining Dutch braids with pigtails creates an adorable style perfect for younger children. Braid from the crown to ear level, then secure with elastics and leave the remaining hair loose in pigtails. This hybrid approach works well for children with hair too short for full braids or those who prefer some movement in their hairstyle.
You can position these partial braids in various ways – straight back, angled, or even creating a crown effect across the front hairline. The pigtails can be high or low, curled or straight, depending on your child’s preference and hair type. This versatility makes the style suitable for everything from playground adventures to holiday portraits.
Decorative Additions and Accessories
Small flowers tucked into the braid create a garden party look, while metallic thread woven through adds sparkle for celebrations. These additions require no extra skill – simply tuck or weave them in after completing the basic braid. Let your child choose their decorations to give them ownership of their style.
Ribbon integration takes Dutch braids to another level. Cut a length of ribbon slightly longer than your child’s hair and include it as a fourth strand from the beginning. The ribbon weaves throughout, creating a professional finish that impresses at recitals and special events. Satin ribbons work best, as they slide smoothly without tangling.
Color coordination with outfits makes children feel put-together and confident. Keep a variety of elastic colors on hand, or invest in a pack of clear elastics that work with everything. Some parents designate specific braid styles for different activities – one variation for soccer, another for piano lessons – helping children anticipate and prepare for transitions.
Maintaining Dutch Braids Throughout the Day
The true test of a successful Dutch braid isn’t how it looks when first completed, but how it holds up through a typical day in a child’s life. Understanding maintenance strategies helps braids last longer while keeping them looking fresh from morning circle time through evening bath time. These techniques prove especially valuable for busy parents managing multiple children or packed schedules.
Morning Touch-Ups Before School
A quick morning refresh takes less than thirty seconds but makes yesterday’s braid look newly styled. Lightly mist the braid with water, smooth any flyaways with a tiny amount of gel on your palms, and gently tug the braid to restore its shape. This revival technique works particularly well for children who sleep restlessly.
Check the elastic securing the braid’s end, as these often loosen overnight. Replace if necessary, positioning the new elastic slightly higher than the previous one to hide any fuzzy ends. A drop of leave-in conditioner on the loose ends prevents tangling throughout the day.
Protecting Braids During Naptime
Preschoolers who still nap need special consideration to preserve their morning hairstyle. A silk or satin pillowcase reduces friction that causes frizzing and loosening. If your child’s school uses standard pillowcases, consider sending a small satin sleep cap or buff that slips over the braid.
Position braids to minimize pressure during sleep. A single center braid should be gently moved to one side, while double braids naturally fall to prevent uncomfortable bumps. Teaching children to be mindful of their braids when lying down helps preserve the style without causing discomfort.
Some parents find that very loose protective braiding over the Dutch braid helps maintain the style during extended wear. This involves creating a simple three-strand braid that encompasses the entire Dutch braid, secured very gently at the bottom. Remove this outer braid after nap time to reveal the preserved style underneath.
Dealing with Loose Strands
Flyaways and escaped pieces are inevitable when children play actively. Rather than attempting to rebraid entirely, use bobby pins that match your child’s hair color to secure rebellious sections. Slide pins under the braid where they won’t be visible, catching loose pieces and tucking them back into formation.
For persistent flyaways around the hairline, a clean mascara wand or toothbrush with light hairspray provides precise control. These tools allow you to smooth specific areas without affecting the overall braid. Keep travel-sized versions in backpacks for quick touch-ups before school photos or performances.
When multiple strands escape despite your best efforts, consider it an opportunity for creativity. Twist escaped pieces and pin them decoratively, or add a small clip that makes the looseness look intentional. Children often prefer these improvised solutions to complete rebraiding, especially when time is limited.
When to Rebraid Completely
Most Dutch braids require complete redoing after two days, though some children’s hair holds the style longer. Signs that rebraiding is necessary include significant loosening at the scalp, multiple escaped sections, or an overall messy appearance that touch-ups can’t fix. Pushing beyond this point risks hair tangling and potential breakage.
Hair hygiene should always take priority over style preservation. Daily washing might not be necessary for all hair types, but scalps need regular cleansing regardless of how good the braid still looks. Plan your braiding schedule around wash days to maximize efficiency and minimize styling time.
Weather conditions affect braid longevity significantly. Humid conditions cause loosening and frizzing, while very dry air might make hair static and unmanageable. Adjust your expectations accordingly – a braid that normally lasts two days might need refreshing after one during particularly challenging weather. This flexibility prevents frustration for both parent and child.
Perfecting Your Dutch Braid Skills
Creating beautiful Dutch braids for children becomes second nature with practice and patience. The techniques shared here provide a foundation for countless hairstyles that grow with your child. From simple single braids for hurried mornings to elaborate styles for special occasions, mastering this versatile technique opens doors to creative expression while solving practical hair management challenges. The time invested in learning these skills pays dividends through calmer mornings, happier children, and hairstyles that actually last through whatever adventures the day brings.
Most importantly, the process of braiding creates moments of connection between parent and child. These quiet morning minutes, filled with gentle touches and careful attention, become treasured routines that children remember long after they’ve outgrown their Dutch braids. Whether your goal is practical hair management or creating special occasion styles, these braiding techniques serve as tools for both function and bonding, transforming necessary grooming into opportunities for creativity and care.
Frequently Asked Questions
Q: At what age can children start wearing Dutch braids?
A: Most children can wear modified Dutch braids starting around age 3, once their hair reaches shoulder length. Younger toddlers with fine hair benefit from looser variations that don’t pull on delicate hair follicles.
Q: How long do Dutch braids typically last on kids?
A: With proper maintenance, Dutch braids usually last 1-2 days on active children. Hair texture, activity level, and sleeping habits affect longevity. Some parents report braids lasting up to 3 days with touch-ups.
Q: Will Dutch braids damage my child’s hair?
A: When done correctly with appropriate tension, Dutch braids are safe and can actually protect hair from damage. Avoid braiding too tightly, give hair breaks between styles, and never leave braids in for more than a few days.
Q: What’s the best way to remove Dutch braids without causing tangles?
A: Start by carefully cutting the elastic at the end, then gently unravel from bottom to top. Use your fingers to separate sections slowly, applying detangling spray if needed. Never rush this process or pull apart sections forcefully.
Q: Can Dutch braids work on very short hair?
A: Yes, though you might need to modify the style. Focus on braiding just the top section or sides where hair is longest. Use bobby pins to secure shorter pieces, and consider partial braids that transition to loose hair or small ponytails.
Q: How can I make Dutch braids more comfortable for sensitive scalps?
A: Braid with lighter tension, especially at the hairline. Use a leave-in conditioner for easier manipulation, take breaks during braiding if needed, and let your child guide you on comfortable tightness levels.
Q: What’s the fastest way to learn Dutch braiding?
A: Practice on a doll or willing friend before attempting on your child. Watch the movement of experienced braiders, focus on consistent hand positions, and start with simple straight-back braids before trying complex patterns. Most parents feel confident after 2-3 weeks of regular practice.
Q: How do I prevent Dutch braids from looking messy by afternoon?
A: Start with slightly damp, well-detangled hair. Use a light-hold product for control, maintain consistent tension while braiding, and secure tightly with quality elastics. Carry bobby pins for quick fixes throughout the day.