
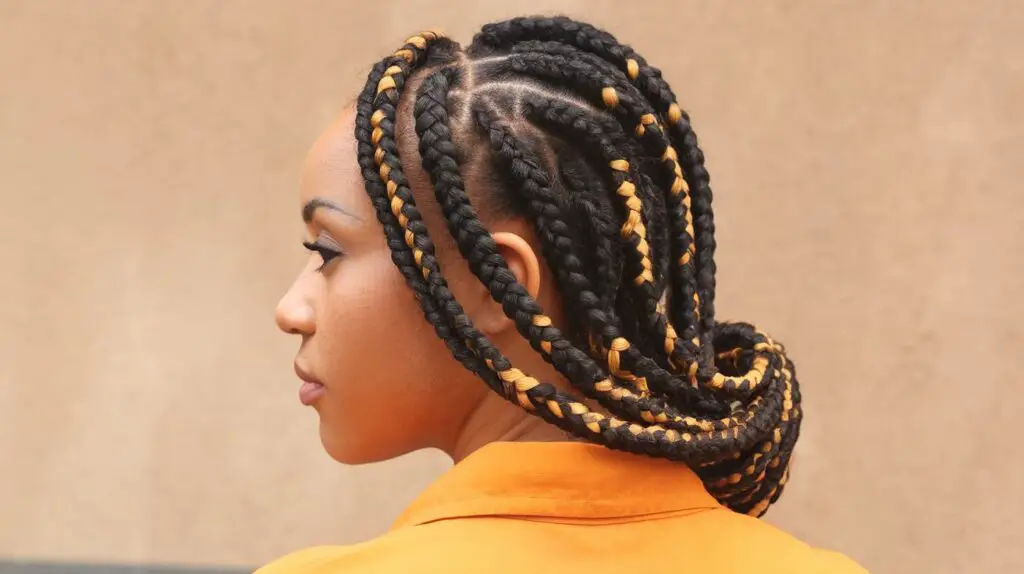
Fulani braids have captured the attention of women worldwide with their striking patterns and cultural beauty. These intricate cornrow designs, originally worn by the Fulani people of West Africa, combine traditional braiding techniques with decorative elements like beads, cowrie shells, and gold accessories. The style features a distinctive center braid that runs from the forehead to the crown, accompanied by thinner braids that create geometric patterns along the scalp.
Finding a protective style that looks stunning yet remains manageable for beginners can feel overwhelming. Many braiding techniques require years of practice or professional help, leaving newcomers frustrated with complicated patterns and time-consuming processes. Fulani braids offer a refreshing alternative – they provide the elegance of traditional African hairstyling while remaining accessible to those just starting their braiding journey.
Ready to discover why these braids have become a go-to choice for women wanting both style and simplicity? We’ll walk through six beginner-friendly variations that you can master at home, plus all the preparation steps, maintenance tips, and styling tricks you need for success. From choosing the right accessories to protecting your edges, every detail matters in creating beautiful Fulani braids that last.
What Makes Fulani Braids Special?

The rich heritage behind these braids stretches back centuries, originating from the nomadic Fulani people who traveled across West and Central Africa. Today’s modern interpretations honor this legacy while adapting to contemporary styling preferences. The combination of cultural authenticity and creative flexibility makes this braiding style particularly appealing to women seeking meaningful hairstyles that tell a story.
Traditional origins and modern appeal
The Fulani people traditionally used braiding as more than just hairstyling – it served as a form of communication, indicating age, marital status, and social position within their communities. Modern interpretations maintain the core elements while allowing for personal expression through color choices, braid thickness, and accessory placement.
Women today appreciate how these braids connect them to African heritage while fitting seamlessly into contemporary lifestyles. The style works equally well in professional settings and casual environments, offering versatility that many protective styles lack.
The signature pattern explained
At its core, the Fulani braid pattern follows a specific structure that sets it apart from other cornrow styles. The central braid acts as an anchor, typically running from the hairline straight back or curving slightly to one side. Surrounding braids fan out in symmetrical or asymmetrical patterns, creating visual interest through varying thickness and direction.
This distinctive layout actually simplifies the braiding process for beginners. Rather than attempting complex all-over patterns, you focus on mastering one section at a time. The central braid provides a clear starting point, while the side braids can be adjusted based on your skill level and available time.
Why beginners love this style
Several factors make Fulani braids particularly suitable for those new to braiding. First, the sectioning follows logical patterns that are easier to visualize and execute than freestyle designs. Second, minor imperfections in individual braids become less noticeable within the overall pattern.
The style also offers built-in flexibility. You can start with just a few braids and gradually add more as your confidence grows. This scalability means you won’t feel overwhelmed trying to complete an entire head of intricate braiding in one session.
Time investment and maintenance
Understanding the time commitment helps set realistic expectations. A basic Fulani style with minimal braids might take 2-3 hours for a beginner, while more elaborate versions could require 4-6 hours. Breaking the process into sections over multiple days remains perfectly acceptable for those just learning.
Maintenance proves surprisingly straightforward compared to other protective styles. The braids typically last 2-4 weeks with proper care, requiring only basic upkeep like moisturizing your scalp and covering your hair at night. This manageable maintenance schedule appeals to women with busy lifestyles.
Tools and products you’ll need
Before starting your braiding journey, gather these essential items:
Basic Tools: A rat-tail comb for precise parting, hair clips to section off areas, and a spray bottle filled with water to keep hair manageable.
Hair Products: Leave-in conditioner for moisture, edge control for neat parts, and lightweight oil for scalp health.
Braiding Hair: Synthetic or human hair extensions in your preferred color, typically 2-3 packs depending on desired fullness.
Accessories: Beads, cowrie shells, or gold cuffs to add authentic finishing touches.
Having everything prepared beforehand prevents interruptions and makes the braiding process smoother.
Preparing Your Hair for Fulani Braids

Proper preparation forms the foundation for beautiful, long-lasting braids. Rushing through prep work often leads to frizzy braids, an itchy scalp, or premature unraveling. Taking time with each preparatory step pays off in both the final appearance and the comfort of wearing your braids.
Washing and conditioning basics
Start with freshly cleaned hair, but avoid washing immediately before braiding. Hair that’s been washed 1-2 days prior offers the ideal balance – clean enough to prevent buildup yet with natural oils that make braiding easier. Use a clarifying shampoo to remove any product residue, followed by a moisturizing conditioner focusing on your ends.
Skip heavy leave-in treatments or oils before braiding, as these can make hair slippery and difficult to grip. A light leave-in conditioner provides adequate moisture without compromising your ability to create tight, neat braids. Pay special attention to your scalp during washing, using gentle circular motions to stimulate blood flow and remove any flakes or buildup.
Some women prefer doing a protein treatment a week before braiding to strengthen their strands. This extra step helps hair withstand the tension of braiding while reducing breakage. However, avoid protein treatments immediately before braiding, as they can make hair temporarily stiff and harder to manipulate.
Detangling techniques that work
Thorough detangling prevents painful snags during braiding and creates smoother finished braids. Work through your hair in sections, starting from the ends and gradually moving toward the roots. A wide-tooth comb or detangling brush works best for this process.
Apply a detangling spray or diluted conditioner to stubborn knots rather than forcing the comb through. Patience during detangling saves both time and hair in the long run. For those with particularly thick or coily hair, finger detangling before using tools can minimize breakage.
Never detangle completely dry hair before braiding. Slightly damp hair offers more flexibility and reduces the risk of breakage. If your hair dries during the detangling process, refresh it with your spray bottle rather than starting over.
Sectioning your hair properly
Clean, precise parts make the difference between professional-looking braids and amateur attempts. Use the pointed end of your rat-tail comb to create parts, working with proper lighting to see clearly. Start with your center part, as this guides the placement of all other sections.
Creating a map of your intended braid pattern before starting helps maintain symmetry. You might even take a photo of a style you like and reference it while sectioning. Use small elastic bands or clips to secure each section, keeping them separate and preventing tangling as you work.
The size of your sections determines braid thickness. Beginners often make sections too large, resulting in bulky braids that don’t lay flat. Aim for sections about the width of your pinky finger for a balanced look that’s neither too thin nor too thick.
Consider these sectioning tips for best results:
Use a mirror setup: Position mirrors so you can see the back and sides of your head clearly.
Keep sections even: Measure sections against each other to maintain consistency.
Work systematically: Complete one side before moving to the other for better symmetry.
Secure firmly: Use clips that won’t slip or leave marks in your hair.
Choosing the right hair extensions
Extension selection significantly impacts both the braiding process and final result. Kanekalon hair remains the most popular choice for beginners due to its affordability and ease of use. This synthetic option comes pre-stretched in many cases, saving preparation time.
Color matching requires careful consideration. While exact matches work well, don’t hesitate to experiment with colors a shade lighter or darker for dimension. Some women choose bold colors for a statement look, while others prefer natural tones that blend seamlessly.
The amount of hair needed varies based on your desired style. Simple styles with fewer braids might only require two packs, while fuller looks could need three or four. Buy an extra pack just in case – it’s better to have too much than run out mid-style.
Protecting your edges
Edge preservation should be a priority throughout the braiding process. These delicate baby hairs around your hairline suffer most from tight braiding and require special care. Apply edge control sparingly – too much product can cause buildup and actually weaken edges over time.
When braiding near your hairline, maintain moderate tension. The braid should feel secure but not painful. If you experience immediate discomfort or see your skin pulling, the braid is too tight and needs to be redone. Some stylists recommend leaving edges out entirely, styling them separately with gentle finger coils or soft gels.
Creating a barrier between your edges and the braiding hair can provide extra protection. A small amount of oil or edge protector applied before braiding acts as a buffer. This technique proves especially helpful for those with naturally fragile edges or anyone recovering from previous damage.
Six Simple Fulani Braid Styles for First-Timers

Now comes the exciting part – choosing and creating your style. These six variations offer different looks while maintaining beginner-friendly techniques. Each style builds on basic braiding skills, allowing you to progress at your own pace.
Classic center part with beads
This timeless variation features a prominent central braid adorned with beads or cowrie shells. Start by creating a straight part from your forehead to your nape, then braid this section first as your anchor. The center braid should be slightly thicker than the surrounding braids for proper proportion.
Add four to six thinner braids on each side, angling them slightly backward for a flattering frame around your face. Keep the pattern simple – straight lines or gentle curves work better than complex zigzags for beginners. Once all braids are complete, thread beads onto the ends or at intervals along the length.
The beauty of this style lies in its simplicity. You can complete it in about three hours once you get comfortable with the technique. The symmetrical design also means any small imperfections on one side can be balanced by adjusting the other side accordingly.
Side-swept pattern with accessories
For those wanting asymmetrical appeal, the side-swept variation offers creative freedom with less pressure for perfect symmetry. Begin with a deep side part, then create your anchor braid following the part line. This main braid curves gracefully from one temple across to the opposite ear.
The remaining braids flow in the same direction, creating a cascade effect. This style works particularly well for women with round or square face shapes, as the diagonal lines create flattering angles. Add small braids near the part for detail, gradually increasing thickness as you move away from the face.
Accessories play a crucial role in this style. Place larger beads or shells where the braids curve for maximum impact. Gold cuffs at varying heights add sophistication without overwhelming the overall look.
Half-up Fulani style
Perfect for those wanting to show length while enjoying the benefits of protective styling, the half-up variation combines braided and loose sections. Braid only the top half of your head, leaving the back and sides free. This approach reduces braiding time to about two hours while still achieving an authentic look.
Create your signature center braid from the hairline to the crown, then add side braids that stop at ear level. The transition between braided and unbraided sections needs careful attention – use edge control to smooth any flyaways and create a clean line.
This style offers versatility for various occasions. Wear the loose section in curls for formal events or straight for everyday wear. The partial braiding also means less tension on your scalp, making it ideal for those with sensitive skin.
Women with different hair textures find this style particularly accommodating. The loose section can showcase natural texture or hold styled curls equally well. Just remember to moisturize both the braided and loose sections regularly to maintain overall hair health.
Simple cornrows with feed-in technique
The feed-in method creates a natural, graduated look that starts thin at the hairline and gradually thickens. This technique might seem advanced, but breaking it down into steps makes it manageable for beginners. Start each braid using only your natural hair, then gradually add small pieces of extension hair as you progress.
Begin with your center braid, practicing the feed-in technique here first. Take a small section at the hairline and braid for about an inch before adding your first piece of extension hair. Continue adding hair every inch or so, keeping additions consistent for smooth, even braids.
The surrounding braids follow the same technique but can remain thinner for contrast. This creates depth and dimension in your overall style. Five to seven braids total provide good coverage without overwhelming beginners.
The feed-in technique offers several advantages:
Less tension: Starting small reduces stress on your hairline.
Natural appearance: The gradual thickening mimics natural hair growth patterns.
Longer lasting: Proper feed-in technique helps braids stay neat longer.
Customizable thickness: Control exactly how thick each braid becomes.
Mini braids with geometric parts
Geometric parting patterns add visual interest while keeping the actual braiding simple. Create triangular, diamond, or curved sections using your rat-tail comb, then braid each section normally. The unique parting does most of the styling work, so even basic braids look impressive.
Start with larger geometric shapes until you’re comfortable with the parting technique. A simple pattern might include triangles at the front transitioning to straight parts at the back. Use a white eyeliner pencil to sketch your pattern before committing to parts – this washes out easily if you need to adjust.
Keep individual braids thin for this style. The geometric patterns show best when braids are uniform in size and tension. This consistency takes practice, so don’t get discouraged if your first attempt isn’t perfect.
This style typically requires more braids than other variations – anywhere from 15 to 25 depending on your pattern complexity. While this means more time investment upfront, the striking result justifies the extra effort. Plus, practicing on numerous small braids rapidly improves your technique.
How to Add Accessories to Your Fulani Braids
Accessories transform basic braids into stunning cultural statements. The right decorations honor tradition while expressing personal style. Understanding placement and attachment techniques prevents accessories from damaging your braids or looking haphazard.
Choosing beads and cowrie shells
Traditional Fulani styling features wooden beads and cowrie shells, but modern interpretations include plastic, metal, and glass options. Wooden beads offer authentic appeal and come in various natural tones. They’re also lightweight, reducing strain on your braids.
Size matters when selecting beads. Larger beads make bold statements but can weigh down thin braids. Smaller beads allow for more intricate patterns and work better for beginners still perfecting their technique. Consider buying variety packs to experiment with different sizes and styles. Most beauty supply stores carry specialized hair beads with wider holes designed for braided hair.
Threading techniques for beginners
Getting beads onto braids frustrates many beginners, but simple techniques make the process easier. The traditional method involves folding the braid tip and pushing it through the bead hole. For stubborn beads, use a beading needle or thin wire to guide the hair through.
Elastic thread or fishing line creates an alternative threading method. Tie the thread to your braid end, thread beads onto the line, then slide them down onto the braid. This technique works especially well for beads with smaller holes or when adding multiple beads at once.
Some women prefer using a bead threader tool, which looks like a large needle threader. These inexpensive tools save time and prevent frustration, especially when working with synthetic hair that tends to fray at the ends.
Placing accessories strategically
Strategic placement creates balanced, polished looks. Avoid overloading one area while leaving others bare. Start with your focal point – usually the center braid – then work outward, adding complementary decorations to surrounding braids.
Consider the weight distribution of your accessories. Heavy beads or shells should be placed closer to the scalp where the braid is strongest. Lighter decorations can go anywhere, including the ends where they’ll move freely and catch light.
Face shape influences optimal placement. Round faces benefit from accessories placed higher on the head to add height. Longer faces look best with decorations spread horizontally to add width. Square faces soften with accessories placed at varying heights to break up angular lines.
Odd numbers of accessories often look more visually appealing than even numbers. Try using three beads on your center braid, five on one side, and seven on another for an organic, artistic arrangement.
Gold cuffs and rings placement
Metallic accessories add sophistication and glamour to Fulani braids. Gold or silver cuffs slide onto braids easily and stay secure without special attachment methods. Place them at different heights along your braids rather than lining them up uniformly.
Hair rings work similarly but offer a more delicate look. Thread them onto braids during the braiding process for the most secure fit, or carefully slide them on afterward. Mix different sizes for visual interest – larger cuffs on thicker braids, delicate rings on thinner ones.
Metal accessories require special consideration:
Quality matters: Choose tarnish-resistant metals to maintain shine throughout wear.
Comfort check: File any rough edges that might snag hair or scratch skin.
Removal planning: Consider how you’ll remove accessories before choosing permanent-seeming placements.
Mix metals carefully: Stick to one metal color family for cohesion, or intentionally mix for an eclectic look.
Creating your signature look
Your accessory choices become part of your personal style signature. Some women prefer minimalist approaches with just a few carefully chosen pieces. Others love maximum decoration with beads, shells, and cuffs throughout.
Consider your lifestyle when developing your signature look. Professional settings might call for subtle accessories in neutral tones. Social occasions allow for bolder choices with bright colors or statement pieces. Having a few different accessory sets lets you modify your look without redoing your braids.
Seasonal adjustments keep your style fresh. Warm months might inspire bright, playful beads while cooler seasons call for metallic accents or deeper tones. Don’t feel locked into one aesthetic – Fulani braids adapt beautifully to changing moods and occasions.
Maintaining Your Fulani Braids
Proper maintenance extends the life of your braids while keeping your natural hair healthy underneath. The effort you put into daily care directly impacts how long your style remains fresh and how your hair looks after removal.
Night care routine
Protecting your braids while sleeping prevents frizz, loosening, and accessory loss. A silk or satin scarf wrapped around your edges provides the first line of defense. The smooth fabric reduces friction that causes baby hairs to escape and edges to look messy.
For additional protection, use a satin pillowcase even with a scarf. This double protection helps during restless nights when scarves might slip off. Some women prefer satin bonnets that cover the entire head, though these can feel warm for hot sleepers.
Before bed, lightly mist your braids with a mixture of water and leave-in conditioner. This maintains moisture without creating buildup. Apply the mixture sparingly – oversaturating braids can lead to mildew or weakening of the braiding hair. Focus the moisture on your scalp and natural hair rather than the extensions.
Loose braids or those with heavy accessories benefit from being gathered gently with a soft scrunchie. This prevents tangling and reduces stress on individual braids. Never use regular elastic bands that can cut into braids or leave indentations.
Keeping your scalp healthy
A healthy scalp ensures comfortable wear and promotes hair growth beneath your braids. Develop a routine that cleanses without disturbing your style. Witch hazel applied with a cotton ball removes buildup and soothes irritation. Follow with a light oil like jojoba or grapeseed for moisture.
Avoid heavy products that clog pores or create visible buildup along parts. If you notice white flakes or feel itching, address it immediately rather than waiting. A diluted apple cider vinegar rinse can reset your scalp’s pH and reduce itching naturally.
Your scalp needs to breathe, so avoid constantly covering your braids with wigs or heavy scarves during the day. If you experience persistent itching, redness, or bumps, these might signal that your braids are too tight or you’re having a reaction to the braiding hair.
Some women find relief by:
Weekly scalp massages: Use your fingertips to gently stimulate blood flow.
Tea tree oil treatments: Add a few drops to your moisturizing routine for antimicrobial benefits.
Dry shampoo application: Use specifically formulated versions for braided styles.
Cool water rinses: Soothe inflammation without full washing.
How long they typically last
Most Fulani braids maintain their neat appearance for 2-4 weeks with proper care. Several factors influence longevity, including your hair texture, activity level, and maintenance dedication. Fine or straight hair might show loosening sooner than coarser textures that grip braiding hair better.
Week one usually looks the freshest, with tight braids and perfectly placed accessories. By week two, you might notice slight frizz around edges or loosening at the roots. This is normal and can be managed with edge control and gentle smoothing.
Week three brings more noticeable changes. Baby hairs escape more frequently, and some braids might need securing at the base. This is when many women decide whether to remove the style or push through another week. Your comfort level and appearance standards guide this decision.
After week four, most styles need removal to prevent matting and maintain hair health. Even if braids still look acceptable, the buildup and potential for damage increase significantly beyond this point.
When to take them down
Recognizing removal signs protects your hair from unnecessary damage. Excessive frizz that doesn’t respond to smoothing products indicates it’s time. Similarly, if you can easily slide braids up and down your natural hair, the style has loosened too much to continue wearing safely.
Other removal indicators include persistent itching despite proper cleansing, visible buildup that won’t wash away, or any signs of hair breakage around the braids. Pain or discomfort always warrants immediate removal – braids should never hurt after the first day.
The removal process requires patience and the right approach. Never rush or yank braids out, as this causes unnecessary breakage. Cut the extensions below where your natural hair ends, then carefully unravel each braid from bottom to top.
Signs you need a touch-up
Sometimes full removal isn’t necessary – a strategic touch-up extends your style another week or two. Focus touch-ups on the most visible areas: your edges, center part, and any braids that frame your face.
Identifying touch-up candidates involves checking for specific issues. Braids that have slipped down from the root can be carefully re-braided just at the base. Frizzy edges respond well to re-smoothing with edge control and light re-braiding of just the first inch.
Missing or broken accessories should be replaced promptly to maintain your style’s polished appearance. Keep extra beads and cuffs on hand for quick fixes. If a braid has completely unraveled, you might need to redo just that section rather than the entire style.
Professional touch-ups offer another option for extending wear time. A skilled braider can refresh your edges and tighten loose sections in about an hour. This investment makes sense for special occasions or when you need your style to last just a bit longer.
Your Journey to Beautiful Braids
Mastering Fulani braids opens doors to endless styling possibilities while honoring a rich cultural tradition. Starting with these simple variations builds skills and confidence that translate to more complex styles as you progress. Every expert braider began exactly where you are now – with determination, patience, and a willingness to learn through practice.
Your first attempts might not match the pictures you’ve admired online, and that’s perfectly normal. Each time you section, braid, and accessorize, your technique improves. Within a few styling sessions, you’ll develop your own rhythm and preferences, creating looks that reflect your personality while maintaining the authentic beauty of traditional Fulani braiding. The investment in learning this skill pays dividends in saved salon costs, creative expression, and the satisfaction of creating beautiful protective styles with your own hands.
Frequently Asked Questions
Q: Can I do Fulani braids on short hair?
A: Yes, you can create Fulani braids on hair as short as 2-3 inches. The feed-in technique works particularly well for shorter hair since you gradually add extensions for length. Just make sure your natural hair is long enough to grip and start the braid securely.
Q: How much does braiding hair cost for a full Fulani style?
A: Expect to spend $10-30 on braiding hair, depending on the brand and quality you choose. Synthetic Kanekalon hair costs around $3-5 per pack, and you’ll need 2-4 packs. Human hair extensions cost more but offer a more natural look and feel.
Q: Will Fulani braids damage my edges?
A: When done correctly with proper tension, Fulani braids shouldn’t damage your edges. The key is avoiding excessive tightness and giving your hairline breaks between styles. If you feel pain or see bumps forming, the braids are too tight and need immediate adjustment.
Q: What’s the easiest Fulani pattern for absolute beginners?
A: Start with the classic center part style using just 5-7 total braids. This gives you the iconic look without overwhelming complexity. Focus on making your center braid neat and straight, then add simple side braids without worrying about intricate patterns.
Q: How do I wash my hair with Fulani braids?
A: Focus on cleansing your scalp rather than washing the braids themselves. Dilute shampoo with water in an applicator bottle, apply directly to your scalp, and gently massage. Rinse thoroughly with cool water, allowing it to run through the braids. Pat dry and follow with a light scalp oil.
Q: Can I swim with Fulani braids?
A: Yes, but take precautions. Rinse your braids with fresh water before swimming to minimize chlorine or salt absorption. Wear a swim cap if possible, and always rinse thoroughly afterward. Apply a leave-in conditioner to protect your natural hair from drying.
Q: How do I prevent my beads from falling off?
A: Secure beads by tying a small rubber band below them or using a dab of clear nail polish on the braid end. Some beaders also braid a tiny knot at the end or use specially designed bead stoppers available at beauty supply stores.
Q: What should I do if my scalp gets really itchy?
A: First, try a scalp rinse with diluted apple cider vinegar or witch hazel. Apply tea tree oil mixed with a carrier oil for its anti-itch properties. If itching persists or you develop bumps, the braids might be too tight or you’re reacting to the synthetic hair and should consider removal.
Q: How long should I wait between taking down braids and getting them redone?
A: Give your hair at least a week of rest between protective styles. Use this time for deep conditioning treatments, protein treatments if needed, and allowing your scalp to breathe. This break helps prevent traction alopecia and maintains healthy hair growth.