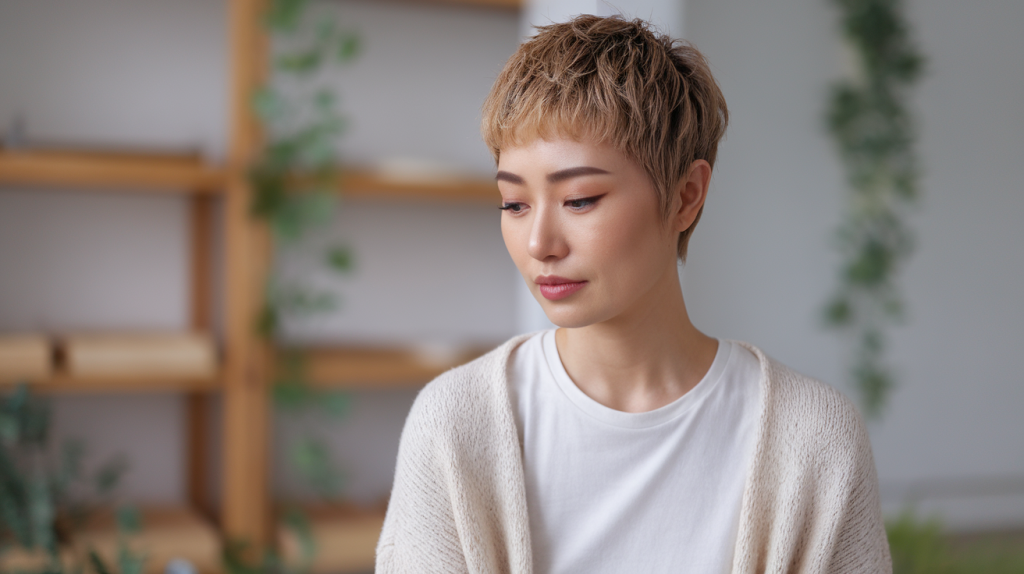
Short haircuts with bold textures have become the ultimate expression of confidence and individuality for women looking to make a statement. These cuts go beyond simple maintenance-friendly styles, offering dramatic shapes and unexpected angles that turn heads wherever you go. The beauty of textured short haircuts lies in their ability to transform your entire look while showcasing your personality through carefully crafted layers and strategic disconnection.
Modern hairstyling has shifted away from perfectly polished looks toward more adventurous cuts that celebrate natural movement and dimension. Women are discovering that shorter lengths paired with edgy textures create powerful silhouettes that require minimal daily styling yet deliver maximum visual impact. These cuts work particularly well for those ready to break free from conventional beauty standards and establish their own signature style.
The world of textured short haircuts offers countless possibilities for customization, from subtle choppy layers to dramatic undercuts and asymmetrical shapes. In the following sections, we’ll share five standout cuts that push boundaries while remaining wearable for various lifestyles and face shapes. Each style brings its own character and attitude, ensuring you’ll find the perfect match for your bold vision. Let’s discover which edgy textured cut will become your new power move.
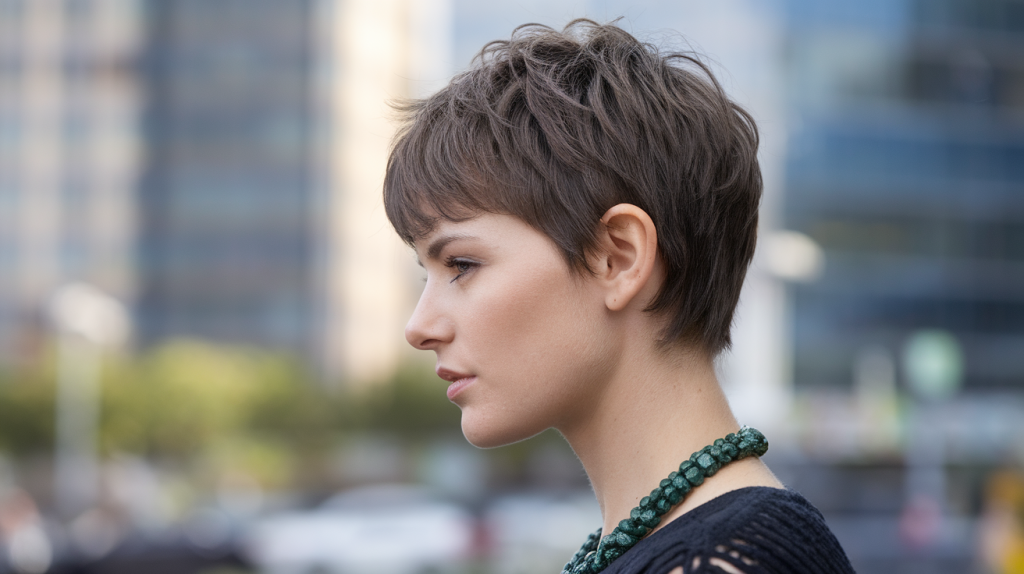
The Choppy Pixie Cut with Razor-Sharp Layers
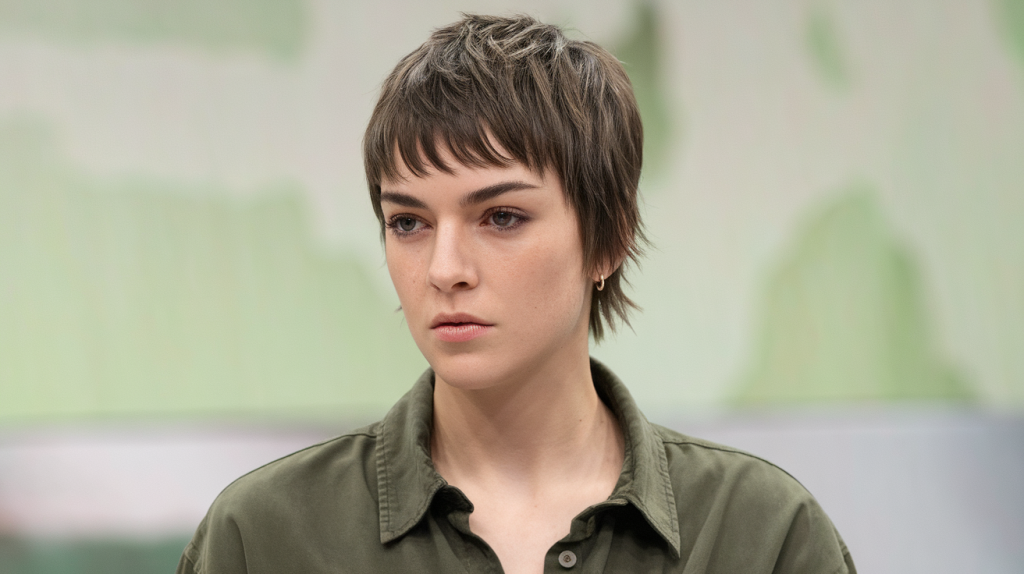
The choppy pixie stands as one of the most versatile short cuts available today, offering endless possibilities for texture and movement. This particular style combines the classic pixie foundation with aggressive layering techniques that create visual interest from every angle. The key lies in using razors or texturizing shears to carve out pieces that move independently, giving your hair a lived-in quality that feels both effortless and intentional.
How to achieve the perfect choppy texture
Getting that ideal choppy texture starts with finding a stylist who understands point cutting and razor work. The technique involves cutting hair at various angles rather than straight across, which creates natural separation between sections. Your stylist will work through small sections, lifting each piece and cutting at different lengths to build dimension throughout the cut.
The magic happens when layers are cut at varying heights around your head. Shorter pieces near the crown add volume and lift, while longer sections around the ears and nape provide softness. This contrast between lengths creates the signature choppy appearance that defines this style.
Hair texture plays a crucial role in how your choppy pixie will behave. Fine hair benefits from more aggressive texturizing to create the illusion of thickness, while coarse hair might need strategic thinning to prevent bulk. Your stylist should assess your natural texture and adjust their cutting technique accordingly.
Styling techniques for maximum edge
Creating that perfectly imperfect choppy look requires the right products and application methods. Start with damp hair and work a texturizing paste or clay through your strands, focusing on the roots for lift and the mid-lengths for separation. These products provide hold without stiffness, allowing pieces to move naturally throughout the day.
The blow-drying process makes all the difference in achieving maximum texture. Use your fingers rather than a brush, lifting sections up and away from your scalp while directing heat at the roots. This technique builds volume while maintaining the piecey quality essential to the choppy pixie aesthetic. For added definition, twist small sections between your fingers as you dry them.
Once your hair is completely dry, the real sculpting begins. Take small amounts of matte wax or pomade between your fingertips and piece out individual sections, pulling them in different directions. Focus on creating contrast – some pieces swept forward, others pushed back or to the side. This deliberate messiness gives your cut its edgy character.
Face shapes that rock this cut
Round faces benefit tremendously from choppy pixies because the added height at the crown creates elongation. The textured layers around the sides can be styled to add angles, counterbalancing softer facial features. Keep the sides slightly longer if you want to minimize width, or go shorter for a more dramatic effect.
Square and rectangular face shapes find perfect harmony with this cut’s irregular lines. The choppy texture softens strong jawlines while the varied lengths prevent the style from appearing too severe. Adding wispy pieces around the temples and forehead creates gentle framing that balances angular features.
Heart-shaped faces look stunning with choppy pixies that feature more volume through the sides and less height on top. This distribution helps balance a wider forehead with a narrower chin. The textured layers can be styled to add width where needed, creating more proportional overall appearance.
Maintenance tips for keeping it sharp
Regular trims every 4-6 weeks keep your choppy pixie looking intentional rather than overgrown. The precision of this cut means that even small amounts of growth can alter its shape significantly. Schedule appointments proactively to maintain those crisp lines and defined layers.
Between salon visits, refresh your texture with dry shampoo applied to the roots. This product absorbs excess oil while adding grip and volume, helping maintain that piecey separation. Apply it before bed and let it work overnight for even better results in the morning.
Consider investing in professional-grade styling tools and products:
Quality Texturizing Products: Salon-brand pastes and clays provide better hold and texture than drugstore alternatives.
Mini Flat Iron: Perfect for adding subtle bends and flips to individual pieces.
Texture Spray: Refreshes your style midday without adding weight.
Overnight Treatment: Keeps hair healthy despite frequent styling.
Color can dramatically enhance your choppy pixie’s impact. Highlights or lowlights add visual depth, making the texture even more apparent. Consider subtle babylights for natural dimension or bold chunks of color for a more dramatic statement. The varied lengths in this cut showcase color beautifully, creating movement even when your hair is still.
What Makes the Undercut Bob Your Power Move?
The undercut bob combines two powerful elements – the classic bob silhouette with the rebellious edge of shaved or closely cropped sections. This hybrid style offers incredible versatility, allowing you to reveal or conceal the undercut depending on your mood or occasion. Women who choose this cut often describe it as liberating, both in terms of maintenance and self-expression.
Defining the undercut bob style
An undercut bob features traditionally longer bob-length hair on top with one or more sections shaved or cut extremely short underneath. The contrast between lengths creates a striking visual effect that can be subtle or dramatic based on placement and how much hair is undercut. Most commonly, the nape area gets the undercut treatment, though side undercuts have gained popularity for their bold asymmetrical appeal.
The beauty of this style lies in its dual personality. With hair down, you might appear to have a conventional bob, making it office-appropriate and professional. Tuck one side behind your ear or pull the top section into a small bun, and suddenly your edgy undercut becomes the star. This versatility makes it perfect for women who navigate between conservative and creative environments.
Customization options for personal flair
The undercut portion itself offers endless creative possibilities. Some women opt for simple, clean lines with uniform length throughout the shaved area. Others request geometric patterns, curved designs, or even small artistic details carved into the shortened sections. These designs can range from subtle texture variations to elaborate patterns that make a statement.
Placement dramatically affects the overall look and functionality of your undercut bob. A nape undercut provides cooling relief in summer while remaining completely hidden when desired. Temple undercuts create an asymmetrical effect that’s always partially visible. Some women choose multiple undercut sections for maximum impact and styling flexibility.
The bob portion requires equal consideration. You might prefer a blunt cut for sharp, clean lines that contrast beautifully with the undercut texture. Alternatively, adding layers and texture to the longer sections creates movement and softness that plays against the precision of the shaved areas.
Length variation in the bob section opens more styling doors. An angled bob that’s longer in front pairs beautifully with a nape undercut, creating visual interest from every angle. A uniform-length bob with side undercuts offers a more balanced, symmetrical option. Consider how different lengths will interact with your undercut when styled various ways.
Color combinations that amplify the edge
Strategic color placement can transform your undercut bob from edgy to absolutely electric. Many women choose to keep their natural color on top while adding bold hues to the undercut section. This approach lets you experiment with vibrant colors without full commitment, as the design remains hidden until you choose to reveal it.
Consider these dynamic color strategies:
Hidden Rainbow: Multiple colors in the undercut create a surprise element when revealed.
Metallic Accents: Silver, gold, or rose gold in the undercut adds futuristic appeal.
Contrast Extremes: Platinum blonde over jet black undercut or vice versa.
Gradient Effect: Colors that fade from dark to light between sections.
The longer bob section benefits from dimensional color too. Balayage or highlights add movement and depth, making the contrast with the undercut even more striking. Some women prefer keeping the top section one solid color for a sleeker, more graphic effect that emphasizes the cut’s architectural quality.
Daily styling routine for busy mornings
The undercut bob’s greatest advantage might be its surprisingly quick styling time. The reduced hair volume means faster drying and less product needed. On rushed mornings, you can focus solely on the visible top section while the undercut requires zero attention.
Start your routine with a lightweight mousse or volumizing spray applied to damp hair, concentrating on the roots of the longer sections. This foundation provides lift and prevents the bob from lying flat against the undercut. Use a round brush while blow-drying to create smooth curves or bend at the ends, depending on your preferred finish.
For texture and separation, work a small amount of styling cream through the mid-lengths and ends once hair is dry. This step defines the bob’s shape while adding shine and controlling flyaways. The cream also helps maintain style throughout the day without the stiffness of hairspray.
Revealing your undercut requires minimal effort – simply tuck one side behind your ear or use a decorative clip to hold sections back. For special occasions, create small braids or twists in the longer sections that lead toward the undercut, drawing attention to the contrast. This technique works particularly well when the undercut features intricate designs or bold colors.
Product selection matters less for the undercut portion, though some women enjoy adding shimmer spray or temporary color for special events. The short length means these sections dry naturally in minutes and maintain their shape without styling. This low-maintenance aspect balances perfectly with the more styled bob portion, giving you control over how much effort you invest each day.
Textured Shag Cuts That Break All the Rules
Modern shag cuts have evolved far beyond their 1970s origins, now incorporating aggressive texturing techniques that create controlled chaos on shorter lengths. This contemporary interpretation features disconnected layers that move independently, creating volume and visual interest without the commitment of traditional longer shags. The result is a perfectly imperfect style that looks different every day yet always maintains its cool-girl appeal.
Creating movement with disconnected layers
Disconnected layers form the foundation of today’s textured shag, with sections cut at dramatically different lengths that don’t blend seamlessly together. Your stylist will create distinct “shelves” of hair that sit at various heights, generating natural lift and separation. This technique works especially well on shorter lengths where traditional blending might create unwanted bulk.
The cutting process involves isolating sections and cutting them without considering how they’ll interact with surrounding pieces. Top layers might be cut surprisingly short to create volume at the crown, while pieces around the face remain longer for softness. This intentional disconnection gives the shag its signature lived-in texture that moves beautifully with minimal styling effort.
Hair density determines how aggressive the disconnection can be. Thick hair benefits from more dramatic differences between layer lengths, as this prevents the style from becoming too heavy. Those with finer hair might need subtler disconnection to maintain fullness while still achieving that shaggy texture. Your stylist should evaluate your hair’s natural tendencies before determining the degree of disconnection.
Products that enhance texture naturally
The right product combination can transform a basic haircut into a perfectly tousled shag without hours of styling. Sea salt sprays provide that beachy texture and grip that makes pieces separate naturally. Apply to damp hair, scrunch gently, and let your hair air dry for the most authentic shag texture.
Texture powders have become secret weapons for shag enthusiasts. These nearly invisible products add incredible volume and grip when applied directly to the roots. Sprinkle a small amount onto dry hair at the crown, then massage in with your fingertips. The powder creates lift while maintaining that effortless appearance essential to the modern shag aesthetic.
Leave-in conditioners might seem counterintuitive for textured styles, but they’re crucial for maintaining healthy hair that styles well. Choose lightweight formulas that won’t weigh down your layers. Apply from mid-length to ends, avoiding roots to preserve volume. This protective barrier prevents damage from daily styling while keeping strands manageable.
Styling variations from messy to polished
The versatility of a textured shag means you can completely change your look based on styling choices. For that perfectly undone appearance, scrunch damp hair with mousse, then diffuse on low heat while continuously scrunching. This method enhances natural texture while maintaining volume throughout your layers.
Creating a more polished version involves strategic smoothing of certain sections while maintaining texture in others. Use a flat iron to gently bend random pieces, creating subtle S-waves rather than pin-straight strands. This technique adds intentional movement while taming any overly wild sections. Focus on face-framing pieces for a more refined appearance that still honors the shag’s rebellious spirit.
Sometimes you want maximum volume and drama from your shag. Start by applying root lift spray to damp hair, then blow-dry with your head flipped upside down. Once hair is about 80% dry, flip right-side up and use a round brush to direct pieces in various directions – some forward, some back, others to the sides. This multi-directional styling creates the signature shag silhouette.
For special occasions, add unexpected elements to your textured shag:
Mini Braids: Incorporate tiny braids throughout for bohemian appeal.
Metallic Clips: Place decorative clips randomly to highlight the layered structure.
Colored Chalk: Temporarily add streaks of color to select layers.
Texture Spray: Layer different texturizing products for enhanced piece-y definition.
Growing out options and transitions
One advantage of the textured shag is its graceful growing-out process. The disconnected layers mean that growth doesn’t create an obvious line or awkward phase. Instead, your shag simply evolves into a slightly different version of itself every few weeks. This natural progression eliminates the desperate need for constant trims that other precision cuts require.
As your shag grows, you’ll notice the disconnected layers beginning to interact differently. Shorter pieces that once stood independently might start blending with longer sections, creating new texture patterns. This evolution can be guided by your stylist during maintenance appointments, where they’ll adjust certain layers while allowing others to grow freely.
Some women choose to transition their short textured shag into a longer version gradually. This process involves maintaining the shortest layers while allowing everything else to grow, eventually creating a more traditional shag shape. The journey between lengths offers numerous styling opportunities as different layers reach new milestones.
If you decide to grow out your shag completely, the textured nature actually helps disguise awkward growth stages. The inherent messiness of the style means that uneven lengths look intentional rather than unkempt. Regular texturizing treatments keep the style looking fresh even as you transition toward your next look.
How Does the Asymmetrical Crop Define Modern Edge?
Asymmetrical crops challenge traditional ideas about balance and proportion in hairstyling, creating visual tension that demands attention. This architectural approach to cutting uses deliberate imbalance to frame the face uniquely, with one side significantly shorter or longer than the other. The style speaks to women who view their hair as wearable art, making a statement about creativity and nonconformity.
Understanding asymmetrical proportions
The key to a successful asymmetrical crop lies in finding the right degree of imbalance for your features and lifestyle. Subtle asymmetry might involve just an inch or two of difference between sides, creating intrigue without dramatic contrast. This softer approach works well for those new to asymmetrical cuts or working in conservative environments.
More dramatic interpretations can feature one side buzzed or closely cropped while the other maintains several inches of length. This bold contrast creates a striking profile view and completely different looks depending on which side faces forward. The longer section can sweep across the forehead or tuck behind the ear, offering styling versatility despite the precision of the cut.
Determining the direction of your asymmetry requires considering your natural part, hair growth patterns, and facial features. Most people have a preferred side they photograph from or style toward. Working with these natural preferences rather than against them ensures your asymmetrical crop feels authentic to your personal style.
Texturizing techniques for added dimension
Asymmetrical crops benefit tremendously from strategic texturizing that enhances the cut’s architectural quality. Point cutting creates soft, feathered edges that prevent harsh lines while maintaining the strong shape. This technique works particularly well on the longer side, where movement and flow balance the precision of the shorter section.
Razor cutting adds another dimension to asymmetrical crops, creating wispy, lived-in texture that softens the overall look. The razor’s sliding motion through hair produces irregular lengths within each section, generating natural movement. This approach works beautifully on medium to thick hair that might otherwise appear too heavy or helmet-like.
The shorter side of your asymmetrical crop might benefit from clipper texturizing, where guards create graduated lengths that add visual interest to closely cropped sections. This technique can produce subtle fade effects or more dramatic carved designs, depending on your preference. The contrast between the highly textured longer side and the precisely cut shorter side amplifies the asymmetrical impact.
Accessories that complement the cut
The unique shape of an asymmetrical crop provides an excellent canvas for statement accessories. Geometric earrings play beautifully against the angular lines of the cut, especially when worn on the shorter side where they’re fully visible. Choose pieces that echo or contrast with your cut’s angles for maximum visual impact.
Decorative hair accessories take on new significance with an asymmetrical crop. A single ornate clip placed strategically on the longer side can anchor sweeping sections while adding glamour. Multiple small pins arranged in patterns on the shorter side create unexpected detail that draws the eye. These accessories transform your daily style into something special without requiring different cutting or styling techniques.
Headbands and scarves offer creative styling options that work with the asymmetry rather than fighting it. Position them at an angle that echoes your cut’s diagonal line, or wear them straight across for interesting contrast. Wide bands can dramatically change your silhouette, while thin metallic bands add subtle sophistication.
Professional settings and versatility
Navigating professional environments with an asymmetrical crop requires thoughtful styling choices. The beauty of this cut lies in its ability to be toned down or amped up based on styling decisions. For conservative settings, style the longer side smoothly across the forehead or tucked neatly behind the ear. This approach minimizes the dramatic difference between sides while maintaining polish.
Product selection significantly impacts how professional or edgy your asymmetrical crop appears. Smoothing serums and light hold gels create a sleeker finish appropriate for formal settings. Swap these for texturizing products and matte finishes when you want to emphasize the cut’s rebellious nature. This flexibility means one haircut serves multiple aspects of your life.
Color placement can either highlight or minimize the asymmetry. Keeping both sides the same color creates cohesion that reads as more professional, while adding highlights or color blocks to one side emphasizes the contrast. Some women choose to keep their natural color for work weeks, then add temporary color for weekends and special events.
Meeting preparation becomes simpler with an asymmetrical crop that’s well-maintained. The structured nature of the cut means it holds its shape even with minimal styling. A quick smooth with a flat iron or a small amount of styling cream can polish your look in minutes. This efficiency makes the asymmetrical crop surprisingly practical despite its artistic appearance.
The growing acceptance of individualistic style in many workplaces has made asymmetrical crops more mainstream than ever. Many professionals find that their unique haircut becomes a memorable personal brand element, helping them stand out in positive ways. The key lies in maintaining the cut impeccably and styling it appropriately for each situation.
The Spiky Textured Cut for Maximum Impact
The spiky textured cut represents the boldest expression of short hair rebellion, combining aggressive cutting techniques with dramatic styling to create unmistakable silhouettes. This style goes beyond simple messy texture, featuring deliberately sculpted sections that stand away from the head in defiant peaks. Women who choose this cut aren’t interested in blending in – they’re making a clear statement about confidence and individuality.
Building height and volume strategically
Creating authentic spiky texture starts with the cut itself, where varying lengths provide the foundation for dramatic styling. Your stylist will cut shorter sections at the crown and gradually increase length toward the perimeter, establishing natural lift points. These strategic length differences mean your hair wants to stand up rather than lie flat, making daily styling more achievable.
The angle at which hair is cut determines how easily it will spike. Cutting at sharp upward angles creates pieces that naturally want to stand away from the scalp. This technique, combined with thinning shears used judiciously, removes weight that might otherwise pull spikes down. The goal is creating sections light enough to defy gravity while maintaining enough density for visual impact.
Root direction plays a crucial role in building lasting height. During cutting, your stylist should identify natural growth patterns and work with them rather than against them. Cowlicks and natural lift areas become assets in a spiky cut, providing built-in volume that requires less product and manipulation. Understanding your hair’s natural tendencies helps predict which areas will spike most successfully.
Layering techniques for spiky cuts differ from traditional approaches. Rather than blending smoothly, layers are cut to create distinct sections that can be styled independently. Each spike essentially becomes its own entity, able to be directed and shaped separately from surrounding pieces. This independence gives you ultimate control over your final look.
Product selection for different hair types
Fine hair requires lightweight products that provide structure without overwhelming delicate strands. Volumizing mousses applied to damp roots create the foundation, while texture powders add grip and staying power. The combination of these products helps fine hair achieve and maintain dramatic spikes that might otherwise fall flat within hours.
Thick, coarse hair needs stronger hold products to maintain spiky shapes against its natural weight. Fiber pastes and strong-hold waxes become essential tools, providing the control needed to direct heavy sections upward. These products should be warmed between palms before application to ensure even distribution through dense hair.
For medium-textured hair, the options expand considerably. This hair type responds well to various products, from lightweight gels to medium-hold clays:
Morning Routine: Start with volumizing spray at roots, add texture cream to mid-lengths.
Styling Phase: Work matte clay through sections you want to spike most dramatically.
Finishing Touches: Use pomade on select pieces for definition and contrast.
Setting Spray: Lock everything in place with flexible hold hairspray.
Curly or wavy hair brings natural texture that enhances spiky styles. Products that define curl pattern while providing hold create interesting variations in texture throughout the spikes. Curl-enhancing mousses combined with strong-hold gels give you control while celebrating your natural texture rather than fighting it.
Creating contrast with smooth sections
The most striking spiky cuts incorporate strategic smooth sections that amplify the dramatic texture elsewhere. These polished areas might include sleek side sections, a smooth fringe, or precisely styled edges around the ears. The juxtaposition between controlled smoothness and wild spikes creates sophisticated visual interest.
Achieving this contrast requires different products and techniques for different sections of your hair. While spiky areas need texture-enhancing products, smooth sections benefit from smoothing serums or light oils. Apply these products separately, being careful not to mix them at the borders where textures meet.
Heat styling tools become valuable for creating smooth contrast sections. A small flat iron can sleek down specific pieces while leaving others untouched. This selective smoothing adds intentionality to your style, showing that every element is deliberate rather than accidental.
The placement of smooth versus textured sections can completely change your look’s character. Smooth sides with spiky top creates a mohawk-inspired silhouette. Alternating smooth and spiky sections throughout generates a more complex, artistic appearance. These choices let you customize your spiky cut to match your personal aesthetic.
Night and day styling transformations
The versatility of a spiky textured cut might surprise those who assume it’s a one-note style. Morning professional looks can involve directing spikes subtly upward and slightly back, creating texture without aggressive height. Use lighter products and less dramatic manipulation for this refined version that maintains edge while respecting workplace norms.
Evening transformations take minutes but create entirely different personalities. Add more product to existing styling, then reshape spikes into more dramatic angles. Introduce temporary color sprays to select spikes for club nights. Add glitter gel to tips for special occasions. These quick additions turn your daytime professional cut into nighttime drama.
Weekend styling can explore the full potential of your spiky cut without restrictions. Experiment with different spike directions – all forward for a aggressive look, radiating outward for maximum drama, or concentrated in specific zones for asymmetrical interest. These variations mean you never get bored with your cut between salon visits.
Recovery from elaborate styling is simpler than expected. The short length means thorough washing removes all product buildup easily. On lazy days, apply light texture spray and let your hair dry naturally. The cut’s inherent structure means it looks intentionally tousled rather than neglected, giving you flexibility in your styling commitment.
Weather considerations affect spiky styles more than some other cuts. Humidity might soften aggressive spikes, while dry conditions help them maintain their structure longer. Learning how your hair responds to different conditions helps you adjust product selection and styling techniques accordingly. Some women keep travel-sized products for touch-ups during weather changes.
Final Thoughts on Your Bold Hair Journey
These five edgy textured cuts represent just the beginning of your potential hair transformation. Each style offers its own unique way to express personality while maintaining practicality for real life. Whether you’re drawn to the architectural precision of an asymmetrical crop or the controlled chaos of a textured shag, the key is choosing a cut that resonates with your authentic self rather than following trends blindly.
The journey toward bolder hair choices often starts with small steps – perhaps beginning with subtle texture before progressing to more dramatic undercuts or asymmetrical shapes. Your comfort level and lifestyle should guide these decisions, remembering that the most successful transformations happen when you feel genuinely excited about your choice rather than pressured into it. The confidence that comes from wearing a haircut you truly love radiates far beyond the style itself.
Frequently Asked Questions
Q: How often should I trim my edgy textured short haircut to maintain its shape?
A: Most textured short cuts require trimming every 4-6 weeks to maintain their intended shape and prevent the texture from becoming undefined. Precision cuts like asymmetrical crops might need attention every 3-4 weeks, while shaggier styles can sometimes stretch to 6-8 weeks between appointments.
Q: Will textured short haircuts work with naturally curly or wavy hair?
A: Absolutely. Natural texture actually enhances many of these cuts, particularly shag styles and choppy pixies. Your stylist will adjust cutting techniques to work with your curl pattern, and you might need different styling products, but curly and wavy hair can look incredible in edgy short styles.
Q: What’s the best way to grow out an undercut if I change my mind?
A: Growing out an undercut takes patience but isn’t as difficult as many fear. The process typically takes 3-4 months for the undercut to reach a length where it blends with other sections. During this time, use headbands, strategic styling, or temporary root touch-up products to minimize the contrast between lengths.
Q: Can I achieve these textured looks without using heat styling tools?
A: Many textured cuts actually look better with air drying and minimal heat styling. Products like texture sprays, sea salt sprays, and air-dry creams enhance natural texture without heat. The key is choosing the right products for your hair type and applying them correctly to damp hair.
Q: How do I know if my face shape suits a super short edgy cut?
A: Any face shape can wear short edgy cuts with the right customization. The key is working with a skilled stylist who can adjust proportions, angles, and texture placement to flatter your specific features. Bring photos of styles you like and trust your stylist to adapt them to suit you.
Q: What should I tell my stylist to avoid ending up with a cut that’s too extreme?
A: Communication is essential. Bring multiple reference photos showing your comfort level, specify exactly how short you’re willing to go, and ask to approve length before any dramatic cutting begins. Start conservatively – you can always go shorter or edgier at your next appointment.
Q: Will textured short cuts damage my hair?
A: When done properly by a skilled stylist, texturizing techniques shouldn’t damage healthy hair. However, over-texturizing or aggressive razor cutting on already damaged hair can cause problems. Maintain hair health with regular deep conditioning treatments and quality products designed for your hair type.
Q: How do I style textured short hair for formal events?
A: Textured short cuts can look elegant for formal occasions with the right styling. Smooth product application, strategic use of decorative accessories, and polished finishing touches transform edgy cuts into sophisticated styles. Consider adding temporary shimmer or using elegant clips to elevate your look.
Q: What’s the minimum length needed to create effective texture in short hair?
A: Texture can be created in hair as short as half an inch, though 1-2 inches provides more styling versatility. The cutting technique matters more than length – skilled stylists can create texture in very short hair using point cutting, razoring, and strategic layering.